Note
Access to this page requires authorization. You can try signing in or changing directories.
Access to this page requires authorization. You can try changing directories.
The catalog in Power Platform enables developers and makers to:
- Crowd-source and find templates and components within their environment easily.
- Find and install the latest and authoritative version of a component.
- Get started with templates and components that provide immediate value.
Administering the catalog includes the following tasks:
- Set up the catalog
- Approve and reject submission requests
- Review install history
- Review catalog items
- Review errors in submission requests
- Review errors in install requests
- Edit user access
Important
You need a Managed Environment in order to submit items to the catalog. You can however install catalog items from any environment. More information: Managed Environments overview
Access controls
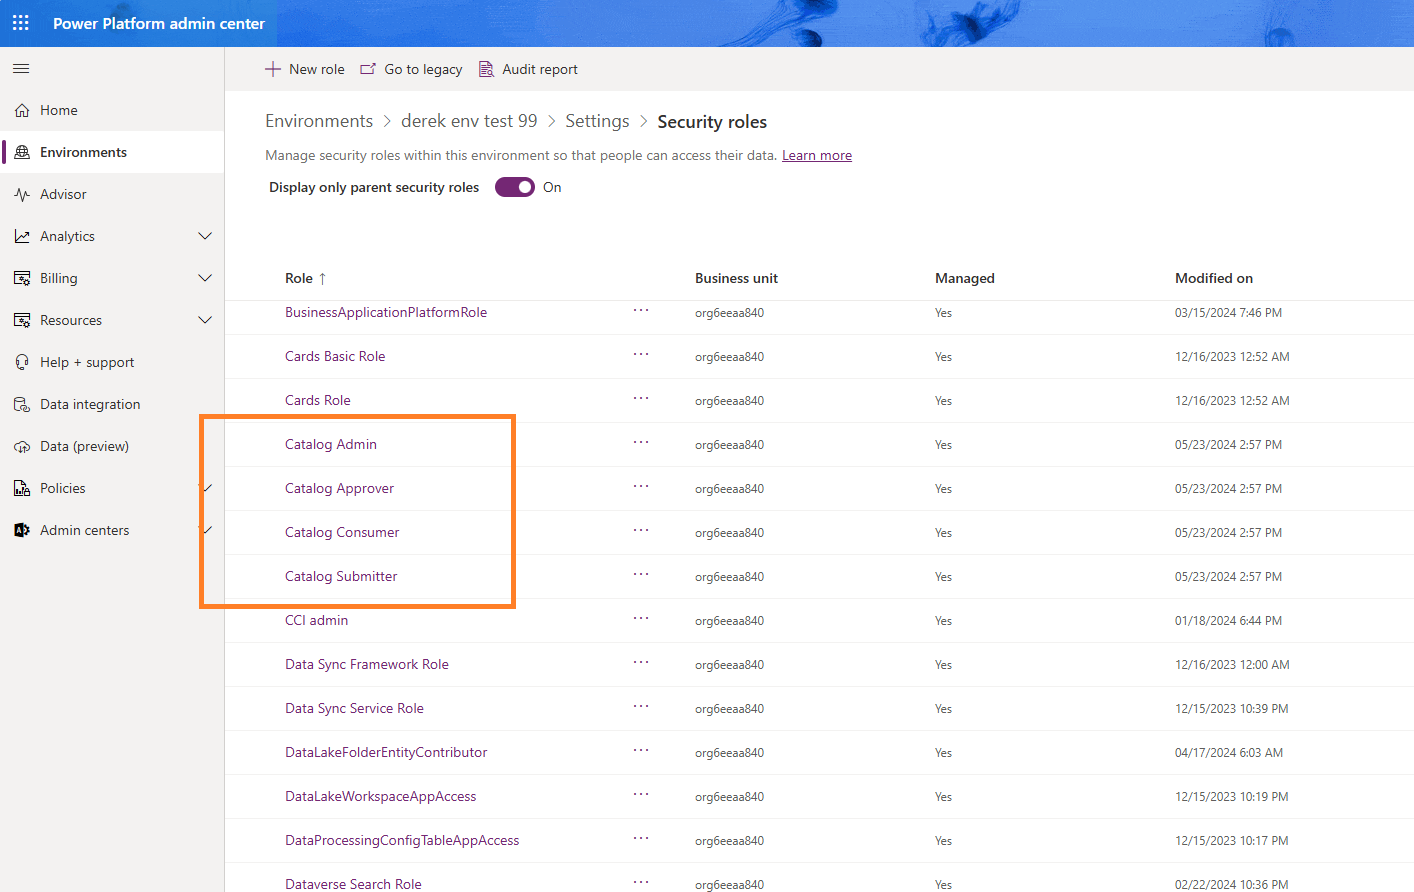
The catalog has a separate set of access controls from Power Platform. This means makers in a given environment don't automatically get permissions to publish and acquire items from the catalog. There are four security roles:
| Role | Enables user to: |
|---|---|
| Catalog Submitter | Submit items to the catalog |
| Catalog Read-Only Member | Discover and install items from the catalog |
| Catalog Approver | Approve submissions to the catalog. Catalog approvers can be users from your central IT department or line of business that your organization wants to empower to participate in the approvals process. |
| Catalog Administrator | Can administer the catalog. |
Any environment that has a catalog has these roles that can be viewed from the Power Platform admin center, and can be assigned to groups or individuals just like any other security role.
Use the security roles in the previous table to provide people with just the level of access that they need. You don't need to assign these roles to people who have the System Administrator and System Customizer security roles because these roles provide full access to the catalog.
Set up the catalog
Before you can administer the catalog, you must install and configure it. Most organizations should be fine with just one catalog in their tenant. All environments in a tenant can install catalog items from a single catalog. But some organizations might want to have different catalogs for regions, departments, or other grouping.
- Sign in to the Power Platform admin center for your tenant.
- In the navigation pane, select Deployment.
- In the Deployment pane, select Catalogs.
- Select New catalog in the top menu or in the page itself to open a setup wizard.
Step 1: Setup
Enter the following information:
| Field | Description |
|---|---|
| Name | Enter a name for the catalog |
| Language | Set the language for your users of the catalog |
| Description | Add some details that help others understand what this catalog is for |
| Region | What region this catalog is for, which will filter the available environments |
| Environment | Which environment in your tenant you want the catalog to be installed for (ensure some environments have been set up for you to select) |
| Status | Uncheck this box if you want the catalog inactive after setting up |
Step 2: Select catalog administrators
Select up to 10 Microsoft Entra ID groups who can administer the catalog. Ensure you have created some Microsoft Entra ID groups for your users.
Step 3: Select approvers
By default, catalog item submissions must be approved by an approver or admin. Check the box if you want your tenant to allow submissions to be autoapproved.
Select up to 10 Microsoft Entra ID groups who can approve catalog items before they're submitted into the catalog. More information: Approve and reject submission requests
Step 4: Select submitters
Select up to 10 Microsoft Entra ID groups who can submit catalog items to the catalog.
Step 5: Select consumers
Select up to 10 Microsoft Entra ID groups who can view and install catalog items from the catalog.
Step 6: Select categories
Select which business categories you would like to allow makers to use when submitting catalog items. These categories also show up in the filters for the discover page to help makers find the catalog items they want. You can also add your own business categories as well.
Step 7: Review and create the catalog
This last step summarizes everything you just set up. If everything looks good, select the terms and conditions link to review, and if agreeable, just check the box and select Create catalog to finish setup.
Next steps
You can add more catalogs to your tenant at any time by going through this wizard again and selecting a different environment to create a new catalog.
After the process is complete, you can access the Power Platform Catalog Manager from the same Catalogs page in the Power Platform admin center.
In addition, When successfully completed, the Power Platform Catalog Manager appears in the Apps area in Power Apps (make.powerapps.com). The Power Platform Catalog Manager is where you perform all your administrative tasks. The below sections are all performed inside the Power Platform Catalog Manager.
Repeat this process if you would like to set up a catalog in more environments.
Approve and reject submission requests
Environment admins and users with the Catalog Approver role can review new submissions and approve or decline requests. If global auto approval or publisher level auto approval is turned on, then there's no requirement for manual review and approval.
In the Approvals section of the navigation pane, select Requests. This list has 16 views. The most important ones are:
| View | Description |
|---|---|
| Active Approval Requests (Default) | Use this view to review submission requests pending approval |
| All Approval Request | Use this view to review all requests across all statuses |
| Failed Pre-Validation | Use this view to identify requests where a submitter has sent a request but it isn't available in the Active Approval Requests view. This view can help with troubleshooting such scenarios. |
| Approved Approval Request | Use this view to review previously approved requests |
Using the Active Approval Requests view, open a request and select Resolve Request in the menu.
- Select Reject Request to decline the request. The request is archived and publisher, item, and asset aren't created.
- Select Complete Request to approve. Upon approval, publisher, item, and assets are created. The request is archived to Inactive status.
Review install history
In the Deployment History section of the navigation pane, select Install History to view a list of installations that were requested from the catalog.
This list has two views:
- Active Install Histories (Default)
- Inactive Install Histories
Review catalog items
In the Catalog section of the navigation pane, select Catalog Items to view a list of catalog items that are available in the catalog
This list has five views:
- Active Catalog Items
- Catalog Items - Publisher View
- Inactive Applications An inactive item can be reactivated, but a deleted item can't be reinstated. Disabled items don't feature in discovery and list command response.
- Pending Approval
- Published (Default) This view shows the most recent version of the item.
These views show the following columns:
| Column | Description |
|---|---|
| Name (Publishers) | Name of the publisher |
| Name | Display Name |
| Catalog Item Id | ID provided by publisher |
| Engineering Contact | The engineering contact |
| Status Reason | The reason for the status of the item. Options: - Active - Published - Pending Approval - Inactive - Rejected |
| Modified On | When the item was last modified |
| Modified By | Who last modified the item |
You can also view this data using the pac catalog list command. View items in the catalog
Review catalog publishers
In the Catalog section of the navigation pane, select Catalog Publishers to view a list of publishers associated to catalog items.
This list has two views:
- Active Publishers
- Inactive Publishers
Catalog publishers have the following default columns:
| Display Name | Description |
|---|---|
| Name | The name of the publisher. |
| Publisher ID | ID provided by item submitter. |
| Description | A description of the publisher. |
| Status Reason | Reason for the status of the publisher. Choices: - Active - Published - Pending Approval - Inactive |
| Allow Auto-Approval | By enabling auto approval at the publisher level, future submissions from this publisher are auto approved. Admins can use this strategy in scenarios where there's a trusted party within their organization that they trust implicitly and don't require approvals from. Also, auto approval can be turned on globally across all publishers here. |
Review packages and solutions of items in catalog
In the Catalog section of the navigation pane, select Packages Assets to view a list of underlying artifacts associated to a catalog item that includes the package and solution details.
This list has eight views:
- Active Packages Assets
- Inactive Packages
- Packages Assets
- Packages Assets - Available
- Packages Assets - Not Available
- Packages Assets - Pending Approval
- Packages Assets - Published (Default)
- Packages Assets in Submission
The following table describes selected fields that can be included in the form:
The following information is available about the Package:
| Field | Description |
|---|---|
| UniqueName | Package Unique Name |
| Version | Package Version |
| Status Reason | Current status choices: - Pending Approval - Published - Rejected |
| Package ID | Package identifier |
| Locale Identifier (LCID) | Identifier for localized package |
| Localized Name | Name in localized language |
| Description | Description in localized language |
| Notes | Timeline section has notes with details for actions on asset |
| Revision Of | This field is populated when a new approval request contains a reference to an existing package version that has previously been made available |
| Modified On | Date last modified |
| Modified By | Modified by user |
| Created On | Date created |
Package and content information
| Field | Description |
|---|---|
| Package File | Package Deployer package file comprised of catalog item contents |
| Package Manifest File | Package Manifest file (.json) |
| Contained Solutions and Components | This information is for reference only and being revised. A planned update enables a streamlined view of this data |
Review errors in submission requests
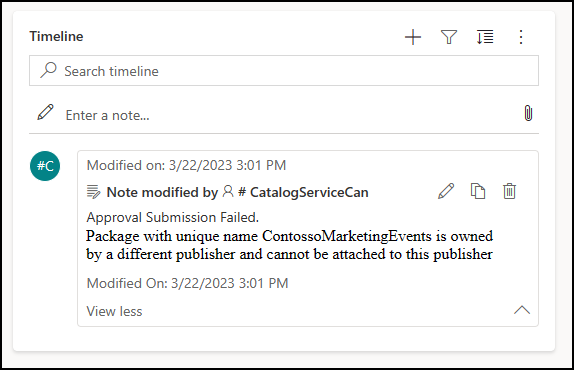
In the Approvals section of the navigation pane, select Failed Pre-Validation to view a list of errors associated to a submission in the Catalog Manager application.
Select on the request name that you want to investigate.
In the Timeline card, you can find the exception in the Notes.

After fixing the submission, trigger the submit again from PAC CLI. You see a new request that can be approved.
Review errors in install requests
In the Deployment History section of the navigation pane, select Install History to view a list of errors associated to an install.
Select the failed request name to get more information.
Edit user access
After the catalog is set up, you might want to add, edit, or remove user access. This can be done in the Power Platform admin center for any environment where you have setup the catalog. You see a new set of roles in the security roles list.
More information: Assign a security role to a user and Manage the security roles of a team
