Exercise - Build and deploy the solution
In the first exercise, you have already installed the Azure IoT Edge runtime on your Linux computer. Make sure you have installed the following software development tools.
- Docker-compatible container development tooling on your Linux computer. The Azure IoT Edge runtime installed in the first exercise uses the Moby container engine; don't replace that runtime engine with another engine. The local build and registry steps in this exercise can use Docker-compatible tooling and Container Tools, installed directly or via the Docker Extension Pack.
- Visual Studio Code is a code editor and is one of the most popular Open Source projects on GitHub. It runs on Linux, macOS, and Windows.
- The following Visual Studio Code extensions for this exercise's Visual Studio Code workflow:
- Azure IoT Hub
- Azure IoT Edge Tools, which provides the Visual Studio Code build and deployment commands used by this exercise. The marketplace page lists this extension as in maintenance mode, but it is still required to follow the existing lab assets and build/deploy workflow.
- Container Tools for Visual Studio Code, installed directly or via the Docker Extension Pack.
- JSON Tools (optional) — useful for editing the "Create Options" for a module. The
eriklynd.json-toolsextension is community-maintained and may be unmaintained; VS Code's built-in JSON support, the IoT Edge Tools and Container Tools extensions, oresbenp.prettier-vscodeare all sufficient alternatives.
Warning
Treat this Visual Studio Code IoT Hub workflow as a legacy path. Microsoft documents that the Azure IoT Hub extension for Visual Studio Code relies on the Azure Account extension (ms-vscode.azure-account) for authentication and connectivity. The Azure Account extension was deprecated in January 2025, and Microsoft says the Azure IoT Hub extension will be retired in a future update. The legacy Azure IoT Hub and Azure IoT Edge Tools extensions may still install Azure Account transitively; let it install if one of those extensions requires it, but don't install Azure Account separately unless another specific extension dependency requires it. If VS Code sign-in, subscription selection, or deployment commands fail, use the Azure CLI deployment fallback later in this exercise or follow the current command-line alternatives in the official IoT Edge tutorial setup guidance.
Note
Microsoft documentation notes that the Azure IoT Edge Tools for Visual Studio Code extension is in maintenance mode. The recommended tool for current Azure IoT Edge development is the Azure IoT Edge Dev Tool command-line interface (iotedgedev), as described in the official IoT Edge tutorial setup guidance. Note that the public iotedgedev PyPI release has not been updated since November 2022 (v3.3.7); check release status before adopting it for new production development. This exercise keeps the Visual Studio Code workflow so you can follow the existing lab assets, but use the CLI workflow for new production development where possible.
Verify Docker/Moby socket access
The local registry docker run, the Visual Studio Code Build and Push IoT Edge Solution command, and any manual docker build, docker push, or docker run commands all need access to the Docker-compatible engine socket on the lab computer. On many Linux IoT Edge hosts, the IoT Edge runtime uses the Moby engine and exposes a Docker-compatible Unix socket such as /var/run/docker.sock; access to that socket is controlled by operating system permissions.
Verify access before continuing:
docker version
A successful check shows both Client and Server details. If you see only client details, a socket connection error, or a permission error, fix Docker/Moby access before you start the registry or build the modules.
- For one-off CLI-only commands, you can prefix Docker commands with
sudo, for examplesudo docker run ..., if your lab policy allows it. - For the Visual Studio Code build/push workflow, don't rely on
sudobecause the extensions run Docker commands as your signed-in user. Configure non-sudo socket access instead, such as adding the user to thedockergroup and then signing out and back in, using a rootless Docker setup or compatible Docker context on a separate development host, or following your organization's approved Docker/Moby access model. Restart Visual Studio Code after permission changes and rerundocker versionin the integrated terminal.
Caution
Membership in the docker group can grant root-equivalent access to the host. Use it only in an appropriate lab environment and follow your organization's security policy.
Create a Foundry resource for Speech
This solution uses an exported Azure AI Custom Vision model and Azure Speech text-to-speech functionality.
The provided fruit recognition model was created and exported from Azure AI Custom Vision before this exercise, then added to the sample project. In this exercise, you use that exported model. If you want to replace it with your own model, train a Custom Vision project that uses a compact domain and export it outside this exercise, then update the project files with your compact-domain Custom Vision export.
Text-to-speech code in the sample's Camera Capture module (
CameraCaptureOpenCV) uses Azure Speech in Foundry Tools to call the Text-to-speech REST APIs, generate spoken audio from the item label, and play the audio. This functionality runs inside the Camera Capture module rather than another deployed IoT Edge module. The Text-to-speech code is region-specific: it hardcodes the Southeast Asia (southeastasia) Speech REST token and synthesis endpoints, and the deployment template exposes only azureSpeechServicesKey. For this exercise, use a Foundry resource for Speech in Southeast Asia and copy only a key into the template.
Azure Speech in Foundry Tools uses a Foundry resource. For this sample, create that Foundry resource for Speech in Southeast Asia because the Camera Capture module's Text-to-speech code calls the southeastasia Speech REST endpoints.
Sign into the Azure portal.
Select this link to create a Foundry resource for Speech: https://portal.azure.com/#create/Microsoft.CognitiveServicesAIFoundry
If the portal deep link opens the Azure portal home page or an unexpected creation blade, use the Azure portal search or Marketplace search for Azure AI Foundry or AI services, then choose the current create experience for a Foundry or Azure AI services resource that supports Speech. Continue to use Southeast Asia for this exercise unless you also update the sample code and deployment template to use another Speech region.
On the Create page, provide the following information:
Project details Description Subscription Select one of your available Azure subscriptions. Resource group The Azure resource group that will contain your Foundry resource for Speech. You can create a new group or add it to a pre-existing group. Region For this exercise, choose Southeast Asia. Azure Speech REST endpoints are regional, and keys are valid only in the region where the Speech resource was created. The linked sample doesn't expose a Speech region setting in deployment.template.json, so a resource in another region won't work without code changes. Name A descriptive name for your Foundry resource for Speech. For example, MySpeechFoundryResource. Pricing tier The cost of your resource depends on the options you choose and your usage. For more information, see the API pricing details. Configure other settings for your resource as needed, read and accept the conditions (as applicable), and then select Review + create.
After deployment completes, select Go to resource. You'll use Resource Management > Keys and Endpoint in a later step to copy a key and confirm that the region is Southeast Asia.
Tip
If your subscription doesn't allow you to create an Azure AI services resource, you may need to enable the privilege of that Azure resource provider using the Azure portal, PowerShell command or an Azure CLI command. If you are not the subscription owner, ask the Subscription Owner or someone with a role of admin to complete the registration for you or ask for the /register/action privileges to be granted to your account.
Install the local container registry on the Linux computer
Azure IoT Edge pulls module images from the container registry referenced in the generated deployment manifest. The linked sample's module.json files use repository values such as localhost:5000/camera-capture-opencv and localhost:5000/image-classifier-service. Keep those values only when the local registry container and the IoT Edge runtime that pulls the images are on the same host, because localhost is evaluated by the Edge device/runtime during the pull. A registry running on your development machine is not localhost to a separate Edge device.
If the build host and IoT Edge device are different computers, use Azure Container Registry (recommended) or another reachable private registry host name with TLS and authentication. Before building, complete the registry path end to end:
Create or choose an Azure Container Registry and note its login server, such as myacr.azurecr.io.
Sign in to that registry from the build host before using Build and Push IoT Edge Solution. For Azure Container Registry, the Azure CLI sign-in path is:
az acr login --name <acr-name>You can also use
docker login <acr-name>.azurecr.iowith appropriate registry credentials.Update each module's module.json repository value to the fully qualified registry host and repository name, for example myacr.azurecr.io/camera-capture-opencv and myacr.azurecr.io/image-classifier-service. The build command combines those repository values with the module tags it generates, then pushes image tags such as
myacr.azurecr.io/camera-capture-opencv:<tag>to the registry.Configure the deployment template's
$edgeAgent.properties.desired.runtime.settings.registryCredentialsso the IoT Edge runtime on the device can pull the private images. Your localaz acr loginordocker loginsession lets the build host push images; it doesn't give the IoT Edge device pull access.
In an IoT Edge deployment manifest, registryCredentials is an object under $edgeAgent.properties.desired.runtime.settings; each child entry defines the registry address, username, and password. For example:
"registryCredentials": {
  "MyPrivateRegistry": {
    "address": "myacr.azurecr.io",
    "username": "<registry-username>",
    "password": "<registry-password>"
  }
}
For schema context, see the IoT Edge deployment manifest example in Learn how to deploy modules and establish routes in IoT Edge. Treat registry credentials as secrets: don't commit real passwords or tokens, prefer a service principal with AcrPull or a repository-scoped token over an admin user for production, and rotate credentials after lab use.
For this learning lab, it is faster to run a local registry on the same Linux computer where you build and deploy the IoT Edge modules. The following command publishes an unauthenticated HTTP registry on host port 5000 and aligns with the sample's localhost:5000 module repository values only for that same-host lab setup. Use it only in an isolated development/lab environment, not for production.
Open the terminal in your Linux computer and run the following command to set up the lab-only local registry. Use the Docker/Moby access path you verified earlier; if your CLI-only Docker access requires sudo, prefix this command with sudo.
docker run -d -p 5000:5000 --restart=always --name registry registry:3
Important
This command maps port 5000 on all host network interfaces and the registry doesn't enforce authentication or TLS. For production images, use Azure Container Registry or another private registry with authenticated access, TLS, least-privilege pull credentials or identity scoped to the needed repositories, and firewall/private endpoint controls.
Bind a registry to loopback only when the generated deployment manifest and its module image references use an address that the IoT Edge runtime can resolve to that same registry. If the runtime must pull through the host's network address, don't change this lab command to a loopback-only publish because module pulls can fail. Instead, restrict inbound TCP/5000 with the host firewall or network controls to the IoT Edge device/development host only.
Note
Use registry:3. If your lab engine cannot pull or start it, registry:2.8 remains an active legacy fallback, but prefer current 3.x tags.
Tip
The --restart=always policy keeps this lab registry running after host restarts. Remove the registry container during cleanup if you don't need it after the lab.
Clone the image recognition solution to the Linux computer
Clone this GitHub repository.
Important
The linked GitHub sample repository is archived (read-only). You can still clone it, but you cannot push commits back to the upstream repository. Several later steps in this exercise instruct you to update files in the cloned solution — including
deployment.template.json,modules\CameraCaptureOpenCV\Dockerfile.amd64,modules\CameraCaptureOpenCV\app\azure_text_speech.py,modules\CameraCaptureOpenCV\app\speech_map_australian.json, andmodules\CameraCaptureOpenCV\app\CameraCapture.py. Either fork the repository to your own GitHub account first and clone the fork, or work entirely on your local clone without attempting to push.Warning
The linked sample's last code push was October 2021, before the September 2025 archive. Its pinned Python, dependency, and base-image stack is old (Python 3.7 — end of life June 2023;
tensorflow==1.13.1/2.0.2;Flask 1.1.2;pygame 1.9.6;ptvsd) and contains known security advisories. Treat the sample as instructional, not production-ready. The Docker build path later in this exercise is best-effort and legacy unless you use a maintained fork, a trusted prebuilt image that you validate, or modernized Dockerfiles and dependencies tested with the exported Custom Vision assets.git clone https://github.com/MicrosoftDocs/mslearn-oxford.create-image-recognition-with-azure-iot-edgeOpen the solution from the Visual Studio Code menu.
Update the IoT Edge runtime image tags
The linked sample repository is intended for learning. Its deployment.template.json currently targets older IoT Edge 1.1 runtime images. Azure IoT Edge 1.5 LTS is the current supported release, so you must update the runtime image tags before you build or deploy the solution.
In Visual Studio Code, open deployment.template.json from the repository root.
In
$edgeAgent.properties.desired.systemModules.edgeAgent.settings.image, replace:"mcr.microsoft.com/azureiotedge-agent:1.1.0"with:
"mcr.microsoft.com/azureiotedge-agent:1.5"In
$edgeAgent.properties.desired.systemModules.edgeHub.settings.image, replace:"mcr.microsoft.com/azureiotedge-hub:1.1.0"with:
"mcr.microsoft.com/azureiotedge-hub:1.5"While editing deployment.template.json, set both
$edgeAgent.properties.desired.schemaVersionand$edgeHub.properties.desired.schemaVersionto"1.1"before you build the solution.Save deployment.template.json. The rolling
1.5tags are appropriate for this exercise. For production deployments, pin and manage specific supported1.5.ximage tags according to your update process.
Update the Azure Speech text-to-speech configuration
In the Azure portal, open your Southeast Asia Foundry resource for Speech. If your Speech resource isn't in Southeast Asia, create one in Southeast Asia before continuing. The current sample doesn't accept a Speech region or endpoint in the deployment template.
Select Resource Management > Keys and Endpoint.
Confirm that Location/Region is Southeast Asia (
southeastasia), then copy one key. For reference, these are the official Azure Speech REST endpoints for the sample's hardcoded Southeast Asia region; the official Speech documentation shows the token endpoint withissueTokencasing:- Speech token endpoint:
https://southeastasia.api.cognitive.microsoft.com/sts/v1.0/issueToken - Text-to-speech endpoint:
https://southeastasia.tts.speech.microsoft.com/cognitiveservices/v1
Azure Speech REST APIs include the region in the endpoint URI, and a key created for another region can cause authentication errors.
- Speech token endpoint:
Important
The cloned sample repository contains a real Azure Speech key in plaintext in deployment.template.json (azureSpeechServicesKey=<committed-sample-key>) and the same key as a hardcoded default in modules\CameraCaptureOpenCV\app\iotedge_camera.py. Treat any committed sample key as compromised and do not use it. Replace it with the key from your own Foundry resource for Speech, and remove the hardcoded default in iotedge_camera.py before building (see the next step below).
Open the deployment.template.json file and replace the example azureSpeechServicesKey value with the key you copied. There are no Speech region or endpoint environment values in the current deployment template; for this exercise, don't add them unless you also update the sample code to read them.
Open modules\CameraCaptureOpenCV\app\iotedge_camera.py and locate the line that reads the environment variable with a default value, for example:
os.getenv('azureSpeechServicesKey', '<committed-sample-key>')Remove the hardcoded default so the call becomes:
os.getenv('azureSpeechServicesKey')Otherwise the committed sample key is baked into the container image, even after you replace the value in
deployment.template.json.Before you build the documented amd64 image, open modules\CameraCaptureOpenCV\app\azure_text_speech.py and correct the Speech token endpoint casing used by the linked sample. Replace:
TOKEN_URL = "https://southeastasia.api.cognitive.microsoft.com/sts/v1.0/issuetoken"with the official Speech REST
issueTokenendpoint:TOKEN_URL = "https://southeastasia.api.cognitive.microsoft.com/sts/v1.0/issueToken"Keep the
southeastasiaregion in this direct code edit for this lab unless you also make the sample code and deployment template read configurable Speech region and endpoint values.Before you build the documented amd64 image, choose how you want to replace the unsupported Text-to-speech voice. The linked sample uses
en-AU-Catherine, a retired non-neural Standard voice that no longer exists in the Azure Speech voice catalog. Choose any current supporteden-AUneural voice from the live Azure Speech catalog. Voices such asen-AU-JoanneNeural,en-AU-NatashaNeural, oren-AU-WilliamNeuralare examples only; voice names and regional availability can change. Verify your choice in the Azure Speech language and voice support list or the Speech voices/list API before you build.The documented amd64 Dockerfile, modules\CameraCaptureOpenCV\Dockerfile.amd64, copies only app/*.py into the container image. If you update only modules\CameraCaptureOpenCV\app\speech_map_australian.json, that JSON change might not be packaged into the amd64 image, and the running module can fall back to the default
en-AU-Catherinevalue in modules\CameraCaptureOpenCV\app\CameraCapture.py.Use one of these approaches before building the image:
Package the JSON speech map in the amd64 image.
Open modules\CameraCaptureOpenCV\Dockerfile.amd64.
Update the Dockerfile so the speech map is copied into the image. For example, add a copy step for JSON files:
COPY /app/*.json ./Use the same path style as the existing
COPY /app/*.py ./line in the file. Both forms work because the build context root contains theapp/directory, but matching the existing style avoids confusion.You can also adjust the existing copy instruction if the sample structure changes, but make sure speech_map_australian.json is present in the same image location that the Python code reads at runtime.
Open modules\CameraCaptureOpenCV\app\speech_map_australian.json and update the default voice to a supported
en-AUneural voice, such as:{ "voice": "en-AU-JoanneNeural", "map": [ ] }
Update the Python fallback voice instead.
- Open modules\CameraCaptureOpenCV\app\CameraCapture.py.
- Replace the fallback
en-AU-Catherinevalue with a supporteden-AUneural voice, such asen-AU-JoanneNeural.
Don't deploy the sample with
en-AU-Catherine.In modules\CameraCaptureOpenCV\app\azure_text_speech.py, keep the SSML language settings consistent with the voice you selected before you build the image. If you select an
en-AUvoice such asen-AU-JoanneNeural, replace the sample's US-English SSML language values:xml_body.set('{http://www.w3.org/XML/1998/namespace}lang', 'en-us') voice.set('{http://www.w3.org/XML/1998/namespace}lang', 'en-US')with:
xml_body.set('{http://www.w3.org/XML/1998/namespace}lang', 'en-AU')
voice.set('{http://www.w3.org/XML/1998/namespace}lang', 'en-AU')
Alternatively, derive the locale from the selected voice name and set both SSML language attributes programmatically. Make this code change before building so the container image includes the corrected SSML.
Note
The linked sample's deployment template defines a route from camera-capture/output1 to $upstream, but the unmodified Python code never actually sends a message to that output:
- In
modules\CameraCaptureOpenCV\app\iotedge_camera.py, thesend_to_Hub_callbackfunction has the activehubManager.send_event_to_output('output1', message, 0)line commented out and only prints locally. HubManager.send_event_to_outputis implemented aspass(with the actual send code commented out).- The
IoTHubModuleClientinstance created inmain()is never used to send messages.
If you want this lab's modules to deliver telemetry upstream to IoT Hub while staying on the synchronous SDK path used by the sample (from azure.iot.device import IoTHubModuleClient), restore the callback send path and implement HubManager.send_event_to_output so it calls module_client.send_message_to_output(message, 'output1') (or the equivalent current SDK call) from the correctly wired callback. If you choose to convert the module to the async SDK instead, import and use azure.iot.device.aio.IoTHubModuleClient, then await the async connect() and send_message_to_output(...) calls. As written, the sample doesn't send upstream messages; local logs still verify the classifier and Speech behavior.
Caution
The azureSpeechServicesKey environment value in deployment.template.json is for this learning exercise only. Don't commit real keys or hard-code secrets in production deployment manifests. For production, use a secret store or secure configuration mechanism, such as Azure Key Vault where appropriate, configure applications to read Speech region, endpoint, and secrets securely, and follow least-privilege access practices.

Confirm the processor
You need to ensure the image you plan to build matches the target processor architecture. This lab's documented build/deploy flow is restricted to amd64, which is the architecture the linked sample demonstrably supports for the exported classifier assets. Confirm processor architecture.
Important
The linked sample repository includes Arm platform entries in module metadata, but don't use them for this lab unless the sample is updated and tested for that target. The ImageClassifierService arm64 Dockerfile uses arm32v7 base/assets, and the repository doesn't include a true arm64 classifier export.
From the Visual Studio Code, bottom bar click the currently selected processor architecture, then from the popup select amd64.

Build the solution
Warning
This build uses the archived sample's legacy Dockerfiles and old Python, dependency, and base-image stack. Treat the unmodified build as best-effort, not guaranteed or reproducible over time, because upstream container images, Linux packages, and Python packages can change or disappear. For repeatable results, use a maintained fork, a trusted prebuilt image that you validate with the lab assets, or modernized Dockerfiles and dependencies tested with the exported Custom Vision model.
Build the amd64 images and push them to the configured container registry by right-clicking the deployment.template.json file and selecting "Build and Push IoT Edge Solution". With the sample's unchanged localhost:5000 module repository values, this push is suitable only for the same-host lab registry described earlier. If your IoT Edge device pulls from Azure Container Registry or another reachable registry host, sign in to that registry from the build host, update the module repository values to fully qualified registry paths, and add the IoT Edge pull credentials before this build. The build should push the fully qualified image tags that will appear in the generated deployment manifest. The first build will be slow as Docker-compatible tooling needs to pull the base layers to your local machine.
On an amd64 development machine, such as one with an Intel Core i7-8750H processor, building amd64 images is a native build, not cross-compilation. The first native amd64 build can still be very slow because Docker-compatible tooling must pull base layers, build image layers, and run the archived Dockerfiles' source-compilation steps for OpenCV and Python dependencies; on that processor, this solution can take approximately 40 minutes to build. Reserve cross-compiling terminology for building a different target architecture, such as building ARM images from an amd64 host.
Note
If the Image Classifier build fails while running pip install --no-cache-dir mscviplib==2.200731.16, troubleshoot modules\ImageClassifierService\Dockerfile.amd64 (and the corresponding platform Dockerfile only if you deliberately use and test that platform). The archived sample installs mscviplib directly in the ImageClassifierService Dockerfile; it doesn't use a requirements.txt step for that module. Choose a maintained inference stack that supports your exported Custom Vision model, such as an available supported Custom Vision compact-domain runtime, a retrained/re-exported ONNX Runtime path, or another supported image/dependency set that you test with the classifier assets.
The Camera Capture module has separate legacy dependencies in modules\CameraCaptureOpenCV\Dockerfile.amd64, including SDL/FFmpeg system packages and Python packages such as pygame==1.9.6, opencv-python-headless, requests, ptvsd, and azure-iot-device~=2.0.0. Troubleshoot those in the Camera Capture Dockerfile separately; they aren't the source of an mscviplib ImageClassifierService install failure.

Verify the generated deployment manifest
Before deploying, open config\deployment.amd64.json. This generated file is the manifest that the IoT Edge device receives.
Confirm
$edgeAgent.properties.desired.systemModules.edgeAgent.settings.imageis:"mcr.microsoft.com/azureiotedge-agent:1.5"Confirm
$edgeAgent.properties.desired.systemModules.edgeHub.settings.imageis:"mcr.microsoft.com/azureiotedge-hub:1.5"Confirm
$edgeAgent.properties.desired.schemaVersionis:"1.1"Confirm
$edgeHub.properties.desired.schemaVersionis:"1.1"Confirm the file doesn't still contain stale IoT Edge 1.1 image references such as mcr.microsoft.com/azureiotedge-agent:1.1.0 or mcr.microsoft.com/azureiotedge-hub:1.1.0. If it does, update deployment.template.json again, rebuild the amd64 solution, and recheck config\deployment.amd64.json before deployment.
Confirm the custom module image references use a registry that the IoT Edge runtime can pull from. localhost:5000 is valid only for the same-host lab registry scenario; separate build and Edge hosts require Azure Container Registry or another reachable registry host with TLS/authentication and device pull credentials. For Azure Container Registry, image values should be fully qualified tags such as
myacr.azurecr.io/camera-capture-opencv:<tag>, and theregistryCredentialsaddressvalue should match the registry login server, such as myacr.azurecr.io. For any private registry, verify the generated$edgeAgent.properties.desired.runtime.settings.registryCredentialsentry has the correctaddress,username, andpasswordvalues for that registry, and don't expose real credentials in screenshots, commits, or shared manifests.
Deploy the solution
When the Docker Build and Push process has completed, deploy the generated amd64 deployment manifest. The build creates config\deployment.amd64.json from deployment.template.json. Don't deploy deployment.template.json directly because it can still contain template placeholders.
In the Visual Studio Code explorer, under Azure IoT Hub, expand Devices.
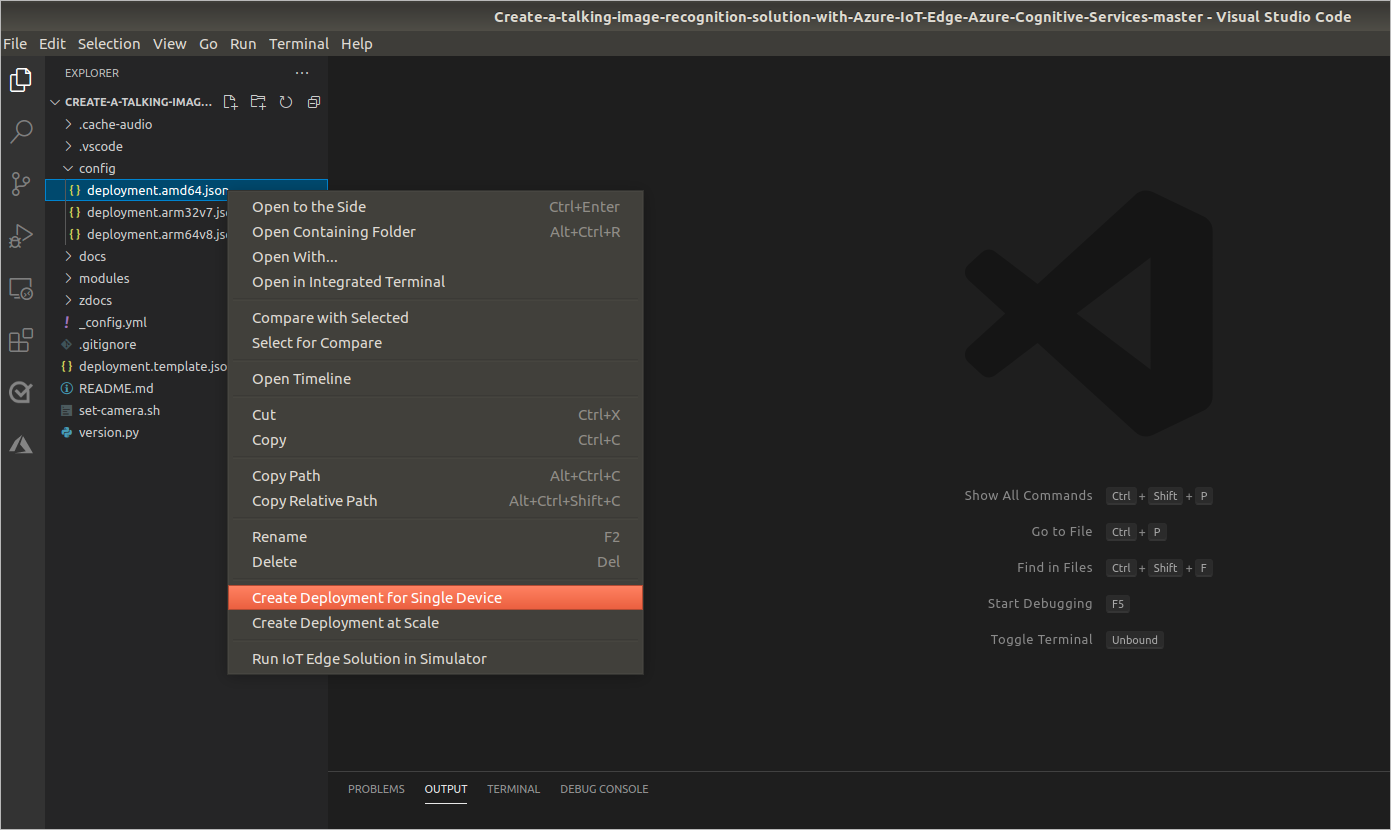
Right-click the IoT Edge device that you want to deploy to, then select Create Deployment for Single Device.
In the file picker, open the solution's config folder and select deployment.amd64.json for this exercise. Don't choose an Arm manifest for this lab unless the linked sample repository is updated and tested for that target.
Wait a few minutes while the IoT Edge runtime receives the deployment manifest, pulls the module images, and starts the modules on the device.

If the Visual Studio Code extension command isn't available, you can apply the same generated manifest with Azure CLI from the solution root. Install Azure CLI if needed, run az login when you're using a local CLI session, and select the subscription that contains your IoT hub. In Azure Cloud Shell, you're already signed in, but still verify or set the subscription before deploying.
# Local CLI sessions only; skip this command in Azure Cloud Shell.
az login
az account set --subscription <subscription-id-or-name>
az extension add --upgrade --name azure-iot
az iot edge set-modules --device-id <device-id> --hub-name <iot-hub-name> --resource-group <resource-group-name> --auth-type login --content ./config/deployment.amd64.json
The Azure IoT CLI extension (azure-iot) provides the az iot edge set-modules command. The --content value is resolved by the shell where Azure CLI is running, and it must point to the generated config\deployment.amd64.json file, not deployment.template.json. If you run the command in Azure Cloud Shell, upload or clone the solution and make sure the generated config\deployment.amd64.json file exists in that Cloud Shell session first; Cloud Shell can't read a manifest generated only on your local computer. Use the path separator that matches the shell where you run Azure CLI.
The command defaults to key-based IoT Hub access. The example uses --auth-type login so Azure CLI uses your current Microsoft Entra sign-in, which is the expected path in Azure RBAC-enabled environments. That signed-in identity must have an IoT Hub data-plane role assignment at the IoT Hub scope, such as IoT Hub Data Contributor, or a custom role that includes Microsoft.Devices/IotHubs/configurations/applyToEdgeDevice/action. For the authoritative service API permissions list, see Permissions for IoT Hub service APIs. If your lab or organization permits shared access policies instead, use an authorized IoT Hub connection string with the CLI --login parameter and follow your organization's secret-handling rules.