Investigate and respond to Defender for Key Vault alerts
A hardened vault is often targeted by a threat actor who obtained valid credentials. What are some sources of a valid credential? A developer phished into revealing credentials, a token harvested from a workstation, or a secret exposed in a code repository—all of them can produce legitimate-looking access to your Key Vault. Defender for Key Vault generates the alert that tells you something can be wrong. The alert is the starting point, not the end.
This unit walks through the four-step response process you use to investigate and act on a Defender for Key Vault alert. With diagnostic logging enabled on your vaults, you have the audit data needed to trace the scope of any incident.
Interpret alert fields and context
Every Defender for Key Vault alert includes a structured set of fields to help you begin the investigation:
- Object ID - the identity (service principal, user, or managed identity) that triggered the alert
- User Principal Name or IP address - the human-readable identity or originating IP, when available
- Vault name - the specific vault that generated the alert
- Secrets or keys accessed - where the alert type supports it, which specific objects were accessed
- MITRE tactic and severity - the categorization of the threat behavior and the assessed severity
- Recommended investigation steps - the suggested next actions specific to that alert type
Note
Azure virtual machines are assigned Microsoft-issued IP addresses. An alert showing a Microsoft IP address doesn't mean the access originated from Microsoft. Investigate every alert based on the identity and access context, not just the IP address.
Not all fields are always present. If the vault is accessed by an application using client credentials, you don't see a User Principal Name. If the traffic originated from outside Azure, you don't see an Object ID. Work with the fields available and use the Key Vault diagnostic logs to fill in gaps.
When an alert fires, follow these four steps:
Identify the source - determine the identity that triggered the alert and is it recognized.
Respond to the immediate threat - restrict or remove access to stop further exposure.
Measure the impact - determine which secrets were accessed and for how long.
Take action - rotate affected credentials and notify downstream application owners.

Identify the source (Step 1)
Your first task is to determine whether the access was from a known identity in your Azure tenant.
Open the alert in Defender for Cloud and note the Object ID and User Principal Name (UPN) (if present). Cross-reference the Object ID against your Microsoft Entra ID to find the identity: a user account, a service principal, a managed identity, or an AI agent workload identity. If you recognize the identity, contact the application owner or the user directly and ask whether the activity was expected.
Note
AI agents—including Azure AI Foundry agents and custom automation workloads—authenticate using a service principal or managed identity. They don't have a separate identity type in Microsoft Entra ID. If you suspect an AI workload triggered the alert, cross-reference the Object ID against your registered AI applications and managed identity assignments to confirm.
Caution
Microsoft Defender for Key Vault is designed to catch stolen credential use—scenarios where access looks legitimate because the attacker is using real credentials. Don't dismiss an alert simply because you recognize the identity. Contact the owner and verify the activity was intentional before marking the alert as resolved.
If you can't identify the source, or if the access appears to come from an unrecognized source, proceed to Step 2 immediately. Don't wait for a second alert.
Respond to the immediate threat (Step 2)
The response action depends on where the suspicious access originated.
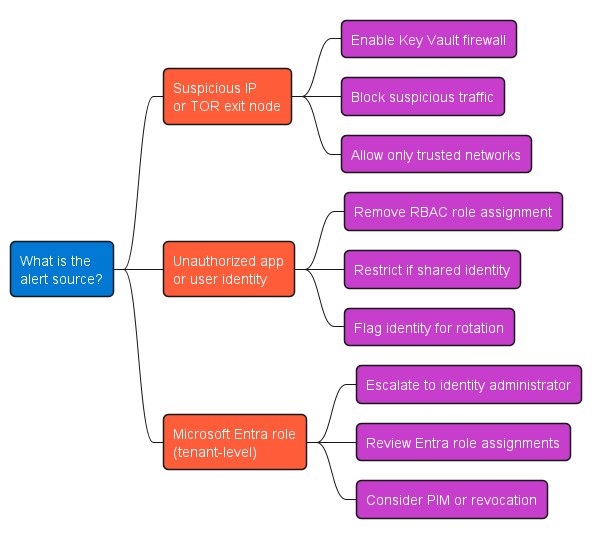
Unrecognized IP address or The Onion Router (TOR) exit node: The vault firewall is your first control. Navigate to the Key Vault in the Azure portal, open Networking, and enable the firewall if it isn't already active. Add your known trusted networks and virtual networks explicitly. Deny all other traffic. Denying traffic stops any further access from the suspicious source while you investigate.
Unauthorized application or suspicious user: Navigate to Key Vault > Access control (IAM) and remove the role assignment for the suspicious identity. If complete removal isn't immediately possible—for example, if the identity is shared with a legitimate workload—restrict the operations it can perform to the minimum set required and flag the identity for rotation. Azure RBAC is the recommended permission model for Key Vault. If the vault is still using the legacy vault access policy model, navigate to Key Vault > Access policies to remove the security principal as an immediate response—then treat migrating the vault to Azure RBAC as a required follow-up action. The legacy model lacks the audit granularity, role inheritance, and centralized management that RBAC provides, and leaves your vaults harder to secure and monitor.
Microsoft Entra role with tenant-level permissions: If the suspicious identity holds a Microsoft Entra role (for example, a Global Administrator or Privileged Role Administrator), the issue extends beyond Key Vault access policy controls. Escalate to your identity administrator. Determine whether Microsoft Entra role assignments need to be reduced, time-limited through Privileged Identity Management, or revoked entirely.
Important
Don't delay remediation while waiting for confirmation that the activity was malicious. In a potential credential theft scenario, every minute of continued access is more exposure. Apply the least-privilege response—restrict or remove access—and verify legitimate use afterward.
Measure the issue (Step 3)
Once you stop or contain the suspicious access, determine the minimum scope of the exposure before handing the investigation to your SOC or incident response team.
Open the Security page on the affected Key Vault and select the triggered alert. Review the list of secrets and keys that were accessed and their access timestamps. The list gives your SOC team the starting point they need: which vault, which objects, and when.
The deeper forensic investigation—tracing the full access history, identifying lateral movement, and determining whether the attacker reached other Azure services—requires the Key Vault diagnostic logs you configured. With diagnostic logging enabled, Key Vault writes every data plane operation to the AuditEvent log table in your Log Analytics workspace. Your analyst team queries that table for the suspicious Object ID, UPN, or IP address across 24 to 72 hours before the alert fired, looking for SecretGet, KeyGet, CertificateGet, and VaultList operations. They check whether the same identity accessed other vaults, storage accounts, databases, or downstream services during the same window—a single alert can be the visible tip of a broader compromise.
Note
Your role in Step 3 is to ensure the audit data exists and to brief the SOC team on the initial scope from the alert. If diagnostic logging wasn't configured before the alert fired, there's no historical access records to hand off—making the investigation substantially harder. Enabling diagnostic logging on all Key Vaults is a Defender for Cloud security recommendation under the Microsoft Cloud Security Benchmark (MCSB) controls, and it's one of the most important preincident configurations a security engineer can make.
Take action (Step 4)
With the threat contained and the issue measured, complete the response.
Rotate all affected credentials. For each secret, key, or certificate that the suspicious identity accessed: disable or delete the current version in Key Vault and create a new version. Don't assume the credential is still secret after the alert. Treat it as compromised.
Notify downstream application owners. Identify each application that uses the rotated credentials. Contact the application owner and communicate the compromise time window—the period from the earliest suspicious access you found in Step 3 through the time you completed containment in Step 2. Application owners must audit their systems for any activity performed using the compromised credentials during that window, assess what data can be accessed or modified, and take appropriate action.
For service-to-service credentials: If a compromised service principal is the source, work with the identity team to rotate the client secret or certificate for that service principal, and audit other resources that service principal had access to.
Monitor the vault after remediation. After rotating credentials and removing compromised access, watch the vault closely for 48 to 72 hours using the Security alerts page in Defender for Cloud. A persistent threat actor can attempt access with different credentials or from a new IP. A quiet vault after remediation means your response contained the incident. Further anomalous access means the attacker still has a foothold somewhere in your environment.
Use security recommendations alongside alerts
Defender for Cloud surfaces Key Vault security recommendations based on the Microsoft Cloud Security Benchmark (MCSB). These recommendations address posture gaps that increase the blast radius of a compromise—for example:
- Key vaults should have soft delete enabled - prevents accidental or malicious permanent deletion of vault objects
- Key vaults should have purge protection enabled - prevents bypass of soft-delete retention
- Diagnostic logs in Key Vault should be enabled - ensures you have the audit data needed for Step 3 of every incident response
Addressing recommendations reduces your exposure. The alert investigation workflow in this unit tells you when an attacker is exploiting an unremediated posture gap. Both work together—recommendations improve the posture; alerts tell you when the posture isn't sufficient to stop a threat.