Discover assets using recursive discovery
Contoso's security team knows the Azure resources in their subscription, but what about the test environment from two years ago that's still running? Or the regional partner's infrastructure they acquired last quarter? External Attack Surface Management uses recursive discovery to find these unknown assets by starting from what you know and expanding outward. Here, you learn how discovery seeds work, how to set up automated or custom discovery, and how to organize the assets External Attack Surface Management (EASM) finds.
| Discovery Phase | What Happens |
|---|---|
| 1. Provide seeds | Supply known assets (domains, IP blocks, contacts) as starting points |
| 2. Query data sources | EASM checks WHOIS, DNS, SSL certificates, ASN records for connections |
| 3. Expand recursively | Each discovered asset becomes a seed for finding more connections |
| 4. Populate inventory | Assets appear in your inventory organized by type and state |
| 5. Schedule updates | Continuous scanning keeps your attack surface current |
Examine recursive discovery
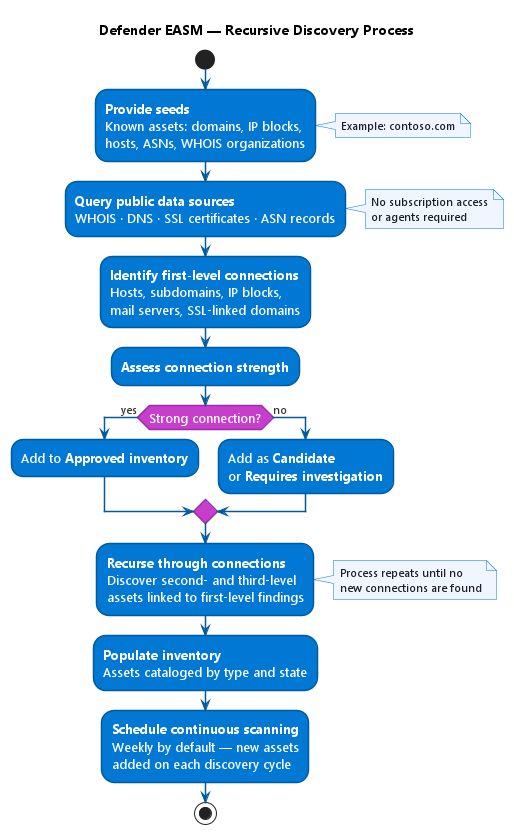
EASM finds assets you don't know about by following connections from assets you do know about. The discovery engine starts with seeds - legitimate assets you provide as starting points—and expands recursively to map your entire internet-facing attack surface.
Seeds can take several forms. You can provide domain names like contoso.com, IP address blocks your organization owns, specific hosts, email contacts used for domain registration, Autonomous System Numbers (ASNs), or WHOIS organization names. Each seed type unlocks different discovery paths through your infrastructure.
The discovery engine queries multiple data sources for each seed. From a domain seed like contoso.com, EASM queries WHOIS records to find other domains registered by the same contact email or organization. It queries DNS records to discover hosts, subdomains, IP blocks, and mail servers associated with the domain. SSL certificate databases reveal all hosts using certificates linked to your organization. ASN lookups find IP blocks under the same autonomous system. Each of these data sources provides a different view into your infrastructure's connections and ownership patterns.
From each first-level connection, EASM discovers second-level and third-level connections, recursively expanding the search. Consider Contoso's scenario: Starting from contoso.com, EASM finds all hosts under that domain. For each host, it finds SSL certificates in use. Those certificates can be shared with other domains—including contoso-partner.net from the recent acquisition. The partner domain leads to more hosts, IP blocks, and infrastructure that shares certificates, WHOIS contacts, or network ownership.
Configure your discovery approach
EASM offers two paths for building your attack surface: automated discovery with prebuilt attack surfaces, or custom discovery groups you configure yourself.
The automated attack surface approach is the fastest starting point. Microsoft maintains preconfigured attack surfaces for many large organizations, built from public data sources linking assets to company names and registrations. To access it:
- Open your EASM instance and select Getting Started under General.
- Search for your organization name.
- Select Build my Attack Surface.
Discovery runs in the background, and your inventory populates in preview mode. This approach works well for established organizations with consistent branding and domain registration practices.
For organizations not in the prebuilt list—or to supplement automated discovery—you create custom discovery groups. A discovery group contains seed assets and a recurrence schedule for ongoing discovery. To create one:
- In EASM, go to Manage > Discovery > Add Discovery Group.
- Name the group and set the recurrence frequency (default: Weekly).
- Add seeds—domains, IP blocks, hosts, ASNs, email contacts, or WHOIS organization names.
- Optionally add exclusions for subsidiaries or assets outside your scope.
- Select Review + Create, then Create & Run.
Organize discovery groups by business unit, brand, or subsidiary—for example, separate groups for core infrastructure and acquired domains—to maintain clear boundaries as your attack surface evolves.
Tip
Start with the automated attack surface search before creating custom groups. Microsoft could have a preconfigured attack surface ready for your organization, saving time on initial setup.
Organize and manage your asset inventory
As discovery runs, EASM populates your inventory with the eight asset types covered in the previous unit—domains, hosts, pages, IP blocks, IP addresses, ASNs, SSL certificates, and WHOIS contacts.
Every asset receives a state that defines its relationship to your organization. This state system helps Contoso's team manage the mixed infrastructure from their acquisition:
| State | Description |
|---|---|
| Approved inventory | Confirmed as owned by your organization; actively monitored and included in dashboard charts |
| Candidate | Has a connection to your seeds but needs manual review to confirm ownership |
| Dependency | Owned by an external but directly supports your approved assets (for example, a CDN or hosting provider) |
| Monitor only | Relevant to your attack surface but not directly controlled—used for franchises or related entities |
| Requires investigation | Low-confidence connection; flagged for manual review to determine how it should be categorized |
When Contoso runs discovery after their acquisition, new assets surface as Candidates - they appear connected to Contoso infrastructure through shared SSL certificates, WHOIS contacts, or network blocks, but aren't manually confirmed yet. The security team reviews these candidates and moves legitimate acquired assets to Approved inventory for ongoing monitoring. Former partner infrastructure that wasn't part of the acquisition can be marked Requires investigation and reviewed for removal or reassignment.
The Dependency state is useful for tracking external infrastructure your assets rely on. Dependency assets are tracked in your inventory but aren't included in dashboard charts by default—they represent external risk context rather than assets you're directly responsible for.
You use inventory filters to navigate large attack surfaces efficiently. Filter by asset type to focus on all domains or all IP blocks at once. Filter by state to review candidates needing confirmation or investigate assets flagged for review. Filter by discovery date to find recently added assets that represent new exposure from development activity or infrastructure changes. Combine filters to surface specific risks—for example, all hosts in candidate state discovered in the last 30 days.
Maintain your attack surface over time
EASM continuously scans your attack surface, running scheduled discoveries to keep your inventory current as your infrastructure evolves.
Assets receive temporal tags based on their activity status. Recent assets are currently active—EASM observed them during the latest scan cycle. Historic assets were observed previously but no longer appear in current scans. Historic assets matter because they represent services you forgot about but that an attacker could still find and exploit. A development environment you think you decommissioned six months ago might still be running, and its historic tag alerts you to investigate.
The combination of continuous scanning and recursive discovery keeps your inventory current as your infrastructure changes—without requiring manual seed updates unless you're expanding into entirely new IP blocks or acquiring new organizations.
Now that you understand how to discover and organize your attack surface, you're ready to analyze what EASM found.