Configure vulnerability assessment
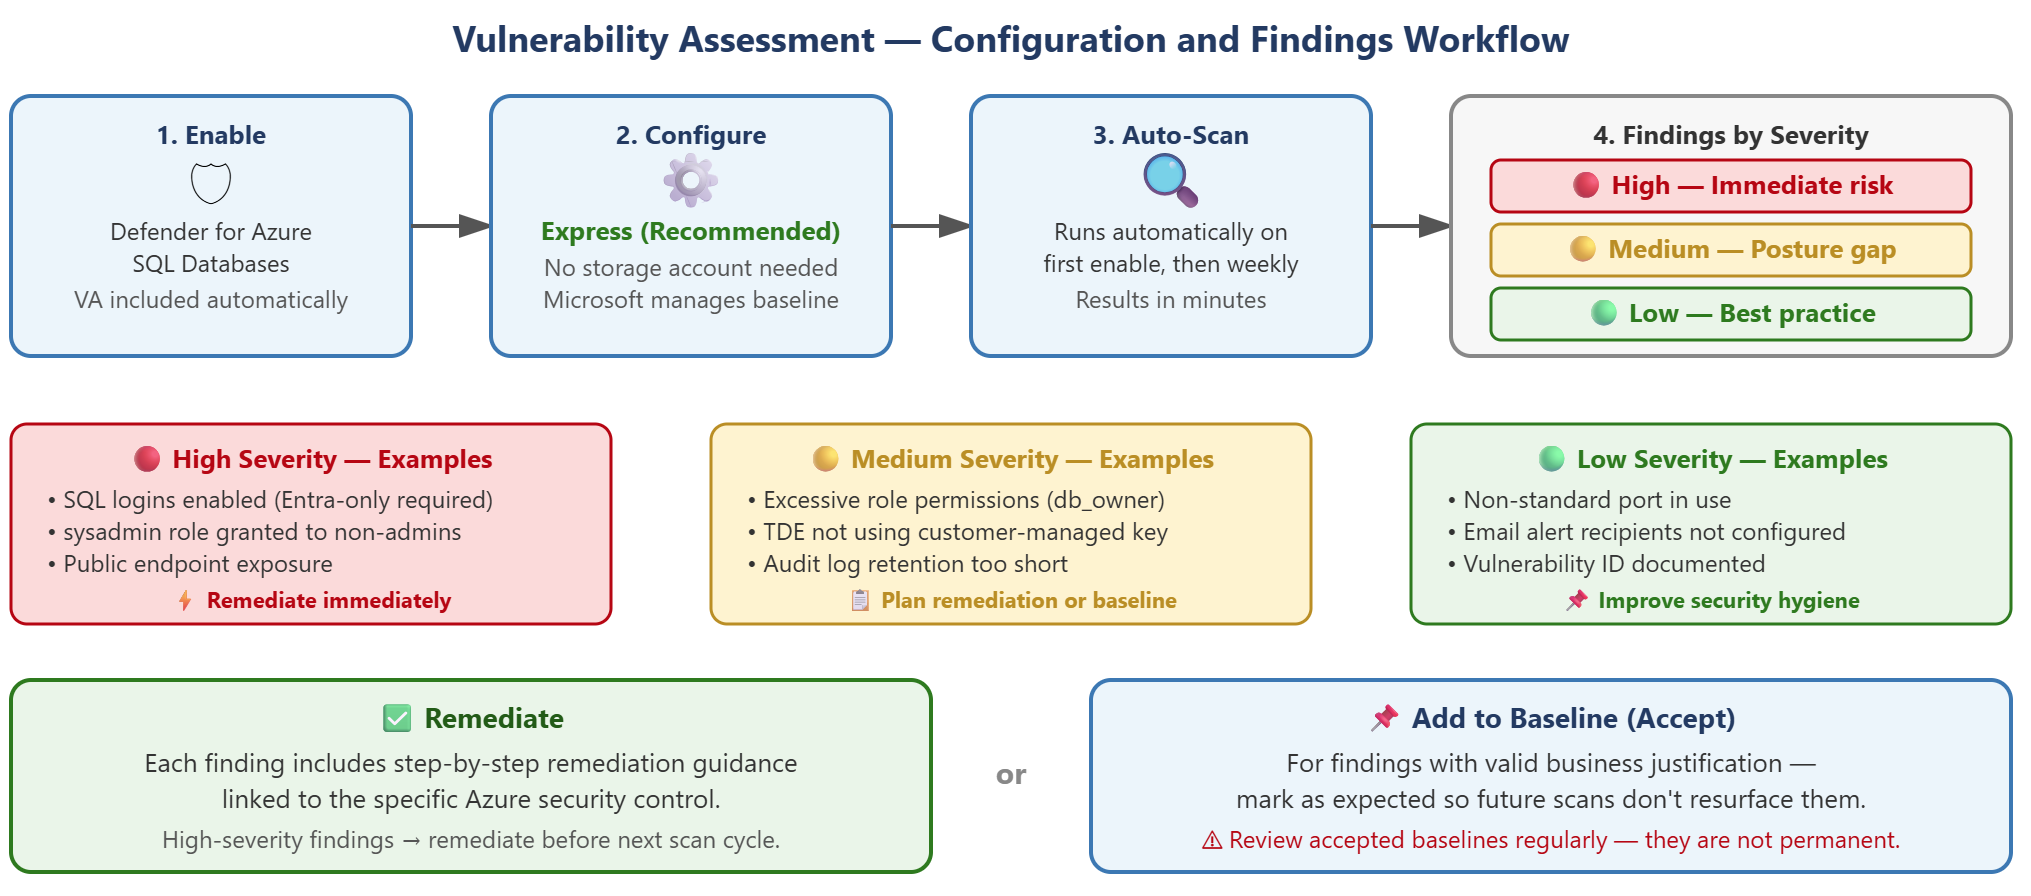
When you enable Defender for Azure SQL Databases, vulnerability assessment automatically becomes available to scan your databases for security misconfigurations and known vulnerabilities. For Contoso Financial Services, the first scan reveals the current security posture of the banking database before the regulator review.
Choose express configuration
Express configuration is the recommended approach for vulnerability assessment because Microsoft manages the baseline automatically and no storage account is required. This configuration simplifies operations and reduces administrative overhead compared to the legacy classic configuration.
| Aspect | Express configuration | Classic configuration |
|---|---|---|
| Baseline management | Microsoft manages baseline automatically | You configure baseline manually in a storage account |
| Storage requirement | No storage account required | Requires a dedicated storage account for scan results |
| Recommendation | Yes—simpler to operate | Legacy approach |
| Availability | Azure SQL Database and Azure Synapse dedicated SQL pools | Azure SQL Database, SQL Managed Instance, and Azure Synapse Analytics |
To enable express configuration, navigate to Microsoft Defender for Cloud, select your SQL server or SQL managed instance resource, open the Defender for Cloud screen, and select Vulnerability assessment. Select Configure, then select Express. The first scan runs automatically and surfaces findings within minutes.
Review and interpret findings
Categorizing vulnerability assessment by severity helps you prioritize remediation efforts. Each severity level represents a different type of risk to your environment.
High-severity findings identify critical misconfigurations that represent active security risks. Examples include SQL logins enabled when Entra-only authentication is required, or the sysadmin role granted to nonadministrator accounts. These findings demand immediate attention because they create exploitable attack vectors.
Medium-severity findings indicate configuration gaps that reduce security posture but don't represent immediate exploitation risks. These findings often relate to defense-in-depth controls or operational best practices that strengthen overall security.
Lower-severity findings provide best practice recommendations that improve security hygiene over time. While not urgent, these findings help you maintain a strong security baseline.
Each finding includes a unique identifier (such as VA2065), a description of the vulnerability, an issue statement explaining the risk, and specific remediation steps. The remediation guidance connects directly to Azure security controls, many of which you configure in earlier units of this module.
Set baselines for accepted configurations
Not all findings require remediation. Some represent accepted configurations for valid business reasons. The baseline mechanism lets you mark these as expected so your team can focus on genuinely new issues.
Consider Contoso's fraud detection scenario: The AI service's managed identity has broad read access across multiple tables using the db_datareader role. This appears as a Medium-severity finding because excessive permissions increase risk. However, the security team reviewed this configuration and determined that the fraud detection service requires this level of access to analyze transaction patterns effectively.
To set a baseline for an accepted finding, open the SQL resource's vulnerability assessment findings in Defender for Cloud, select the finding you want to baseline, and mark it as expected. The finding is now excluded from open issues in future scans. Future scans compare against this baseline, so only new or changed findings surface as open issues.
Baselines aren't permanent exemptions. You should review accepted configurations regularly because an acceptable configuration today can become a risk if the threat landscape changes or if business requirements evolve.
Remediate high-severity findings
Each finding includes specific remediation guidance that connects to Azure security controls.
| Finding | Remediation |
|---|---|
| SQL authentication enabled | Enable Microsoft Entra ID–only authentication |
| Public endpoint accessible | Deploy private endpoint and disable public access |
| Auditing not enabled | Enable server or database auditing |
| Transparent Data Encryption (TDE) not using customer-managed key | Configure CMK in Azure Key Vault |
| Excessive permissions | Apply least-privilege GRANT statements, and remove unnecessary role memberships |
The remediation workflow follows a consistent pattern: First review findings sorted by severity with High findings at the top. For each High finding, apply the remediation using the guidance in the finding details. Trigger a rescan by navigating to Defender for Cloud, selecting your SQL resource, opening Vulnerability assessment, and choosing Scan. The rescan verifies that your remediation resolved the finding. Configurations you accept as valid business requirements, set a baseline instead of remediating. Track remaining open findings as a remediation backlog to address during your next maintenance window.