Note
Access to this page requires authorization. You can try signing in or changing directories.
Access to this page requires authorization. You can try changing directories.
This article describes how to use Azure API Center to register agent skills as part of your API inventory. Skills are reusable capabilities that AI agents can discover and consume to extend their functionality.
By registering skills in your API center, you create a centralized registry that helps your organization:
- Discover available skills and their capabilities
- Access source code and documentation for the skills
Prerequisites
- An API center. If you don't have an API center yet, see the quickstart to Create an API center.
- One or more skills that you want to register, typically hosted in a source code repository such as GitHub.
Register a skill
To register a skill in your API center:
Sign in to the Azure portal and go to your API center.
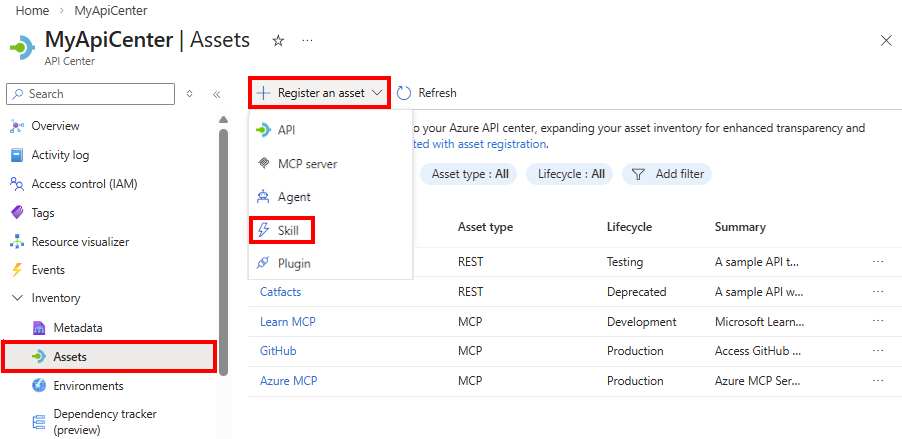
In the sidebar menu, under Inventory, select Assets.
Select + Register an asset > Skill.
In the Register a skill form, provide the information in the following table:
Field Description Title Enter a descriptive name for the skill (for example, Code Review Skill). Identification API Center automatically generates an identifier based on the title (for example, code-review-skill). You can edit this if needed. Summary Provide a brief one-line description of what the skill does (for example, Performs automated code reviews using static analysis). Description Enter a more detailed description of the skill's capabilities, use cases, and behavior. Lifecycle stage Select the current stage of the skill's lifecycle from the dropdown menu. Source Source URL Enter the Git repository URL for the skill source code (for example, https://github.com/<org>/<repo>/tree/main/skills/<skill-name>).Compatibility Describe the requirements, dependencies, and prerequisites for using the skill (for example, required software or tools like git, docker, programming languages; system requirements; network access requirements; API keys or authentication requirements). Allowed tools Select + Add tool to specify the APIs or MCP servers from your API inventory that this skill can access. This approach helps ensure proper governance and security by explicitly defining what resources the skill can consume. License Select + Add to provide licensing information. Enter the license name (for example, MIT, Apache 2.0, or Proprietary), optionally provide a license URL, and add a description if needed to clarify licensing terms or restrictions. Contact information Select + Add to add contact points for support or inquiries. Enter a contact name or role (for example, API Team or John Smith), provide contact details such as email address, and optionally add a description to clarify when and why to contact this person or team. Select Create to register the skill in your API center.
After registration, the skill appears in your inventory on the Inventory > Assets page.
Update a registered skill
You can update skill information at any time:
- In your API center, go to Inventory > Assets.
- Find and select the skill you want to update.
- Select Edit to modify the skill's properties.
- Make your changes and select Save.
Synchronize skills from a Git repository
To automate skill registration and keep your inventory up to date, you can integrate a Git repository with your API center. For more information, see Synchronize API assets from a Git repo.
Discover skills in the API Center portal
Set up your API Center portal so that developers and other stakeholders in your organization can discover skills in your API inventory. From the API Center portal, users can:
- Browse and filter skills in the inventory.
- View detailed information about each skill.
Assess AI assets (preview)
API Center can assess the quality of AI assets such as skills and agents registered in your API center. API Center comes with default assessment criteria out of the box, assessing assets across predefined dimensions. Enterprise platform administrators can further extend these defaults by defining custom assessment criteria tailored to their organization's specific standards, compliance requirements, and governance policies.
To enable automated assessments of AI assets in your inventory:
In the Azure portal, go to your API center.
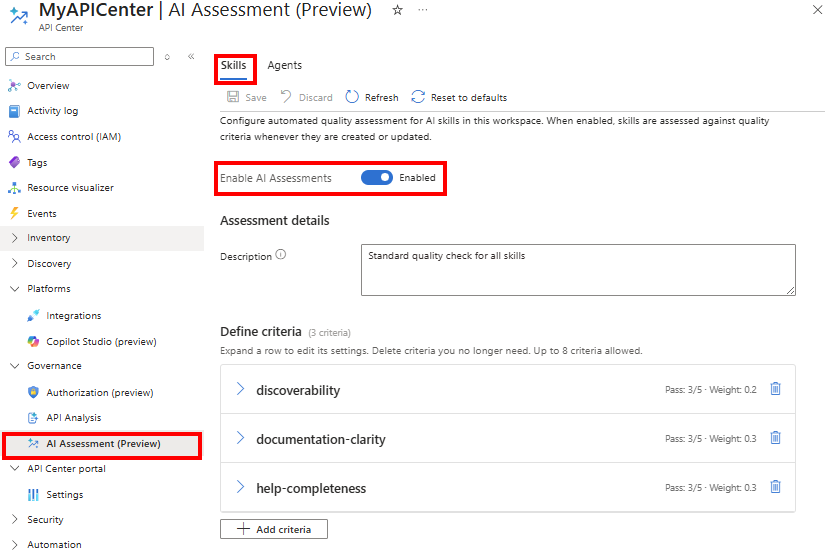
In the sidebar menu. go to Governance > AI Assessment (preview).
Select the Skills tab to configure assessments for skills, or select the Agents tab to configure assessments for agents.
In Assessment status, select Enabled.
Enter a Description for the assessment.
In Assessment criteria, do one of the following:
- Accept the Default criteria provided by API Center. Optionally remove default criteria that aren't relevant for your organization.
The following screenshot shows default criteria for skills:
- Add one or more custom criteria.
- Select + Add criteria.
- Enter a Name and optional Assessment instruction for the criterion.
- Enter Minimum score and Maximum score values for the score (for example, 1 and 5).
- Enter a Pass threshold value (for example, 3) that indicates the minimum acceptable score for the criterion.
- Enter a Weight value that indicates the contribution of the criterion to the total assessment (for example, a weight of 0.3 multiples the score by 0.3, contributing 30% to the total assessment).
- Repeat the preceding steps to add more criteria as needed.
Select Save.

You can then view assessment results in the API Center portal. For example, view assessment results for each skill on the skill details page.
