Note
Access to this page requires authorization. You can try signing in or changing directories.
Access to this page requires authorization. You can try changing directories.
Important
Azure Backup for Confidential virtual machines (VMs) is currently in preview. See the Supplemental Terms of Use for Microsoft Azure Previews for legal terms that apply to Azure features that are in beta, preview, or otherwise not yet released into general availability.
This article describes how to restore an OS-disk encrypted Confidential VM (CVM) with Platform Managed Key (PMK) or Customer Managed Key (CMK) by using Azure Backup. It explains restore behavior across key and Disk Encryption Set (DES) states, and provides a recovery procedure for key-loss scenarios.
Learn about the supported scenarios for Confidential VM backup.
Supported restore scenarios
Azure Backup supports the following restore scenarios for OS-disk encrypted Confidential VMs:
| Category | Support details |
|---|---|
| Restore types | Restore VM (Alternate Location Restore), Restore VM (Original Location Restore), and Restore Disks |
| Encryption configuration | Restore by using the original encryption configuration or a customer-provided replacement Disk Encryption Set for OS-disk encryption, based on restore tier support |
For supportability boundaries and regional availability, see the support matrix for Confidential VM backup.
Restores from snapshot tier
The following scenarios are supported for snapshot-tier restore points:
| Scenario | Support details | Steps to restore |
|---|---|---|
| Original key used during backup is available in the key store associated with the same DES | Supported | Use original DES during restore |
| Keys are rotated since backup was performed | Supported | Key rotation also propagates to the corresponding snapshots. Use original DES during restore |
| Original key used during backup is deleted | Not supported | Not supported for snapshot-tier restore points |
| Wrap the restored OS disk of the CVM with a new key | Not supported | Not supported for snapshot-tier restore points |
If you provide a new DES for a restore point that has both snapshot and vaulted tiers, the restore process attempts to restore from the vaulted tier.
Restores from vault tier
Vault-tier restore points support the following scenarios:
| Scenario | Support details | Steps to restore |
|---|---|---|
| Original key used during backup is available in the key store associated with the same DES | Supported | Use original DES during restore |
| Keys are rotated since backup was performed | Supported | Follow a two-step restore process. DES association: rotated new key |
| Original key used during backup is deleted from key store | Supported | Follow a two-step restore process |
| Wrap the restored OS disk of the CVM with a new key | Supported | Follow a two-step restore process. DES association: new key |
For vault-tier restore with a new wrapping key:
- Provide the DES associated with the new key that you want to use for the restored OS disk.
- If the new (wrap) key is different from the original (unwrap) key, ensure both keys are present in the same key vault.
- Azure Backup uses the original key to unwrap backup data during restore and uses the new key to wrap the restored OS disk.
Successful restore requirements
Restore succeeds when Azure Backup can validate required encryption relationships.
| Restore point tier | Criteria |
|---|---|
| Snapshot | The provided Disk Encryption Set is the same as the original. |
| Vaulted | - The provided DES is associated with the same key vault as the original and the original key is present. - The provided DES is associated with another key vault that has the original key restored from backup. |
Restore flows
Restore by using original encryption assets
Use this option when:
- Original DES resources exist.
- Original Key Vault resources exist.
- Required keys remain available.
In this scenario:
- No additional encryption configuration is required.
- Azure Backup automatically reconstructs the VM encryption configuration.
To restore by using original encryption assets, continue with the default encryption selection from backup.
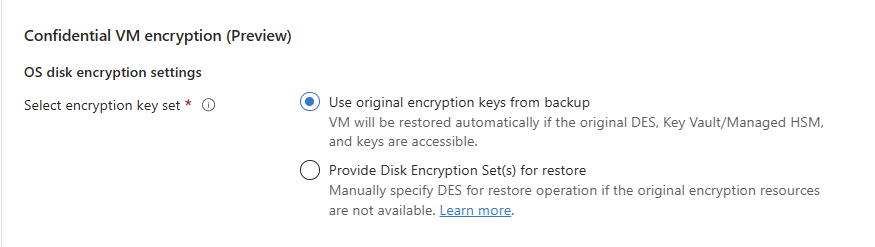
If you don't provide input, this option is selected by default. Restore fails if successful restore criteria aren't met.
Restore by using replacement encryption assets
Use this option when:
- Original key vaults were deleted.
- Original keys were deleted.
- Original DES resources are unavailable.
- You need to use a different key to wrap the restored OS disk.
Criteria for success
- Restores from snapshot tier don't support this mode.
- The key vault associated with the new DES should contain the original keys used during backup. If required, restore missing keys.
- If you use different keys for wrap and unwrap operations, both keys must be available in the same key vault. The new key must be the one associated with the provided DES.
OS disk encryption configuration
For OS disk recovery, select Provide Disk Encryption Set(s) for restore and choose a valid DES.
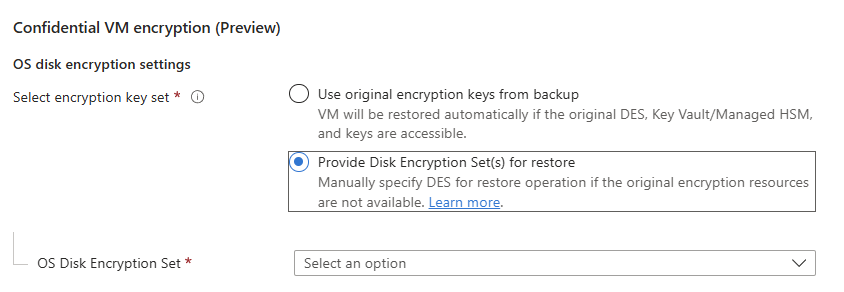
Note
For any new DES you provide for restore, the backup service needs access to the referenced key vaults. Required permissions: Get and list keys. Learn more about assigning permissions.
Recovering when original encryption assets are unavailable
If original keys are deleted, disabled, or become inaccessible:
- Trigger a restore attempt.
- Azure Backup exports the required key material to the configured staging location.
- Restore the required keys into a customer-controlled Key Vault.
- Create the required Disk Encryption Set resources.
- Retry restore by using the newly created DES resources.
Restore missing keys for Confidential VM restore
If the restore operation fails, you need to restore the keys that Azure Backup backed up.
To restore the key by using PowerShell, follow these steps:
To select the vault containing the protected CVM and CMK, enter the resource group and name of the vault in the cmdlet, and then run the cmdlet.
$vault = Get-AzRecoveryServicesVault -ResourceGroupName "<vault-rg>" -Name "<vault-name>"To list all failed restore jobs from the last seven days, run the following cmdlet. If you want to fetch older jobs, update the day range in the cmdlet.
$Jobs = Get-AzRecoveryServicesBackupJob -From (Get-Date).AddDays(-7).ToUniversalTime() -Status Failed -Operation Restore -VaultId $vault.IDTo select the failed restore job from the result and get the job details, run the following cmdlet:
Example
$JobDetails = Get-AzRecoveryServicesBackupJobDetail -Job $Jobs[0] -VaultId $vault.IDTo get all the necessary parameters required for key restore from the job details, run the following cmdlet:
$properties = $JobDetails.properties
$storageAccountName = $properties["Target Storage Account Name"]
$containerName = $properties["Config Blob Container Name"]
$securedEncryptionInfoBlobName = $properties["Secured Encryption Info Blob Name"]
To select the target storage account used for restore, enter its resource group in the following cmdlet, and then run the cmdlet:
Set-AzCurrentStorageAccount -Name $storageaccountname -ResourceGroupName '<storage-account-rg >'To restore the JSON configuration file containing key details for CVM with CMK, run the following cmdlet:
$destination_path = 'C:\cvmcmkencryption_config.json'
Get-AzStorageBlobContent -Blob $securedEncryptionInfoBlobName -Container $containerName -Destination $destination_path
$encryptionObject = Get-Content -Path $destination_path | ConvertFrom-Json
After the JSON file is generated in the destination path mentioned previously, generate key blob file from the JSON data by running the following cmdlet:
$keyDestination = 'C:\keyDetails.blob'
[io.file]::WriteAllBytes($keyDestination, [System.Convert]::FromBase64String($encryptionObject.OsDiskEncryptionDetails.KeyBackupData))
To restore the key back in the Key Vault or Managed Hardware Security Module (HSM), run the following cmdlet:
Restore-AzKeyVaultKey -VaultName '<target_key_vault_name> ' -InputFile $keyDestination
For MHSM Use,
Restore-AzKeyVaultKey -HsmName '<target_mhsm_name>' -InputFile $keyDestination
Now, create a new DES with encryption type Confidential disk encryption with CMK and point it to the restored key. Ensure the DES has required key access permissions before retrying restore. If you use a new Key Vault or Managed HSM to restore the key, Backup Management Service has enough permissions on it by default. Learn how to grant permission for Key Vault or Managed HSM access.
Assign permissions to DES and Confidential Guest VM Agent for restore
Disk Encryption Set and Confidential Guest VM Agent need permissions on the Key Vault or Managed HSM. To provide the permissions, follow these steps:
For Key vault: To grant permissions to the Key vault, you can follow these steps in the documentation or follow these steps:
- Navigate to the Disk encryption set instance.
- Select the message To associate a disk, image, or snapshot with this disk encryption set, you must grant permissions to the key vault and grant permissions.
For Managed HSM: To grant permissions to the Managed HSM, follow these steps:
Assign newly created DES with the Managed HSM Crypto User Role:
- In the Azure portal, go to Managed HSM > Settings, and then select Local RBAC.
- To add a new Role Assignment, select Add.
- Under Role, select Managed HSM Crypto User Role.
- Under Scope, select the restored key. You can also select All Keys.
- On the Security principal, select newly created DES.
Assign required permissions to the Confidential Guest VM Agent for booting up CVM:
- In the Azure portal, go to Managed HSM > Settings, and then select Local RBAC.
- To add a new Role Assignment, select Add.
- Under Role, select Managed HSM Crypto Service Encryption User.
- Under Scope, select the restored key. You can also select All Keys.
- On the Security principal, select Confidential Guest VM Agent.
After permission changes, allow RBAC propagation before retrying restore.
Troubleshooting restore failures
If a restore operation fails, use the following checks:
- Validate that the DES exists and references the expected key and key version.
- Validate that the source key isn't deleted or disabled.
- Validate that DES and Confidential Guest VM Agent have the required permissions.
- Retry the restore operation after key recovery and permission propagation.