Note
Access to this page requires authorization. You can try signing in or changing directories.
Access to this page requires authorization. You can try changing directories.
This article shows you how to use PowerShell to get, set, and update the access control lists (ACLs) of directories and files.
New child items that you create under a parent directory automatically inherit ACLs. However, you can also add, update, and remove ACLs recursively on existing child items of a parent directory without making these changes individually for each child item.
Prerequisites
An Azure subscription. For more information, see Get Azure free trial.
A storage account that has hierarchical namespace (HNS) enabled. Follow these instructions to create one.
One of the following security permissions:
A provisioned Microsoft Entra ID security principal that's assigned the Storage Blob Data Owner role, scoped to the target container, storage account, parent resource group, or subscription.
Owning user of the target container or directory to which you plan to apply ACL settings. To set ACLs recursively, this user includes all child items in the target container or directory.
Install the PowerShell module
Verify that the version of PowerShell you installed is
5.1or higher by using the following command. To upgrade your version of PowerShell, see Upgrading existing Windows PowerShell.echo $PSVersionTable.PSVersion.ToString()Install the Az.Storage module. For more information about how to install PowerShell modules, see Install the Azure PowerShell module.
Install Az.Storage module.
Install-Module Az.Storage -Repository PSGallery -Force
Connect to the account
Open a Windows PowerShell command window, and then sign in to your Azure subscription with the Connect-AzAccount command and follow the on-screen directions.
Connect-AzAccountIf your identity is associated with more than one subscription and you're not prompted to select the subscription, set your active subscription to the subscription of the storage account that you want to use. In this example, replace the
<subscription-id>placeholder value with the ID of your subscription.Select-AzSubscription -SubscriptionId <subscription-id>Get the storage account context.
$ctx = New-AzStorageContext -StorageAccountName '<storage-account-name>' -UseConnectedAccount
Get ACLs
Get the ACL of a directory or file by using the Get-AzDataLakeGen2Item cmdlet.
In Azure Data Lake Storage, a container is also called a file system. The -FileSystem parameter used in the following examples takes the name of your container.
The following example gets the ACL of the root directory of a container and then prints the ACL to the console.
$filesystemName = "my-file-system"
$filesystem = Get-AzDataLakeGen2Item -Context $ctx -FileSystem $filesystemName
$filesystem.ACL
The following example gets the ACL of a directory, and then prints the ACL to the console.
$filesystemName = "my-file-system"
$dirname = "my-directory/"
$dir = Get-AzDataLakeGen2Item -Context $ctx -FileSystem $filesystemName -Path $dirname
$dir.ACL
The following example gets the ACL of a file and then prints the ACL to the console.
$filePath = "my-directory/upload.txt"
$file = Get-AzDataLakeGen2Item -Context $ctx -FileSystem $filesystemName -Path $filePath
$file.ACL
The following image shows the output after getting the ACL of a directory.
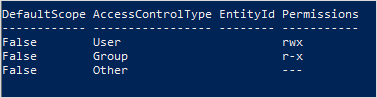
In this example, the owning user has read, write, and execute permissions. The owning group has only read and execute permissions. For more information about access control lists, see Access control in Azure Data Lake Storage.
Set ACLs
When you set an ACL, you replace the entire ACL, including all its entries. If you want to change the permission level of a security principal or add a new security principal to the ACL without affecting other existing entries, update the ACL instead. To update an ACL instead of replace it, see the Update ACLs section of this article.
If you choose to set the ACL, you must add an entry for the owning user, an entry for the owning group, and an entry for all other users. To learn more about the owning user, the owning group, and all other users, see Users and identities.
This section shows you how to:
- Set an ACL
- Set ACLs recursively
Set an ACL
Use the Set-AzDataLakeGen2ItemAclObject cmdlet to create an ACL for the owning user, owning group, or other users. Then, use the Update-AzDataLakeGen2Item cmdlet to commit the ACL.
This example sets the ACL on the root directory of a container for the owning user, owning group, or other users, and then prints the ACL to the console.
$filesystemName = "my-file-system"
$acl = Set-AzDataLakeGen2ItemAclObject -AccessControlType user -Permission rw-
$acl = Set-AzDataLakeGen2ItemAclObject -AccessControlType group -Permission rw- -InputObject $acl
$acl = Set-AzDataLakeGen2ItemAclObject -AccessControlType other -Permission -wx -InputObject $acl
Update-AzDataLakeGen2Item -Context $ctx -FileSystem $filesystemName -Acl $acl
$filesystem = Get-AzDataLakeGen2Item -Context $ctx -FileSystem $filesystemName
$filesystem.ACL
This example sets the ACL on a directory for the owning user, owning group, or other users, and then prints the ACL to the console.
$filesystemName = "my-file-system"
$dirname = "my-directory/"
$acl = Set-AzDataLakeGen2ItemAclObject -AccessControlType user -Permission rw-
$acl = Set-AzDataLakeGen2ItemAclObject -AccessControlType group -Permission rw- -InputObject $acl
$acl = Set-AzDataLakeGen2ItemAclObject -AccessControlType other -Permission -wx -InputObject $acl
Update-AzDataLakeGen2Item -Context $ctx -FileSystem $filesystemName -Path $dirname -Acl $acl
$dir = Get-AzDataLakeGen2Item -Context $ctx -FileSystem $filesystemName -Path $dirname
$dir.ACL
Note
To set a default ACL entry, use the -DefaultScope parameter when running the Set-AzDataLakeGen2ItemAclObject command. For example: $acl = Set-AzDataLakeGen2ItemAclObject -AccessControlType user -Permission rwx -DefaultScope.
This example sets the ACL on a file for the owning user, owning group, or other users, and then prints the ACL to the console.
$filesystemName = "my-file-system"
$filePath = "my-directory/upload.txt"
$acl = Set-AzDataLakeGen2ItemAclObject -AccessControlType user -Permission rw-
$acl = Set-AzDataLakeGen2ItemAclObject -AccessControlType group -Permission rw- -InputObject $acl
$acl = Set-AzDataLakeGen2ItemAclObject -AccessControlType other -Permission "-wx" -InputObject $acl
Update-AzDataLakeGen2Item -Context $ctx -FileSystem $filesystemName -Path $filePath -Acl $acl
$file = Get-AzDataLakeGen2Item -Context $ctx -FileSystem $filesystemName -Path $filePath
$file.ACL
Note
To set the ACL of a specific group or user, service principal, or managed identity, use their respective object IDs. For example, to set the ACL of a group, use group:xxxxxxxx-xxxx-xxxx-xxxx-xxxxxxxxxxxx. To set the ACL of a user, use user:xxxxxxxx-xxxx-xxxx-xxxx-xxxxxxxxxxxx.
The following image shows the output after setting the ACL of a file.
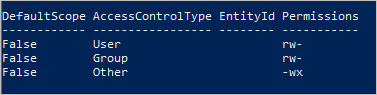
In this example, the owning user and owning group have only read and write permissions. All other users have write and execute permissions. For more information about access control lists, see Access control in Azure Data Lake Storage.
Set ACLs recursively
Set ACLs recursively by using the Set-AzDataLakeGen2AclRecursive cmdlet.
This example sets the ACL of a directory named my-parent-directory. These entries give the owning user read, write, and execute permissions, give the owning group only read and execute permissions, and give all others no access. The last ACL entry in this example gives a specific user with the object ID "xxxxxxxx-xxxx-xxxx-xxxx-xxxxxxxxxxxx" read and execute permissions.
$filesystemName = "my-container"
$dirname = "my-parent-directory/"
$userID = "xxxxxxxx-xxxx-xxxx-xxxx-xxxxxxxxxxxx";

$acl = Set-AzDataLakeGen2ItemAclObject -AccessControlType user -Permission rwx
$acl = Set-AzDataLakeGen2ItemAclObject -AccessControlType group -Permission r-x -InputObject $acl
$acl = Set-AzDataLakeGen2ItemAclObject -AccessControlType other -Permission "---" -InputObject $acl
$acl = Set-AzDataLakeGen2ItemAclObject -AccessControlType user -EntityId $userID -Permission r-x -InputObject $acl

Set-AzDataLakeGen2AclRecursive -Context $ctx -FileSystem $filesystemName -Path $dirname -Acl $acl
Note
To set a default ACL entry, use the -DefaultScope parameter when running the Set-AzDataLakeGen2ItemAclObject command. For example: $acl = Set-AzDataLakeGen2ItemAclObject -AccessControlType user -Permission rwx -DefaultScope.
To see an example that sets ACLs recursively in batches by specifying a batch size, see the Set-AzDataLakeGen2AclRecursive reference article.
Update ACLs
When you update an ACL, you modify the ACL instead of replacing the ACL. For example, you can add a new security principal to the ACL without affecting other security principals listed in the ACL. To replace the ACL instead of update it, see the Set ACLs section of this article.
This section shows you how to:
- Update an ACL
- Update ACLs recursively
Update an ACL
First, get the ACL. Then, use the Set-AzDataLakeGen2ItemAclObject cmdlet to add or update an ACL entry. Use the Update-AzDataLakeGen2Item cmdlet to commit the ACL.
This example creates or updates the ACL on a directory for a user.
$filesystemName = "my-file-system"
$dirname = "my-directory/"
$acl = (Get-AzDataLakeGen2Item -Context $ctx -FileSystem $filesystemName -Path $dirname).ACL
$acl = Set-AzDataLakeGen2ItemAclObject -AccessControlType user -EntityID aaaaaaaa-bbbb-cccc-1111-222222222222 -Permission r-x -InputObject $acl
Update-AzDataLakeGen2Item -Context $ctx -FileSystem $filesystemName -Path $dirname -Acl $acl
Note
To update a default ACL entry, use the -DefaultScope parameter when you run the Set-AzDataLakeGen2ItemAclObject command. For example: $acl = Set-AzDataLakeGen2ItemAclObject -AccessControlType user -EntityID aaaaaaaa-bbbb-cccc-1111-222222222222 -Permission r-x -DefaultScope.
Update ACLs recursively
Update ACLs recursively by using the Update-AzDataLakeGen2AclRecursive cmdlet.
This example updates an ACL entry with write permission.
$filesystemName = "my-container"
$dirname = "my-parent-directory/"
$userID = "xxxxxxxx-xxxx-xxxx-xxxx-xxxxxxxxxxxx";

$acl = Set-AzDataLakeGen2ItemAclObject -AccessControlType user -EntityId $userID -Permission rwx

Update-AzDataLakeGen2AclRecursive -Context $ctx -FileSystem $filesystemName -Path $dirname -Acl $acl
Note
To set the ACL of a specific group or user, service principal, or managed identity, use their respective object IDs. For example, to set the ACL of a group, use group:xxxxxxxx-xxxx-xxxx-xxxx-xxxxxxxxxxxx. To set the ACL of a user, use user:xxxxxxxx-xxxx-xxxx-xxxx-xxxxxxxxxxxx.
To see an example that updates ACLs recursively in batches by specifying a batch size, see the Update-AzDataLakeGen2AclRecursive reference article.
Remove ACL entries
This section shows you how to:
- Remove an ACL entry
- Remove ACL entries recursively
Remove an ACL entry
This example removes an entry from an existing ACL. It reuses the $ctx storage account context and the $acl, $filesystemName, and $dirname variables established in earlier sections of this article.
$id = "xxxxxxxxx-xxxx-xxxx-xxxx-xxxxxxxxxxxx"

# Create the new ACL object.
[Collections.Generic.List[System.Object]]$aclnew =$acl

foreach ($a in $aclnew)
{
    if ($a.AccessControlType -eq "User" -and $a.DefaultScope -eq $false -and $a.EntityId -eq $id)
    {
        $aclnew.Remove($a);
        break;
    }
}
Update-AzDataLakeGen2Item -Context $ctx -FileSystem $filesystemName -Path $dirname -Acl $aclnew
Remove ACL entries recursively
You can remove one or more ACL entries recursively. To remove an ACL entry, create a new ACL object for the ACL entry you want to remove, and then use that object in the remove ACL operation. Don't get the existing ACL, just provide the ACL entries to remove.
Remove ACL entries by using the Remove-AzDataLakeGen2AclRecursive cmdlet.
This example removes an ACL entry from the root directory of the container.
$filesystemName = "my-container"
$userID = "xxxxxxxx-xxxx-xxxx-xxxx-xxxxxxxxxxxx"

$acl = Set-AzDataLakeGen2ItemAclObject -AccessControlType user -EntityId $userID -Permission "---"

Remove-AzDataLakeGen2AclRecursive -Context $ctx -FileSystem $filesystemName  -Acl $acl
Note
To remove a default ACL entry, use the -DefaultScope parameter when you run the Set-AzDataLakeGen2ItemAclObject command. For example: $acl = Set-AzDataLakeGen2ItemAclObject -AccessControlType user -EntityId $userID -Permission "---" -DefaultScope.
To see an example that removes ACLs recursively in batches by specifying a batch size, see the Remove-AzDataLakeGen2AclRecursive reference article.
Recover from failures
You might encounter runtime or permission errors when modifying ACLs recursively. The examples in this section reuse the $ctx storage account context and the $filesystemName, $dirname, and $acl variables established in earlier sections of this article.
For runtime errors, restart the process from the beginning. Permission errors can occur if the security principal doesn't have sufficient permission to modify the ACL of a directory or file that's in the directory hierarchy that you're modifying. Address the permission issue, and then choose to either resume the process from the point of failure by using a continuation token, or restart the process from the beginning. You don't have to use the continuation token if you prefer to restart from the beginning. You can reapply ACL entries without any negative impact.
This example returns results to the variable, and then pipes failed entries to a formatted table.
$result = Set-AzDataLakeGen2AclRecursive -Context $ctx -FileSystem $filesystemName -Path $dirname -Acl $acl
$result
$result.FailedEntries | ft
Based on the output of the table, you can fix any permission errors, and then resume execution by using the continuation token.
$result = Set-AzDataLakeGen2AclRecursive -Context $ctx -FileSystem $filesystemName -Path $dirname -Acl $acl -ContinuationToken $result.ContinuationToken
$result
To see an example that sets ACLs recursively in batches by specifying a batch size, see the Set-AzDataLakeGen2AclRecursive reference article.
If you want the process to complete uninterrupted by permission errors, you can configure it to do so.
This example uses the ContinueOnFailure parameter so that execution continues even if the operation encounters a permission error.
$result = Set-AzDataLakeGen2AclRecursive -Context $ctx -FileSystem $filesystemName -Path $dirname -Acl $acl -ContinueOnFailure

echo "[Result Summary]"
echo "TotalDirectoriesSuccessfulCount: `t$($result.TotalDirectoriesSuccessfulCount)"
echo "TotalFilesSuccessfulCount: `t`t`t$($result.TotalFilesSuccessfulCount)"
echo "TotalFailureCount: `t`t`t`t`t$($result.TotalFailureCount)"
echo "FailedEntries:"$($result.FailedEntries | ft)
To see an example that sets ACLs recursively in batches by specifying a batch size, see the Set-AzDataLakeGen2AclRecursive reference article.
Best practices
This section provides you some best practice guidelines for setting ACLs recursively.
Handling runtime errors
A runtime error can occur for many reasons (For example: an outage or a client connectivity issue). If you encounter a runtime error, restart the recursive ACL process. ACLs can be reapplied to items without causing a negative impact.
Handling permission errors (403)
If you encounter an access control exception while running a recursive ACL process, your AD security principal might not have sufficient permission to apply an ACL to one or more of the child items in the directory hierarchy. When a permission error occurs, the process stops and a continuation token is provided. Fix the permission issue, and then use the continuation token to process the remaining dataset. The directories and files that have already been successfully processed won't have to be processed again. You can also choose to restart the recursive ACL process. ACLs can be reapplied to items without causing a negative impact.
Credentials
We recommend that you provision a Microsoft Entra security principal that has been assigned the Storage Blob Data Owner role in the scope of the target storage account or container.
Performance
To reduce latency, we recommend that you run the recursive ACL process in an Azure Virtual Machine (VM) that is located in the same region as your storage account.
ACL limits
The maximum number of ACLs that you can apply to a directory or file is 32 access ACLs and 32 default ACLs. For more information, see Access control in Azure Data Lake Storage Gen2.