Configure BGP peering to an NVA - Azure portal
This article helps you configure an Azure Virtual WAN hub router to peer with a Network Virtual Appliance (NVA) in your virtual network using BGP Peering using the Azure portal. The virtual hub router learns routes from the NVA in a spoke VNet that is connected to a virtual WAN hub. The virtual hub router also advertises the virtual network routes to the NVA. For more information, see Scenario: BGP peering with a virtual hub. You can also create this configuration using Azure PowerShell.
Prerequisites
Verify that you've met the following criteria before beginning your configuration:
You have an Azure subscription. If you don't have an Azure subscription, create a free account.
You have a virtual network to which you want to connect.
- Verify that none of the subnets of your on-premises networks overlap with the virtual networks that you want to connect to.
- To create a virtual network in the Azure portal, see the Quickstart article.
Your virtual network must not have any existing virtual network gateways.
- If your virtual network already has gateways (VPN or ExpressRoute), you must remove all of the gateways before proceeding.
- This configuration requires that virtual networks connect to the Virtual WAN hub gateway only.
Decide the IP address range that you want to use for your virtual hub private address space. This information is used when configuring your virtual hub. A virtual hub is a virtual network that is created and used by Virtual WAN. It's the core of your Virtual WAN network in a region. The address space range must conform the certain rules:
- The address range that you specify for the hub can't overlap with any of the existing virtual networks that you connect to.
- The address range can't overlap with the on-premises address ranges that you connect to.
- If you're unfamiliar with the IP address ranges located in your on-premises network configuration, coordinate with someone who can provide those details for you.
Create a virtual WAN
In the portal, in the Search resources bar, type Virtual WAN in the search box and select Enter.
Select Virtual WANs from the results. On the Virtual WANs page, select + Create to open the Create WAN page.
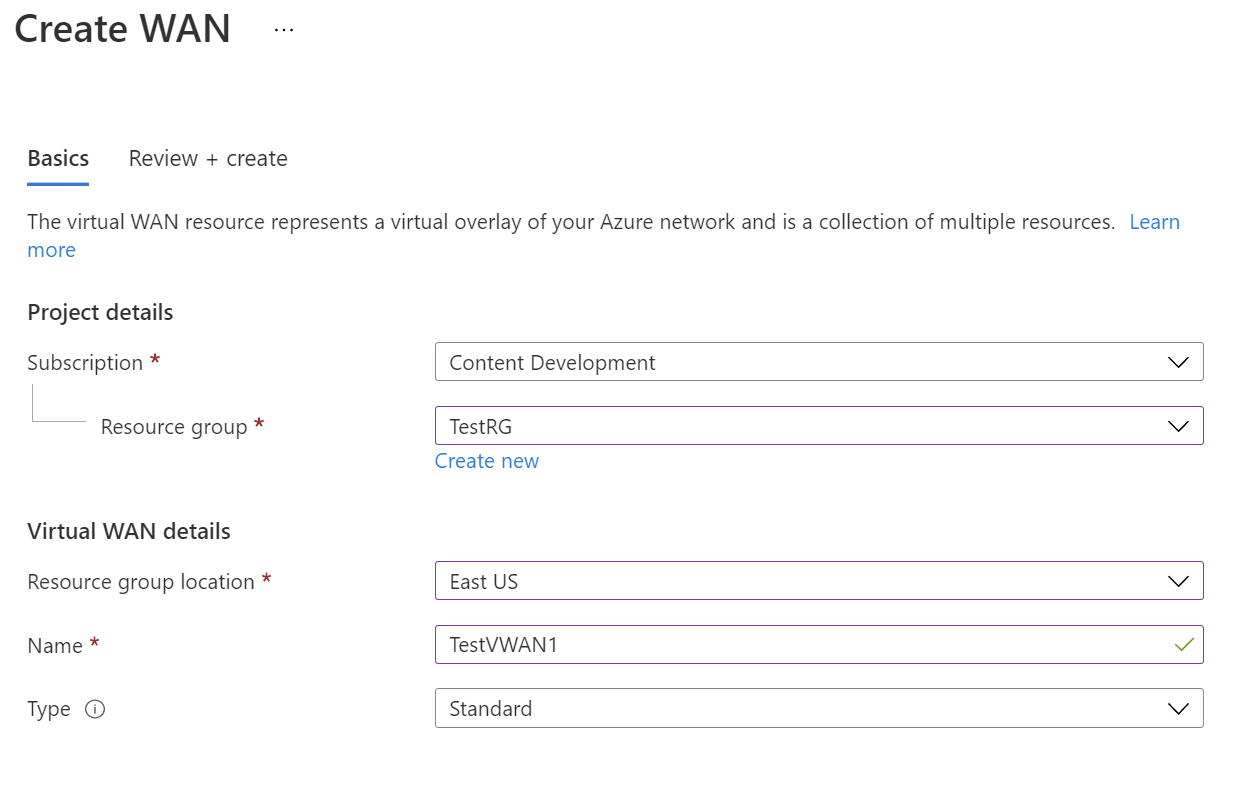
On the Create WAN page, on the Basics tab, fill in the fields. Modify the example values to apply to your environment.

- Subscription: Select the subscription that you want to use.
- Resource group: Create new or use existing.
- Resource group location: Choose a resource location from the dropdown. A WAN is a global resource and doesn't live in a particular region. However, you must select a region in order to manage and locate the WAN resource that you create.
- Name: Type the Name that you want to call your virtual WAN.
- Type: Basic or Standard. Select Standard. If you select Basic, understand that Basic virtual WANs can only contain Basic hubs. Basic hubs can only be used for site-to-site connections.
After you finish filling out the fields, at the bottom of the page, select Review +Create.
Once validation passes, click Create to create the virtual WAN.
Create a hub
A hub is a virtual network that can contain gateways for site-to-site, ExpressRoute, or point-to-site functionality. Once the hub is created, you'll be charged for the hub, even if you don't attach any sites.
Go to the virtual WAN that you created. On the virtual WAN page left pane, under the Connectivity, select Hubs.
On the Hubs page, select +New Hub to open the Create virtual hub page.
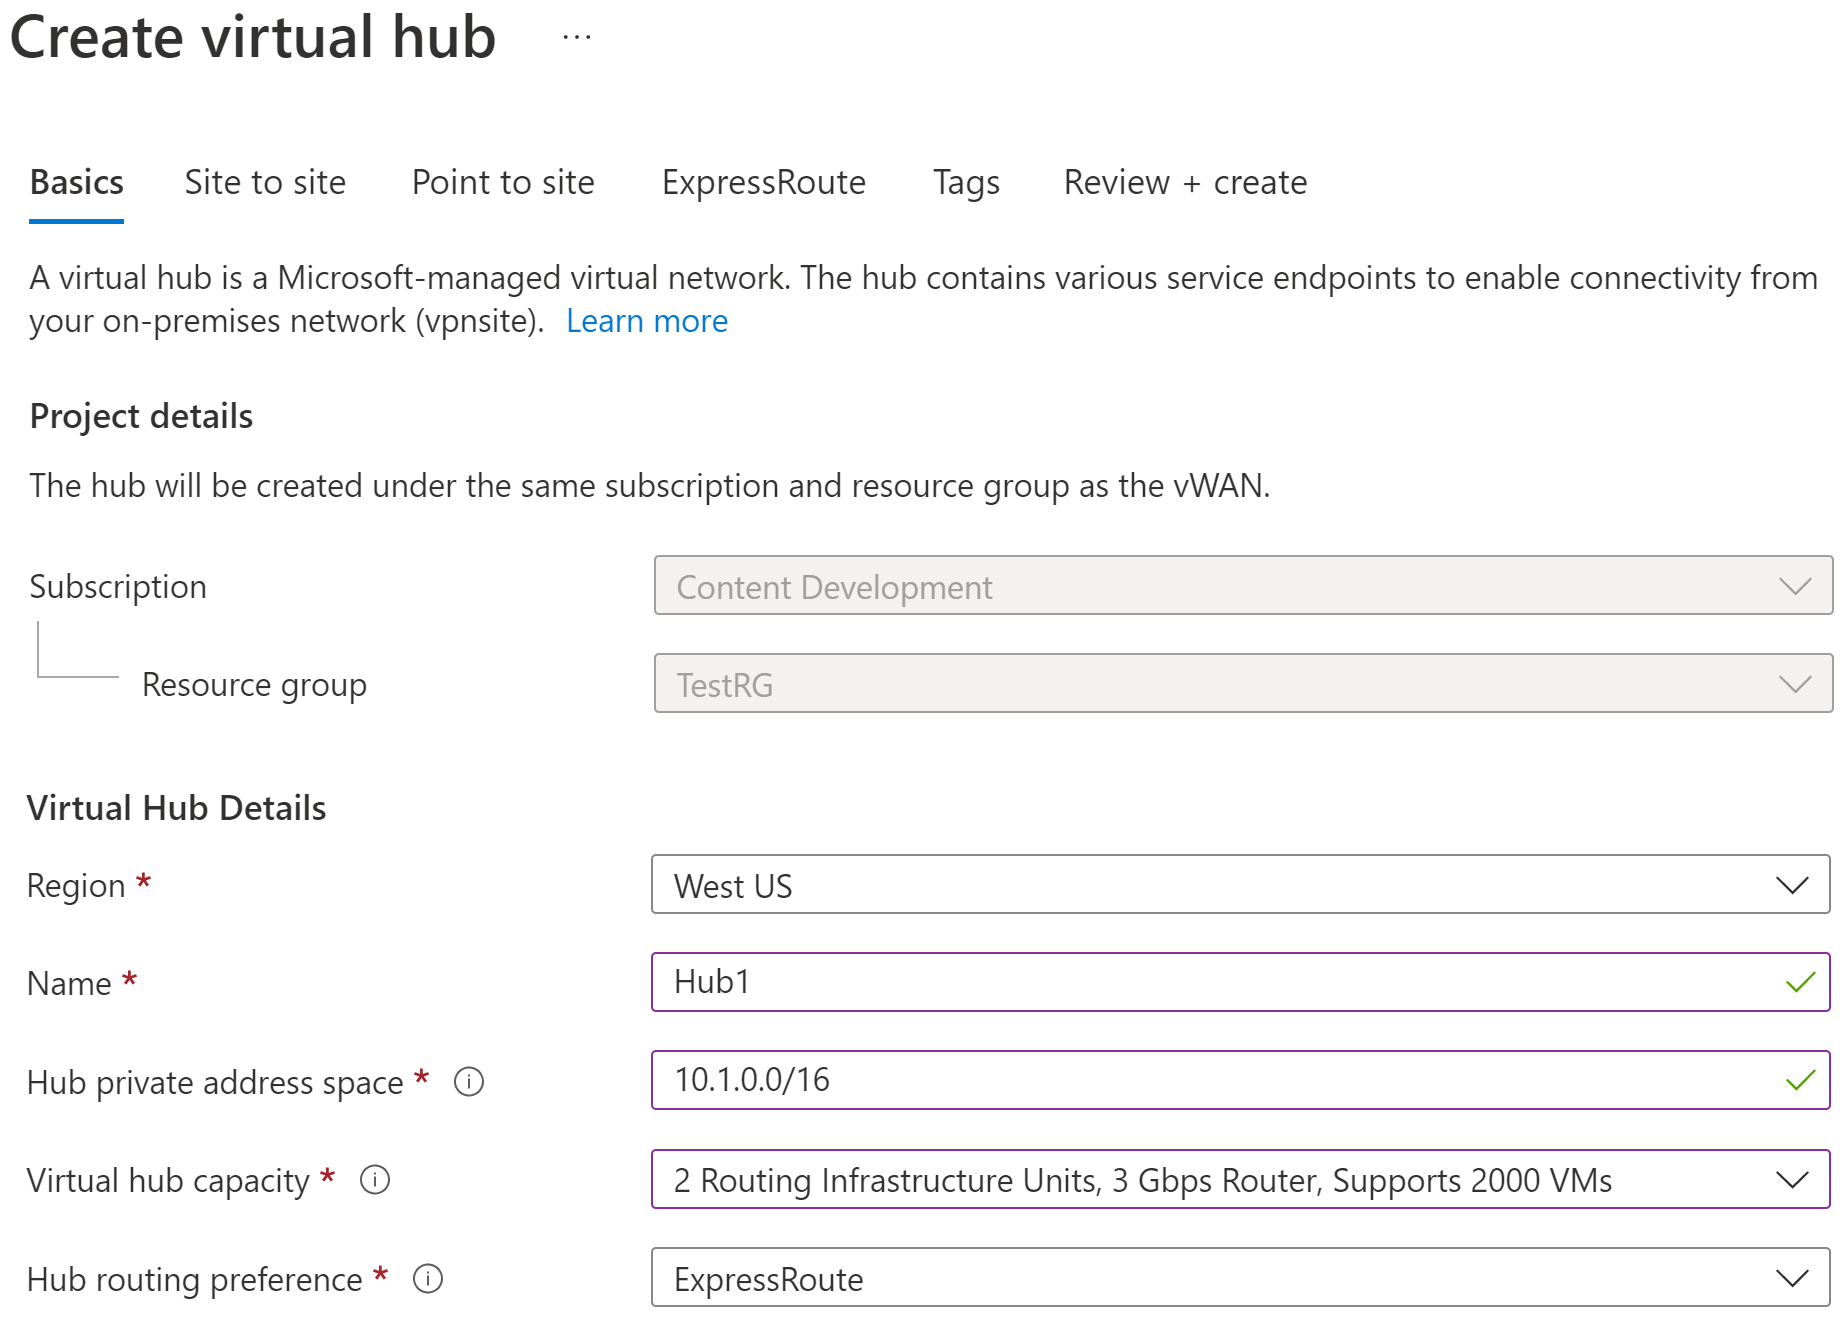
On the Create virtual hub page Basics tab, complete the following fields:
- Region: Select the region in which you want to deploy the virtual hub.
- Name: The name by which you want the virtual hub to be known.
- Hub private address space: The hub's address range in CIDR notation. The minimum address space is /24 to create a hub.
- Virtual hub capacity: Select from the dropdown. For more information, see Virtual hub settings.
- Hub routing preference: Leave as default. For more information, see Virtual hub routing preference.
Once you have the settings configured, click Review + Create to validate, then click Create. The hub will begin provisioning. After the hub is created, go to the hub's Overview page. When provisioning is completed, the Routing status is Provisioned.
Connect the VNet to the hub
After your hub router status is provisioned, create a connection between your hub and VNet.
In the Azure portal, go to your Virtual WAN In the left pane, select Virtual network connections.
On the Virtual network connections page, select + Add connection.
On the Add connection page, configure the connection settings. For information about routing settings, see About routing.
- Connection name: Name your connection.
- Hubs: Select the hub you want to associate with this connection.
- Subscription: Verify the subscription.
- Resource group: Select the resource group that contains the virtual network to which you want to connect.
- Virtual network: Select the virtual network you want to connect to this hub. The virtual network you select can't have an already existing virtual network gateway.
- Propagate to none: This is set to No by default. Changing the switch to Yes makes the configuration options for Propagate to Route Tables and Propagate to labels unavailable for configuration.
- Associate Route Table: From the dropdown, you can select a route table that you want to associate.
- Propagate to labels: Labels are a logical group of route tables. For this setting, select from the dropdown.
- Static routes: Configure static routes, if necessary. Configure static routes for Network Virtual Appliances (if applicable). Virtual WAN supports a single next hop IP for static route in a virtual network connection. For example, if you have a separate virtual appliance for ingress and egress traffic flows, it would be best to have the virtual appliances in separate VNets and attach the VNets to the virtual hub.
- Bypass Next Hop IP for workloads within this VNet: This setting lets you deploy NVAs and other workloads into the same VNet without forcing all the traffic through the NVA. This setting can only be configured when you're configuring a new connection. If you want to use this setting for a connection you've already created, delete the connection, then add a new connection.
- Propagate static route: This setting is currently being rolled out. This setting lets you propagate static routes defined in the Static routes section to route tables specified in Propagate to Route Tables. Additionally, routes will be propagated to route tables that have labels specified as Propagate to labels. These routes can be propagated inter-hub, except for the default route 0/0. This feature is in the process of rolling out. If you need this feature enabled please open a support case
Once you've completed the settings you want to configure, click Create to create the connection.
Configure a BGP peer
Sign in to the Azure portal.
On the portal page for your virtual WAN, in the left pane, select Hubs to view the list of hubs. Click a hub to configure a BGP peer.
On the Virtual Hub page, in the left pane, select BGP Peers. On the BGP Peers page, click + Add to add a BGP peer.

On the Add BGP Peer page, complete the following fields.
- Name – Resource name to identify a specific BGP peer.
- ASN – The ASN for the BGP peer.
- IPv4 address – The IPv4 address of the BGP peer.
- Virtual Network connection – Choose the connection identifier that corresponds to the Virtual network that hosts the BGP peer.
Click Add to complete the BGP peer configuration. You can view the peer on the BGP Peers page.

Modify a BGP peer
- On the Virtual Hub resource, go to the BGP Peers page.
- Select the BGP peer.
- Click … at the end of the line for the peer, then select Edit from the dropdown.
- On the Edit BGP Peer page, make any necessary changes, then click Add.
Delete a BGP peer
- On the Virtual Hub resource, go to the BGP Peers page.
- Select the BGP peer.
- Click … at the end of the line for the peer, then select Delete from the dropdown.
- Click Confirm to confirm that you want to delete this resource.
Next steps
For more information about BGP scenarios, see Scenario: BGP peering with a virtual hub.


