Deploy the Higher Education Crisis Financial Impact Tracker app
The Higher Education Crisis Financial Impact Tracker app requires a small amount of setup to adapt to your needs. This article provides step-by-step instructions for university IT admins to deploy and configure the app for their organization.
See the overview video about how to download and deploy the solution, or follow the steps in this article. Estimated time to complete these steps: 30–35 minutes
Demo: Quick overview of how to download and deploy the solution
Watch a quick overview about how to download and deploy the solution.
Step 1: Download the deployment package
Download the latest deployment package (.zip) from here. Before extracting the .zip file, ensure that you unblock it.
To unblock the .zip file:
Right-click to select the .zip file, and then select Properties.
In the Properties dialog box, select Unblock, and then select Apply followed by OK.
When you extract the .zip file, you see the following components in the extracted folder.
| Component | File name | Description |
|---|---|---|
| AppIcons | Higher Education Crisis Financial Impact Tracker.png | Sample app icon. |
| Data | Import Templates | Individual entity template for data load files in .xlsx (Excel) format. The files are arranged in the order in which they should be imported. |
| Data | Sample Data | Individual entity sample data in .xlsx (Excel) format. The files are arranged in the order in which they should be imported. |
| Package | Higher Education Crisis Financial Impact Tracker app package-related files. | Complete list of files required to deploy the app. |
| Power BI Template | PBITemplate.pbix | A sample Power BI template to connect to the app's Microsoft Dataverse instance. |
Step 2: Sign up for Power Apps, and create an environment
Sign up for Power Apps if you don't have it already, and purchase an appropriate license. More information: Power Apps pricing
After you purchase Power Apps, create an environment with a Dataverse database.
Sign in to the Power Platform admin center.
Create a Dataverse environment with a database. More information: Create and manage environments
Important
If you select a security group for the database while creating it, remember that any apps can be shared only with users who are members of that security group.
Create users, and assign appropriate security roles. More information: Create users and assign security roles
Step 3: Install the app
Follow the steps below to install and configure the Higher Education Crisis Financial Impact Tracker app.
Install the app from the deployment package
Go to the folder where you extracted the deployment package (.zip file). You'll find a Package folder. Open the Package folder, and then double-click to select PackageDeployer.exe.
On the next screen, select Continue.
You'll be prompted to connect to your environment. Select Office 365 as the Deployment Type, select Show Advanced, and then enter your credentials to connect to your environment.
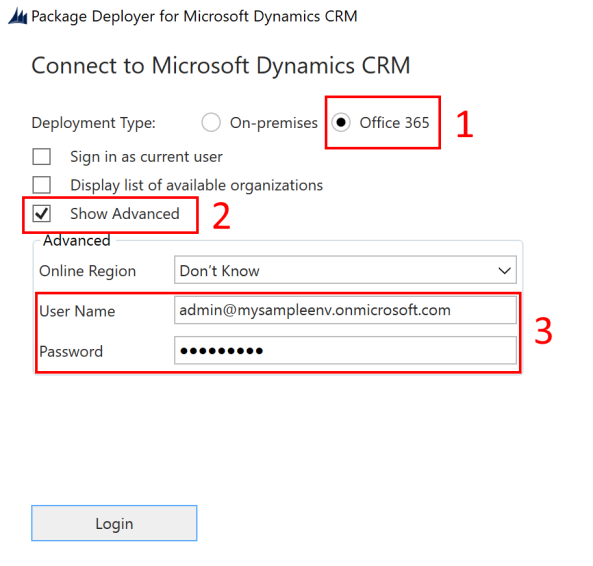
Select Login to continue.
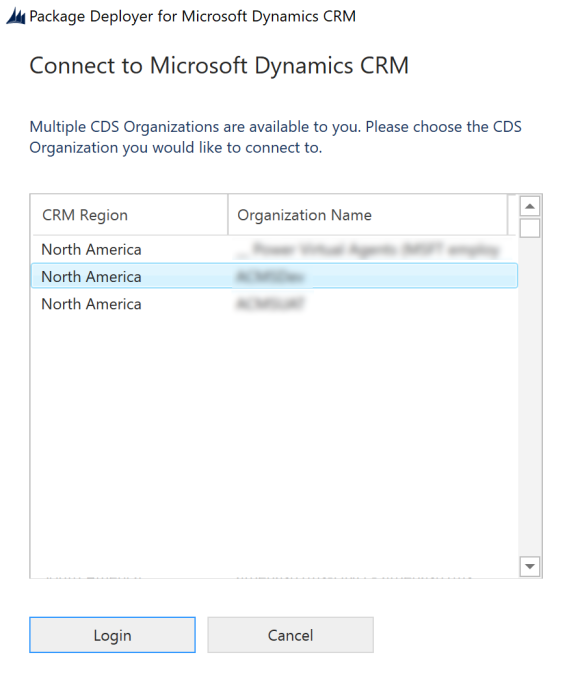
If you have access to more than one Dataverse environment, the next screen prompts you to select from the list of available environments where you want to install the package. Select the environment you want, and then select Login.
On the next screen, select Next.
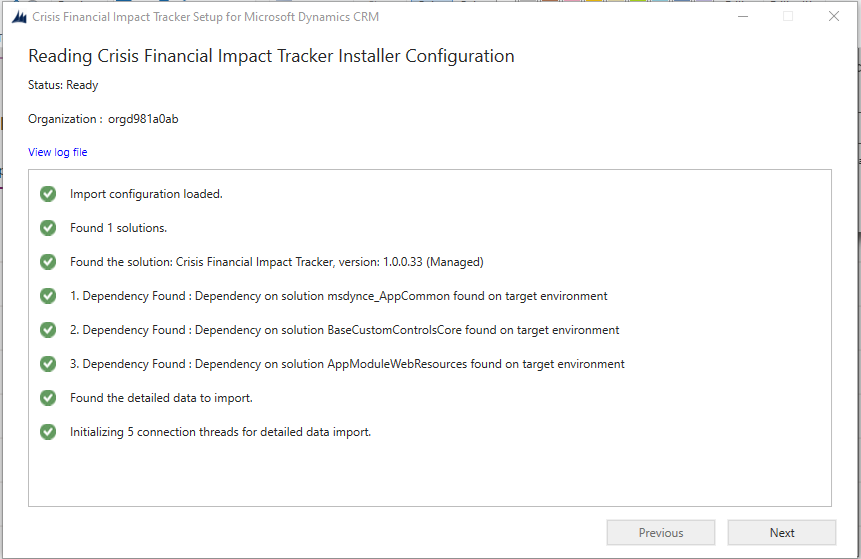
The next screen displays the environment name where the package is installed. Review the information, and then select Next.
The next screen validates whether the package can be installed on your environment. Select Next to continue with the installation.
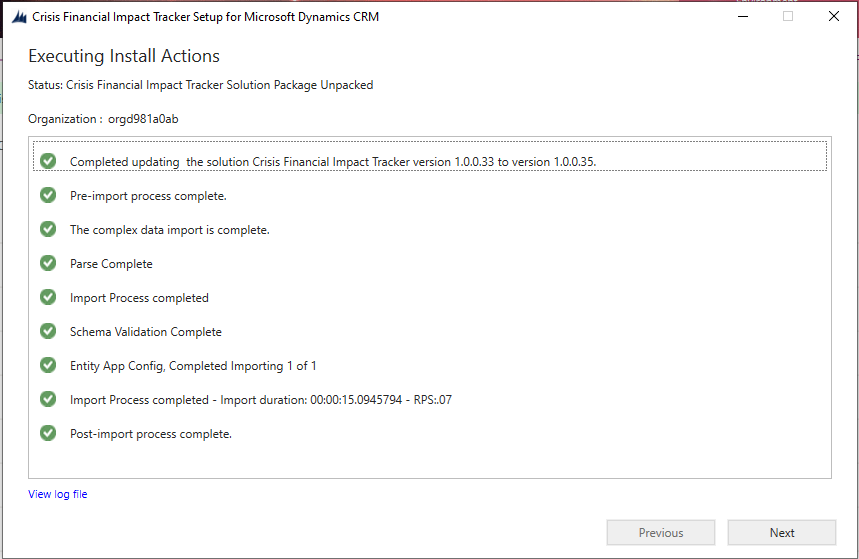
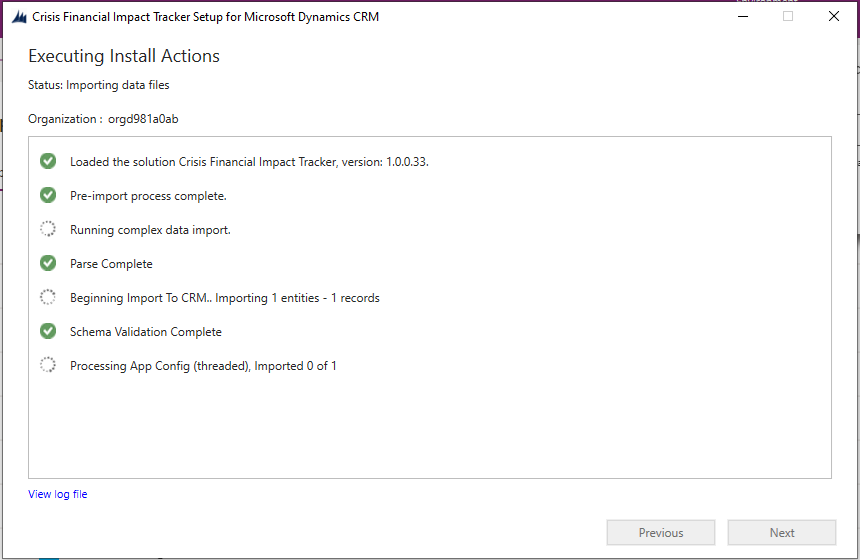
The next screen displays the installation status of the package. After the installation is complete, select Next.
Note
It might take a while for the package installation to be completed.
On the next screen, select Finish to complete and close the setup.
After the app is installed, go to Power Apps and select your environment from the upper-right corner. You'll see the new app under Apps.
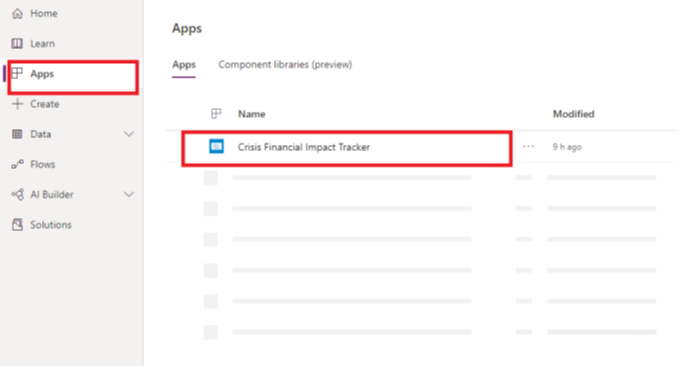
The installation also adds the configuration data for the Higher Education Crisis Financial Impact Tracker app.
Select Higher Education Crisis Financial Impact Tracker App to open the model-driven app and configure the rest of the deployment settings. This app has several entities where you can add and manage data for your university system. You can use the area picker on the lower part of the left pane to select a different area.
Step 4: Update the app branding and tracking level
You can change the app icon, color scheme, or display name to match the branding of your organization. You use the App Configs entity in the Administration area.
Open the admin app, and on the left pane, select Administration from the area picker, and then select App Configs. This shows all the records that you imported from the AppConfig.xlsx file.
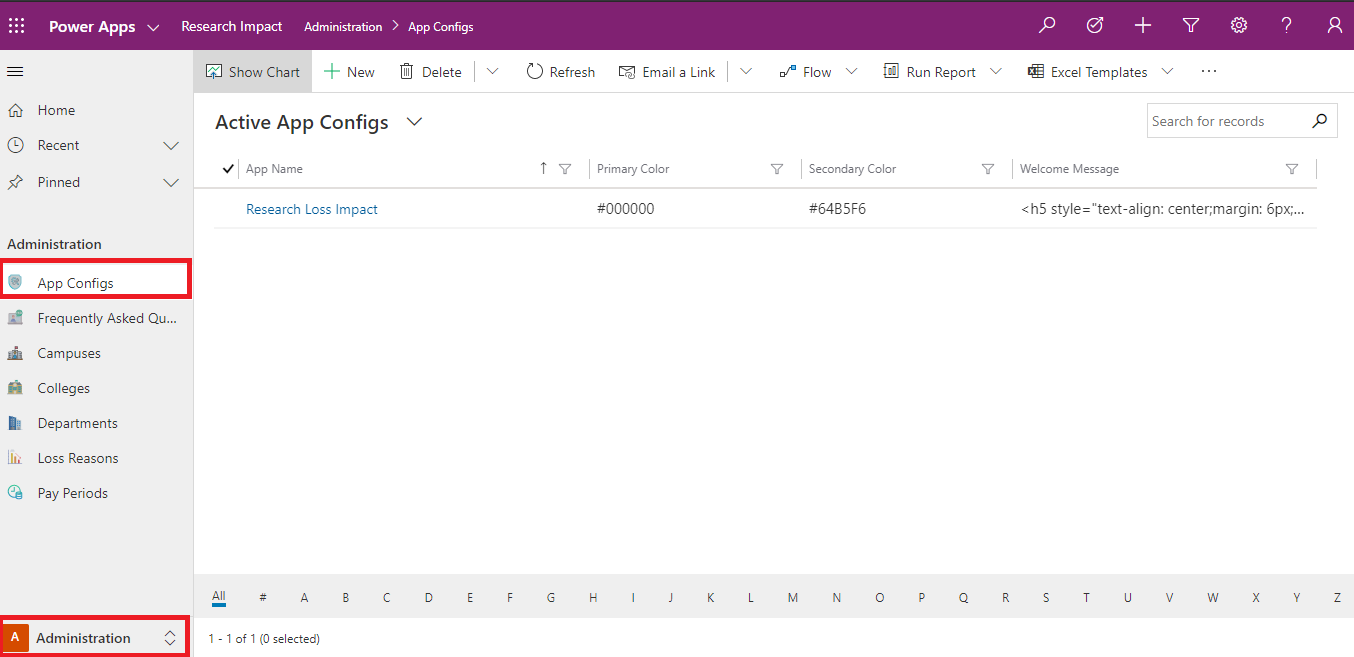
Select the Higher Education Crisis Financial Impact Tracker record.
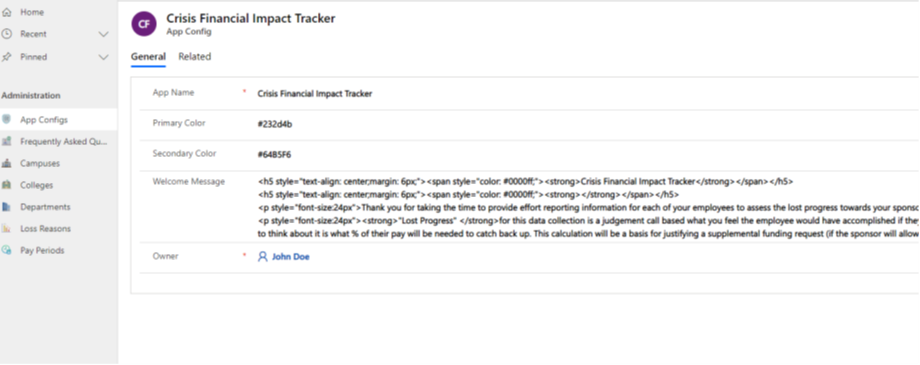
On the app details page, do the following:
Double-click to select the app icon, and then select an icon file for the app from the AppIcons folder. The image files are named intuitively so that you can easily select the correct icon. For example, select the
Higher Education Crisis Financial Impact Tracker.pngfile for Higher Education Crisis Financial Impact Tracker. You can also select a custom image in accordance with your organization's branding.If necessary, update the App Name.
If necessary, update the Primary and secondary color value of the app to set the display colors of the app in the app list.
If necessary, update the welcome message in HTML format that you want your users to see on initial sign-in.
Select Save.
Step 5: Share canvas apps with the users in your organization
For users to use and consume the data by using the apps on their mobile devices, the apps must be shared with them. It's easiest to use Azure Active Directory (Azure AD) groups to share apps with groups of users.
Sign in to Power Apps.
On the left pane, select Apps to view the list of all your apps.
Select the app you want, and then select Share.
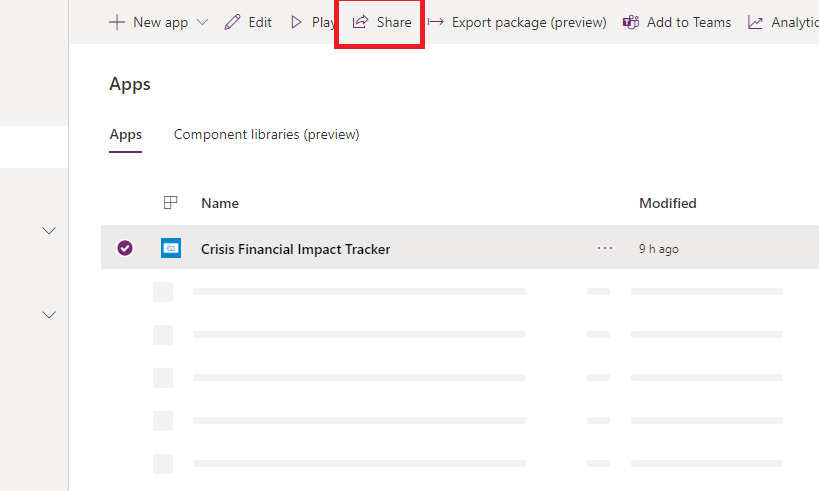
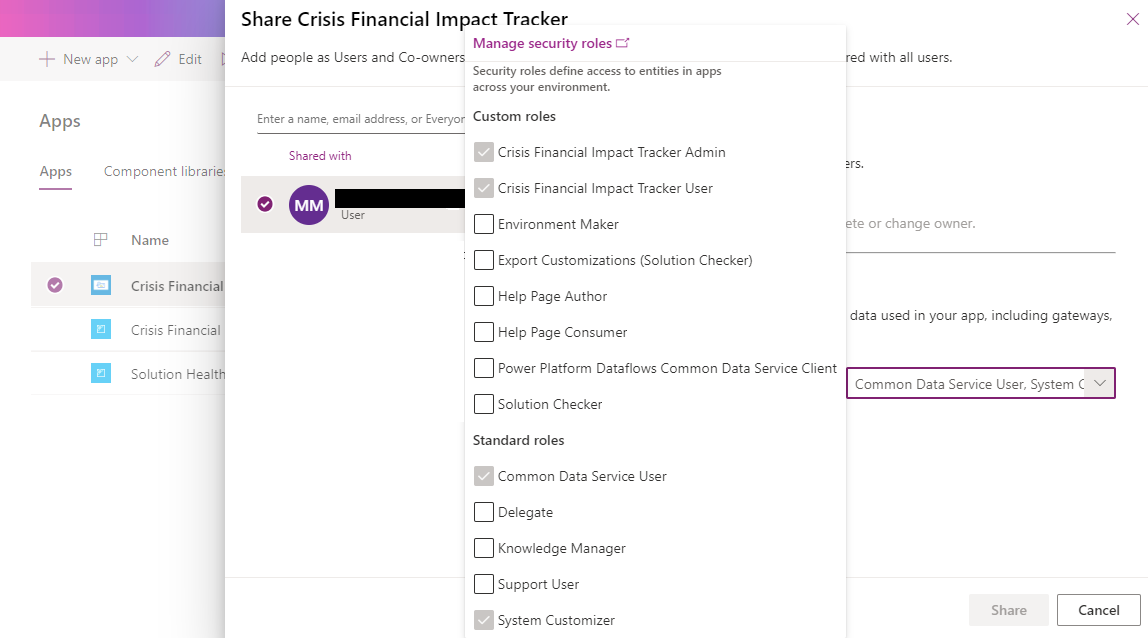
Specify the Azure AD group or users who you want to share this app with. Because the app connects to Dataverse data, you also need to provide permissions to the entities. The sharing panel prompts you to manage security for the entities. Assign the Higher Education Crisis Financial Impact Tracker User and Common Data Service User security roles to the entities used by this app, and then select Share.
Step 6: Share the model-driven app with admins in your organization
For admin users to use the admin app (the model-driven app), it must be shared with them. It's easiest to use Azure AD groups to share apps with a group of admin users.
Sign in to Power Apps.
On the left pane, select Apps to view a list of all your apps.
Select the model-driven app Higher Education Crisis Financial Impact Tracker App, and then select Share on the banner.
Specify the Azure AD group or admin users who you want to share this app with, assign them the Higher Education Crisis Financial Impact Tracker App User security role, and then select Share.
Issues and feedback
- To report an issue with the Higher Education Crisis Financial Impact Tracker app, visit https://aka.ms/crisis-financial-impact-tracker-issues.
- For feedback about Higher Education Crisis Financial Impact Tracker app, visit https://aka.ms/crisis-financial-impact-tracker-feedback.