Note
Access to this page requires authorization. You can try signing in or changing directories.
Access to this page requires authorization. You can try changing directories.
By following this guided scenario, you can deploy Windows 365 Boot to shared Windows 11 Pro or Enterprise physical devices. Windows 365 Boot lets physical device users sign in directly to their Cloud PCs, without signing in to their physical devices.
This guide steps you through defining:
- Autopilot device name templates and resource name prefixes.
- Windows update settings.
- VPN profile, Wifi profile, and language settings.
- Group assignments to identify which physical devices are set up for Windows 365 Boot.
For more information about guided scenarios in general, see Intune guided scenarios overview.
Prerequisites
Each physical device and Cloud PC must be running Windows 11 Enterprise or Professional, version 22621.3374 or later.
A Windows 365 Enterprise license is required to make Windows 365 Boot provisioning policies.
You must have the Intune Service Administrator role.
Before adding physical devices to the group, you must ensure that they meet the Windows 365 Boot requirements.
You can complete the guided scenario before there are any devices in the group. After devices are added to the group, and have internet access, they'll automatically get updated with the Windows 365 Boot settings defined in the guided scenario.
Step 1 - Introduction
- Sign in to the Microsoft Intune admin center as a user with the Intune Service Administrator role.
- Select Devices > Cloud PC Overview > Windows 365 Boot (under Windows 365 guides).
- On the Introduction page, select Next: Basics.
Step 2 - Basics
Choose how your devices are named when they enroll, and choose the prefix of all the resources created.
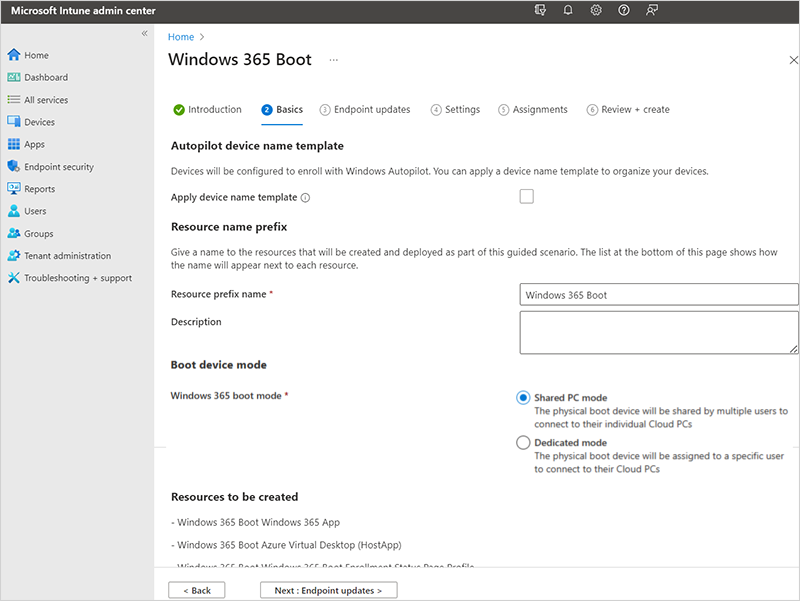
Autopilot device name template: This guided scenario enrolls your devices in Windows Autopilot. When they enroll, you can optionally name your devices using a unique pattern that applies to all devices. Your options:
Apply device name template: If you don't check this box, then no template or pattern is created when naming your devices. The device gets the OEM name, such as DESKTOP-, followed by some random characters. Select the box to create a unique pattern to name your devices. For example, enter Contoso-%RAND:7% to name all your devices Contoso- followed by seven random characters.
The names:
- Must be 15 characters or less.
- Can include letters (a-z, A-Z), numbers (0-9), and hyphens.
- Can't be only numbers, and can't include a blank space.
- Can use the %SERIAL% macro to add a hardware-specific serial number.
- Can use the %RAND:x% macro to add a random string of characters, where x equals the number of characters to add.
Resource name prefix: When you deploy this guided scenario, several resources are automatically created. To distinguish the items used in this deployment, add a prefix.
Enter a resource prefix name: Enter some text to put at the beginning of the items created. For example, enter
Windows 365 Boot. All resources created are named something like Windows 365 Boot Azure Virtual Desktop (HostApp).Boot device mode: Select one of the following options:
- Shared PC mode: For physical devices shared by multiple users
- Dedicated mode: For a physical device used by one specific user.
Select Next: Endpoint updates.
Step 3 - Endpoint updates
On the Endpoint updates page, set the options that you want to use for Windows Updates on the physical devices. Make sure that your choices comply with your organization's security requirements. Select Next: Settings.
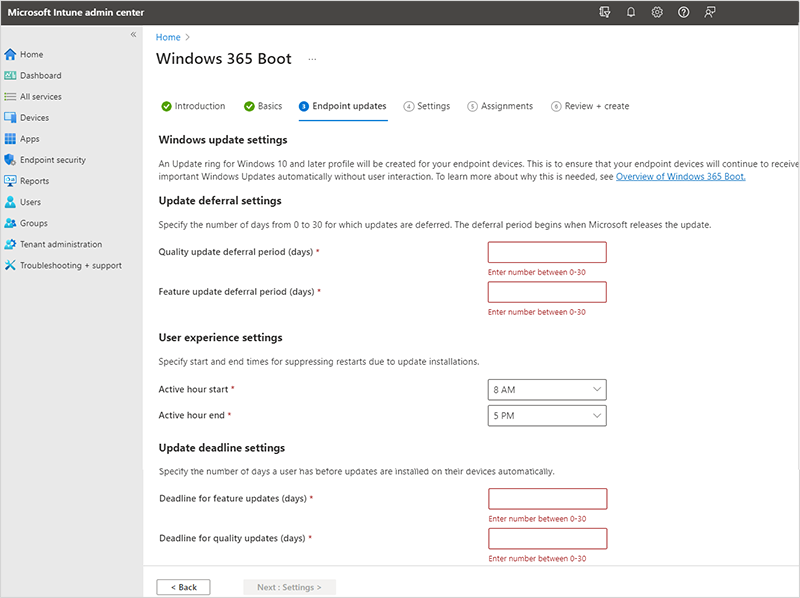
Windows 365 Boot supports Windows Autopatch to automate patch management to Windows 365 Boot physical devices. If you use this automation, it should be configured outside this guided scenario.
Step 4 - Settings
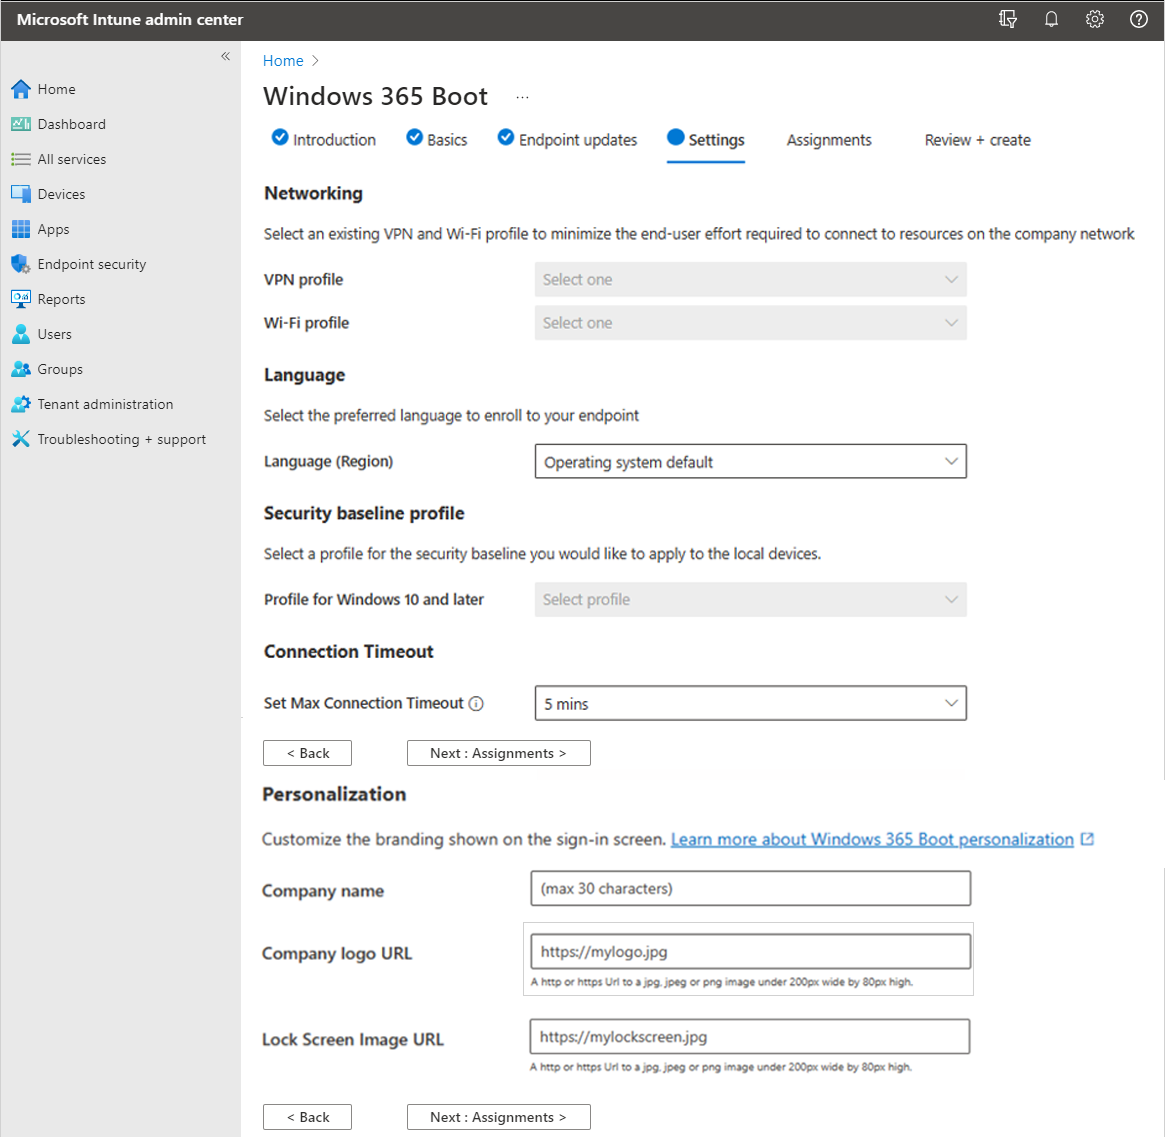
- (Optional) On the Settings page, select the VPN profile and Wifi profile to use for Windows 365 Boot physical devices. When you select an existing WiFi or VPN profile, if the profile is already assigned to All Users or All Devices, this assignment is removed and replaced with a new assignment that only targets the Windows 365 group created or selected in this guided scenario.
- (Optional) If you don't want to use the operating system's default language, select a specific Language (region) > Next: Assignments.
- (Optional) Select the Security baseline profile to use for Windows 365 Boot physical devices.
- (Optional) Select a value for the Set Max Connection time-out for Windows 365 Boot. The operating system waits for a connection until the selected time-out value is reached. For more information, see SetMaxConnectionTimeout policy configuration service provider (CSP).
- (Optional) If you want to customize the branding shown at the top of the sign-in screen, provide any or all of the following information:
- Company name
- Company logo URL
- Lock screen image URL
Step 5 - Assignments
Select the groups that you want to receive this guided scenario, and all the resources it creates. You can assign existing groups, or create new ones and assign them.
Create new group: Creates a new group, and deploys the guided scenario policies to this group. As devices are added to this group, they receive the resources from this guided scenario.
- Group name: Enter the group name. For example, enter
Windows 365 boot physical devices.
- Group name: Enter the group name. For example, enter
Choose an existing group: Select an existing group. Your guided scenario resources are deployed to this group.
You can also choose user groups to assign the physical device access policy to. This policy allows users to access the local desktop on the physical device by using the CTRL-ALT-DEL screen or any error screens. You can choose to apply the CTRL-ALT-DEL screen access, the error screen access, none, or both, to any user group. You can assign this policy to an existing group or create a new group for the policy.
For more information about the physical device access feature, see Enable or restrict access to physical device.
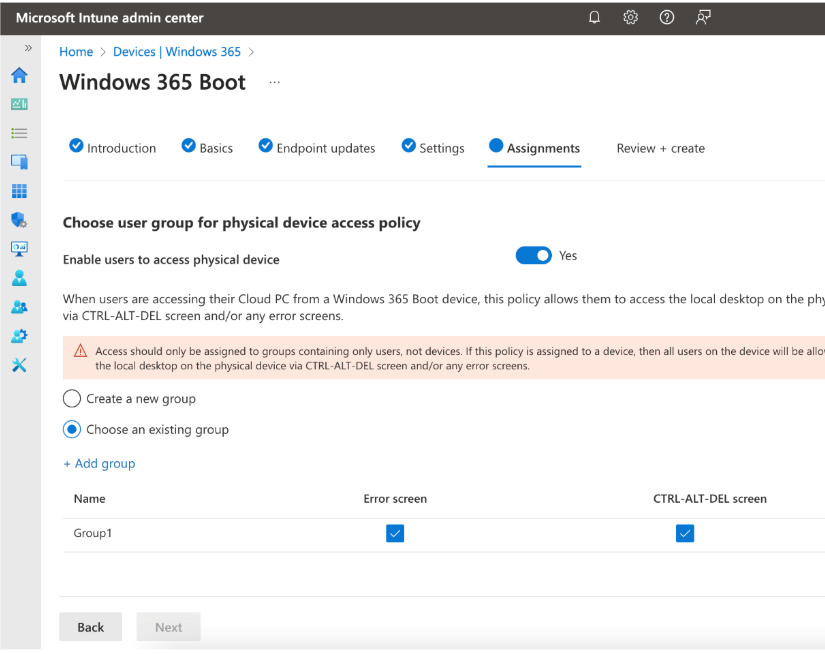
When you're done assigning groups, select Next: Review + create.
You can complete the guided scenario before there are any devices in the group. When devices are added to the group, and have internet access, they automatically start receiving the policies in this guided scenario.
You can also add preregistered Windows Autopilot devices to the group. Add them to the group before you enroll or apply any policies. For steps to set up new devices with Windows Autopilot, see Windows 365 Boot physical device requirements.
Step 6 - Review + create
A summary of the settings and the values you configured are shown. You can go back to the other tabs, and change any values you added.
When you're satisfied with the settings, select Create.
Step 7 (Optional) - Self-deployment mode
Self-deployment mode is a configuration in Windows Autopilot that allows a device to deploy without user interaction. It's ideal for scenarios like shared devices or kiosk-style setups.
If you've already completed the Guided Scenario, a User-Driven Autopilot profile is created to provision Windows 365 Boot devices. Follow these steps to switch to Self-Deploying mode:
Create a new Autopilot deployment profile:
In the Microsoft Intune admin center, go to Devices > Enrollment > Windows Autopilot > Deployment Profiles.
Select + Create profile, then choose Windows PC.
Enter a name for the profile.
Under Deployment mode, select Self-Deploying from the dropdown.
Complete the rest of the profile settings as needed and select Next,
Under Assignments leave the Included groups set to "No groups selected" for now, click Next then Create.
Change group assignment:
Go back to the User-Driven profile created previously using the Guided Scenario.
Under Properties > Assignments click Edit.
Take note of the name of the currently assigned group, then click Remove to unassign the profile. Click Review+Save then Save.
Open the new Self-Deploying profile you just created.
Under Properties > Assignments click Edit then add the same group to assign the new profile.
Manually set up Windows 365 Boot without the Intune guided scenario
The Windows 365 Boot guided scenario is the recommended way to configure physical devices for Windows 365 Boot. The guided scenario creates and assigns the resources you need automatically.
In some environments, however, the guided scenario isn't available or doesn't complete successfully. In these cases, you can deploy Windows 365 Boot manually by creating the same resources yourself in the Microsoft Intune admin center. These steps walk you through each resource you need and how to assign it.
The manual deployment described here creates the three core resources that the guided scenario creates:
- A Microsoft Store app that installs the Windows App on the physical device.
- A device-targeted Settings Catalog profile that turns on Windows 365 Boot in either shared mode or dedicated mode.
- (Optional) A user-targeted Settings Catalog profile that lets users return to their physical device sign-in screen from the Ctrl+Alt+Delete screen, Cloud PC error screens, or both.
Items such as Autopilot deployment profiles, enrollment status pages, Windows Update rings, Wi-Fi or VPN profiles, language packs, and security baselines aren't covered here. Configure those resources to match your organization's standards, the same way you would for any other Intune-managed device. For more information, see Windows 365 Boot physical device requirements.
Manual Set-up Prerequisites
Before you start, make sure that:
- Each physical device meets the device requirements of Windows 365 Boot physical device requirements.
- Each user has a Windows 365 license and a provisioned Cloud PC.
- You have the Intune Service Administrator role (or equivalent custom role) in the Microsoft Intune admin center.
- You have a Microsoft Entra group that contains the physical devices that you want to configure for Windows 365 Boot. If you're also configuring return-to-physical-device access, you also need a user group that contains the users that you want to grant that access to.
Step 1: Add the Windows App to Microsoft Intune
The Windows App is the client that runs on the physical device and connects users to their Cloud PCs. Deploy it as a required Microsoft Store app so that it's installed on every Windows 365 Boot physical device.
Sign in to the Microsoft Intune admin center.
Select Apps > All apps > Create.
In the Select app type pane, select Windows as the Platform and under App type, select Microsoft Store app (new) and hit Select
On the App information page, select Search the Microsoft Store app.
In the search box, enter
Windows App. Select the entry with the publisher Microsoft Corp and the package identifier9N1F85V9T8BN, then select Select.Review the prepopulated app information. For Install behavior, select System.
Note
Windows 365 Boot requires the Windows App to be installed in System context so that it's available to every user that signs in to the physical device.
Select Next.
On the Assignments page, under Required, select Add group and select the Microsoft Entra group that contains your Windows 365 Boot physical devices. Select Next.
On the Review + create page, review your selections and select Create.
It can take up to several hours for the app to install on devices, depending on when the device next checks in with Intune.
Step 2: Configure the device for Windows 365 Boot
Create a device-targeted Settings Catalog profile that enables Windows 365 Boot on the physical device. Choose the mode that matches how the device will be used:
- Shared mode: Multiple users sign in to the same physical device, each connecting to their own Cloud PC. Recommended for shift workers and shared devices.
- Dedicated mode: One specific user signs in to the physical device. Supports Windows Hello for Business.
For a comparison of the two modes, see Windows 365 Boot overview.
Create the configuration profile
In the Microsoft Intune admin center, select Devices > Manage devices > Configuration > Create > New policy.
In Create a profile, enter the following values, then select Create:
Setting Value Platform Windows 10 and later Profile type Settings catalog On the Basics page, enter a Name and Description, for example
Windows 365 Boot - Device configuration. Select Next.On the Configuration settings page, select Add settings.
In the Settings picker, search for
Cloud Desktop.Under the Cloud Desktop category, select the Boot To Cloud PC Enhanced setting, and, optionally, the Set Max Connection Timeout. Close the Settings picker.
Set Boot To Cloud PC Enhanced to one of the following values:
Value Description Enable Boot to Cloud Shared PC Mode Multiple users can sign in to the same physical device and connect to their own Cloud PC. Enable Boot to Cloud Dedicated Mode (Cloud only) A single user signs in to the physical device. Supports Windows Hello for Business. Note
The Boot To Cloud PC Enhanced setting matches what the Windows 365 Boot guided scenario configures. For more information, see CloudDesktop CSP.
(Optional) Set Set Max Connection Timeout to the desired value (5 minutes to 20 minutes).
Select Next.
On the Scope tags page, add scope tags if your organization uses them, then select Next.
On the Assignments page, under Included groups, select Add groups and select the Microsoft Entra group that contains your Windows 365 Boot physical devices. Select Next.
On the Review + create page, review your selections and select Create.
About shared mode and the SharedPC configuration service provider
When you select Enable Boot to Cloud Shared PC Mode, Windows 365 Boot uses the SharedPC configuration service provider on the physical device to support fast user switching, account cleanup, and account-less sign-in. You don't need to create a separate Shared multi-user device profile in Intune; the Windows 365 Boot Cloud Desktop CSP applies the required SharedPC settings for you.
If your organization already manages other Shared PC configuration on these devices, review those policies for conflicts before deploying Windows 365 Boot.
Step 3 (Optional): Let users return to the physical device sign-in screen
By default, Windows 365 Boot physical devices don't let users sign in to the physical device directly. If a user can't reach their Cloud PC (for example, during an internet outage), they have no way to use the physical device.
To give users a way out, you can create a user-targeted Settings Catalog profile that adds a Return to physical PC sign in button. You can show this button from either or both of the following screens:
- The Ctrl+Alt+Delete screen.
- Windows 365 error screens that appear when the Windows App can't reach the Cloud PC, or you get disconnected from your Cloud PC session.
These settings are user-scoped, so the configuration profile must be assigned to a user group (not a device group).
Note
The return-to-physical-device settings require Windows 11, version 23H2 (OS build 22621.4249) or later on the physical device. For more information, see Allow user access to the physical device.
Create the configuration profile
In the Microsoft Intune admin center, select Devices > Manage devices > Configuration > Create > New policy.
In Create a profile, enter the following values, then select Create:
Setting Value Platform Windows 10 and later Profile type Settings catalog On the Basics page, enter a Name and Description, for example
Windows 365 Boot - Return to physical device access. Select Next.On the Configuration settings page, select Add settings.
In the Settings picker, search for
Cloud Desktop.Under the Cloud Desktop category, select one or both of the following settings, depending on where you want the Return to physical PC sign in button to appear:
Setting Where the button appears Enable Physical Device Access On Ctrl Alt Del (User) The Ctrl+Alt+Delete screen on the physical device. Enable Physical Device Access On Error Screens (User) Cloud PC error screens shown by the Windows App. Close the Settings picker and set each selected setting to enabled. Setting a value to disabled (or leaving it unconfigured) hides the button on that screen.
Select Next.
On the Scope tags page, add scope tags if your organization uses them, then select Next.
On the Assignments page, under Included groups, select Add groups and select the Microsoft Entra user group that contains the users you want to allow physical device access for. Select Next.
On the Review + create page, review your selections and select Create.
For more information about how this feature behaves and what's supported, see Restrict user access to Windows 365 Boot physical device.
Step 4: Add physical devices to the Windows 365 Boot device group
After the app and configuration profiles are created and assigned, add your physical devices to the Microsoft Entra device group that you used in steps 1 and 2:
- Register each physical device with Windows Autopilot if it isn't already.
- In the Microsoft Intune admin center, select Groups > All groups, and then select the device group.
- Select Members > Add members, search for the physical device by serial number, select it, and then select Select.
- Wait several minutes for the assignments to apply.
When the device next syncs with Intune, the Windows App is installed and the Windows 365 Boot Cloud Desktop CSPs are applied. After the device restarts and the user signs in, they're taken directly to their Cloud PC.
(Recommended) Restrict access to the physical device
Windows 365 Boot doesn't automatically lock down every aspect of the physical device. To help meet your organization's security requirements, review the additional configuration service providers documented in Restrict user access to Windows 365 Boot physical device. Common policies to consider include:
- Disabling Task Manager from the Ctrl+Alt+Delete screen.
- Preventing users from changing their physical device password.
- Hiding the Notification Center and disabling toast notifications.
- Preventing physical device drive redirection into the Cloud PC.
You can deploy these settings in the same Settings Catalog profile that you created in Step 2, or in a separate profile that you assign to the same device group.
(Optional) Use App Control for Business or AppLocker to further lock down the device
If you enabled the return-to-physical-device experience in Step 3, users have a path to the local Windows 11 desktop on the physical device. The Cloud Desktop CSPs alone don't restrict what users can launch on that local desktop. To reduce the risk of users running unapproved software when they fall back to the physical device, you can deploy an application control policy:
- App Control for Business (formerly Windows Defender Application Control / WDAC) is the recommended modern application control technology on Windows 11. It can be deployed and managed directly from Microsoft Intune.
- AppLocker is still supported and may be appropriate if your organization already maintains AppLocker rule sets.
Important
Any allowlist-style application control policy that you deploy to a Windows 365 Boot physical device must allow the Windows App to run. If the Windows App is blocked, the device can't connect to the Cloud PC and Windows 365 Boot fails to start.
When you author your policy, include rules that allow the following packaged app:
- Package family name:
MicrosoftCorporationII.Windows365_8wekyb3d8bbwe - Publisher:
CN=Microsoft Corporation, O=Microsoft Corporation, L=Redmond, S=Washington, C=US
Test the policy in audit mode before enforcing it, and use the Event Viewer to confirm that the Windows App and any helper processes aren't being blocked.
To deploy an application control policy through Intune, assign it to the same Microsoft Entra device group that you used in Step 2.
For more information, see:
- Application Control for Windows – overview of App Control for Business, including planning and authoring guidance.
- Manage approved apps for Windows devices with App Control for Business policy and Managed Installers for Microsoft Intune – how to deploy App Control for Business policies from the Microsoft Intune admin center.
- AppLocker overview – overview and rule reference for AppLocker.
- Manage AppLocker policies with Intune – how to deploy AppLocker rules through Intune.
Verify the configuration
After deployment:
- Complete the Windows out-of-box experience (OOBE) on the physical device and let it enroll in Intune.
- Restart the device.
- At the sign-in screen, sign in with a user that has a Cloud PC. The user should be taken directly to their Cloud PC.
- If you configured Step 3, on the physical device, press Ctrl+Alt+Delete or trigger a Cloud PC connection error and confirm that the Return to physical PC sign in button appears.
If users can't reach their Cloud PC, see Troubleshoot Windows 365 Boot for diagnostic steps, including how to confirm that the expected registry keys and app versions are present on the physical device.
Next steps
- Windows 365 Boot physical device requirements
- Restrict user access to Windows 365 Boot physical device
- Troubleshoot Windows 365 Boot
- CloudDesktop CSP reference
For more information about guided scenarios, see Intune guided scenarios overview.