Note
Access to this page requires authorization. You can try signing in or changing directories.
Access to this page requires authorization. You can try changing directories.
If you have an existing Datadog organization on the US3 site and want to send Azure telemetry from a subscription to that organization, use this approach.
Note
If you don't have an existing Datadog organization, create a new Datadog organization instead.
Prerequisites
An Azure account with an active subscription is required. If you don't already have one, you can create an account for free.
Your Azure role must be set to Owner for the subscription. Confirm that you have the appropriate access before you begin.
- You must configure your environment.
- You must have an existing Datadog organization on the US3 site (
us3.datadoghq.com) with admin access.
Important
Linking only works with Datadog organizations on the US3 site. If your existing organization is on US1, US5, EU1, AP1, or any other Datadog site, you can't link it to an Azure subscription through this integration. In that case, create a new Datadog organization instead.
Create a Datadog resource linked to an existing organization
Begin by signing in to the Azure portal.
Type the name of the service in the header search bar.
Choose the service from the Services search results.
Select the + Create option under Link Azure subscription to an existing Datadog org.
The Create resource pane shows in the working pane with the Basics tab open by default.
Basics tab
The Basics tab has three sections:
- Project details
- Azure resource details
- Datadog organization details
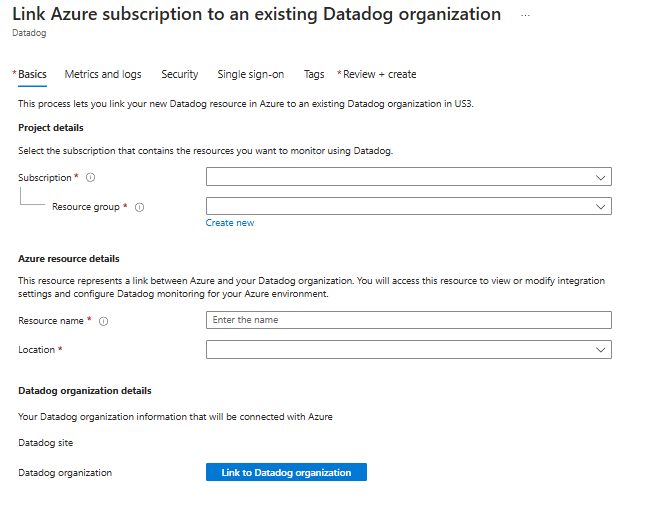
There are required fields (identified with a red asterisk) in the first two sections that you need to fill out.
Enter the values for each required setting under Project details.
Field Action Subscription Select a subscription from your existing subscriptions. Resource group Use an existing resource group, or create a new one. Enter the values for each required setting under Azure Resource details.
Field Action Resource name Specify a unique name for the resource. Location Select a region to deploy your resource. Select Link to Datadog organization under Datadog organization details.
A new window appears for Log in to Datadog.
Important
- By default, Azure links your current Datadog organization to your Datadog resource. If you'd like to link to a different organization, select the appropriate organization in the authentication window.
- You can't link the subscription to the same organization through a different Datadog resource if the subscription is already linked to an organization. This restriction prevents duplicate logs and metrics being shipped to the same organization for the same subscription.
Once you finish authenticating, return to the Azure portal.
Select the Next button at the bottom of the page.
Metrics and logs tab (optional)
Configure which Azure resources send metrics and logs to Datadog. You can change these settings at any time after creation.
For details on what gets forwarded and include/exclude examples, see tag rules for sending metrics and tag rules for sending logs in Monitor & Observe Azure resources with Azure Native Integrations.
| Setting | What it does |
|---|---|
| Silence monitoring for expected Azure VM Shutdowns | Suppresses alerts when VMs are stopped intentionally |
| Collect custom metrics from App Insights | Forwards Application Insights custom metrics to Datadog |
| Send subscription activity logs | Sends Azure subscription activity logs (management plane operations) to Datadog |
| Send Azure resource logs for all defined sources | Forwards resource diagnostic logs from all supported Azure resources to Datadog |
After you finish configuring metrics and logs, select Next.
Security tab (optional)
The Security tab controls two features:
| Setting | Default | What it does |
|---|---|---|
| Enable resource collection | On | Allows Datadog to collect metadata about your Azure resources — types, tags, and configurations — so they appear in the Datadog Resource Catalog for search, inventory, and infrastructure context. There's no additional Datadog charge for this. |
| Enable Datadog Cloud Security Posture Management | Off | Continuously assesses your Azure configuration against CIS, PCI DSS, SOC 2, HIPAA, and other benchmarks. Learn more about Cloud Security Posture Management. |
Important
Resource collection is enabled by default and we recommend keeping it on — it's what populates the Datadog Resource Catalog and gives every other Datadog product accurate Azure context. Cloud Security Posture Management (CSPM) is optional and can be enabled only when resource collection is on. If you turn resource collection off, the CSPM checkbox is disabled.
Select the Next button at the bottom of the page.
Single sign-on tab (optional)
If your organization uses Microsoft Entra ID as its identity provider, you can establish single sign-on from the Azure portal:
Select the checkbox.
The Azure portal retrieves the appropriate application from Microsoft Entra ID.
Select the app name.
Select Next.
Tags tab (optional)
Optionally, you can create tags for your resource. Then select Review + create.
Review + create tab
If the review finds no errors, the Create button becomes active. Select Create.
If the review identifies errors, a red dot appears next to each section where errors exist. To fix errors:
Open each section that has errors and fix the errors.
Fields with errors are highlighted in red.
Select Review + create again.
Select Create.
The message "Deployment is in progress" appears. When the deployment is complete, the message "Your deployment is complete" appears on the upper-right corner of the Azure portal.
After the resource is created, select Go to resource to view your resource.
Verify the link
After creation, verify the link to your existing organization:
- Navigate to your Datadog resource in the Azure portal.
- In the Overview pane, confirm the Datadog organization field shows your expected organization name.
- Select the Datadog portal link to open your organization. You should see your existing dashboards and monitors.
- Check Infrastructure > Host Map in the Datadog portal to confirm Azure hosts are appearing.
Tip
If you don't see Azure data flowing to your existing organization after 10 minutes, see Troubleshooting.