Note
Access to this page requires authorization. You can try signing in or changing directories.
Access to this page requires authorization. You can try changing directories.
Data security and integrity are essential in collaborative environments where multiple users work on a shared database. PowerTable sheets address your security requirements by enabling you to configure permissions for rows and columns at a granular level.
Important
This feature is in preview.
In this article, you learn how to set row and column access control permissions for your PowerTable app to ensure database security. You perform the following actions:
- Use the Manage Access menu to set row and column permissions, allowing or restricting specific users from performing certain actions (add, update, or delete).
- Set up rule-based access to rows and columns to further customize permissions.
To get started, select Setup > Manage Access.

Row access
From the Row Access pane, you can complete the following actions.
Add
In Row Access, under the Add section, you can specify who is allowed to add rows to the table:
- No one: Select this option to prevent users from adding new rows to your table.
- All users in this workspace: Select this option to allow everyone in the workspace to add records.
- Specific users: Select this option to allow only certain users to add rows. Enter the email addresses of the users or the Active Directory groups you wish to grant access.

Select Save to save and close the window.
Update
In the Update section, you can specify who has permission to update existing rows:
- No one: Choose this option to prevent users from updating rows.
- All users in this workspace: Select this option to allow all workspace users to update records.
- Specific users in this workspace: Choose this option to allow only certain workspace users to update the rows. Enter the user email addresses or the Active Directory group IDs that you want to allow.
- Rule-based access: Select this option to configure rules that specify the conditions under which a user or an Active Directory group can update rows in the table.

Add rule
Select Add Rule. Enter a name for the rule. Configure the filter criteria for the rule and add the required users. Only designated users can update product records that meet the configured condition.

You can configure multiple conditions and combine them using And or Or.

You can create multiple rules based on specific criteria and assign the appropriate users to each rule.

When you're done, select Save.
Delete
In the Delete section, you can specify which workspace users can delete rows.

Delete type
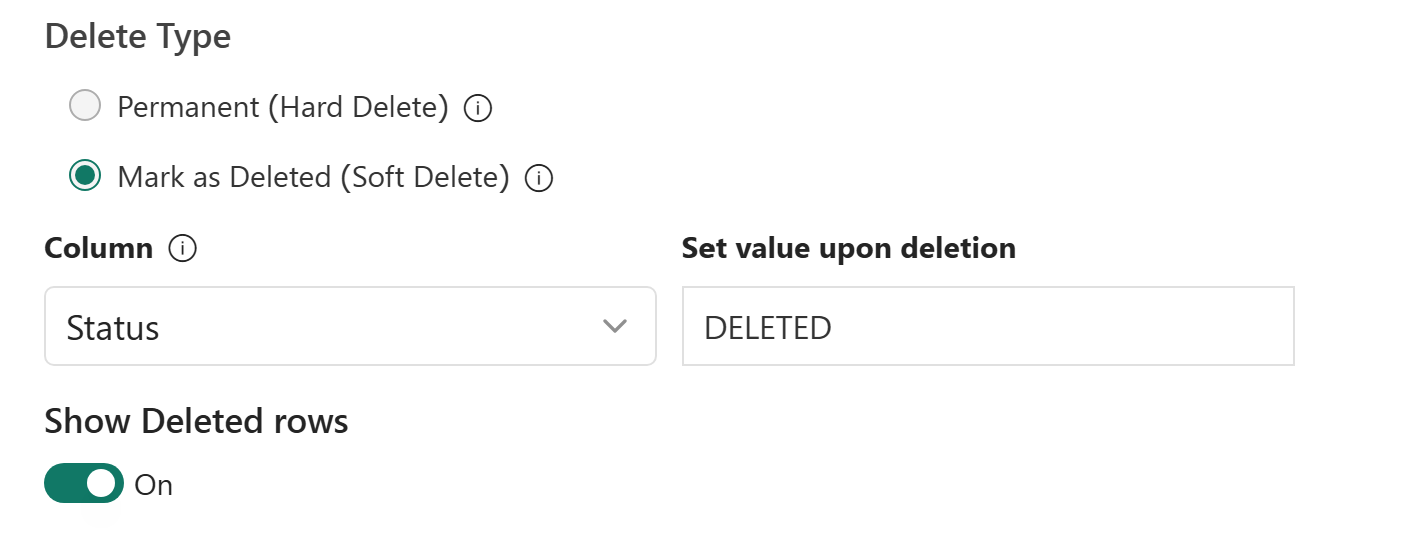
With the Delete Type option, you can configure whether users can delete rows permanently or do a soft delete.
Permanent (Hard Delete): If you select this option, the deleted rows are removed from the database permanently.
Mark as Deleted (Soft Delete): If you select this option, the deleted rows remain in the database but are marked as deleted. When a row is deleted, a specific value is assigned to an existing table column.
For instance, you might assign the value DELETED to the Status column for the rows that are deleted.
Deleting a row doesn't remove the row. Instead, it marks it as deleted.

Note
In this example, a new column called Status was created using Add Database Column to track deleted rows.
Show deleted rows
While soft-deleting rows, if the Show Deleted rows option is selected, the deleted rows are shown in a grayed-out format.
When this option is unchecked, the deleted rows are hidden from the table.
You can use the audit log to keep track of all changes, including the list of permanently deleted and soft-deleted rows.

Finish the rule
After configuring the add, update, and delete permissions, select Save.
Column access
Just as you can configure row permissions, you can also set column permissions.
By default, all workspace users who have access to the PowerTable item can view and modify all columns.
To set up access permissions to the columns,
Select Setup > Manage Access.
Choose Column Access.
To set permissions for a column, enter the name or email address of the users to whom you wish to provide the access in the Who Can Edit field.
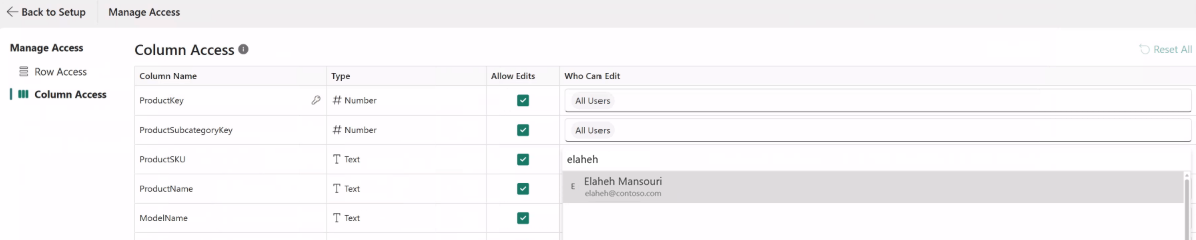
You can add multiple users. You can also enter the email address of an organizational group or an Active Directory list.
Clear Allow Edits to prevent users from editing specific columns, such as sensitive data or critical information that should remain unchanged. As a best practice, keep the primary key field locked so that it can't be edited.
Select Save to save the settings.

In addition to row-level access control, you can also set up approval workflows so that every change made by a user goes through a review and approval process.