Quickstart: Protect an ASP.NET Core web API with the Microsoft identity platform
This quickstart uses an ASP.NET Core web API code sample to demonstrate how to restrict resource access to authorized accounts. The sample uses ASP.NET Core Identity that interacts with Microsoft Authentication Library (MSAL) to handle authentication.
Prerequisites
- Azure account with an active subscription. If you don't already have one, Create an account for free.
- A minimum requirement of .NET 6.0 SDK
- Visual Studio 2022 or Visual Studio Code
Register the application and record identifiers
Tip
Steps in this article might vary slightly based on the portal you start from.
To complete registration, provide the application a name and specify the supported account types. Once registered, the application Overview page displays the identifiers needed in the application source code.
Sign in to the Microsoft Entra admin center as at least an Application Developer.
If you have access to multiple tenants, use the Settings icon
 in the top menu to switch to the tenant in which you want to register the application from the Directories + subscriptions menu.
Browse to Identity > Applications > App registrations.
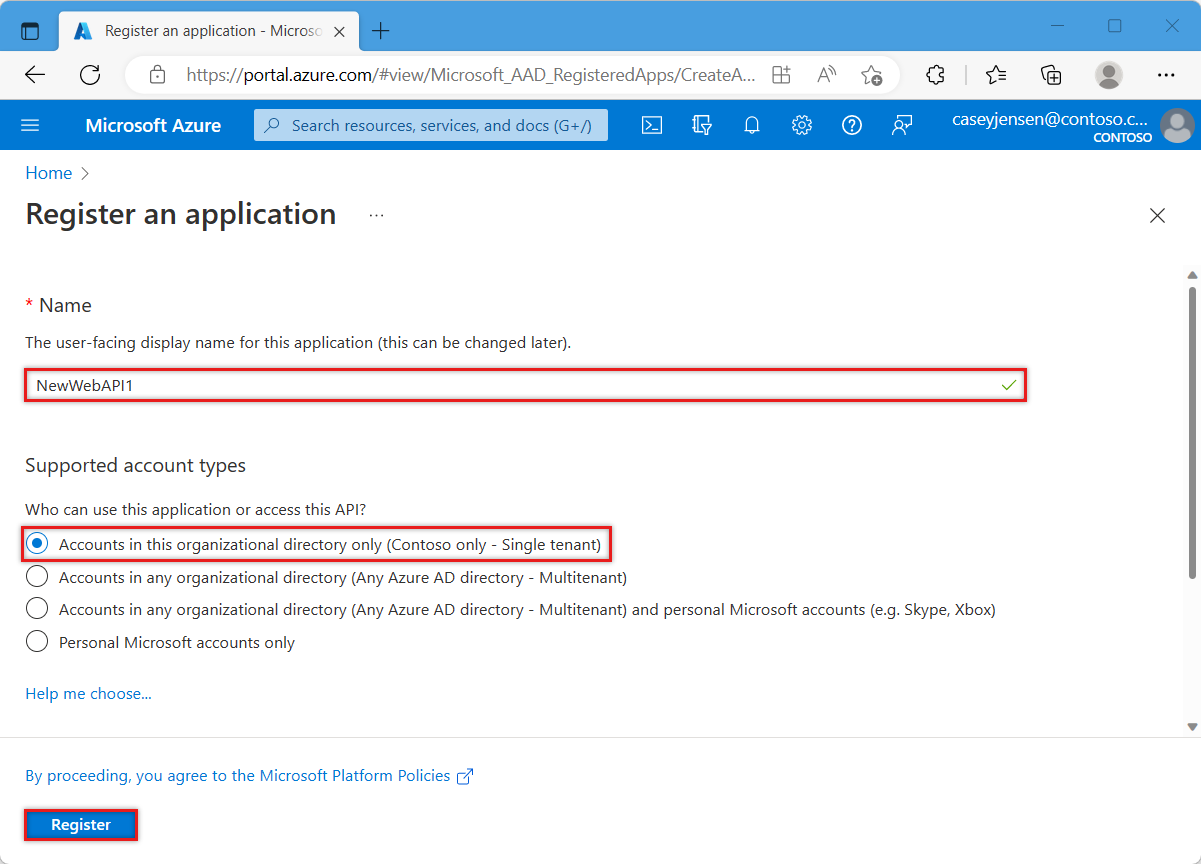
Select New registration.
Enter a Name for the application, such as NewWebAPI1.
For Supported account types, select Accounts in this organizational directory only. For information on different account types, select Help me choose option.
Select Register.
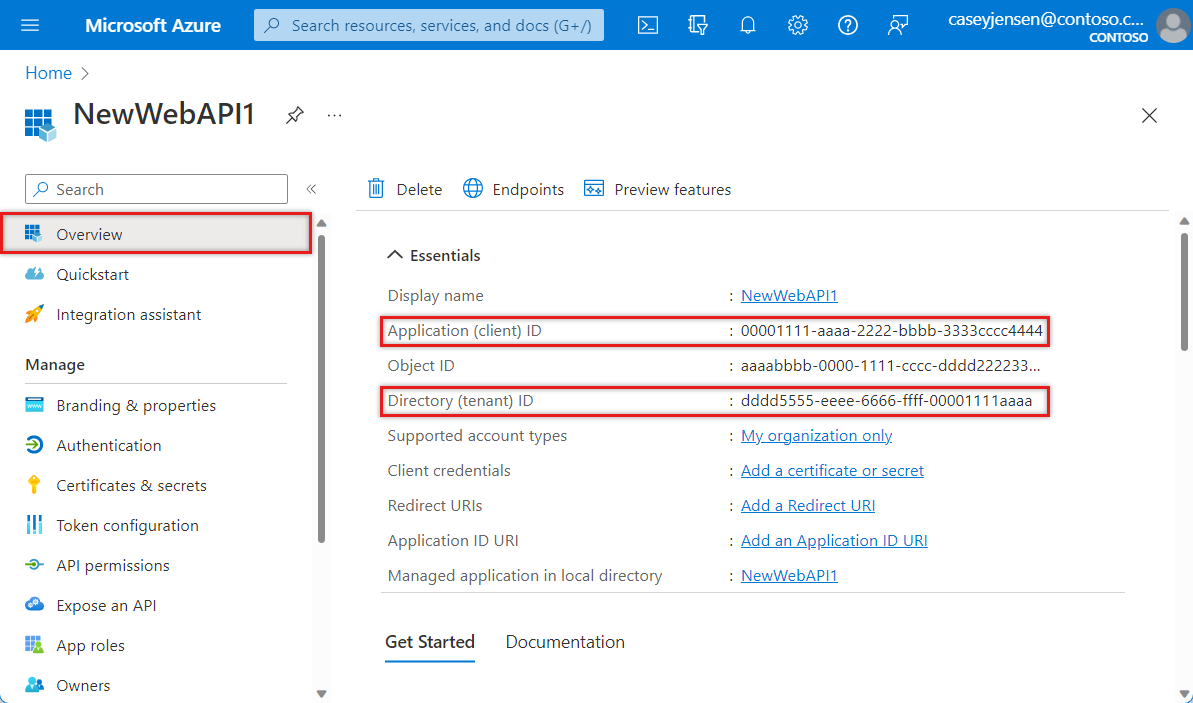
The application's Overview pane is displayed when registration is complete. Record the Directory (tenant) ID and the Application (client) ID to be used in your application source code.
Note
The Supported account types can be changed by referring to Modify the accounts supported by an application.
Expose an API
Once the API is registered, you can configure its permission by defining the scopes that the API exposes to client applications. Client applications request permission to perform operations by passing an access token along with its requests to the protected web API. The web API then performs the requested operation only if the access token it receives contains the required scopes.
Under Manage, select Expose an API > Add a scope. Accept the proposed Application ID URI
(api://{clientId})by selecting Save and continue. The{clientId}is the value recorded from the Overview page. Then enter the following information:- For Scope name, enter
Forecast.Read. - For Who can consent, ensure that the Admins and users option is selected.
- In the Admin consent display name box, enter
Read forecast data. - In the Admin consent description box, enter
Allows the application to read weather forecast data. - In the User consent display name box, enter
Read forecast data. - In the User consent description box, enter
Allows the application to read weather forecast data. - Ensure that the State is set to Enabled.
- For Scope name, enter
Select Add scope. If the scope has been entered correctly, it's listed in the Expose an API pane.


Clone or download the sample application
To obtain the sample application, you can either clone it from GitHub or download it as a .zip file.
To clone the sample, open a command prompt and navigate to where you wish to create the project, and enter the following command:
git clone https://github.com/Azure-Samples/ms-identity-docs-code-dotnet.gitDownload the .zip file. Extract it to a file path where the length of the name is fewer than 260 characters.
Configure the ASP.NET Core sample application
In your IDE, open the project folder, ms-identity-docs-code-dotnet/web-api, containing the sample.
Open
appsettings.jsonfile, which contains the following code snippet:{ "AzureAd": { "Instance": "https://login.microsoftonline.com/", "TenantId": "Enter the tenant ID obtained from the Microsoft Entra admin center", "ClientId": "Enter the client ID obtained from the Microsoft Entra admin center", "Scopes": "Forecast.Read" }, "Logging": { "LogLevel": { "Default": "Information", "Microsoft.AspNetCore": "Warning" } }, "AllowedHosts": "*" }Find the following
key:ClientId- The identifier of the application, also referred to as the client. Replace thevaluetext in quotes with Application (client) ID that was recorded earlier from the Overview page of the registered application.TenantId- The identifier of the tenant where the application is registered. Replace thevaluetext in quotes with Directory (tenant) ID value that was recorded earlier from the Overview page of the registered application.
Run the sample application
Execute the following command to start the app:
dotnet runAn output like the following sample appears:
...
info: Microsoft.Hosting.Lifetime[14]
      Now listening on: https://localhost:{port}
...
Record the port number in the
https://localhost:{port}URL.To verify the endpoint is protected, use the following cURL command in Bash to send an unauthenticated HTTP GET request in Bash:
curl -X GET https://localhost:5001/weatherforecast -kiThe expected response is 401 Unauthorized with output similar to:
user@host:~$ curl -X GET https://localhost:5001/weatherforecast -ki
HTTP/2 401
date: Fri, 23 Sep 2023 23:34:24 GMT
server: Kestrel
www-authenticate: Bearer
content-length: 0
Related content
- How-to: Call an ASP.NET Core web API with cURL
- Learn more by building this Web API from scratch with the following series - Tutorial: Register a web API with the Microsoft identity platform
Feedback
Coming soon: Throughout 2024 we will be phasing out GitHub Issues as the feedback mechanism for content and replacing it with a new feedback system. For more information see: https://aka.ms/ContentUserFeedback.
Submit and view feedback for