Get started: Document Intelligence Studio
This content applies to:![]() v4.0 (preview) | Previous versions:
v4.0 (preview) | Previous versions: ![]() v3.1 (GA)
v3.1 (GA) ![]() v3.0 (GA)
v3.0 (GA)
Document Intelligence Studio is an online tool for visually exploring, understanding, and integrating features from the Document Intelligence service in your applications. You can get started by exploring the pretrained models with sample or your own documents. You can also create projects to build custom template models and reference the models in your applications using the Python SDK and other quickstarts.
Prerequisites for new users
To use Document Intelligence Studio, you need the following assets and settings:
An active Azure account. If you don't have one, you can create a free account.
A Document Intelligence or multi-service resource.
Tip
Create an Azure AI services resource if you plan to access multiple Azure AI services under a single endpoint/key. For Document Intelligence access only, create a Document Intelligence resource. Please note that you'll need a single-service resource if you intend to use Microsoft Entra authentication.
Document Intelligence now supports AAD token authentication additional to local (key-based) authentication when accessing the Document Intelligence resources and storage accounts. Be sure to follow below instructions to setup correct access roles, especially if your resources are applied with DisableLocalAuth policy.
Properly scoped Azure role assignments For document analysis and prebuilt models, following role assignments are required for different scenarios.
Basic ✔️ Cognitive Services User: you need this role to Document Intelligence or Azure AI services resource to enter the analyze page.
Advanced ✔️ Contributor: you need this role to create resource group, Document Intelligence service, or Azure AI services resource.
For more information on authorization, see Document Intelligence Studio authorization policies.
Note
If local (key-based) authentication is disabled for your Document Intelligence service resource, be sure to obtain Cognitive Services User role and your AAD token will be used to authenticate requests on Document Intelligence Studio. The Contributor role only allows you to list keys but does not give you permission to use the resource when key-access is disabled.
Once your resource is configured, you can try the different models offered by Document Intelligence Studio. From the front page, select any Document Intelligence model to try using with a no-code approach.
To test any of the document analysis or prebuilt models, select the model and use one of the sample documents or upload your own document to analyze. The analysis result is displayed at the right in the content-result-code window.
Custom models need to be trained on your documents. See custom models overview for an overview of custom models.
Authentication
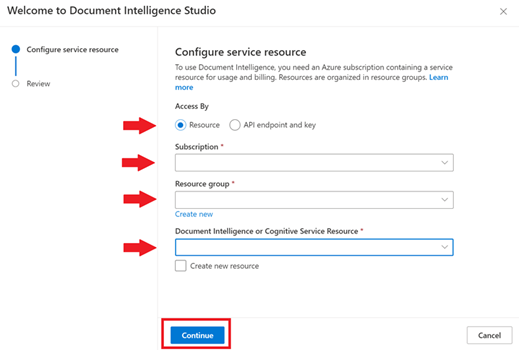
Navigate to the Document Intelligence Studio. If it's your first time logging in, a popup window appears prompting you to configure your service resource. In accordance with your organization's policy, you have one or two options:
Microsoft Entra authentication: access by Resource (recommended).
Choose your existing subscription.
Select an existing resource group within your subscription or create a new one.
Select your existing Document Intelligence or Azure AI services resource.
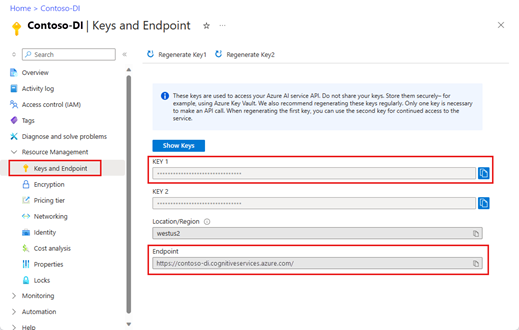
Local authentication: access by API endpoint and key.
Retrieve your endpoint and key from the Azure portal.
Go to the overview page for your resource and select Keys and Endpoint from the left navigation bar.
Enter the values in the appropriate fields.
After validating the scenario in the Document Intelligence Studio, use the C#, Java, JavaScript, or Python client libraries or the REST API to get started incorporating Document Intelligence models into your own applications.
To learn more about each model, see our concept pages.
View resource details
To view resource details such as name and pricing tier, select the Settings icon in the top-right corner of the Document Intelligence Studio home page and select the Resource tab. If you have access to other resources, you can switch resources as well.
Added prerequisites for custom projects
In addition to the Azure account and a Document Intelligence or Azure AI services resource, you need:
Azure Blob Storage container
A standard performance Azure Blob Storage account. You create containers to store and organize your training documents within your storage account. If you don't know how to create an Azure storage account with a container, following these quickstarts:
- Create a storage account. When creating your storage account, make sure to select Standard performance in the Instance details → Performance field.
- Create a container. When creating your container, set the Public access level field to Container (anonymous read access for containers and blobs) in the New Container window.
Azure role assignments
For custom projects, the following role assignments are required for different scenarios.
Basic
- Cognitive Services User: You need this role for Document Intelligence or Azure AI services resource to train the custom model or do analysis with trained models.
- Storage Blob Data Contributor: You need this role for the Storage Account to create a project and label data.
Advanced
- Storage Account Contributor: You need this role for the Storage Account to set up CORS settings (this action is a one-time effort if the same storage account is reused).
- Contributor: You need this role to create a resource group and resources.
Note
If local (key-based) authentication is disabled for your Document Intelligence service resource and storage account, be sure to obtain Cognitive Services User and Storage Blob Data Contributor roles respectively, so you have enough permissions to use Document Intelligence Studio. The Storage Account Contributor and Contributor roles only allow you to list keys but does not give you permission to use the resources when key-access is disabled.
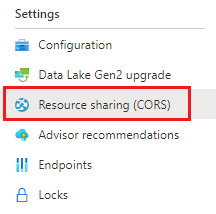
Configure CORS
CORS (Cross Origin Resource Sharing) needs to be configured on your Azure storage account for it to be accessible from the Document Intelligence Studio. To configure CORS in the Azure portal, you need access to the CORS tab of your storage account.
Select the CORS tab for the storage account.
Start by creating a new CORS entry in the Blob service.
Set the Allowed origins to
https://documentintelligence.ai.azure.com.
Tip
You can use the wildcard character '*' rather than a specified domain to allow all origin domains to make requests via CORS.
Select all the available 8 options for Allowed methods.
Approve all Allowed headers and Exposed headers by entering an * in each field.
Set the Max Age to 120 seconds or any acceptable value.
To save the changes, select the save button at the top of the page.
CORS should now be configured to use the storage account from Document Intelligence Studio.
Sample documents set
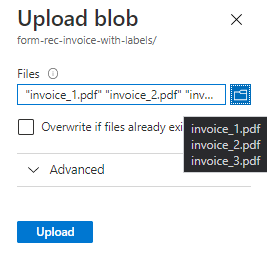
Sign in to the Azure portal and navigate to Your storage account > Data storage > Containers.
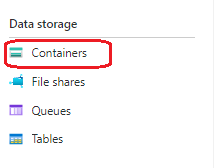
Select a container from the list.
Select Upload from the menu at the top of the page.

The Upload blob window appears.
Select your files to upload.
Note
By default, the Studio will use documents that are located at the root of your container. However, you can use data organized in folders by specifying the folder path in the Custom form project creation steps. See Organize your data in subfolders
Next steps
- Follow our Document Intelligence v3.1 migration guide to learn the differences from the previous version of the REST API.
- Explore our v4.0 SDK quickstarts to try the v3.0 features in your applications using the new client libraries.
- Refer to our v4.0 REST API quickstarts to try the v3.0 features using the new REST API.