


Events
17 Mar, 9 pm - 21 Mar, 10 am
Join the meetup series to build scalable AI solutions based on real-world use cases with fellow developers and experts.
Register nowThis browser is no longer supported.
Upgrade to Microsoft Edge to take advantage of the latest features, security updates, and technical support.
Azure DevOps Services | Azure DevOps Server 2022 - Azure DevOps Server 2019
Visual Studio 2019 | Visual Studio 2022
Git doesn't automatically take snapshots of your work as you modify files in your repo. You tell Git what file changes you want to capture in a snapshot by staging specific changes. After staging, you save the snapshot by making a commit.
This article provides procedures for the following tasks:
For an overview of the Git workflow, see Azure Repos Git tutorial.
| Category | Requirements |
|---|---|
| Project access | Member of a project. |
| Permissions | - View code in private projects: At least Basic access. - Clone or contribute to code in private projects: Member of the Contributors security group or corresponding permissions in the project. - Set branch or repository permissions: Manage permissions permissions for the branch or repository. - Change default branch: Edit policies permissions for the repository. - Import a repository: Member of the Project Administrators security group or Git project-level Create repository permission set to Allow. For more information, see Set Git repository permissions. |
| Services | Repos enabled. |
| Tools | Optional. Use az repos commands: Azure DevOps CLI. |
Note
In public projects, users with Stakeholder access have full access to Azure Repos, including viewing, cloning, and contributing to code.
| Category | Requirements |
|---|---|
| Project access | Member of a project. |
| Permissions | - View code: At least Basic access. - Clone or contribute to code: Member of the Contributors security group or corresponding permissions in the project. |
| Services | Repos enabled. |
As you work in your repo, Git tracks changes to all tracked files. Tracked files are files that are currently staged or are included in the previous commit. Git separates tracked files into three categories:
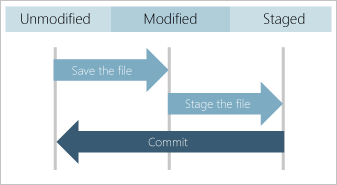
When you create a commit, only staged files and unmodified files are used for the snapshot. Unstaged changes to the modified files are kept, but the snapshot contains the unmodified version of those files. Git doesn't track changes to new files or include new files in the snapshot until you stage them.
Commits are created in your local Git repo. Each commit doesn't have to be perfect, and it might take several commits to accomplish an intended change. Create commits as you work, and when you're done you can push your commits to a remote repo to share your work with others.
Each commit includes the following information:
Git uses the snapshot and parent reference(s) of each commit to maintain a complete record of development in the repo. To investigate changes in your code, you can review the Git history of your repo.
To create a snapshot for a commit:
To exclude temp files, log files, or other files from your snapshot, you can configure Git to ignore specific files.
Note
Git supports interactive staging of edited files so you can choose to stage specific changes within a file. This is a useful feature when you want different file edits in different commits.
Visual Studio 2022 provides a Git version control experience by using the Git menu, Git Changes, and through context menus in Solution Explorer. Visual Studio 2019 version 16.8 also offers the Team Explorer Git user interface. For more information, see the Visual Studio 2019 - Team Explorer tab.
In the Git Changes window, right-click a file in the Changes section and choose Stage to add it into the Staged Changes section.

Or, you can stage a changed file by selecting the plus sign next to the file. To stage all changed files in a folder, select the plus sign next to the folder. To stage all changed files in your repo, select the plus sign in the top-right corner of the Changes section.
You can tell Git to ignore a file by right-clicking it and selecting Ignore this local item or Ignore this extension. Either command creates a .gitignore file in your repo if it doesn't exist, and adds an entry to it. Ignored files won't appear in the Changes section in Visual Studio. However, the .gitignore file has no effect on tracked files. For information on how to configure Git to ignore tracked files, see Ignore files. To save time, you can download .gitignore templates for various development environments from the GitHub gitignore repo.
Note
Starting with Visual Studio 2022 version 17.3, Visual Studio supports staging partial changes within a file. For more information, see Stage lines of code in Visual Studio.
In the Git Changes window, enter a message that describes your staged changes and then select Commit Staged.

Select the commit link for commit details.

Note
If all your changes are unstaged, you can skip staging and directly commit by choosing Commit All.
Git supports changing the staged files or message of your last commit. This operation replaces your last commit with a new commit that combines the staged files from both commits and uses the new commit message. Amending a commit is useful if you forgot to stage a file, or your last commit message has a typo.
Warning
Don't amend an already pushed commit because that will cause sync issues with your remote repo. For a pushed commit, use one of these strategies:
git revert to create a new commit that reverts all changes made by the prior commit. Then push the new commit.In the Git Changes window, optionally stage one or more files, enter a commit message, select Amend, and then choose Commit Staged.

The Git Changes window supports amending either the commit message, staged files, or both. When you select Amend, the identifier SHA for the previous commit is displayed.
Events
17 Mar, 9 pm - 21 Mar, 10 am
Join the meetup series to build scalable AI solutions based on real-world use cases with fellow developers and experts.
Register nowTraining
Module
Manage changes to your Bicep code by using Git - Training
Learn how to use Git version control with your Bicep files and infrastructure as code.
Documentation
Sync your changes to a remote Git repo - Azure Repos
Learn how to share your commits on a branch of your local Git repo by uploading them to a remote Git repo.
Create a new Git branch from the web - Azure Repos
Learn about Git branches and how to create a new branch in your local Git repo, Azure Repos Git repo, and GitHub.
Learn about version control in Git with Azure DevOps.