Manage NSG flow logs using the Azure portal
Network security group flow logging is a feature of Azure Network Watcher that allows you to log information about IP traffic flowing through a network security group. For more information about network security group flow logging, see NSG flow logs overview.
In this article, you learn how to create, change, disable, or delete an NSG flow log using the Azure portal. You can learn how to manage an NSG flow log using PowerShell, Azure CLI, REST API, or ARM template.
Prerequisites
An Azure account with an active subscription. Create an account for free.
Insights provider. For more information, see Register Insights provider.
A network security group. If you need to create a network security group, see Create, change, or delete a network security group.
An Azure storage account. If you need to create a storage account, see Create a storage account using the Azure portal.
Register Insights provider
Microsoft.Insights provider must be registered to successfully log traffic flowing through a network security group. If you aren't sure if the Microsoft.Insights provider is registered, you can check its status by following these steps:
In the search box at the top of the portal, enter subscriptions. Select Subscriptions from the search results.
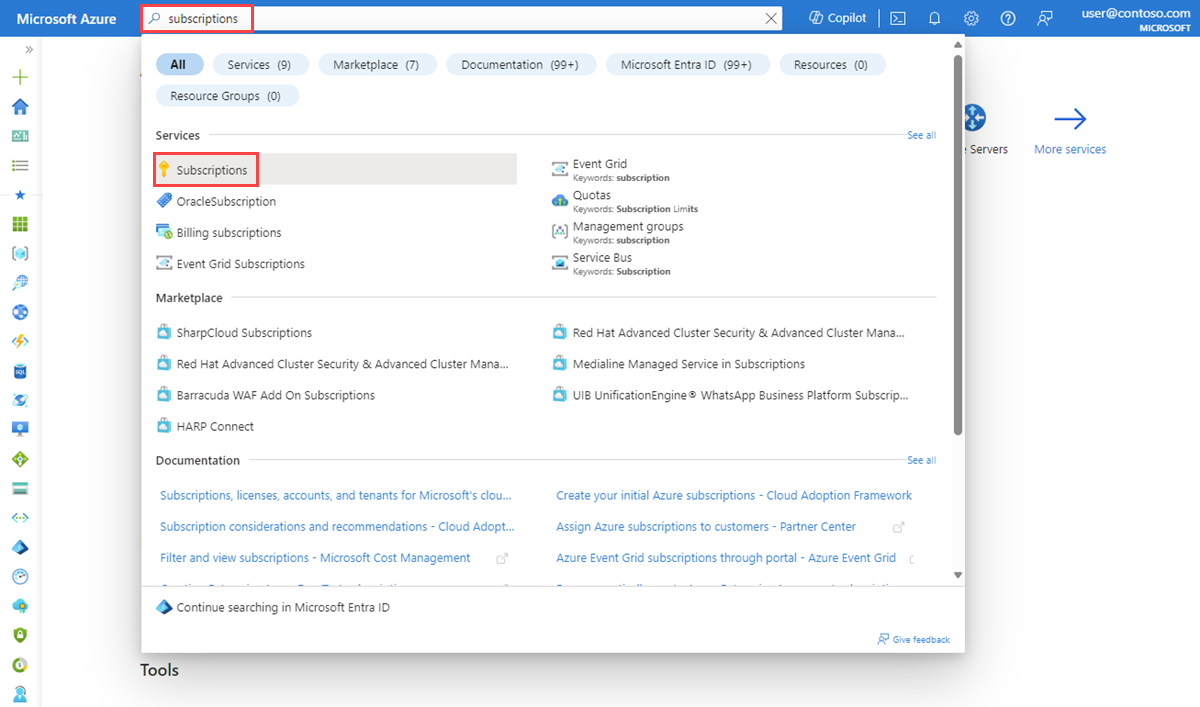
Select the Azure subscription that you want to enable the provider for in Subscriptions.
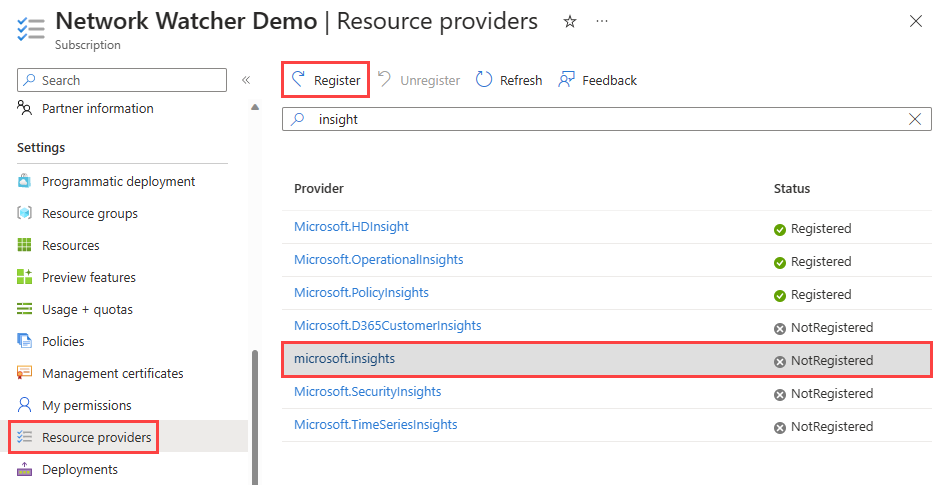
Under Settings, select Resource providers.
Enter insight in the filter box.
Confirm the status of the provider displayed is Registered. If the status is NotRegistered, select the Microsoft.Insights provider then select Register.

Create a flow log
Create a flow log for your network security group. This NSG flow log is saved in an Azure storage account.
In the search box at the top of the portal, enter network watcher. Select Network Watcher from the search results.
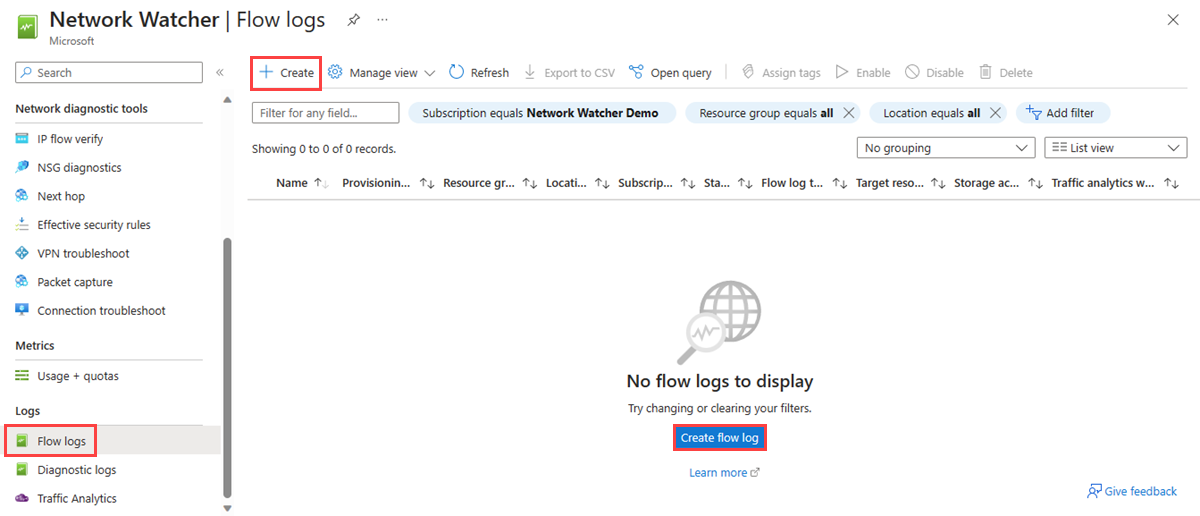
Under Logs, select Flow logs.
In Network Watcher | Flow logs, select + Create or Create flow log blue button.
On the Basics tab of Create a flow log, enter or select the following values:
Setting Value Project details Subscription Select the Azure subscription of your network security group that you want to log. Flow log type Select Network security group then select + Select target resource.
Select the network security group that you want to flow log, then select Confirm selection.Flow Log Name Enter a name for the flow log or leave the default name. Azure portal uses {ResourceName}-{ResourceGroupName}-flowlog as a default name for the flow log. myNSG-myResourceGroup-flowlog is the default name used in this article. Instance details Subscription Select the Azure subscription of your storage account. Storage accounts Select the storage account that you want to save the flow logs to. If you want to create a new storage account, select Create a new storage account. Retention (days) Enter a retention time for the logs (this option is only available with Standard general-purpose v2 storage accounts). Enter 0 if you want to retain the flow logs data in the storage account forever (until you delete it from the storage account). For information about pricing, see Azure Storage pricing. 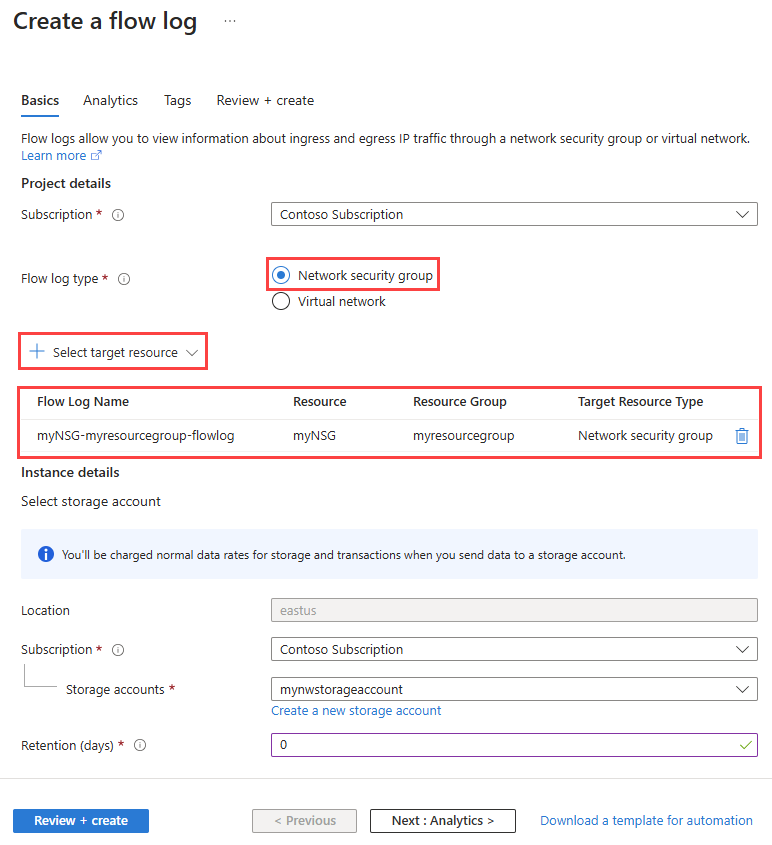
Note
If the storage account is in a different subscription, the network security group and storage account must be associated with the same Microsoft Entra tenant. The account you use for each subscription must have the necessary permissions.
To enable traffic analytics, select Next: Analytics button, or select the Analytics tab. Enter or select the following values:
Setting Value Flow logs version Select the version of the network security group flow log, available options are: Version 1 and Version 2. The default version is version 2. For more information, see Flow logging for network security groups. Enable traffic analytics Select the checkbox to enable traffic analytics for your flow log. Traffic analytics processing interval Select the processing interval that you prefer, available options are: Every 1 hour and Every 10 mins. The default processing interval is every one hour. For more information, see Traffic analytics. Subscription Select the Azure subscription of your Log Analytics workspace. Log Analytics Workspace Select your Log Analytics workspace. By default, Azure portal creates DefaultWorkspace-{SubscriptionID}-{Region} Log Analytics workspace in defaultresourcegroup-{Region} resource group. 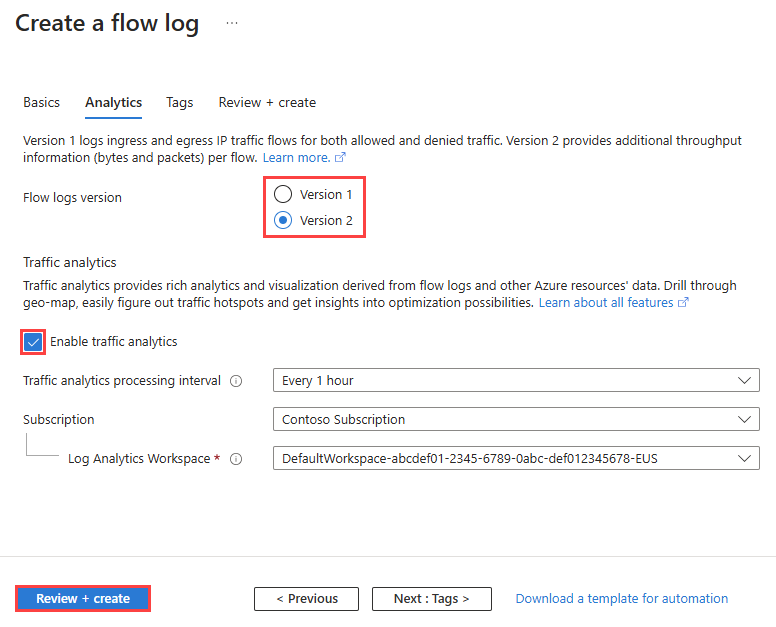
Note
To create and select a Log Analytics workspace other than the default one, see Create a Log Analytics workspace
Select Review + create.
Review the settings, and then select Create.

Enable or disable traffic analytics
Enable traffic analytics for a flow log to analyze the flow log data. Traffic analytics provides insights into your traffic patterns. You can enable or disable traffic analytics for a flow log at any time.
To enable traffic analytics for a flow log, follow these steps:
In the search box at the top of the portal, enter network watcher. Select Network Watcher from the search results.
Under Logs, select Flow logs.
In Network Watcher | Flow logs, select the flow log that you want to enable traffic analytics for.
In Flow logs settings, check the Enable traffic analytics checkbox.
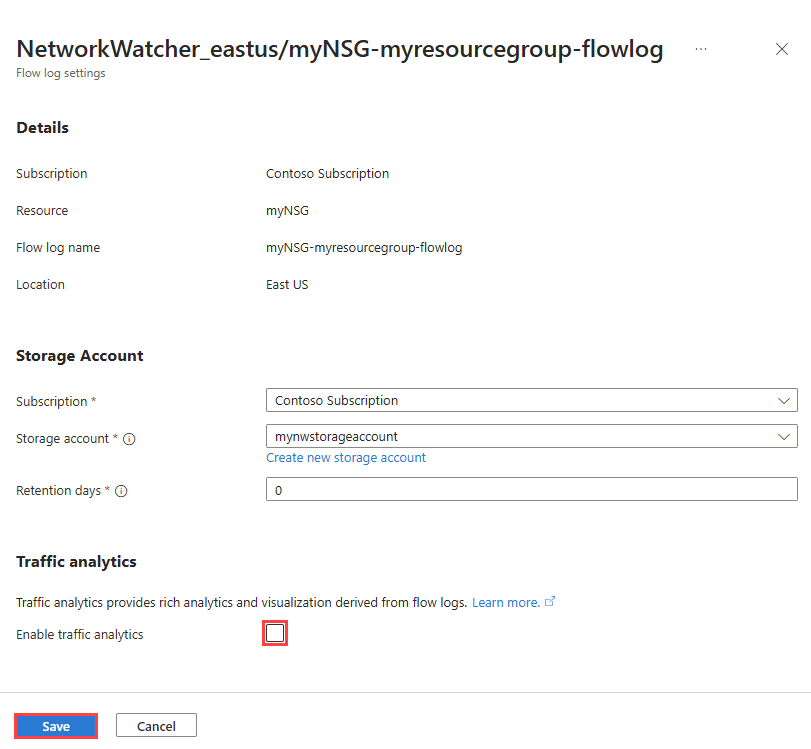
Select the following values:
Setting Value Subscription Select the Azure subscription of your Log Analytics workspace. Log Analytics workspace Select your Log Analytics workspace. By default, Azure portal creates DefaultWorkspace-{SubscriptionID}-{Region} Log Analytics workspace in defaultresourcegroup-{Region} resource group. Traffic logging interval Select the processing interval that you prefer, available options are: Every 1 hour and Every 10 mins. The default processing interval is every one hour. For more information, see Traffic analytics. 
Select Save to apply the changes.


To disable traffic analytics for a flow log, take the previous steps 1-3, then uncheck the Enable traffic analytics checkbox and select Save.

Change a flow log
You can change the properties of a flow log after you create it. For example, you can change the flow log version or disable traffic analytics.
In the search box at the top of the portal, enter network watcher. Select Network Watcher from the search results.
Under Logs, select Flow logs.
In Network Watcher | Flow logs, select the flow log that you want to change.
In Flow logs settings, you can change any of the following settings:
Setting Value Storage account Subscription Change the Azure subscription of the storage account that you want to use. Storage account Change the storage account that you want to save the flow logs to. If you want to create a new storage account, select Create a new storage account. Retention (days) Change the retention time in the storage account. Enter 0 if you want to retain the flow logs data in the storage account forever (until you manually delete the data from the storage account). Traffic analytics Enable traffic analytics Enable or disable traffic analytics by checking or unchecking the checkbox. Subscription Change the Azure subscription of the Log Analytics workspace that you want to use. Log analytics workspace Change the Log Analytics workspace that you want to save the flow logs to (if traffic analytics is enabled). Traffic logging interval Change the processing interval of traffic analytics (if traffic analytics is enabled). Available options are: one hour and 10 minutes. The default processing interval is every one hour. For more information, see Traffic Analytics.
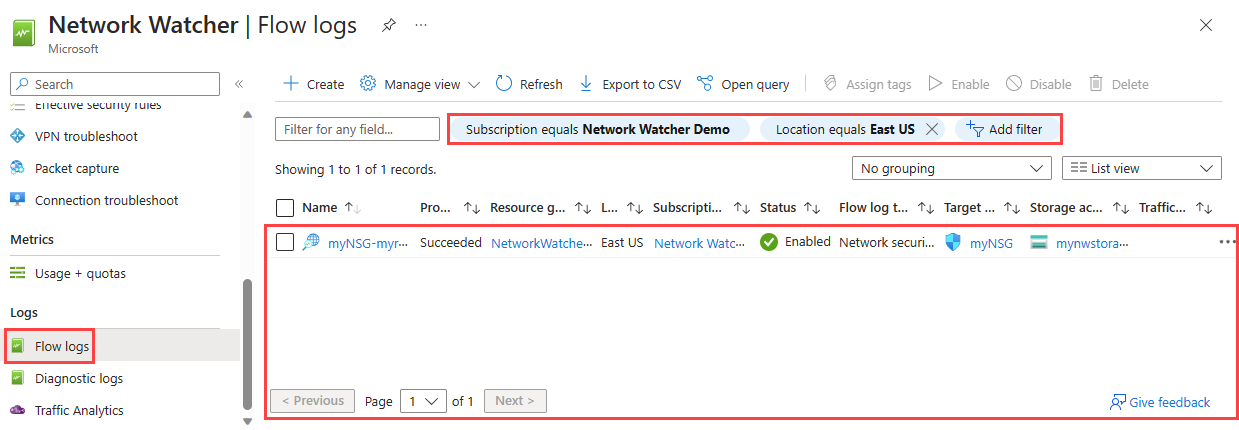
List all flow logs
You can list all flow logs in a subscription or a group of subscriptions. You can also list all flow logs in a region.
In the search box at the top of the portal, enter network watcher. Select Network Watcher from the search results.
Under Logs, select Flow logs.
Select Subscription equals filter to choose one or more of your subscriptions. You can apply other filters like Location equals to list all the flow logs in a region.

View details of a flow log resource
You can view the details of a flow log in a subscription or a group of subscriptions. You can also list all flow logs in a region.
In the search box at the top of the portal, enter network watcher. Select Network Watcher from the search results.
Under Logs, select Flow logs.
In Network Watcher | Flow logs, select the flow log that you want to see.
In Flow logs settings, you can view the settings of the flow log resource.


Download a flow log
The storage location of a flow log is defined at creation. To access and download flow logs from your storage account, you can use Azure Storage Explorer. Fore more information, see Get started with Storage Explorer.
NSG flow log files saved to a storage account follow this path:
https://{storageAccountName}.blob.core.windows.net/insights-logs-networksecuritygroupflowevent/resourceId=/SUBSCRIPTIONS/{subscriptionID}/RESOURCEGROUPS/{resourceGroupName}/PROVIDERS/MICROSOFT.NETWORK/NETWORKSECURITYGROUPS/{NetworkSecurityGroupName}/y={year}/m={month}/d={day}/h={hour}/m=00/macAddress={macAddress}/PT1H.json
For information about the structure of a flow log, see Log format of NSG flow logs.
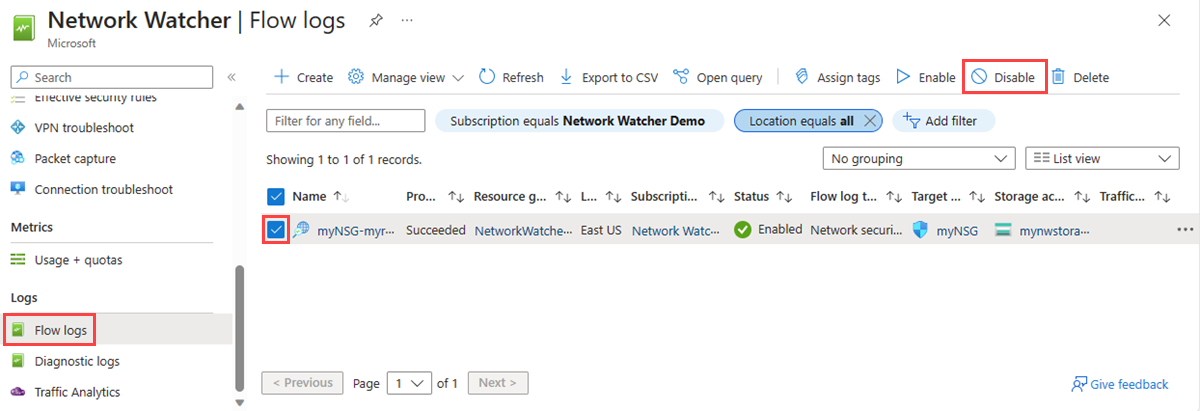
Disable a flow log
You can temporarily disable an NSG flow log without deleting it. Disabling a flow log stops flow logging for the associated network security group. However, the flow log resource remains with all its settings and associations. You can re-enable it at any time to resume flow logging for the configured network security group.
In the search box at the top of the portal, enter network watcher. Select Network Watcher from the search results.
Under Logs, select Flow logs.
In Network Watcher | Flow logs, select the checkbox of the flow log that you want to disable.
Select Disable.

Note
If traffic analytics is enabled for a flow log, it must disabled before you can disable the flow log. To disable traffic analytics, see Change a flow log.
Delete a flow log
You can permanently delete an NSG flow log. Deleting a flow log deletes all its settings and associations. To begin flow logging again for the same network security group, you must create a new flow log for it.
In the search box at the top of the portal, enter network watcher. Select Network Watcher from the search results.
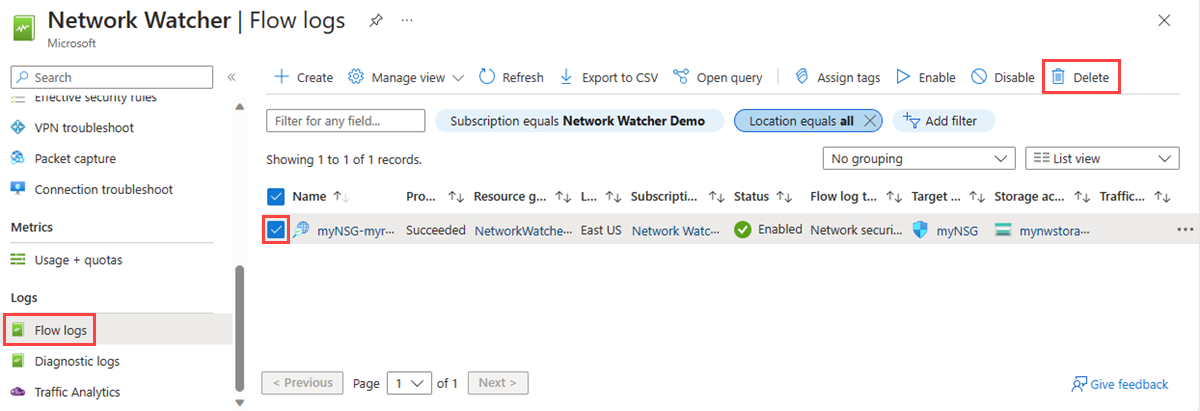
Under Logs, select Flow logs.
In Network Watcher | Flow logs, select the checkbox of the flow log that you want to delete.
Select Delete.

Note
Deleting a flow log does not delete the flow log data from the storage account. Flow logs data stored in the storage account follows the configured retention policy or stays stored in the storage account until manually deleted (in case no retention policy is configured).
Related content
- To learn how to use Azure built-in policies to audit or deploy NSG flow logs, see Manage NSG flow logs using Azure Policy.
- To learn about traffic analytics, see Traffic analytics.
Feedback
Coming soon: Throughout 2024 we will be phasing out GitHub Issues as the feedback mechanism for content and replacing it with a new feedback system. For more information see: https://aka.ms/ContentUserFeedback.
Submit and view feedback for