Encryption scopes enable you to manage encryption at the level of an individual blob or container. You can use encryption scopes to create secure boundaries between data that resides in the same storage account but belongs to different customers. For more information about encryption scopes, see Encryption scopes for Blob storage.
This article shows how to create an encryption scope. It also shows how to specify an encryption scope when you create a blob or container.
You can create an encryption scope that is protected with a Microsoft-managed key or with a customer-managed key that is stored in an Azure Key Vault or in an Azure Key Vault Managed Hardware Security Model (HSM). To create an encryption scope with a customer-managed key, you must first create a key vault or managed HSM and add the key you intend to use for the scope. The key vault or managed HSM must have purge protection enabled.
The storage account and the key vault can be in the same tenant, or in different tenants. In either case, the storage account and key vault can be in different regions.
An encryption scope is automatically enabled when you create it. After you create the encryption scope, you can specify it when you create a blob. You can also specify a default encryption scope when you create a container, which automatically applies to all blobs in the container.
When you configure an encryption scope, you are billed for a minimum of one month (30 days). After the first month, charges for an encryption scope are prorated on an hourly basis. For more information, see Billing for encryption scopes.
To create an encryption scope in the Azure portal, follow these steps:
Navigate to your storage account in the Azure portal.
Under Security + networking select Encryption.
Select the Encryption Scopes tab.
Click the Add button to add a new encryption scope.
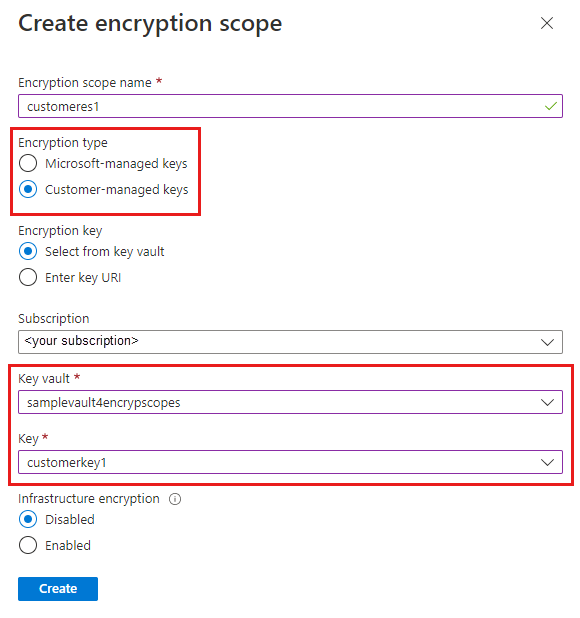
In the Create Encryption Scope pane, enter a name for the new scope.
Select the desired type of encryption key support, either Microsoft-managed keys or Customer-managed keys.
- If you selected Microsoft-managed keys, click Create to create the encryption scope.
- If you selected Customer-managed keys, then select a subscription and specify a key vault and a key to use for this encryption scope. If the desired key vault is in a different region, select Enter key URI and specify the key URI.
If infrastructure encryption is enabled for the storage account, then it will automatically be enabled for the new encryption scope. Otherwise, you can choose whether to enable infrastructure encryption for the encryption scope.
To create an encryption scope with PowerShell, install the Az.Storage PowerShell module, version 3.4.0 or later.
Create an encryption scope protected by Microsoft-managed keys
To create an encryption scope that is protected by Microsoft-managed keys, call the New-AzStorageEncryptionScope command with the -StorageEncryption parameter.
If infrastructure encryption is enabled for the storage account, then it will automatically be enabled for the new encryption scope. Otherwise, you can choose whether to enable infrastructure encryption for the encryption scope. To create the new scope with infrastructure encryption enabled, include the -RequireInfrastructureEncryption parameter.
Remember to replace the placeholder values in the example with your own values:
$rgName = "<resource-group>"
$accountName = "<storage-account>"
$scopeName = "<encryption-scope>"

New-AzStorageEncryptionScope -ResourceGroupName $rgName `
    -StorageAccountName $accountName `
    -EncryptionScopeName $scopeName1 `
    -StorageEncryption
Create an encryption scope protected by customer-managed keys in the same tenant
To create an encryption scope that is protected by customer-managed keys stored in a key vault or managed HSM that is in the same tenant as the storage account, first configure customer-managed keys for the storage account. You must assign a managed identity to the storage account that has permissions to access the key vault. The managed identity can be either a user-assigned managed identity or a system-assigned managed identity. To learn more about configuring customer-managed keys, see Configure customer-managed keys in the same tenant for an existing storage account.
To grant the managed identity permissions to access the key vault, assign the Key Vault Crypto Service Encryption User role the managed identity.
To configure customer-managed keys for use with an encryption scope, purge protection must be enabled on the key vault or managed HSM.
The following example shows how to configure an encryption scope with a system-assigned managed identity. Remember to replace the placeholder values in the example with your own values:
$rgName = "<resource-group>"
$accountName = "<storage-account>"
$keyVaultName = "<key-vault>"
$scopeName = "<encryption-scope>"

# Assign a system-assigned managed identity to the storage account.
$storageAccount = Set-AzStorageAccount -ResourceGroupName $rgName `
    -Name $accountName `
    -AssignIdentity

# Assign the necessary permissions to the managed identity
# so that it can access the key vault.
$principalId = $storageAccount.Identity.PrincipalId
$keyVault = Get-AzKeyVault $keyVaultName

New-AzRoleAssignment -ObjectId $storageAccount.Identity.PrincipalId `
    -RoleDefinitionName "Key Vault Crypto Service Encryption User" `
    -Scope $keyVault.ResourceId
Next, call the New-AzStorageEncryptionScope command with the -KeyvaultEncryption parameter, and specify the key URI. Including the key version on the key URI is optional. If you omit the key version, then the encryption scope will automatically use the most recent key version. If you include the key version, then you must update the key version manually to use a different version.
The format of the key URI is similar to the following examples and can be constructed from the key vault's VaultUri property and the key name:
# Without the key version
https://<key-vault>.vault.azure.net/keys/<key>

# With the key version
https://<key-vault>.vault.azure.net/keys/<key>/<version>
If infrastructure encryption is enabled for the storage account, then it will automatically be enabled for the new encryption scope. Otherwise, you can choose whether to enable infrastructure encryption for the encryption scope. To create the new scope with infrastructure encryption enabled, include the -RequireInfrastructureEncryption parameter.
Remember to replace the placeholder values in the example with your own values:
$keyUri = $keyVault.VaultUri + "keys/" + $keyName

New-AzStorageEncryptionScope -ResourceGroupName $rgName `
    -StorageAccountName $accountName `
    -EncryptionScopeName $scopeName `
    -KeyUri $keyUri `
    -KeyvaultEncryption
Create an encryption scope protected by customer-managed keys in a different tenant
To create an encryption scope that is protected by customer-managed keys stored in a key vault or managed HSM that is in a different tenant than the storage account, first configure customer-managed keys for the storage account. You must configure a user-assigned managed identity for the storage account that has permissions to access the key vault in the other tenant. To learn more about configuring cross-tenant customer-managed keys, see Configure cross-tenant customer-managed keys for an existing storage account.
To configure customer-managed keys for use with an encryption scope, purge protection must be enabled on the key vault or managed HSM.
After you have configured cross-tenant customer-managed keys for the storage account, you can create an encryption scope on the storage account in one tenant that is scoped to a key in a key vault in the other tenant. You will need the key URI to create the cross-tenant encryption scope.
Remember to replace the placeholder values in the example with your own values:
$rgName = "<resource-group>"
$accountName = "<storage-account>"
$scopeName = "<encryption-scope>"

# Construct the key URI from the key vault URI and key name.
$keyUri = $kvUri + "keys/" + $keyName

New-AzStorageEncryptionScope -ResourceGroupName $rgName `
    -StorageAccountName $accountName `
    -EncryptionScopeName $scopeName `
    -KeyUri $keyUri `
    -KeyvaultEncryption
To create an encryption scope with Azure CLI, first install Azure CLI version 2.20.0 or later.
Create an encryption scope protected by Microsoft-managed keys
To create an encryption scope that is protected by Microsoft-managed keys, call the az storage account encryption-scope create command, specifying the --key-source parameter as Microsoft.Storage.
If infrastructure encryption is enabled for the storage account, then it will automatically be enabled for the new encryption scope. Otherwise, you can choose whether to enable infrastructure encryption for the encryption scope. To create the new scope with infrastructure encryption enabled, include the --require-infrastructure-encryption parameter and set its value to true.
Remember to replace the placeholder values with your own values:
az storage account encryption-scope create \
    --resource-group <resource-group> \
    --account-name <storage-account> \
    --name <encryption-scope> \
    --key-source Microsoft.Storage
Create an encryption scope protected by customer-managed keys in the same tenant
To create an encryption scope that is protected by customer-managed keys stored in a key vault or managed HSM that is in the same tenant as the storage account, first configure customer-managed keys for the storage account. You must assign a managed identity to the storage account that has permissions to access the key vault. The managed identity can be either a user-assigned managed identity or a system-assigned managed identity. To learn more about configuring customer-managed keys, see Configure customer-managed keys in the same tenant for an existing storage account.
To grant the managed identity permissions to access the key vault, assign the Key Vault Crypto Service Encryption User role the managed identity.
To configure customer-managed keys for use with an encryption scope, purge protection must be enabled on the key vault or managed HSM.
The following example shows how to configure an encryption scope with a system-assigned managed identity. Remember to replace the placeholder values in the example with your own values:
az storage account update \
    --name <storage-account> \
    --resource-group <resource_group> \
    --assign-identity

principalId=$(az storage account show --name <storage-account> \
    --resource-group <resource_group> \
    --query identity.principalId \
    --output tsv)

$kvResourceId=$(az keyvault show \
    --resource-group <resource-group> \
    --name <key-vault> \
    --query id \
    --output tsv)

az role assignment create --assignee-object-id $principalId \
    --role "Key Vault Crypto Service Encryption User" \
    --scope $kvResourceId
Next, call the az storage account encryption-scope command with the --key-uri parameter, and specify the key URI. Including the key version on the key URI is optional. If you omit the key version, then the encryption scope will automatically use the most recent key version. If you include the key version, then you must update the key version manually to use a different version.
The format of the key URI is similar to the following examples and can be constructed from the key vault's vaultUri property and the key name:
# Without the key version
https://<key-vault>.vault.azure.net/keys/<key>

# With the key version
https://<key-vault>.vault.azure.net/keys/<key>/<version>
If infrastructure encryption is enabled for the storage account, then it will automatically be enabled for the new encryption scope. Otherwise, you can choose whether to enable infrastructure encryption for the encryption scope. To create the new scope with infrastructure encryption enabled, include the --require-infrastructure-encryption parameter and set its value to true.
Remember to replace the placeholder values in the example with your own values:
az storage account encryption-scope create \
    --resource-group <resource-group> \
    --account-name <storage-account> \
    --name <encryption-scope> \
    --key-source Microsoft.KeyVault \
    --key-uri <key-uri>
Create an encryption scope protected by customer-managed keys in a different tenant
To create an encryption scope that is protected by customer-managed keys stored in a key vault or managed HSM that is in a different tenant than the storage account, first configure customer-managed keys for the storage account. You must configure a user-assigned managed identity for the storage account that has permissions to access the key vault in the other tenant. To learn more about configuring cross-tenant customer-managed keys, see Configure cross-tenant customer-managed keys for an existing storage account.
To configure customer-managed keys for use with an encryption scope, purge protection must be enabled on the key vault or managed HSM.
After you have configured cross-tenant customer-managed keys for the storage account, you can create an encryption scope on the storage account in one tenant that is scoped to a key in a key vault in the other tenant. You will need the key URI to create the cross-tenant encryption scope.
Remember to replace the placeholder values in the example with your own values:
az storage account encryption-scope create \
    --resource-group <resource-group> \
    --account-name <storage-account> \
    --name <encryption-scope> \
    --key-source Microsoft.KeyVault \
    --key-uri <key-uri>
When you create a container, you can specify a default encryption scope. Blobs in that container will use that scope by default.
An individual blob can be created with its own encryption scope, unless the container is configured to require that all blobs use the default scope. For more information, see Encryption scopes for containers and blobs.
To create a container with a default encryption scope in the Azure portal, first create the encryption scope as described in Create an encryption scope. Next, follow these steps to create the container:
Navigate to the list of containers in your storage account, and select the Add button to create a container.
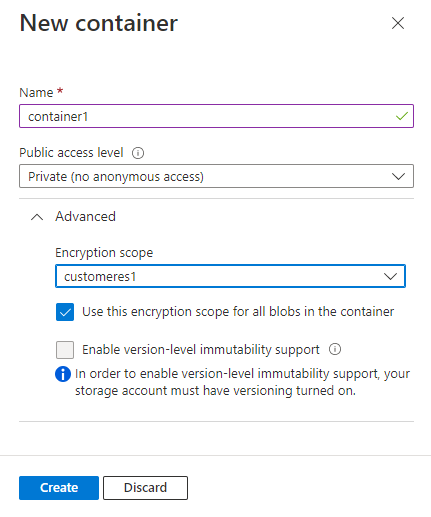
Expand the Advanced settings in the New Container pane.
In the Encryption scope drop-down, select the default encryption scope for the container.
To require that all blobs in the container use the default encryption scope, select the checkbox to Use this encryption scope for all blobs in the container. If this checkbox is selected, then an individual blob in the container cannot override the default encryption scope.
To create a container with a default encryption scope with PowerShell, call the New-AzStorageContainer command, specifying the scope for the -DefaultEncryptionScope parameter. To force all blobs in a container to use the container's default scope, set the -PreventEncryptionScopeOverride parameter to true.
$containerName1 = "container1"
$ctx = New-AzStorageContext -StorageAccountName $accountName -UseConnectedAccount

# Create a container with a default encryption scope that cannot be overridden.
New-AzStorageContainer -Name $containerName1 `
    -Context $ctx `
    -DefaultEncryptionScope $scopeName1 `
    -PreventEncryptionScopeOverride $true
To create a container with a default encryption scope with Azure CLI, call the az storage container create command, specifying the scope for the --default-encryption-scope parameter. To force all blobs in a container to use the container's default scope, set the --prevent-encryption-scope-override parameter to true.
The following example uses your Microsoft Entra account to authorize the operation to create the container. You can also use the account access key. For more information, see Authorize access to blob or queue data with Azure CLI.
az storage container create \
    --account-name <storage-account> \
    --resource-group <resource-group> \
    --name <container> \
    --default-encryption-scope <encryption-scope> \
    --prevent-encryption-scope-override true \
    --auth-mode login
If a client attempts to specify a scope when uploading a blob to a container that has a default encryption scope and the container is configured to prevent blobs from overriding the default scope, then the operation fails with a message indicating that the request is forbidden by the container encryption policy.
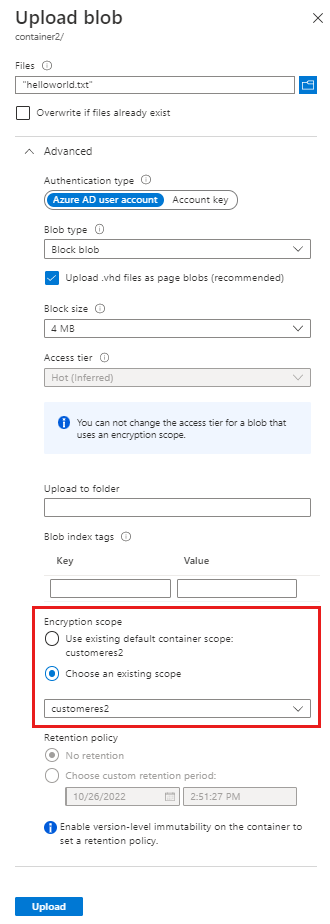
When you upload a blob, you can specify an encryption scope for that blob, or use the default encryption scope for the container, if one has been specified.
To change the key that protects a scope in the Azure portal, follow these steps:
- Navigate to the Encryption Scopes tab to view the list of encryption scopes for the storage account.
- Select the More button next to the scope you wish to modify.
- In the Edit encryption scope pane, you can change the encryption type from Microsoft-managed key to customer-managed key or vice versa.
- To select a new customer-managed key, select Use a new key and specify the key vault, key, and key version.
To change the key that protects an encryption scope from a customer-managed key to a Microsoft-managed key with PowerShell, call the Update-AzStorageEncryptionScope command and pass in the -StorageEncryption parameter:
Update-AzStorageEncryptionScope -ResourceGroupName $rgName `
    -StorageAccountName $accountName `
    -EncryptionScopeName $scopeName2 `
    -StorageEncryption
Next, call the Update-AzStorageEncryptionScope command and pass in the -KeyUri and -KeyvaultEncryption parameters:
Update-AzStorageEncryptionScope -ResourceGroupName $rgName `
    -StorageAccountName $accountName `
    -EncryptionScopeName $scopeName1 `
    -KeyUri $keyUri `
    -KeyvaultEncryption
To change the key that protects an encryption scope from a customer-managed key to a Microsoft-managed key with Azure CLI, call the az storage account encryption-scope update command and pass in the --key-source parameter with the value Microsoft.Storage:
az storage account encryption-scope update \
    --account-name <storage-account> \
    --resource-group <resource-group>
    --name <encryption-scope> \
    --key-source Microsoft.Storage
Next, call the az storage account encryption-scope update command, pass in the --key-uri parameter, and pass in the --key-source parameter with the value Microsoft.KeyVault:
az storage account encryption-scope update \
    --resource-group <resource-group> \
    --account-name <storage-account> \
    --name <encryption-scope> \
    --key-source Microsoft.KeyVault \
    --key-uri <key-uri>
Disable any encryption scopes that are not needed to avoid unnecessary charges. For more information, see Billing for encryption scopes.