Publish a copilot to a live or demo website
When publishing the copilot to the web, you can publish to a prebuilt demo website (which you can use to share the copilot with your teammates and stakeholders). You can also publish to your own live website.
Tip
When should I use the demo website and when should I use my own website?
You should use the demo website only to try out the copilot and share it with your teammates or other stakeholders who want to try out the copilot. It's not intended for production uses, for example, you shouldn't use it directly with customers.
You should publish and use the copilot on your live website for production scenarios, such as a help copilot on your help webpage for customers to interact with.
Important
This article contains Microsoft Copilot Studio preview documentation and is subject to change.
Preview features aren't meant for production use and may have restricted functionality. These features are available before an official release so that you can get early access and provide feedback.
If you're building a production-ready copilot, see Microsoft Copilot Studio Overview.
A prebuilt demo website is automatically created for you when you publish your copilot. Your teammates and stakeholders can use the demo website to try out the copilot while you're building it. You might want to customize the demo site to guide your teammates' testing efforts. Publish the copilot to your live website when it's ready for customers to use.
When should you use the demo website and when should you use your own website?
You should use the demo website only to try out your copilot, or to share it with teammates and stakeholders who want to try it out. It's not intended for production use. You shouldn't give the URL to customers. Publish the copilot on your live website for customers to use.
Customize the demo website
Edit the demo website's welcome message and trigger phrases as often as you like. The welcome message can explain the purpose of the testing and prompt your teammates for what to ask the copilot.
Open your copilot and on the top menu bar, select Settings.
On the side navigation pane, select Security.
Select Authentication and then No authentication, and then select Save.
Exit Settings and on the top menu bar, select Channels.
Under Channels, select Demo website.
On the Demo Website pane, under Welcome message, enter the message you want your teammates to see.
Under Conversation starters, enter a list of trigger phrases.
Trigger phrases are what initiate specific topics, so you could enter trigger phrases for topics that you want your teammates to test.
Select Save.
Copy the demo website URL and share it with your teammates.
Add your copilot to your website
When your copilot is ready for customers, add it to your website as an iframe code snippet. Your live website can be external or internal, like a SharePoint site. You can also add the copilot to your Power Platform admin center.
Open your copilot and on the top menu bar, select Channels.
Select Custom website, and then either:
- Select Copy to copy the embed code to the clipboard.
- Select Share to email to open a compose window in your default email app, with the code snippet included.
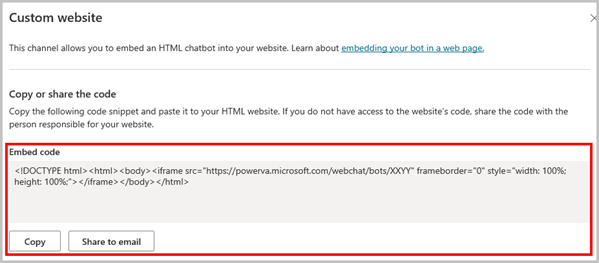
Provide the snippet to your web developer to add the copilot to your website.