Note
Access to this page requires authorization. You can try signing in or changing directories.
Access to this page requires authorization. You can try changing directories.
The Payables Agent in Business Central automates processing of vendor invoices received from vendors through email as PDF documents. This article explains how to set up, activate, configure the Payables Agent, and manage user access.
Learn more about the agent in Payables Agent overview.
Prerequisites
Before configuring and activating the Payables Agent, ensure the following prerequisites are met:
The Business Central environment is a country/region version supported by the Payables Agent as listed in Feature availability by country/region and language.
You have permissions to configure the Payables Agent. You can configure the agent if you meet one of these conditions:
- You're listed in the agent's user access list with Can Configure selected.
- You have the Configure All Agents system permission (ID 9665).
Learn more in Manage agent permissions and user access.
An email account is set up to receive vendor invoice PDF documents.
The Payables Agent monitors incoming emails to this mailbox. The email account must be a Microsoft 365 type (user mailbox or shared mailbox) in your organization. Learn more at Set up email.
If you have multiple Business Central companies, you can configure each company's agent to use a separate dedicated mailbox, or you can use a shared mailbox with different folder monitoring per company. Configure Outlook rules to route invoices to company-specific subfolders, then set each company's agent to monitor its designated subfolder.
Important
To activate and configure the agent, you need Read and manage (Full Access) permission on the mailbox, unless it's your personal mailbox. As an Exchange admin, delegate these permissions to all users who need to activate and configure the agent. Learn more in Use the Exchange admin center to edit shared mailbox delegation.
When a user activates the agent, it runs as a background task in the context of that user and needs access to the shared mailbox to process emails. It might take a few hours for Exchange to propagate the permissions to the selected users.
Billing for agent capabilities is configured for the Business Central environment in the Business Central admin center.
Agents use Microsoft Copilot Studio messages when activated, which your company is charged for. However, if you use trial mode, the first 50 invoices are processed free of charge without consuming billable AI credits. Learn more in Manage consumption-based billing and Try Payables Agent with free trial mode.
(Sandbox environments only) The Allow HttpClient Requests toggle in the Payables Agent extension settings is turned on.
Open the Extension management page, select Payables Agent, and then turn on the Allow HttpClient Requests toggle.
Turn on Payables Agent capability for environment
The agent capability is on if the  Payables Agent icon appears in the top navigation menu of the role center.

If the icon isn't present, turn it on from the Copilot & agent capabilities page, like other Copilot features in Business Central. The Payables Agent is listed under Generally available. Learn more in Configure Copilot and AI agent capabilities.
Next, configure and activate the agent so it can process vendor invoices.
Try Payables Agent with free trial mode
Before fully activating the Payables Agent, you can try it free of charge with trial mode. Trial mode lets you process up to 50 invoices without consuming billable AI credits. Trial mode is available only in production environments when you haven't activated the agent yet.
During trial mode:
- The agent processes PDF invoices you upload or receive via email without billing your organization
- You can test all agent capabilities, including draft creation and review workflows
- Nothing is posted automatically - you review and approve all drafts before posting
- The setup wizard displays your progress (for example, "Invoices processed in trial mode: 5 of 50")
After you process 50 invoices, the trial ends automatically and the agent transitions to full mode. The agent continues processing invoices without interruption but starts consuming billable AI credits as described in the prerequisites. No additional configuration is required for this transition.
When the trial ends, the Payables Agent Trial section is removed from the configuration page and replaced with the Cost section. The Cost section displays the total number of Copilot credits consumed by the agent.
Start the agent with trial mode
- In the navigation bar at the upper right of the role center, select Payables Agent > Activate.
- On the Configure the Payables Agent assisted setup guide, in the Try the Payables Agent section, select Select file to upload a PDF invoice, or select Try some sample invoices to use demo invoices.
- After uploading an invoice, the agent activates automatically in trial mode and begins processing.
The agent task pane on the right-hand side displays the invoice processing progress.
Configure and activate Payables Agent
Configure and activate the Payables Agent for your company. Only one Payables Agent is allowed per company, but you can give access to many users.
If you start with trial mode, the agent is already active and automatically transitions to full mode after 50 invoices. Use the following steps to adjust settings or set up the agent without using trial mode.
In the navigation bar at the upper right of the role center, select
Payables Agent > Activate (or  Configure Payables Agent if already in trial mode).
On the Configure the Payables Agent assisted setup guide, turn on the Active toggle.
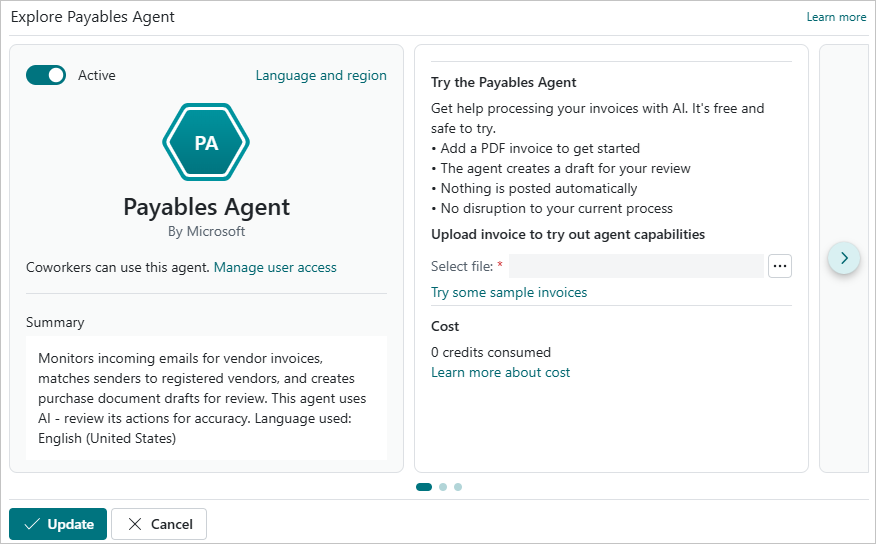
Select Manage user access to specify the users who can manage or interact with the agent. You can add more users now or later. Learn more in Manage user access to the Payables Agent.
Turn on the Monitor incoming information toggle, select the Mailbox checkbox, and then set the Mailbox field to the email account you want the agent to monitor.
(Optional) Set the Folder field to specify a specific mailbox folder the agent should monitor. Leave this field blank to monitor the entire mailbox.
Tip
Use the Folder field to support multiple Business Central companies sharing the same mailbox. Set up email rules in Outlook to route invoices for each company into separate subfolders, then configure each company's agent to monitor its designated subfolder. This setup prevents invoices from being processed by the wrong company's agent.
Ensure the Payables Agent's language is set to a supported language.
When you first configure the agent, it uses the same language as the display language of your workspace. You can change the language later from the Payables Agent card page. Learn more about these settings in Change language and regional settings.
On the right side of the page, select the Go to next card arrow to configure more options that determine how the agent behaves.
The options are spread across multiple cards. Use the Go to next card and Go to previous card arrows to go back and forth between the cards and set the various options. Each tab that follows describes a group of related options:
These options specify how the agent processes incoming vendor invoices and creates purchase documents.
- Review email: Select this checkbox to require users to review the incoming emails before the agent creates purchase document drafts.
- Configure additional fields: Select the link to choose more fields from matched purchase invoice history to populate automatically when the agent finalizes purchase document drafts to become purchase invoice documents. This feature ensures that purchase invoice line fields that aren't visible in the purchase document draft can be populated in the same process when matched with historic data. It's the way the generic Purchase document draft experience supports fields from customizations and add-on apps.

- Select Update to complete the setup.
The Payables Agent icon changes to  , indicating the agent is active and ready to handle incoming vendor invoices sent to the mailbox.
Tip
Refer to Payables Agent process flow to understand the agent in more detail and learn how it works.
Note
The  icon indicates the agent is configured with a mailbox, but it's not active. To activate it, select the icon, then select Configure Payables Agent to reopen the configuration page. From there, turn on the Active toggle.
Monitor and manage Copilot credit consumption
Payables Agent requires Copilot Credits to process incoming vendor invoices. You can monitor credit consumption in the Cost section of the configuration page, which displays the total number of Copilot credits the agent consumes.
To view credit consumption:
- Select Payables Agent > Configure.
- In the Cost section, view the total Copilot credits consumed.
- Select Learn more about cost to access detailed information about consumption-based billing.
What happens when credits run out
When your organization's Copilot Credit quota is depleted, the agent stops processing new invoices from the monitored mailbox. However, the agent remains active and continues to run its scheduled task.
When credits become available again (for example, at the start of a new billing period or when you purchase more capacity), the agent automatically resumes processing. It picks up all unread invoice emails that accumulated in the mailbox while credits were unavailable. Depending on the volume of accumulated emails, this action can consume a significant portion of your renewed credits quickly.
Best practices for managing credits
- Monitor your credit usage regularly. Check the Cost section in the agent configuration or review Copilot Credit capacity and usage in the Power Platform admin center to stay ahead of quota limits. Learn more in Manage consumption-based billing.
- Use trial mode to evaluate. Before committing to full mode, use the free trial to process up to 50 invoices and estimate your typical credit consumption pattern.
- Deactivate the agent if you don't want automatic resumption. If you're experimenting with the agent or running on limited credits, deactivate the agent before credits run out to prevent it from automatically processing a backlog of invoices when credits renew. To deactivate, turn off the Active toggle in the configuration page.
- Manage unread emails before reactivating. Before reactivating the agent after a credit shortage, consider clearing or archiving old invoice emails from the monitored mailbox that no longer need processing. This action prevents the agent from consuming credits on stale requests.
Note
When you reactivate the agent after deactivating it, the agent processes unread emails from the mailbox starting from when it was deactivated. If you don't want the agent to process older emails, clear them from the monitored folder before reactivating.
Manage agent permissions and user access
Configure agent users
As an administrator, you can specify which users have permission to use or configure the Payables Agent. There are three ways to add and configure agent users:
Open the Configure Payables Agent page by selecting
Payables Agent > Configure.Turn off the Active toggle.
Select Manage user access.
On the Select users that can manage or interact with the Agent page, you can do the following steps:
- To add a user, select an empty line, select the User Name field, then select the user from the list.
- To give a user permission to configure Payables Agent, select the Can configure check box.
The Can configure setting defines whether a user has access to update the agent configuration (for example, updating the designated mailbox, activating and deactivating the agent, and other settings) or only to work with the agent tasks (for example, reviewing and confirming agent steps). - To remove a user's access to the agent, select
 Show more options next to the user name, and then select Delete.
Tip
If users need to create or modify email accounts in Business Central (separate from the Exchange mailbox permissions above) or set up the Microsoft 365 document connector, assign them the Payables Ag. - Adm. permission set.
Manage agent's permissions to objects, data, and UI elements
The Payables Agent has a user account in Business Central, similar to other users. To edit this account, search for and open the Agents page, and then select PAYABLES AGENT - [COMPANY] to open the agent card page.
The Agent Permission Sets section lists all the permission sets currently assigned to the agent. By default, the Payables Agent has the PAYABLES AG. – RUN permission set. This set restricts access to only the objects, data, and UI elements (such as pages, fields, and actions) necessary for processing vendor invoices.
You can't modify the PAYABLES AG. – RUN permission set directly, because it's a system permissions set. However, you can create a copy, modify the copy to suit your needs, then add it to Agent Permission Sets section, along with any other permission sets.
Before you can add or delete permission sets applied to the agent, change the State to disabled. When you're done making changes, set it back to Enabled.
Change language and regional settings
The Payables Agent is validated and supported in English (EN) in the following locales: Australia (AU), United Kingdom (UK), United States (US) and New Zealand (NZ). While it can be used in other languages, it might not function as intended. Language quality might vary based on the user's interaction or system settings, which might impact accuracy and the user experience. Learn more in Copilot country/region availability and supported languages.
- To open the Payables Agent card page, search (Alt+Q) for Agents, and then select PAYABLES AGENT - [COMPANY].
- Select Agent User Settings.
- Set Language to a supported English locale.
Next steps
Related information
Payables Agent overview
Configure Copilot and agent capabilities