Note
Access to this page requires authorization. You can try signing in or changing directories.
Access to this page requires authorization. You can try changing directories.
Use Azure Batch to run large-scale parallel and high-performance computing (HPC) batch jobs efficiently in Azure. This tutorial walks through a Python example of running a parallel workload using Batch. You learn a common Batch application workflow and how to interact programmatically with Batch and Storage resources.
- Authenticate with Batch and Storage accounts.
- Upload input files to Storage.
- Create a pool of compute nodes to run an application.
- Create a job and tasks to process input files.
- Monitor task execution.
- Retrieve output files.
In this tutorial, you convert MP4 media files to MP3 format, in parallel, by using the ffmpeg open-source tool.
If you don't have an Azure account, create a free account before you begin.
Prerequisites
An Azure Batch account and a linked Azure Storage account. To create these accounts, see the Batch quickstart guides for Azure portal or Azure CLI.
Grant access to your Batch and Storage accounts
This tutorial shows how to authenticate to Azure Batch and Azure Storage by using Microsoft Entra ID with DefaultAzureCredential. The app doesn't use account keys. Before running the app, make sure the identity you use has the required roles on both accounts.
Sign in by using the Azure CLI.
DefaultAzureCredentialautomatically picks up this sign-in:az loginAssign your user account a role that allows data-plane operations on the Batch account, such as Azure Batch Data Contributor. This role is required to create pools, jobs, and tasks. You can assign the role on the Batch account's Access control (IAM) page in the Azure portal, or use the Azure CLI:
az role assignment create \
    --assignee "<your-user-principal-name>" \
    --role "Azure Batch Data Contributor" \
    --scope "/subscriptions/<subscription-id>/resourceGroups/<resource-group>/providers/Microsoft.Batch/batchAccounts/<batch-account-name>"
Assign your user account the Storage Blob Data Contributor role on the storage account. This role is required to create containers, upload the input files, and request the user delegation key that signs the shared access signature (SAS) URLs used by the tasks:
az role assignment create \
    --assignee "<your-user-principal-name>" \
    --role "Storage Blob Data Contributor" \
    --scope "/subscriptions/<subscription-id>/resourceGroups/<resource-group>/providers/Microsoft.Storage/storageAccounts/<storage-account-name>"
Note the following values, which you add to the sample's config.py file in the next section. You can find them on each account's Overview page in the Azure portal:
- Batch account name
- Batch account URL, for example
https://mybatchaccount.westus2.batch.azure.com - Storage account name
Note
It can take a few minutes for role assignments to propagate. If the app fails with an authorization error immediately after you assign the roles, wait a few minutes and try again.
Download and run the sample app
Important
The downloadable sample in the batch-python-ffmpeg-tutorial repo is being updated to match this tutorial. Until that update publishes, the repo might still contain the earlier key-based authentication and Ubuntu 20.04 code. The code in this article is the source of truth. If the downloaded sample doesn't match the snippets here, follow the code shown in this article.
Download the sample app
Download or clone the sample app from GitHub. To clone the sample app repo with a Git client, use the following command:
git clone https://github.com/Azure-Samples/batch-python-ffmpeg-tutorial.git
Navigate to the directory that contains the file batch_python_tutorial_ffmpeg.py.
In your Python environment, install the required packages using pip.
pip install -r requirements.txt
Use a code editor to open the file config.py. Update the Batch and storage account values with the names unique to your accounts. The sample uses DefaultAzureCredential to authenticate, so account keys are no longer required. For example:
_BATCH_ACCOUNT_NAME = 'yourbatchaccount'
_BATCH_ACCOUNT_URL = 'https://yourbatchaccount.yourbatchregion.batch.azure.com'
_STORAGE_ACCOUNT_NAME = 'mystorageaccount'
Make sure you're signed in by using az login and that your identity has the roles described in Grant access to your Batch and Storage accounts. DefaultAzureCredential can also discover other credential sources, such as a managed identity, Visual Studio Code, or environment variables.
Run the app
To run the script:
python batch_python_tutorial_ffmpeg.py
When you run the sample application, the console output is similar to the following. During execution, you experience a pause at Monitoring all tasks for 'Completed' state, timeout in 00:30:00... while the pool's compute nodes are started.
Sample start: 11/28/2018 3:20:21 PM

Container [input] created.
Container [output] created.
Uploading file LowPriVMs-1.mp4 to container [input]...
Uploading file LowPriVMs-2.mp4 to container [input]...
Uploading file LowPriVMs-3.mp4 to container [input]...
Uploading file LowPriVMs-4.mp4 to container [input]...
Uploading file LowPriVMs-5.mp4 to container [input]...
Creating pool [LinuxFFmpegPool]...
Creating job [LinuxFFmpegJob]...
Adding 5 tasks to job [LinuxFFmpegJob]...
Monitoring all tasks for 'Completed' state, timeout in 00:30:00...
Success! All tasks reached the 'Completed' state within the specified timeout period.
Deleting container [input]....

Sample end: 11/28/2018 3:29:36 PM
Elapsed time: 00:09:14.3418742
Go to your Batch account in the Azure portal to monitor the pool, compute nodes, job, and tasks. For example, to see a heat map of the compute nodes in your pool, select Pools > LinuxFFmpegPool.
When tasks are running, the heat map is similar to the following:
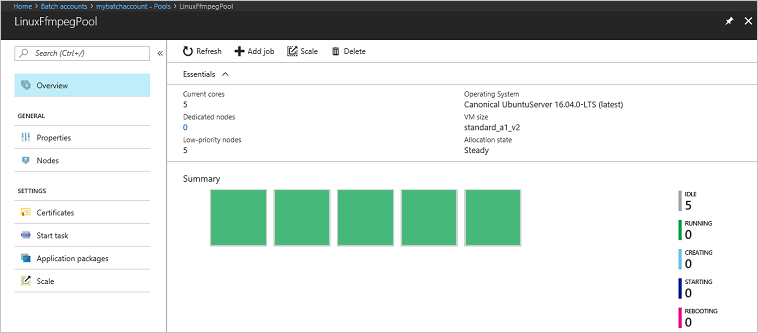
Typical execution time is approximately 5 minutes when you run the application in its default configuration. Pool creation takes the most time.
Retrieve output files
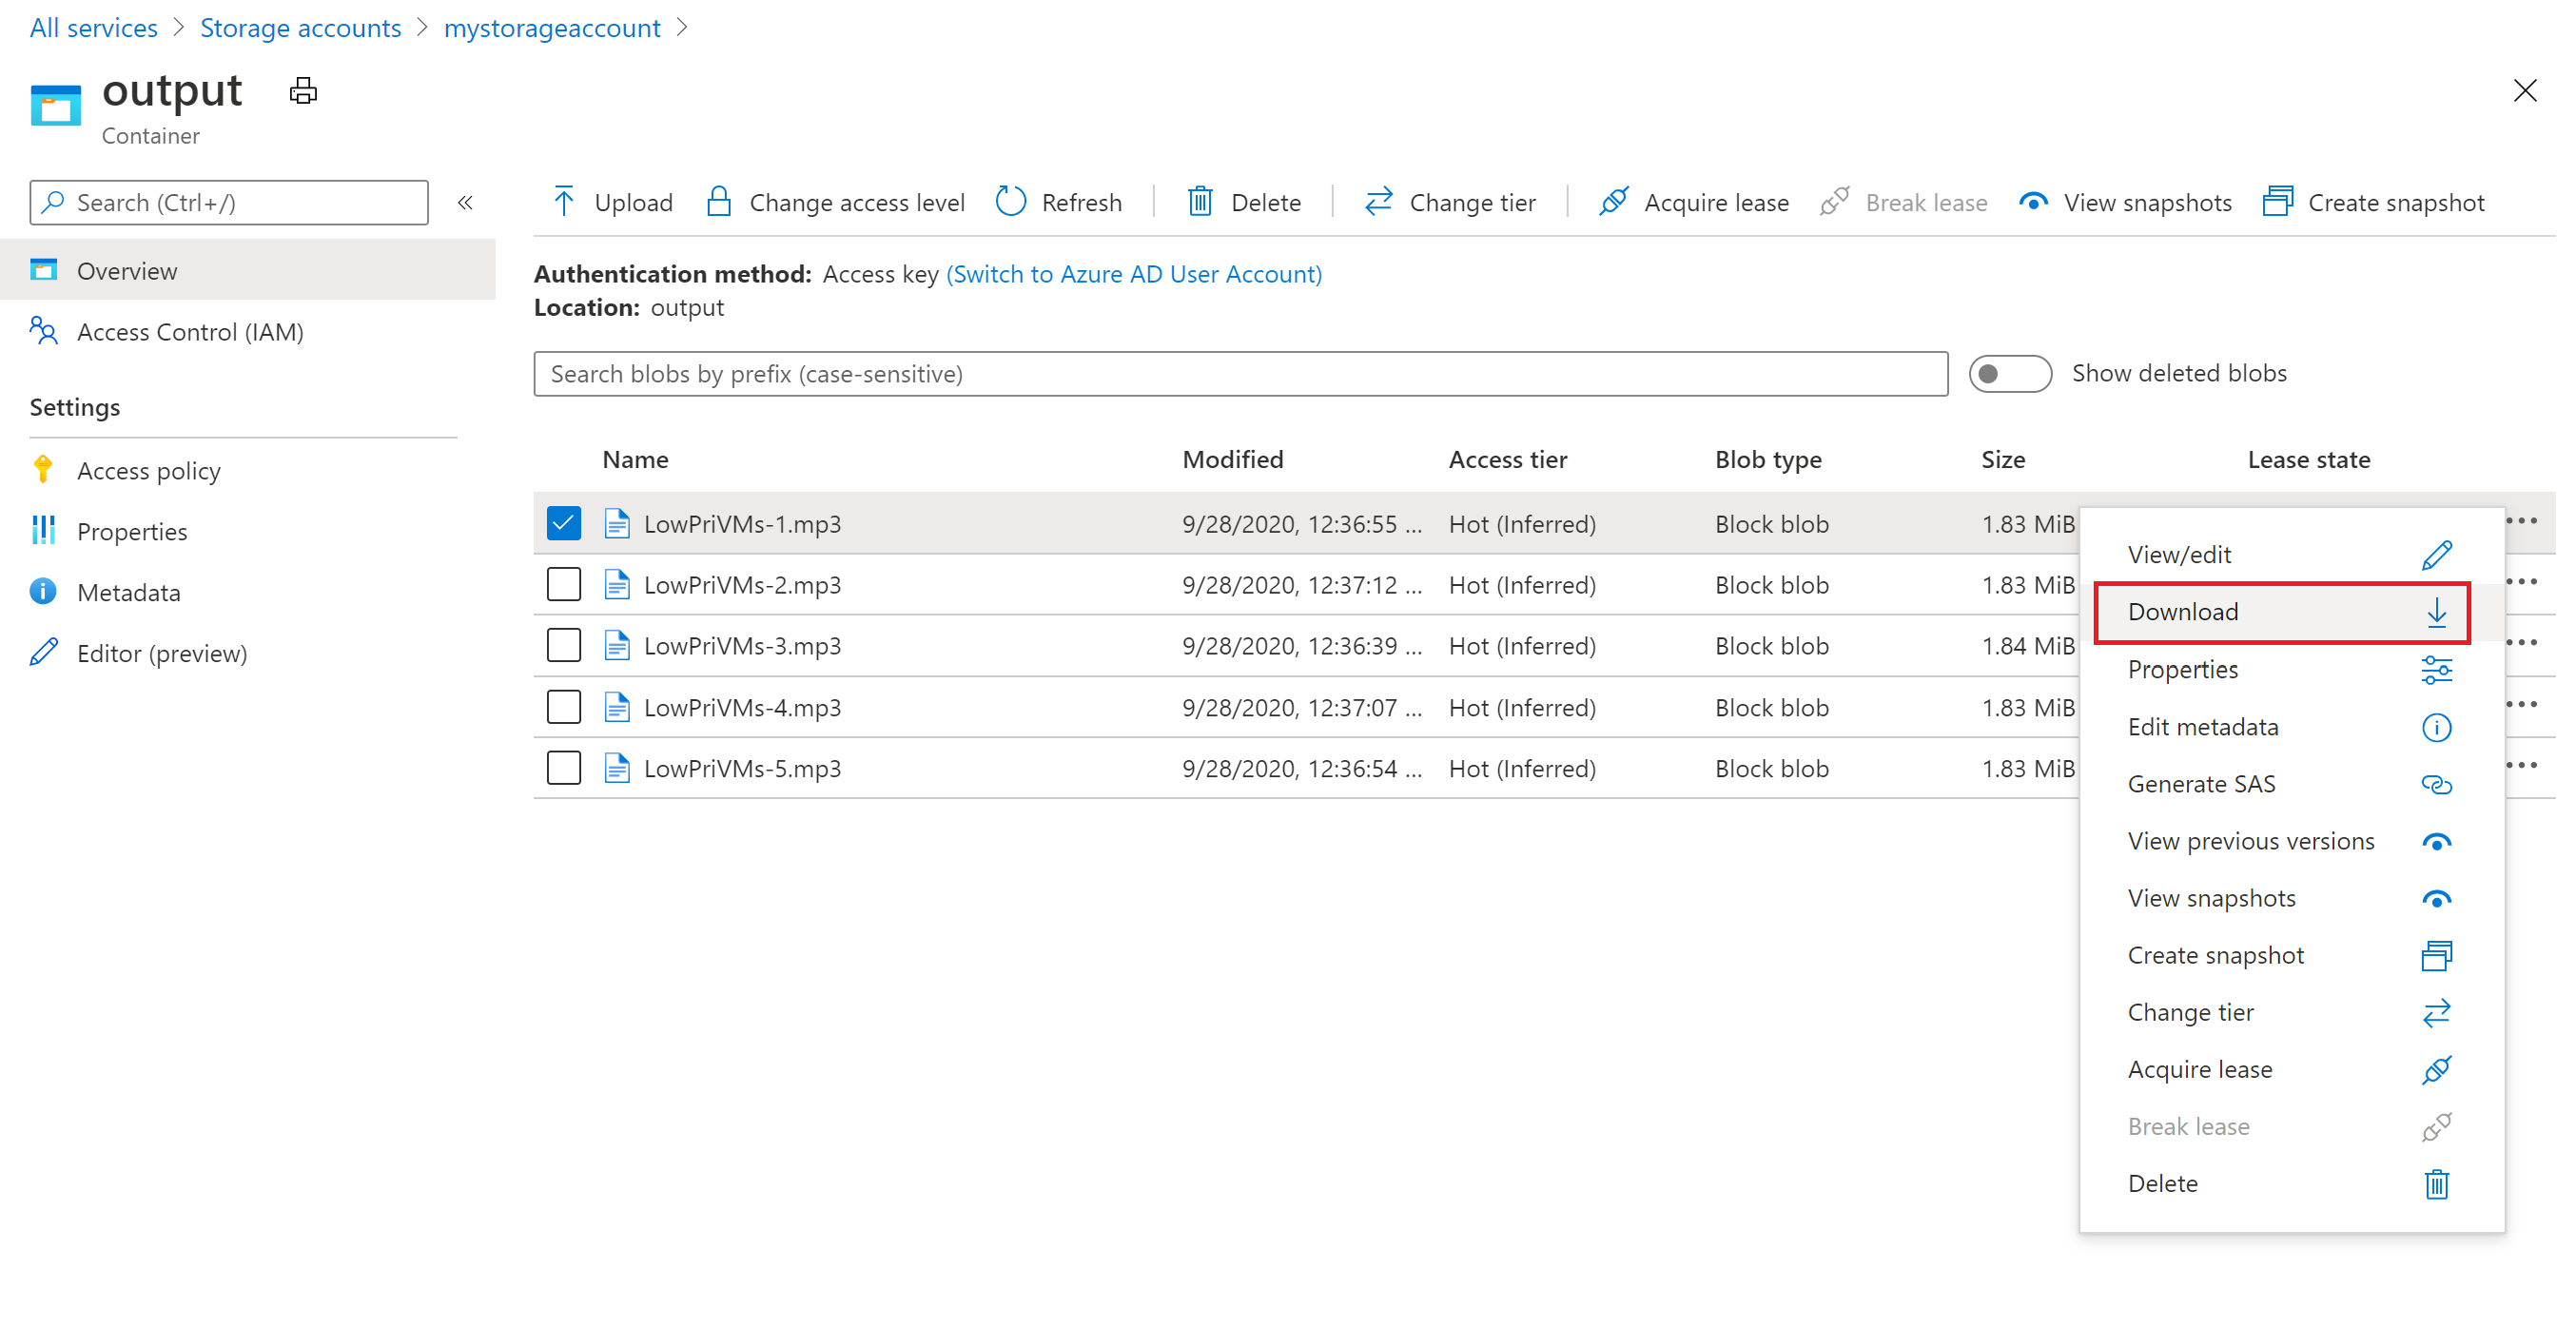
You can use the Azure portal to download the output MP3 files generated by the ffmpeg tasks.
- Click All services > Storage accounts, and then click the name of your storage account.
- Click Blobs > output.
- Right-click one of the output MP3 files and then click Download. Follow the prompts in your browser to open or save the file.
Although not shown in this sample, you can also download the files programmatically from the compute nodes or from the storage container.
Review the code
The following sections break down the sample application into the steps that it performs to process a workload in the Batch service. Refer to the Python code while you read the rest of this article, since not every line of code in the sample is discussed.
Authenticate Blob and Batch clients
The sample authenticates with both Storage and Batch by using DefaultAzureCredential from the azure-identity package. DefaultAzureCredential tries multiple credential types in order (environment variables, managed identity, Azure CLI sign-in, and so on), which makes the same code work in local development and in production without storing account keys.
To interact with a storage account, the app uses the azure-storage-blob package to create a BlobServiceClient object that uses the credential.
The sample imports the following identity and storage types, and reads the account names from config.py:
import config
from azure.identity import DefaultAzureCredential
from azure.storage.blob import (
    BlobServiceClient,
    BlobSasPermissions,
    ContainerSasPermissions,
    generate_blob_sas,
    generate_container_sas,
)
credential = DefaultAzureCredential()

blob_service_client = BlobServiceClient(
    account_url=f"https://{config._STORAGE_ACCOUNT_NAME}.blob.core.windows.net/",
    credential=credential)
The app creates a BatchClient object to create and manage pools, jobs, and tasks in the Batch service. The Batch client uses the same DefaultAzureCredential to authenticate through Microsoft Entra ID.
batch_client = BatchClient(
    endpoint=config._BATCH_ACCOUNT_URL,
    credential=credential)
Batch compute nodes access the input and output containers by using shared access signature (SAS) URLs. Because the app doesn't use the storage account key, it can't sign SAS tokens with it. Instead, the app requests a user delegation key from the Blob service, which is signed with the app's Microsoft Entra credentials, and uses that key to generate the SAS tokens. For more information, see Create a user delegation SAS.
start = datetime.datetime.now(datetime.timezone.utc)
expiry = start + datetime.timedelta(hours=4)
user_delegation_key = blob_service_client.get_user_delegation_key(
    key_start_time=start, key_expiry_time=expiry)

# Sign the SAS tokens with the same expiry as the user delegation key.
sas_expiry = expiry
Note
The user delegation key in this sample is valid for four hours. A SAS token that's signed with a user delegation key can't outlive the key, and a user delegation key can be valid for a maximum of seven days. For long-running workloads, request a new key and regenerate the SAS URLs before they expire.
Upload input files
After it creates the input and output containers with blob_service_client, the app uploads each local MP4 file in the InputFiles folder to the input container. The following upload_file_to_container helper uploads a single file, generates a read-only SAS token for it that's signed with the user delegation key, and returns a Batch ResourceFile object whose URL includes the SAS token so that Batch can later download the file to a compute node. The app calls this helper once for each input file:
def upload_file_to_container(blob_service_client, user_delegation_key,
                             sas_expiry, container_name, file_path):
    blob_name = os.path.basename(file_path)
    blob_client = blob_service_client.get_blob_client(container_name, blob_name)

    with open(file_path, "rb") as data:
        blob_client.upload_blob(data, overwrite=True)

    sas_token = generate_blob_sas(
        account_name=config._STORAGE_ACCOUNT_NAME,
        container_name=container_name,
        blob_name=blob_name,
        user_delegation_key=user_delegation_key,
        permission=BlobSasPermissions(read=True),
        expiry=sas_expiry)

    sas_url = f"{blob_client.url}?{sas_token}"

    return models.ResourceFile(http_url=sas_url, file_path=blob_name)
The app also generates a SAS URL for the output container that grants write access. The tasks use this URL to upload their output files to storage:
sas_token = generate_container_sas(
    account_name=config._STORAGE_ACCOUNT_NAME,
    container_name=output_container_name,
    user_delegation_key=user_delegation_key,
    permission=ContainerSasPermissions(write=True, create=True, list=True),
    expiry=sas_expiry)

output_container_sas_url = (
    f"https://{config._STORAGE_ACCOUNT_NAME}.blob.core.windows.net/"
    f"{output_container_name}?{sas_token}")
Create a pool of compute nodes
Next, the sample creates a pool of compute nodes in the Batch account by calling create_pool. This defined function uses the Batch BatchPoolCreateOptions class to set the number of nodes, VM size, and a pool configuration. In this configuration, a VirtualMachineConfiguration object specifies a BatchVmImageReference to an Ubuntu Server 22.04 LTS image published in the Azure Marketplace. Batch supports a wide range of VM images in the Azure Marketplace, as well as custom VM images.
The number of nodes and VM size are set using defined constants. Batch supports dedicated nodes and Spot nodes, and you can use either or both in your pools. Dedicated nodes are reserved for your pool. Spot nodes are offered at a reduced price from surplus VM capacity in Azure. Spot nodes become unavailable if Azure doesn't have enough capacity. The sample by default creates a pool containing only five Spot nodes in size Standard_A1_v2.
In addition to physical node properties, this pool configuration includes a BatchStartTask object. The BatchStartTask executes on each node as that node joins the pool, and each time a node is restarted. In this example, the BatchStartTask runs Bash shell commands to install the ffmpeg package and dependencies on the nodes.
The create_pool method submits the pool to the Batch service.
new_pool = models.BatchPoolCreateOptions(
    id=pool_id,
    virtual_machine_configuration=models.VirtualMachineConfiguration(
        image_reference=models.BatchVmImageReference(
            publisher="canonical",
            offer="0001-com-ubuntu-server-jammy",
            sku="22_04-lts",
            version="latest"
        ),
        node_agent_sku_id="batch.node.ubuntu 22.04"),
    vm_size=_POOL_VM_SIZE,
    target_dedicated_nodes=_DEDICATED_POOL_NODE_COUNT,
    target_low_priority_nodes=_LOW_PRIORITY_POOL_NODE_COUNT,
    start_task=models.BatchStartTask(
        command_line="/bin/bash -c \"apt-get update && apt-get install -y ffmpeg\"",
        wait_for_success=True,
        user_identity=models.UserIdentity(
            auto_user=models.AutoUserSpecification(
                scope=models.AutoUserScope.POOL,
                elevation_level=models.ElevationLevel.ADMIN)),
    )
)
batch_client.create_pool(pool=new_pool)
Note
Marketplace VM images and Batch node agents have support end dates. Ubuntu Server 20.04 LTS images and the batch.node.ubuntu 20.04 node agent are no longer supported for new Batch pools. To list the image references and node agent SKUs your Batch account currently supports, call the list_supported_images method.
Create a job
A Batch job specifies a pool to run tasks on and optional settings such as a priority and schedule for the work. The sample creates a job by calling create_job. This defined function uses the BatchJobCreateOptions class to create a job on your pool. The create_job method submits the job to the Batch service. Initially the job has no tasks.
job = models.BatchJobCreateOptions(
    id=job_id,
    pool_info=models.BatchPoolInfo(pool_id=pool_id))

batch_client.create_job(job=job)
Create tasks
The app creates tasks in the job with a call to add_tasks. This defined function creates a list of task objects using the BatchTaskCreateOptions class. Each task runs ffmpeg to process an input resource_files object using a command_line parameter. ffmpeg was previously installed on each node when the pool was created. Here, the command line runs ffmpeg to convert each input MP4 (video) file to an MP3 (audio) file.
The sample creates an OutputFile object for the MP3 file after running the command line. Each task's output files (one, in this case) are uploaded to a container in the linked storage account, using the task's output_files property.
Then, the app adds tasks to the job with the create_tasks method, which queues them to run on the compute nodes.
tasks = list()

for idx, input_file in enumerate(input_files):
    input_file_path = input_file.file_path
    output_file_path = "".join((input_file_path).split('.')[:-1]) + '.mp3'
    command = "/bin/bash -c \"ffmpeg -i {} {} \"".format(
        input_file_path, output_file_path)
    tasks.append(models.BatchTaskCreateOptions(
        id='Task{}'.format(idx),
        command_line=command,
        resource_files=[input_file],
        output_files=[models.OutputFile(
            file_pattern=output_file_path,
            destination=models.OutputFileDestination(
                container=models.OutputFileBlobContainerDestination(
                    container_url=output_container_sas_url)),
            upload_options=models.OutputFileUploadConfiguration(
                upload_condition=models.OutputFileUploadCondition.TASK_SUCCESS))]
    )
    )
batch_client.create_tasks(job_id=job_id, task_collection=tasks)
Monitor tasks
When tasks are added to a job, Batch automatically queues and schedules them for execution on compute nodes in the associated pool. Based on the settings you specify, Batch handles all task queuing, scheduling, retrying, and other task administration duties.
There are many approaches to monitoring task execution. The wait_for_tasks_to_complete function in this example uses the BatchTaskState object to monitor tasks for a certain state, in this case the completed state, within a time limit.
while datetime.datetime.now() < timeout_expiration:
    print('.', end='')
    sys.stdout.flush()
    tasks = batch_client.list_tasks(job_id=job_id)

    incomplete_tasks = [task for task in tasks if
                        task.state != models.BatchTaskState.COMPLETED]
    if not incomplete_tasks:
        print()
        return True
    else:
        time.sleep(5)
...
Clean up resources
After it runs the tasks, the app automatically deletes the input storage container it created, and gives you the option to delete the Batch pool and job. The begin_delete_job and begin_delete_pool methods of the BatchClient class each start the corresponding delete operation when you confirm the prompt. Although you aren't charged for jobs and tasks themselves, you are charged for compute nodes. Thus, allocate pools only as needed. When you delete the pool, all task output on the nodes is deleted. However, the output files remain in the storage account.
When no longer needed, delete the resource group, Batch account, and storage account. To do so in the Azure portal, select the resource group for the Batch account and choose Delete resource group.
Next steps
In this tutorial, you learned how to:
- Authenticate with Batch and Storage accounts.
- Upload input files to Storage.
- Create a pool of compute nodes to run an application.
- Create a job and tasks to process input files.
- Monitor task execution.
- Retrieve output files.
For more examples of using the Python API to schedule and process Batch workloads, see the Batch Python samples on GitHub.