Note
Access to this page requires authorization. You can try signing in or changing directories.
Access to this page requires authorization. You can try changing directories.
After you publish your tool's container image to Azure Container Registry (ACR) and author its YAML definition, the next step is to register the tool with Microsoft Discovery as an Azure resource of type Microsoft.Discovery/tools. Once registered, agents in any project that has access to the tool can invoke it during investigations.
This article shows you how to:
- Convert your YAML tool definition into the JSON format that the Discovery resource provider accepts.
- Create the tool resource by using the Azure portal, the REST API, or Discovery Studio.
- Optionally pass runtime environment variables to the tool's container at deployment time.
Prerequisites
- A container image published to Azure Container Registry. See Publish a tool container image to Azure Container Registry.
- A tool definition YAML file. See Create a tool definition for Microsoft Discovery.
- An existing Microsoft Discovery workspace and a resource group in a supported region.
- Permissions to create resources of type
Microsoft.Discovery/toolsin your target resource group. The Microsoft Discovery Platform Administrator (Preview) or Contributor role is sufficient. - For REST API calls: Azure CLI 2.50+ or another HTTP client (
curl, Postman) able to send authenticated requests.
Step 1: Convert the tool definition YAML to JSON
The Discovery resource provider stores the tool definition as a JSON document on the resource. You author the definition in YAML for readability, then convert it to JSON before uploading. Conversion changes the serialization format; it doesn't validate the deployed tool contract or test the container. First complete the local definition checks.
# Requires PowerShell 7+ with the powershell-yaml module
Install-Module powershell-yaml -Scope CurrentUser

$yaml = Get-Content -Raw ./tool.yaml | ConvertFrom-Yaml
$yaml | ConvertTo-Json -Depth 20 | Set-Content ./tool.json
Tip
Keep both the YAML source and the generated JSON in source control. The YAML is easier to review in pull requests; the JSON is what you upload to Discovery.
Step 2 (optional): Prepare an environment variables file
Environment variables let you pass runtime configuration to your tool's container without rebuilding the image. Use this when values vary per deployment (for example, endpoints, feature flags, model names, or non-secret tokens) and aren't pre-baked into the image.
The environment variables file is a JSON document containing a flat map of string keys to string values:
{
  "MODEL_ENDPOINT": "https://contoso-models.openai.azure.com/",
  "MAX_BATCH_SIZE": "32",
  "FEATURE_FLAG_NEW_PARSER": "true"
}
Save the file (for example, my-tool.env.json). You upload it alongside the definition file in step 3.
Important
Don't store secrets such as API keys or connection strings in the environment variables file. Use a managed identity with appropriate role assignments, or reference a Key Vault, instead.
Step 3: Create the tool resource
You can create the Discovery tool resource by using the Azure portal, the REST API, or Discovery Studio.
Sign in to the Azure portal.
Search for Microsoft Discovery Tools and select it.
Select + Create. The Basics tab opens.
On the Basics tab, fill in the following fields:
Field Description Subscription The subscription where the tool resource is created. Resource group An existing resource group, or select Create new. Use the same resource group as your workspace for simpler management. Name A unique name for the tool resource. Use lowercase letters, numbers, and hyphens. Region An Azure region that supports Microsoft Discovery (East US, East US 2, Sweden Central, or UK South). Definition content file The JSON file produced in Step 1. Select the folder icon and upload tool.json.Definition content version Any string that identifies the version of the definition (for example, 1.0.0,2026-05-01, or a git commits SHA). Increment this value each time you upload a new definition so that consumers can detect updates.Environment variables Optional. Upload the JSON file from Step 2. Leave blank if your container doesn't need runtime configuration. 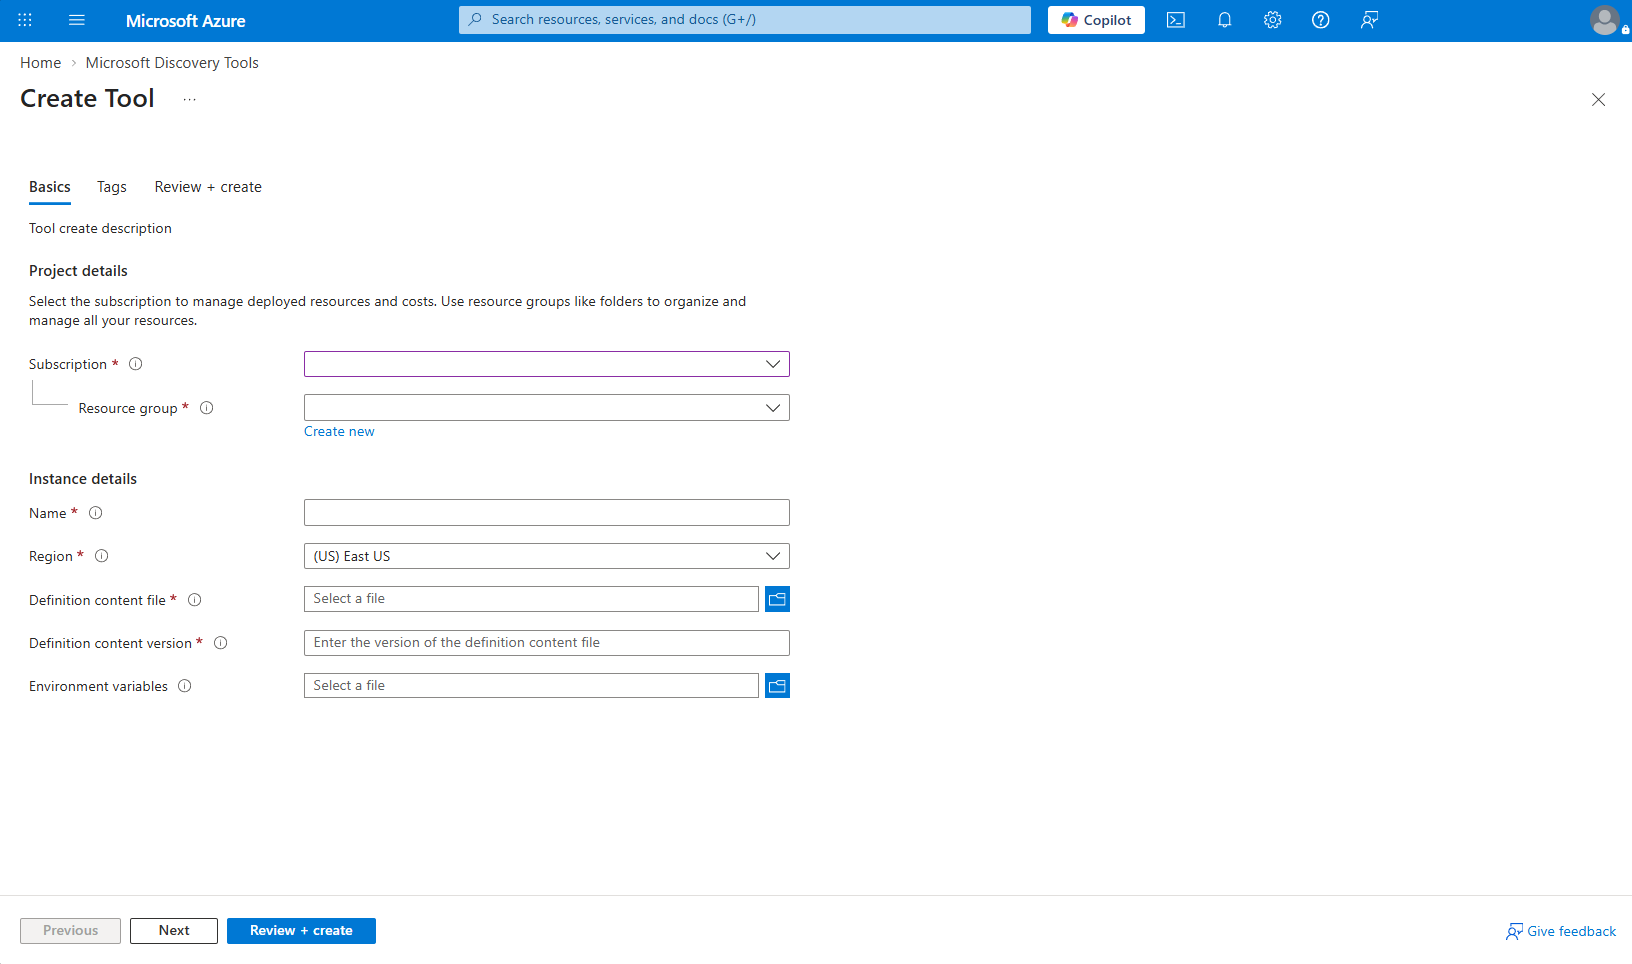
(Optional) On the Tags tab, add any tags required by your organization.
On the Review + create tab, verify the settings and select Create.
After deployment completes, the tool appears in the Discovery tool catalog and can be added to projects.
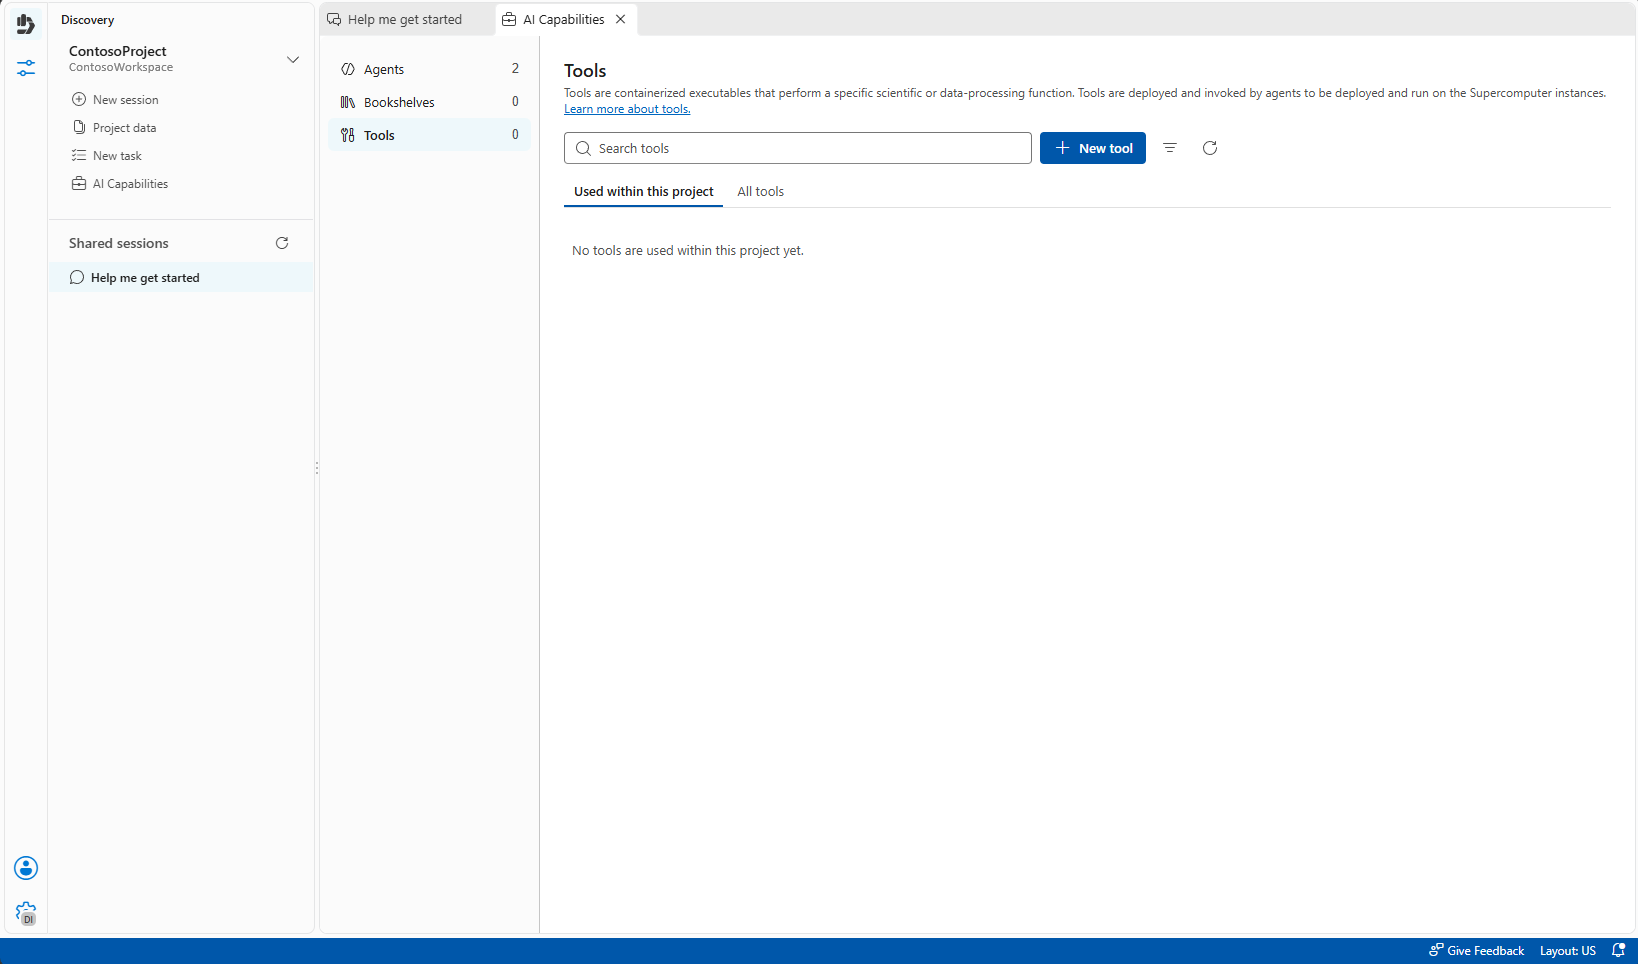
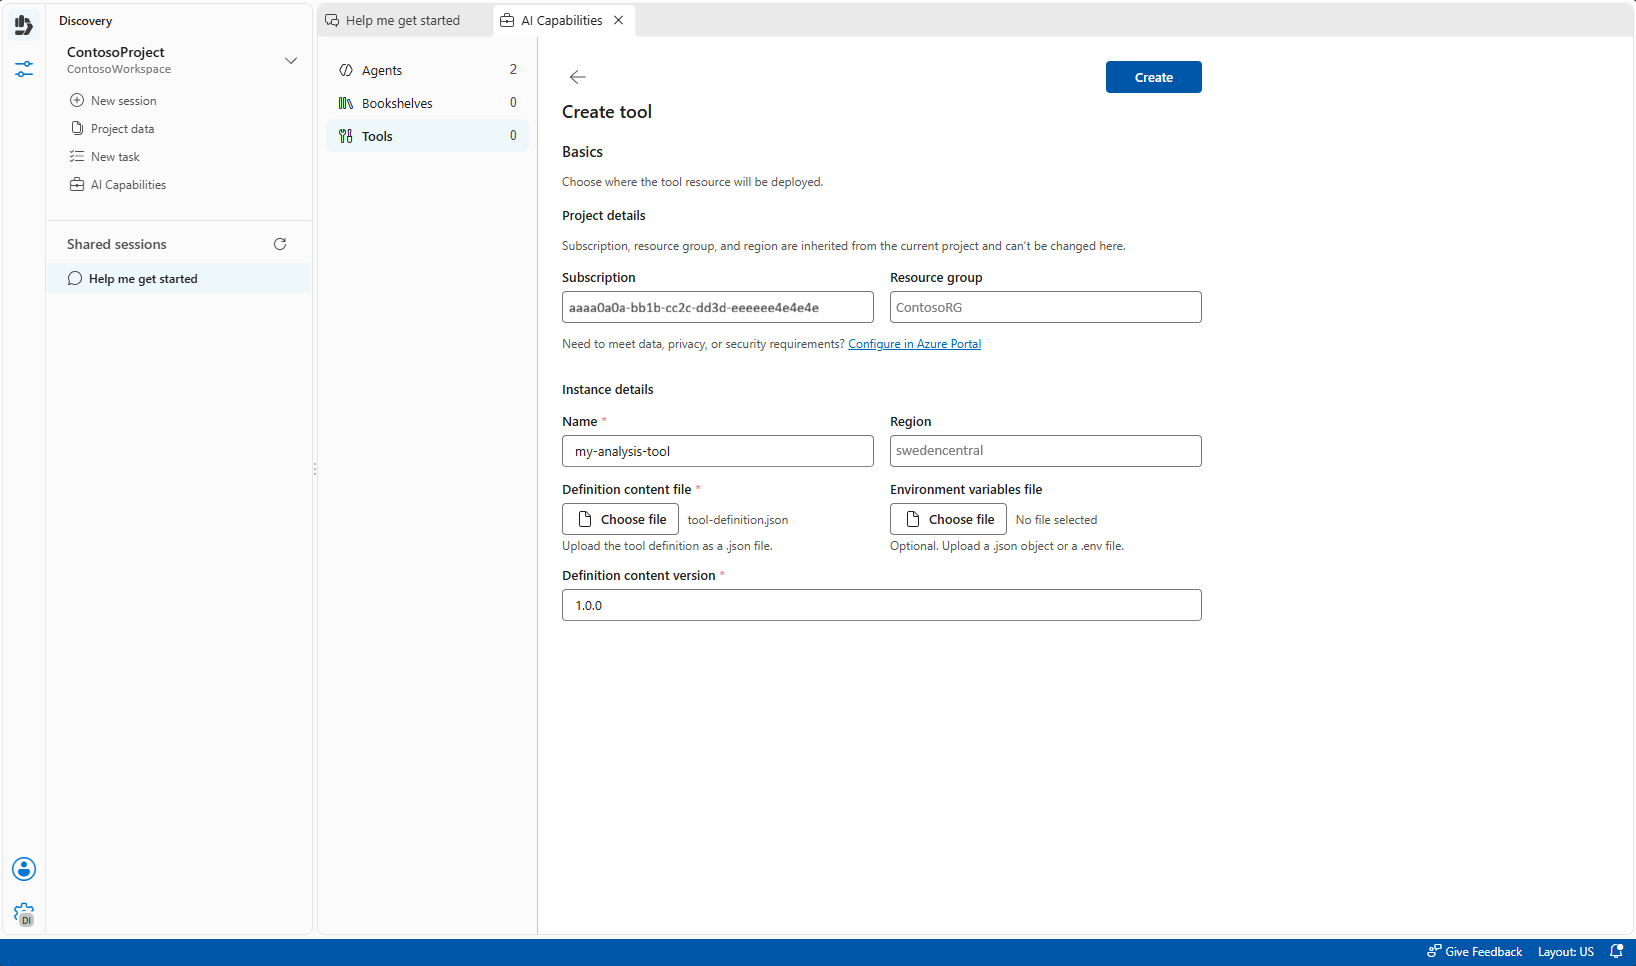
Step 4: Verify the deployment
After you create the tool, verify that it deployed successfully. In Discovery Studio, open your project, select AI Capabilities > Tools, and then select All tools to confirm your tool appears in the list.
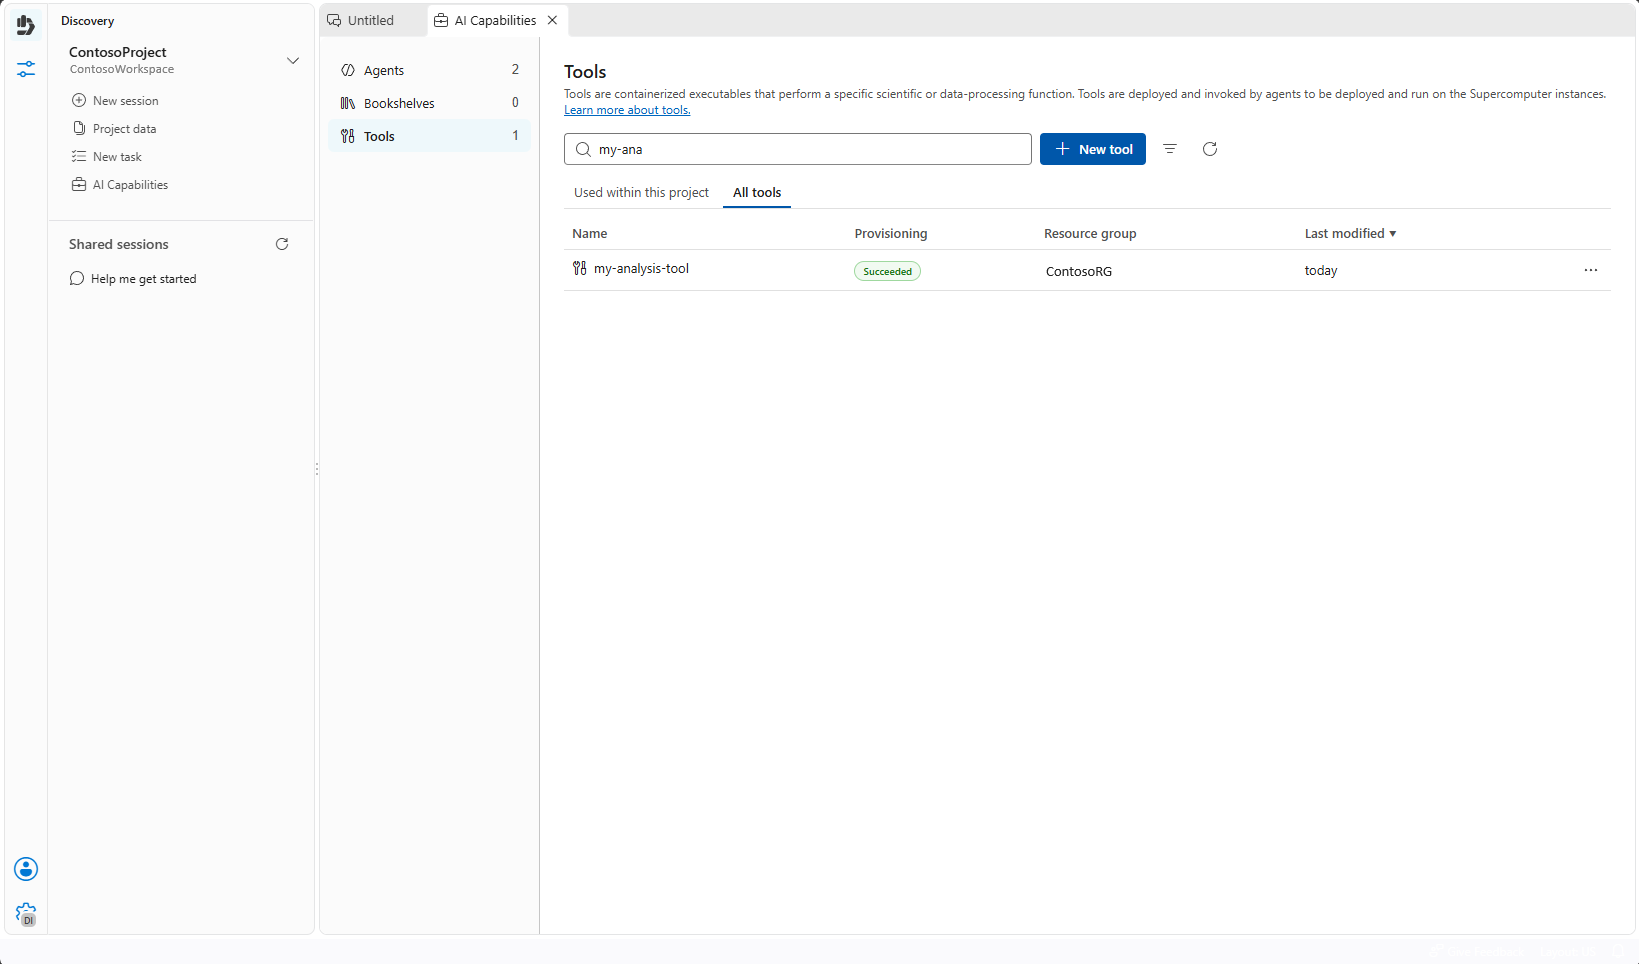
You can also verify the deployment by using the Azure CLI:
az resource show \
  --ids "/subscriptions/<subscriptionId>/resourceGroups/<resourceGroupName>/providers/Microsoft.Discovery/tools/<toolName>" \
  --api-version 2026-06-01 \
  --query "{name:name, state:properties.provisioningState, version:properties.version}" \
  -o table
The provisioningState should be Succeeded. Creating this resource doesn't automatically add it to every project or grant access to it. In each project that needs the tool, add the existing tool through AI Capabilities > Tools and ensure the invoking identities have the required permissions.
Update an existing tool
To publish a new version of a tool, repeat Step 1 with your updated YAML, then re-run Step 3 using the same tool name. Always increment Definition content version so that downstream consumers can detect the change.
Troubleshooting
| Symptom | Likely cause | Resolution |
|---|---|---|
InvalidDefinitionContent error during create |
The uploaded JSON doesn't match the tool definition schema. | Re-validate the YAML with the tool definition reference and reconvert. See Create a tool definition. |
ImagePullBackOff when the tool runs |
The image reference, registry permissions, or network access are incorrect. | Verify the repository and tag, the supercomputer's kubelet UAMI image-pull permissions, and the network and DNS path. See Supercomputer registry access, including ABAC role differences. |
| Environment variables aren't visible in the container | The file wasn't valid JSON or wasn't uploaded. | Confirm the file is a flat { "KEY": "value" } JSON object and re-create the resource. |
RoleAssignmentNotFound when creating the resource |
Missing RBAC on the resource group. | Assign Contributor or Microsoft Discovery Platform Administrator (Preview) at the resource group scope. |