Note
Access to this page requires authorization. You can try signing in or changing directories.
Access to this page requires authorization. You can try changing directories.
Note
Community interest groups have now moved from Yammer to Microsoft Viva Engage. To join a Viva Engage community and take part in the latest discussions, fill out the Request access to Finance and Operations Viva Engage Community form and choose the community you want to join.
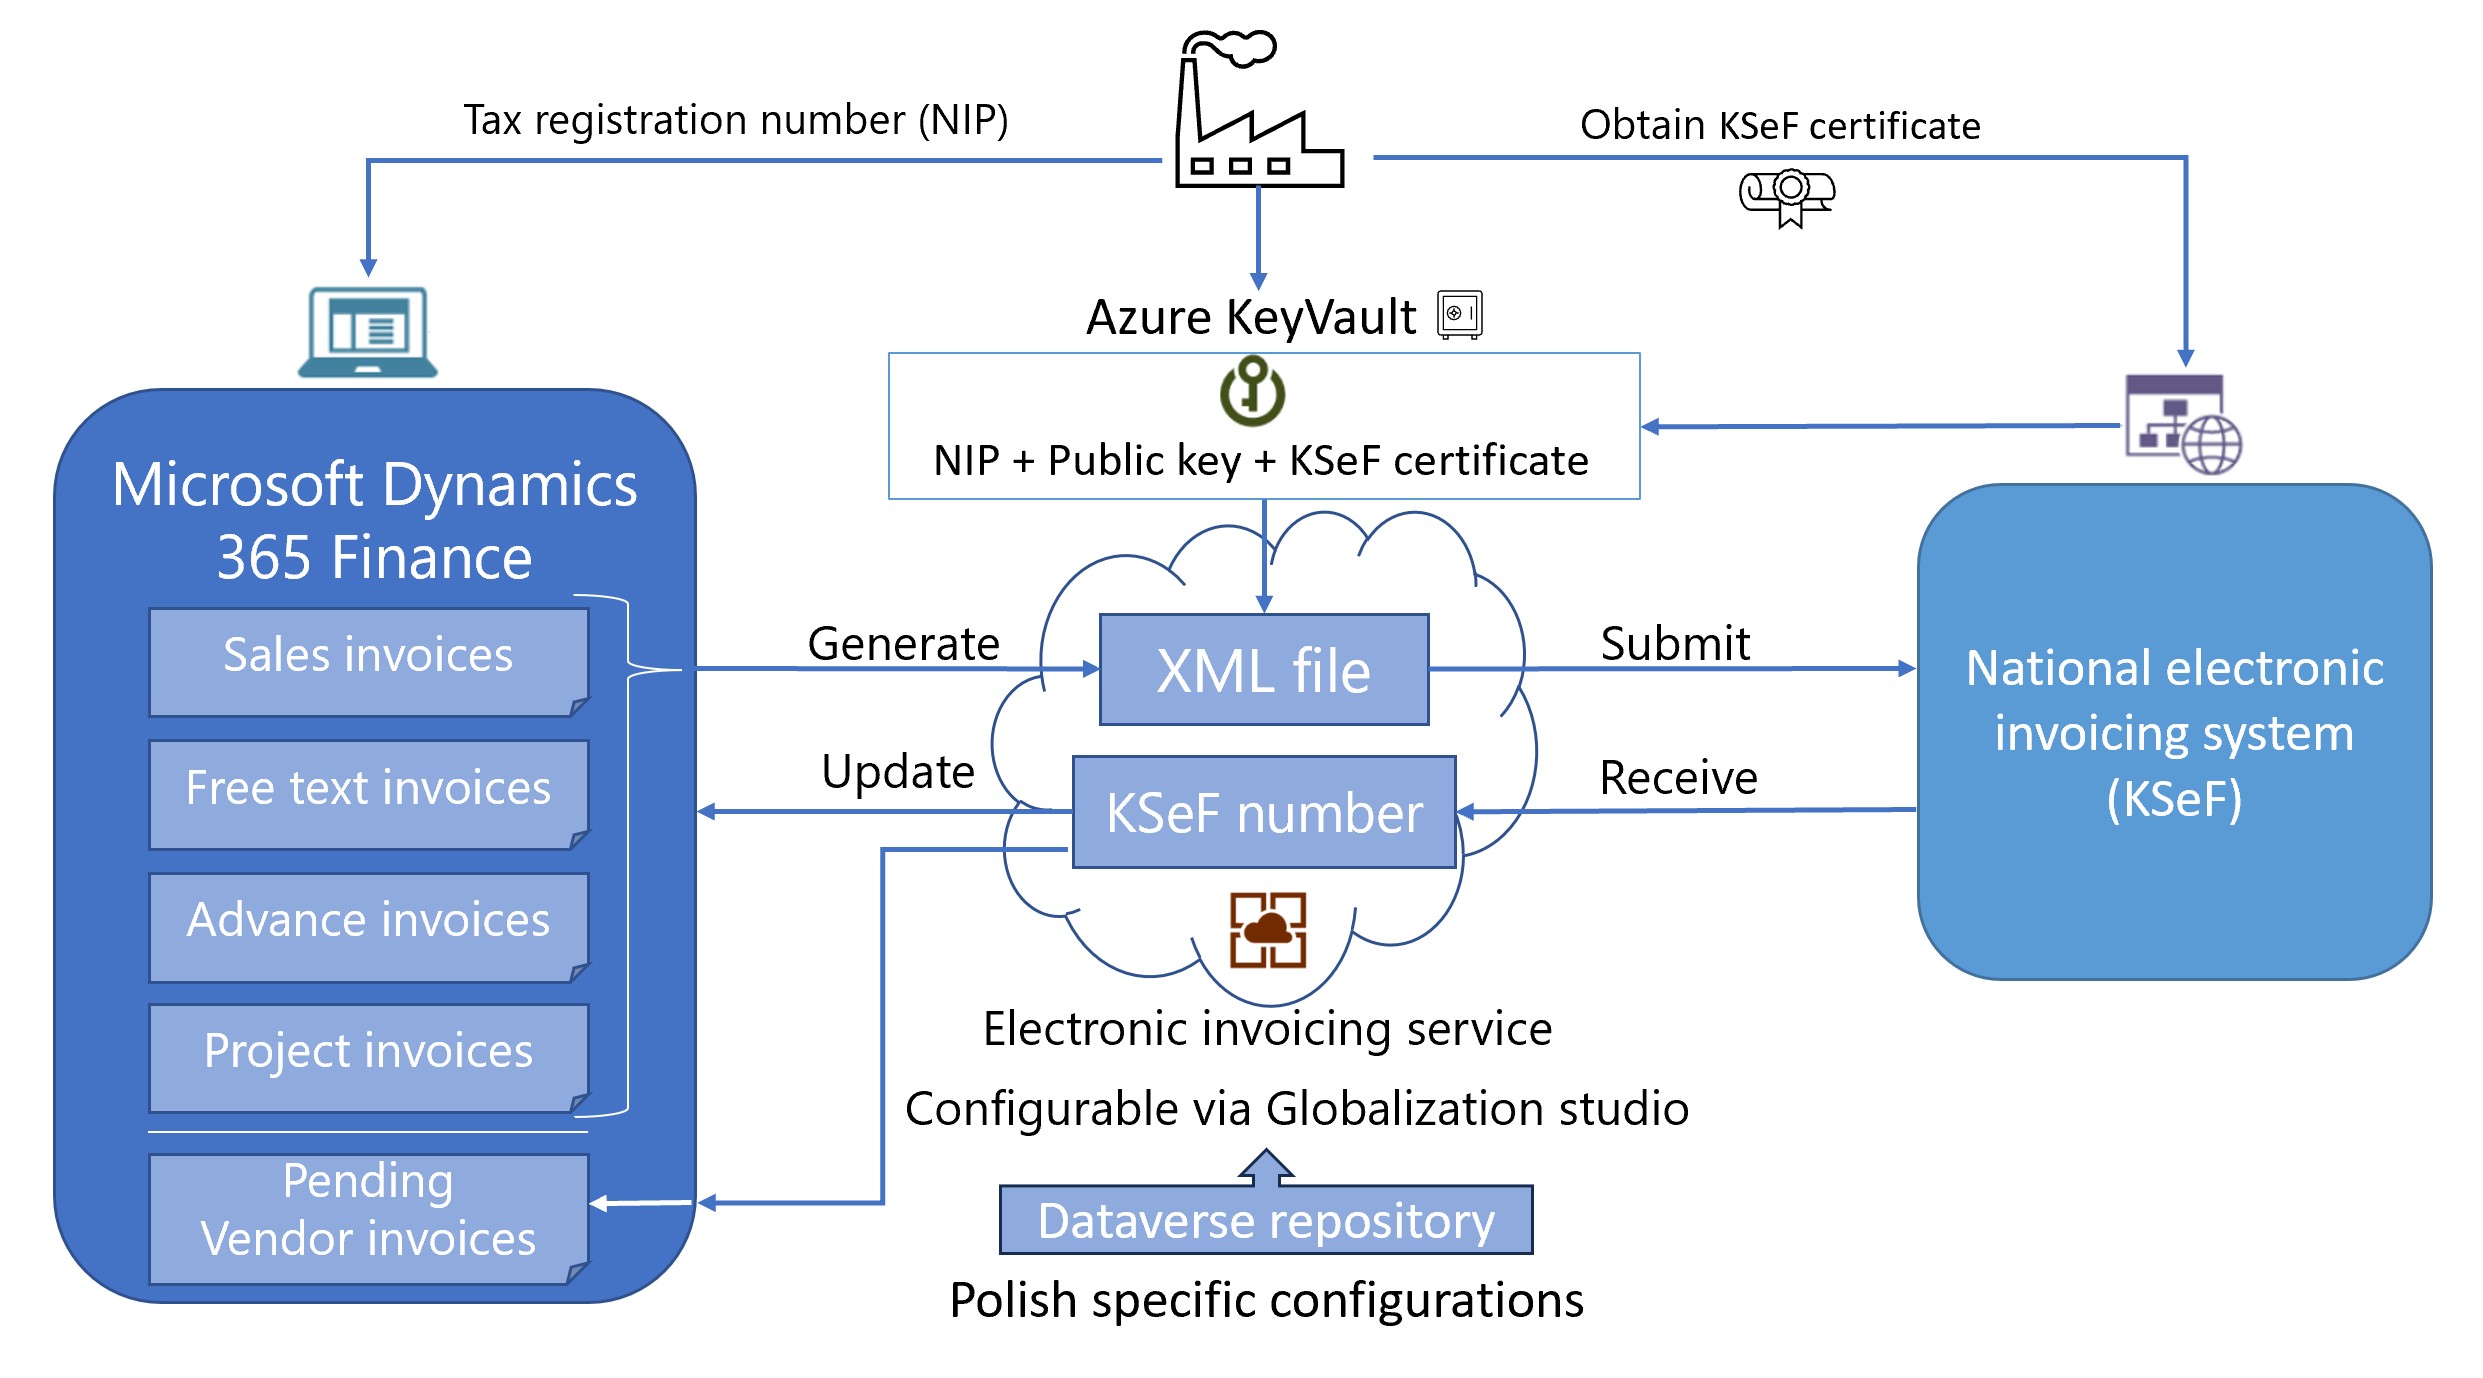
This article explains how to get started with electronic invoicing for Poland in Microsoft Dynamics 365 Finance.
After you configure electronic invoicing, you can submit and receive the XML files of electronic invoices according to the regulatory requirements in Poland.
Note
The electronic invoicing approach that this article describes uses an invoicing service that's applicable only to cloud deployments of Finance or Supply Chain Management.
Prerequisites
Before you begin the procedures in this article, complete the following prerequisites:
The primary address of the legal entity must be in Poland.
The legal entity must be registered as a taxpayer in Poland and must have a valid tax identification number (Numer identyfikacji podatkowej [NIP]).
Sign in to the Polish National system for electronic invoicing (Krajowy System e-Faktur [KSeF]) via a trusted profile, qualified signature, or qualified seal. Obtain the certificate of the Authentication in KSeF system type that the Invoicing Service can use to securely communicate with KSeF. For more information, see the video from the Ministry of Finance: Applying for and Managing Certificates.
During the initial downloading you obtain the pair of files - the *.crt file with the certificate itself and the *.key file for the private key.
Note
Store the private key file securely as since it might not be downloadable during the consequent obtaining of the same certificate.
To process further with the system configuration, you need to convert the obtained pair of files into one *.pfx certificate file, which is then stored in your Key Vault and used as a parameter in the feature setup.
You can use any convenient tool for the certificate conversion. As an example, the following Windows PowerShell script can be used for the conversion.
Note
The sample script isn't supported under any Microsoft standard support program or service. The sample script is provided AS IS without warranty of any kind. Microsoft further disclaims all implied warranties including, without limitation, any implied warranties of merchantability or of fitness for a particular purpose. The entire risk arising out of the use or performance of the sample scripts and documentation remains with you. In no event shall Microsoft, its authors, or anyone else involved in the creation, production, or delivery of the script be liable for any damages whatsoever (including, without limitation, damages for loss of business profits, business interruption, loss of business information, or other pecuniary loss) arising out of the use of or inability to use the sample script or documentation, even if Microsoft has been advised of the possibility of such damages.
openssl pkcs12 -export -in <your-ksef-certificate>.crt -inkey <your-ksef-certificate>.key -out <your-ksef-certificate>.pfxWhere:
- <your-ksef-certificate>.crt - is the certificate file obtained from KSeF the private key will be combined with
- <your-ksef-certificate>.key - is the private key file obtained from KSeF to combine with the certificate
- <your-ksef-certificate>.pfx - the output file name that is used for uploading to your Key Vault
Obtain the public key these links depending on the type of environment you're configuring: test, demo, or prod. From the response, copy the value from the second certificate element with the SymmetricKeyEncryption usage type. You use it during Key Vault parameters configuration described in the next chapter. For more information, see the details provided by KSeF.
Install the Electronic invoicing add-in as described in Install the add-in for Electronic invoicing microservices.
Activate Electronic invoicing integration with Finance or Supply Chain Management as it's described in Enable Electronic invoicing integration.
Configure the common part of the Electronic document parameters.
Note
Service environment configuration is required only if the Regulatory Configuration Service (RCS) experience was previously used to configure the Electronic Invoicing service. Otherwise, keep the Environment parameter empty. The system assigns it automatically and makes read-only. For more information, see Service environment configuration.
Create the Azure Key Vault configuration
Configure the common part of the Azure resources required for Electronic invoicing functioning. For more information, see Configure Azure resources for Electronic invoicing.
Add the following required elements in the key vault:
The secret that holds the shared access signature (SAS) token of the storage account.
The certificate for the obtained KSeF certificate.
The secret for the client ID, which must equal the taxpayer's tax identification number (NIP).
The secret for the obtained public key.
Note
The value of the public key must be wrapped in the following commands.
-----BEGIN CERTIFICATE-----
…
-----END CERTIFICATE-----
Configure electronic invoicing Key Vault parameters
To configure electronic invoicing Key Vault parameters, follow these steps:
In Dynamics 365 Finance, go to Organization administration > Setup > Electronic document parameters.
On the Electronic invoicing tab, in the Key Vault settings section, in the Key Vault field, select the reference to the key vault that you created in the previous section of this article.
In the SAS token secret field, select the name of the storage account secret URL that must be used to authenticate access to the storage account.
Select Key Vault parameters.
On the Key Vault parameters page, in the Certificates section, select Add to create new elements of the appropriate type for each secret that is described in the previous section.
- The secret for the SAS token of the storage account.
- The certificate element of the Certificate type.
- The Client ID element of the Secret type.
- The Public key element of the Secret type.
Note
The values in the Name column should match the names of the secrets that are described in the previous section.
For more information, see Create a Key Vault reference.
Synchronization of the Electronic invoicing service with Finance
After you complete all the configuration steps described in the previous chapters, validate the configuration.
- In Dynamics 365 Finance, go to Organization administration > Setup > Electronic document parameters.
- Select the Electronic invoicing tab and select the Save menu button.
- If the configuration is correct, the system shows the Synchronization with the e-invoicing service was successful information message. You can continue with the next chapters.
- If there are synchronization errors, address the errors to achieve successful synchronization.
Import the electronic invoicing feature
To import the electronic invoicing feature, follow these steps:
In Dynamics 365 Finance, go to Globalization Studio, and select the Electronic invoicing tile. Then import the latest version of the Polish electronic invoice (PL) Globalization feature as described in Import features from the repository.
In the Electronic reporting workspace, on the Reporting configurations tile, make sure that the following Electronic reporting configurations are successfully imported as result of the Polish electronic invoice (PL) Globalization feature import.
- Invoice model
- Invoice model mapping
- Advance invoice model mapping
- Sales e-invoice (PL)
- Project e-invoice (PL)
- Advance e-invoice (PL)
- Customer invoice context model
- Response message model
- Response message model mapping to destination (PL)
- KSeF response message import (PL)
Note
If the import process doesn't import these Electronic reporting configurations, import them manually as described in Import Electronic reporting (ER) configurations from Dataverse.
In the Electronic reporting workspace, on the Reporting configurations tile, import the latest versions of the following Electronic reporting configurations required for receiving incoming vendor invoices.
- Vendor invoice import (PL)
- Vendor invoice Mapping to destination (PL)
- KSeF number message import (PL)
- KSeF number model mapping to destination (PL)
Configure the import channel
To configure the import channel, follow these steps:
In the Electronic reporting workspace, on the Reporting configurations tile, select the Customer invoice context model configuration.
Select Create configuration, and then select Derive from Name: Customer invoice context model, Microsoft in the dropdown dialog. This action creates a derived configuration.
Open the derived configuration for editing in the designer, and then select Map model to datasource.
Open the DataChannel definition for editing in the designer.
In the Data sources tree, expand the $Context_Channel container.
In the Value field, select Edit, and then enter the name of the data channel. Make a note of the value, because you use it in later configuration steps.
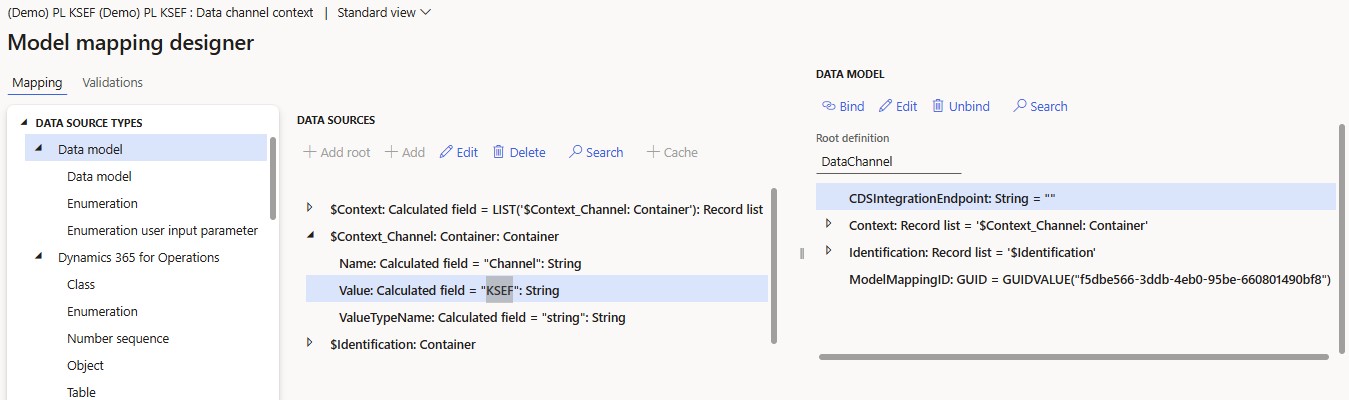
Save your changes and complete the derived configuration.
Configure the electronic invoicing feature
Some parameters for the Polish electronic invoice (PL) electronic invoicing feature have default values. Before you deploy the electronic invoicing feature to the service, review the default values, and update them as needed to better reflect your business operations.
To review and update the Polish electronic invoice (PL) electronic invoicing feature configuration, follow these steps:
In Dynamics 365 Finance, go to Globalization Studio, and select the Electronic invoicing tile. Then import the latest version of the Polish electronic invoice (PL) Globalization feature as described in Import features from the repository.
Create a copy of the imported Globalization feature, and select your configuration provider for it, as described in Create a Globalization feature.
On the Versions tab, verify that the Draft version is selected.
On the Feature parameters tab, specify values for the following connection and integration parameters. You need these parameters for interoperation with Polish KSEF services.
- EnvironmentName – select the type of the environment, depending on the implementation stage: Test, Demo, or Prod.
- PolishClientID – select the name of the client ID that you previously created.
- PolishImportDataChannel – enter the name of the data channel that you previously defined.
- PolishPublicKey – select the name of the public key that you previously created.
- PolishCertificate – select the name of the certificate that you previously created.
On the Setups tab, in the grid, select the Import vendor invoices derived feature setup and select Edit.
On the Import channel tab, in the Parameters section, in the Value field for the Start Date parameter, enter the date starting from which the import is to be performed.
On the Applicability rules tab, in the Set up applicability rule section, for the line with the Channel field, make sure that the previously defined import channel name is defined in the Value field.
On the Variables tab, make a note of the OutputFile name, because you use it in later configuration steps.
Select Save, and close the page.
The copy of the feature is always a Draft version. Complete and deploy the feature as described in Complete and deploy a Globalization feature.
Configure electronic document parameters
To configure electronic document parameters, follow these steps:
In Dynamics 365 Finance, go to Organization administration > Setup > Electronic document parameters.
On the Electronic document tab, add records for the Customer Invoice journal, Project invoice, and Advance invoice table names.
For each table name, set the Document context and Electronic document model mapping fields in accordance with Set up electronic invoicing parameters.
Note
If you created the derived analogs of the mentioned above Electronic Reporting configurations, use them instead of standard ones.

Note
To minimize the risk of accidental massive submissions, the system implements forcible default filtering by documents dates. In the Date filed to filter column, specify the exact selected table's field for filtering. In the Days to look back column, define the number of days to subtract from the current date to determine the earliest date for documents processing. If you don't configure the Date filed to filter and Days to look back columns, the Invoice date equal to the current date is used by default.
For the Customer Invoice journal table name, select Response types.
Select New to create a response type, and enter the following values:
In the Response type field, enter ResponseData (the default value).
In the Submission status field, select Pending.
In the Model mapping field, select KSeF response message import (PL).
Important
Make sure that the Response message model mapping to destination (PL) Electronic Reporting configuration is marked as Default for model mapping.

Note
ResponseData is the default name of the response type. If you change it, make sure that the new name matches the name that you defined for the related variable of the To client type in the corresponding feature setups. To validate the variable's value, go to Globalization Studio, and select the Electronic invoicing tile. On the Electronic invoicing features page, verify that the Polish electronic invoice (PL) electronic invoicing feature is selected. On the Setups tab, in the grid, select the Submit customer invoice derived feature setup. Then select Edit or View, depending on the status of the feature version.
Repeat steps 4 and 5 for the Project invoice and Advance invoice table names.
On the Integration channels tab, in the Channels section, in the Channel field, enter the name of the data channel that you previously defined.
In the Company field, select a required legal entity. In the Document context field, select the context configuration that you previously created.
In the Import sources section, in the Name field, enter the OutputFile name that is actually used.
In the Data entity name field, select Vendor invoice header. In the Model mapping field, reference the Vendor invoice import (PL) configuration.
Add the second import source line, in the Name field, enter the ReferenceNumber value.
In the Data entity name field, select Vendor invoice header. In the Model mapping field, reference the KSeF number message import (PL) configuration.
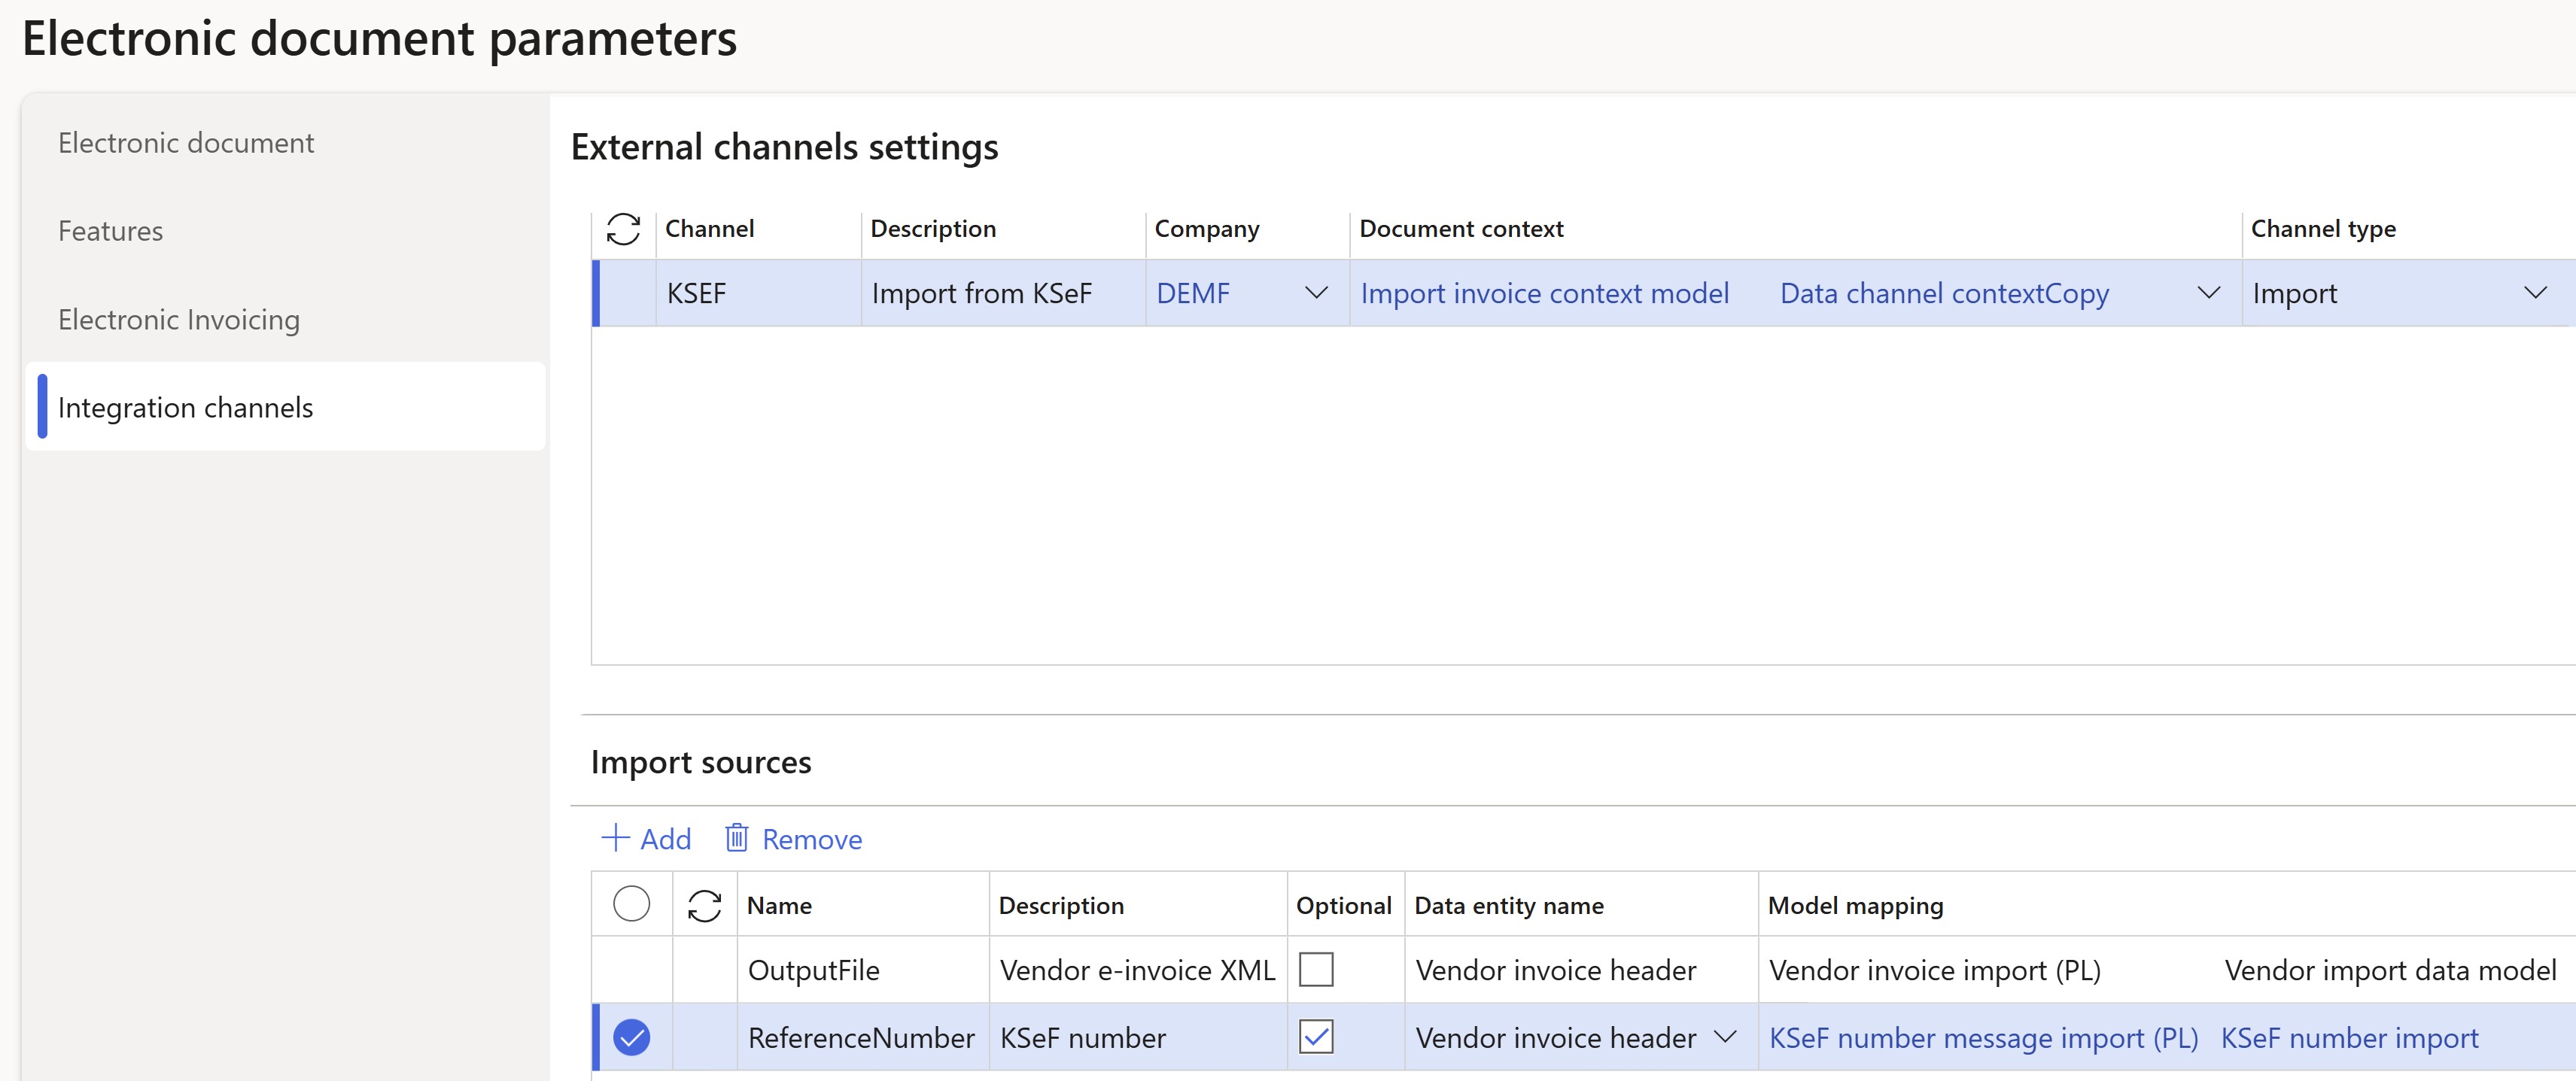
Select Save, and close the page.
Configure Finance business data
Prerequisites
The primary address of the legal entity must be in Poland.
Configure legal entity data
To configure the legal entity data, complete the steps in each of the following sections.
Enter a legal entity's address
To enter a legal entity's address, follow these steps:
In Dynamics 365 Finance, go to Organization administration > Organizations > Legal entities.
Select a legal entity, and then, on the Addresses FastTab, add a valid primary address for the legal entity.
Note
Make sure that the following mandatory address elements are defined: country/region code, ZIP/postal code, city, and building number.
Enter a legal entity's tax registration number
To enter a legal entity's tax registration number, follow these steps:
- In Dynamics 365 Finance, go to Organization administration > Organizations > Legal entities.
- Select a legal entity, and then, on the Tax registration FastTab, in the Tax registration number field, enter a valid tax registration number for the legal entity. This number is the seller's tax identification number (NIP).
Configure customer data
To configure the customer data, complete the steps in each of the following sections.
Enter a customer's address
To enter a customer's address, follow these steps:
In Dynamics 365 Finance, go to Accounts receivable > Customers > All customers.
Select a customer, and then, on the Addresses FastTab, add a valid address for the customer.
Note
- For addresses in Poland, make sure that the following mandatory elements are defined: country/region code, ZIP/postal code, city, and building number.
- For foreign addresses, make sure that at least the following mandatory elements are defined: country/region code and city.
Enter a customer's tax registration number
To enter a customer's tax registration number, follow these steps:
- In Dynamics 365 Finance, go to Accounts receivable > Customers > All customers.
- Select a customer, and then, on the Invoice and delivery FastTab, in the Tax exempt number field, enter a valid tax registration number for the customer. This number is the buyer's tax identification number (NIP).
Configure sales taxes
Configure the following sales tax codes related data that affect the system behavior in the event of non-taxable, zero-rated, or exempted operations:
- Tax > Indirect taxes > Sales tax > Sales tax codes > Report setup > Country/region type.
- Tax > Indirect taxes > Sales tax > Sales tax groups > Setup > Exempt.
- Tax > Indirect taxes > Sales tax > Sales tax groups > Setup > Exempt code.
- Tax > Indirect taxes > Sales tax > Sales tax groups > Setup > Reverse charge.
- Tax > Setup > Sales tax > Sales tax exempt codes.
Note
Different combinations of the preceding parameters dynamically enable and disable related XML elements in the output files of electronic invoices.
Configure extra data
You can add extra data to invoices. This data goes in a special section of electronic invoices headers named DodatkowyOpis.
Configure electronic document properties
To configure electronic document properties, follow these steps:
- In Dynamics 365 Finance, go to Accounts receivable > Setup > Electronic document property types.
- Select New to add a property type.
- In the Type field, enter the value to use as an extra data key (
Klucz) in the resulting XML file of an electronic invoice. - In the Group description field, enter the KSEF value.
Note
Only the properties with the KSEF value in the Group description field will be considered during the electronic invoice generation process.
- Select Applicability to add an applicable table.
- On the Electronic document property type applicability setup page, in the Table name field, select Customer invoice journal and Project invoice.
- Add as many extra document properties as you need.
- Save your changes and return to the Electronic document property types page.
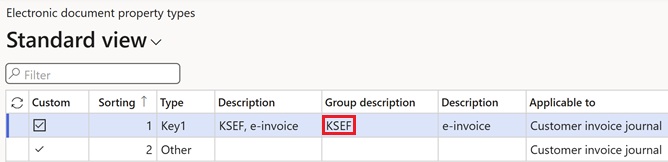
Enter extra invoice data
To enter extra invoice data, follow these steps:
- In Dynamics 365 Finance, go to Accounts payable > Inquiries and reports > Invoice > Invoice journal.
- Select an invoice in the list. On the Action Pane, on the Invoice tab, in the Properties group, select Electronic document properties.
- Enter a required value. This value is used in the
Wartoscfield in the resulting XML file of an electronic invoice.
Note
You can enter extra data for project invoices in a similar way at Project management and accounting > Project invoices > Project invoice.
Extra data apply to the invoice header level only.
Configure the data for incoming electronic invoices matching
You must configure the following types of master data to provide a match for incoming electronic invoices:
- Vendors
- Products
- Units
Configure vendors
To configure vendors, follow these steps:
- In Dynamics 365 Finance, go to Accounts payable > Vendors > All vendors, and select a vendor.
- On the Invoice and delivery FastTab, in the Tax exempt number field, enter a valid value. The vendor's tax exempt number is used to identify the vendor during the import process for incoming electronic invoices. If the system doesn't find a vendor with matching data, the import process fails and shows a related error message.
Configure products
To configure products, follow these steps:
- In Dynamics 365 Finance, go to Product information management > Products > Released products, and select a product.
- On the Action Pane, on the Purchase tab, in the Related information group, select External item description.
- In the Vendor relation field, select the vendor or vendor group that the product's external identification is being set up for.
- In the External item number field, enter the identification number of the product for a specific vendor or the group of vendors. External item numbers are used to identify the product during the import process for incoming electronic invoices. If the system doesn't find a product with matching criteria, the import process fails and shows a related error message.
Configure units
To configure units, follow these steps:
In Dynamics 365 Finance, go to Organization administration > Setup > Units > Units.
Select a unit, and then select External codes.
On the External codes page, in the Overview section, in the Code field, enter a code that corresponds to the selected unit.
In the Value section, in the Value field, enter the external code to match with the unit codes from incoming electronic invoices during the import process.
Note
External unit codes make sense only if incoming electronic invoices contain explicitly defined units. If incoming electronic invoices don't contain explicitly defined units, you can skip step 4.
Issue outgoing electronic invoices
After you complete all the required configuration steps, you can generate and submit electronic invoices for posted invoices. Go to Organization administration > Periodic > Electronic documents > Submit electronic documents. For more information about how to generate and submit electronic invoices, see Submit electronic documents.
You can check the results of a submission by going to Organization administration > Periodic > Electronic documents > Electronic document submission log and selecting the required document type. For more information about the submission log, see Work with Electronic document submission log.
Configure printable invoice layouts
To enable QR code printing in invoices, follow these steps:
- In Dynamics 365 Finance, go to Accounts receivable > Setup > Forms > Form setup.
- Select Print management.
- Select the Customer invoice report, and then, in the Report format field, reference the SalesInvoice.ReportPL layout.
- Select the Free text invoice report, and then, in the Report format field, reference the FreeTextInvoice.ReportPL layout.
- Select the Sales advance invoice report, and then, in the Report format field, reference the CustAdvanceInvoice.ReportPL layout.
If you use project invoices, follow these steps:
- In Dynamics 365 Finance, go to Project management and accounting > Setup > Forms > Form setup.
- Select Print management.
- Select the Project invoices without billing rules report, and then, in the Report format field, reference the PSAProjInvoice.ReportPL layout.
- Select the Project invoices with billing rules report, and then, in the Report format field, reference the PSAContractLineInvoice.ReportPL layout.
- Select the User defined project invoice report, and then, in the Report format field, reference the PSAManageInvoice.ReportPL layout.
Note
The QR code that appears on the printouts of invoices represents the URL that takes you to the official portal of the KSeF system, where you can find the details of the related electronic invoice.
QR codes are printed only for invoices that the KSeF system successfully submitted, validated, and accepted. Printing of QR codes for Offline24 mode isn't supported in this implementation.
Receive incoming electronic invoices
To receive electronic invoices, follow these steps:
- In Dynamics 365 Finance, go to Organization administration > Periodic > Electronic documents > Receive electronic documents.
- Select OK, and then close the page.
During the import process, the system tries to automatically match incoming electronic vendor invoices with existing confirmed purchase orders.
If the system doesn't find a purchase order, it raises a warning but continues to import the products on invoice lines as Non-stock items. Therefore, it expects that the products belong to an item model group where the Stocked product checkbox is cleared in the inventory policy.
If no related Non-stock products exist, the system tries to import invoice lines by referring to a default item. You must configure the default item in the system as a released product where the code is defined exactly as DEFAULT_ITEM. In addition, the product must belong to an item model group where the Stocked product checkbox is cleared in the inventory policy. If you don't configure a default item in the system, the import process fails, and a related error message is shown.
To view the receipt logs for electronic invoices, go to Organization administration > Periodic > Electronic documents > Electronic document receipt log. For more information about how to receive electronic invoices, see Receive electronic documents.
To view successfully received invoices, go to Accounts payable > Invoices > Pending vendor invoices.