Note
Access to this page requires authorization. You can try signing in or changing directories.
Access to this page requires authorization. You can try changing directories.
Now that you can log into figma.com with your admin email, you can see your organization alongside the respective administrator features. Select the Admin settings tab. From here, you can see tabs for Dashboard, Workspaces, plus a list of all Teams created, all Members of the Organization, Activity, Resources, and Settings.
Recommended Account Settings
We recommend that you review some of the default settings configured on your district's organization account. The following items are common changes:
- Team management: Choose who can create teams in your organization. While many districts allow all users to create their own teams, some districts choose to limit that permission to administrators only.
- External Access
- Guest Management: By default, external users can join your organization by invitation. We recommend disabling guest access by selecting the option that No external users can join your organization.
- Access to external content: By default, users have access to content outside your organization. We recommend disabling access to content outside your organization.
- Public Sharing: By default, public link sharing is disabled. You can choose to enable public sharing by toggling on the option to Allow links to be shared with anyone.
- By default, open sessions are enabled. You can disable by toggling off the option to allow anyone to edit and interact with a FigJam file for 24 hours.
- Other
- Cursor Chat: By default, cursor chat is enabled. If you choose to disable this feature, you can toggle off the option to enable cursor chat for all files in your organization.
Organization Structures
There are various options for organization structure based on your administrative needs. By default, the organization members and teams across sites are all administered by the org admins. If the org admin wants to delegate administrative controls to learning sites, they can create workspaces. Within the workspace structure, the designated workspace admins have administrative control over the teams and users within their group.
Here's a sample of an organization employing a hybrid structure, where one school site uses workspaces and the rest adhere to the default team ownership structure:
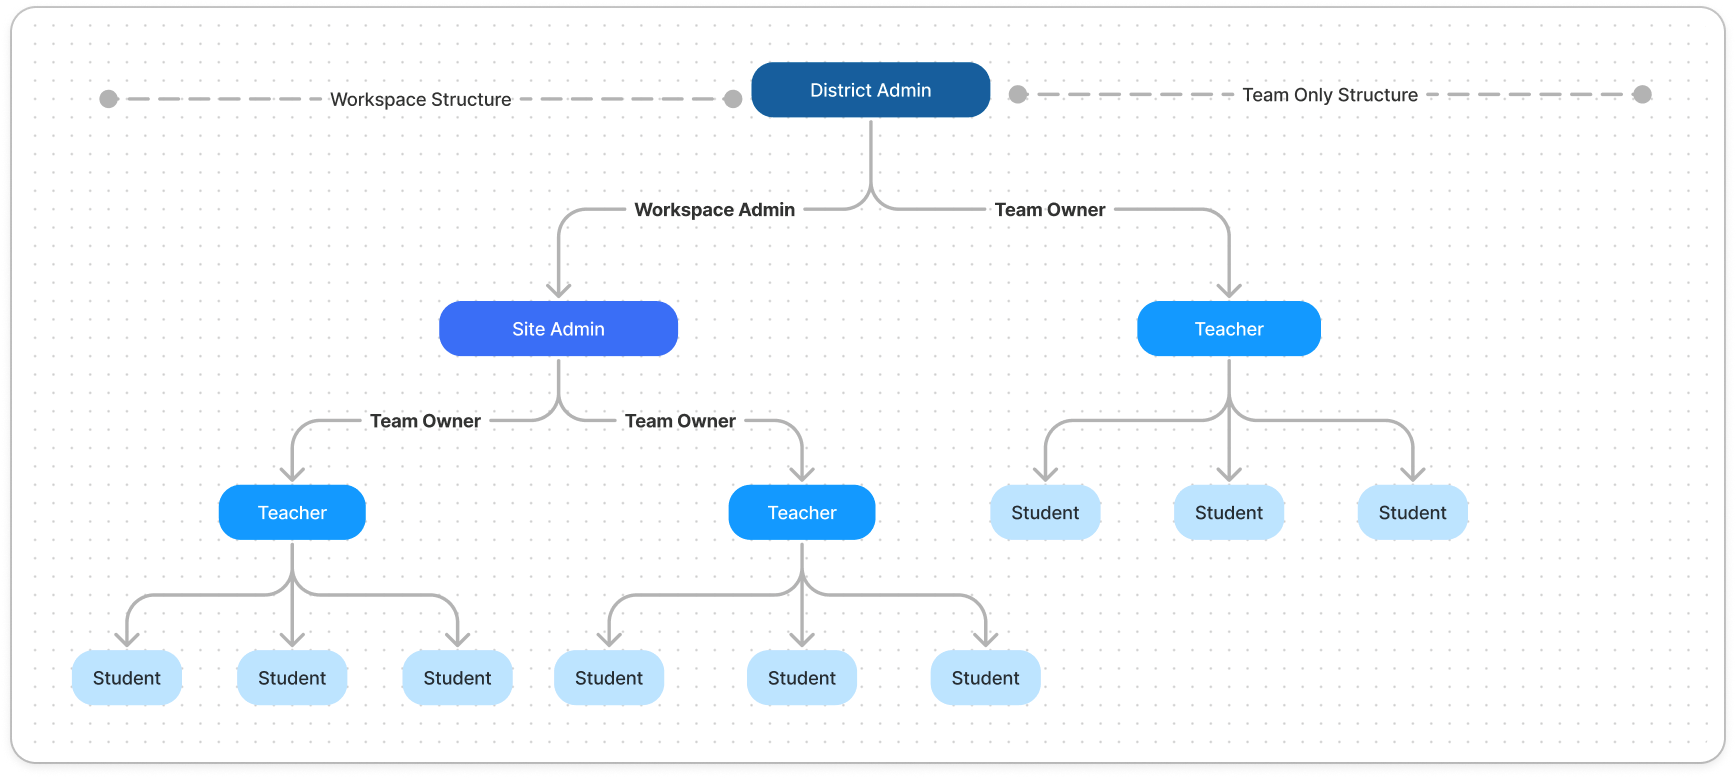
In the following sections, we discuss the Workspace, Team, and Membership controls that help org admins manage their preferred organization structure.
Workspaces
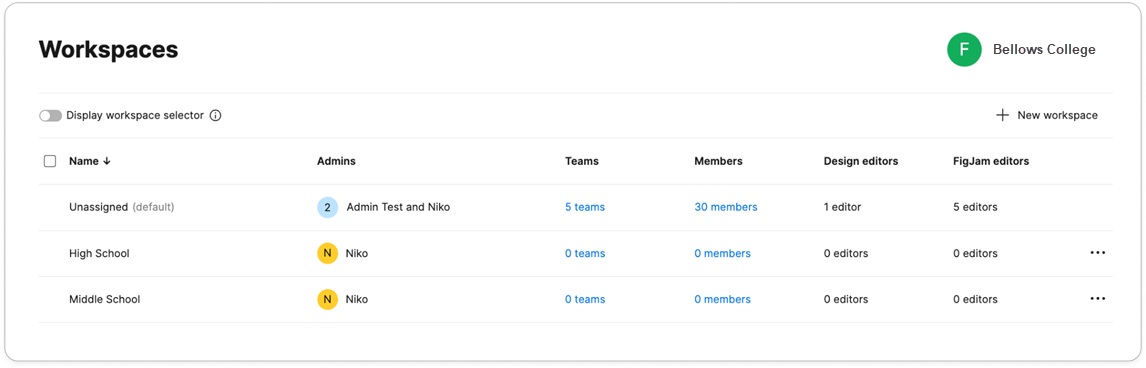
Workspaces are an optional feature of Figma's enterprise plan. Workspaces allow administrators to divide users into designated groups and delegate administration of those groups to other users.
- This Help Center article covers everything to know about workspace management.
- From the Workspaces tab, admins can create new workspaces and review the teams and individual members that belong to a specific workspace. On the More options menu, admins can edit ownership of a workspace.
- By toggling Display workplace selector to on the Workspaces tab, admins can force users to self-select into a workspace upon signing into Figma. If the toggle remains unchecked, admins must manually assign teams or members to workspaces.
For large districts with several school sites, administrators typically create a Workspace with a site-level administrator at each. Students and staff then self-select into their proper workspace upon accessing for the first time.
Teams
Teams are how Figma allows teachers or administrators to build groups or classes of students. Teams allow for more streamlined access to shared files and collaborative activities.
- This Help Center article covers everything to know about team management.
- From the Teams tab, admins can create new teams, review owners, project and member counts, as well as reassign org access or workspace membership. On the More options menu, administrators can view specific details or reassign ownership of the team.
We recommend each teacher set up a closed team for each of their classes and invite their student to the team via email.
Members
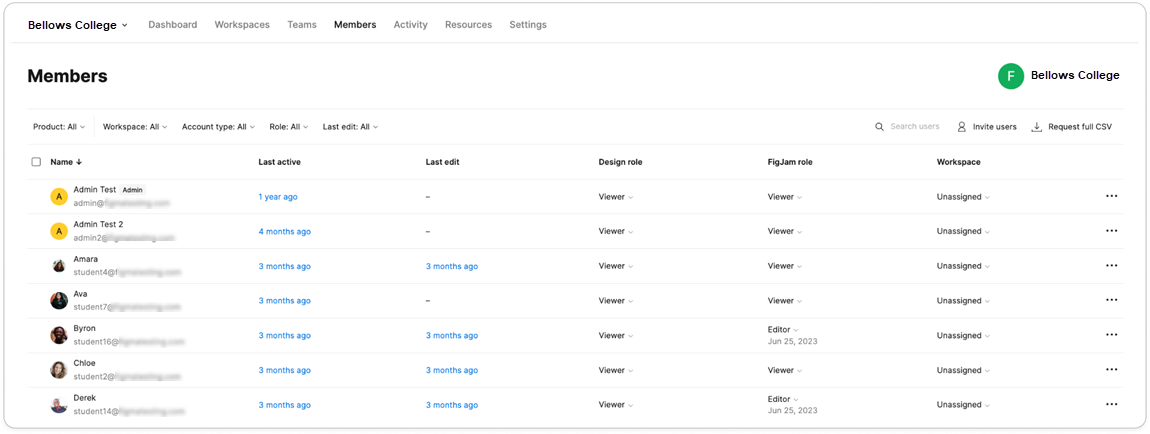
The Members tab shows all members of your organization, their last activity date, roles, and any workspace assignments they have.
- This Help Center article covers everything to know about Member access management.
- From the Members tab, admins can select individual members to upgrade or change their role. On the More options menu, administrators can get more insights into the activity of a particular member.
Get familiar with your organization
- Start with this Overview Guide for Organization Administrators. It has helpful videos embedded throughout to cover the main capabilities and considerations. You can ignore the Billing section.
- For a few more details, this Help Center article shows you how to get started with your organization.
- This Help Center article shares specifics for how to manage roles within an organization.
- If you want to learn more, here's a Help Center collection with more articles on setting up your organization.
Administrator capabilities
- This Help Center collection has all articles relevant for Administrators.
- This Help Center article shows you how to view and export activity logs.