Note
Access to this page requires authorization. You can try signing in or changing directories.
Access to this page requires authorization. You can try changing directories.
Vibrant Visuals (previously Advanced Rendering: Deferred Lighting) is a complete overhaul of the Minecraft graphics system, introduced with Editor v1.0. Use it to tune lighting, water, sky, color grading, tone mapping, shadows, and default PBR values for worlds you build in Editor.
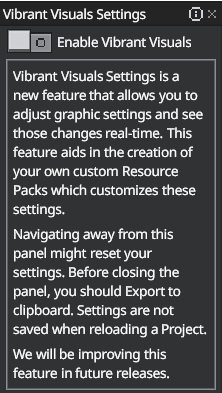
Open Minecraft Editor and add Vibrant Visuals to the Action Bar to get started, then select the graphical element you want to start editing.
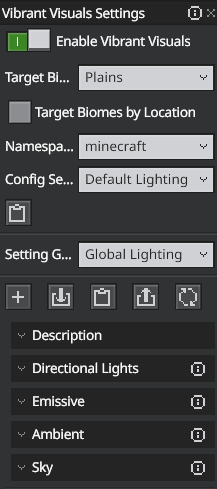
Generate Resource Pack: A template on mctools.dev for a new resource pack with the Vibrant Visuals settings you've configured.
Export to Clipboard: Copys the JSON of the current visual setting to your device's clipboard. You can use this to quickly modify parts of a resource pack without the need to generate a completely new one.
Tip
You can reset the current visual settings to the Editor default by clicking Revert Changes near the top of the Vibrant Visuals menu at any time.
Water settings
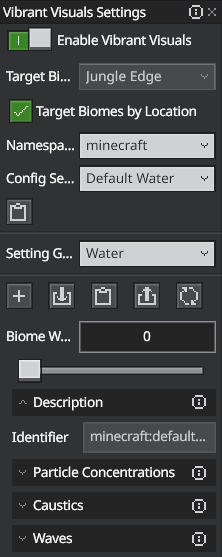
Particle Concentration
Chromophoric Dissolved Organic Matter (CDOM)
Represents the organic matter suspended in the water. Increasing this value increases the strength of the organic matter’s blue wavelength absorption, turning the water yellow to yellow-brown (CDOM values range from 1 – 15).
Chlorophyll
Represents the amount of chlorophyll present in a body of water. Chlorophyll absorbs blue and red wavelengths, turning the water green according to the slider’s value (ranges from 1 – 10).
Suspended Sediment
Represents the amount of sediment suspended in the water. Sediment absorbs blue and green light wavelengths, so adding more Suspended Sediment will turn the water red to red-brown (sediment values range from 1 – 300).
Caustics
Enabling Caustics lets light rays project onto underwater surfaces.
Frame length
Represents the time spent (in seconds) on a single frame of animation in the caustics sprite sheet texture.
Tip
A larger frame length results in a slower animation.
Power
Adjusts the brightness of the caustic effect (ranges from 1 - 6).
Scale
Adjusts the caustics texture projection size.
Tip
Larger scale values make the texture repeat/tile more frequently, making it appear smaller. Smaller scale values make the texture cover a larger area.
Texture
Reveals the texture used for the caustics animation.
Waves
When enabled, bodies of water in your world generate waves, which you can edit by adjusting the following settings:
Depth
Adjusts the amount the water’s surface is displaced by waves. Larger values make bigger waves (ranges from 0 - 3)
Direction Increment
Represents the degree each heading changes between each octave.
Frequency
Adjusts the number of waves that fit in a single block of water. Larger values pack the waves tighter together, resulting in more total waves per water block.
Frequency Scaling
Adjusts the change in wave frequency between octaves. A value of 1 is neutral, while anything below it reduces wave frequency and anything above it increases wave frequency.
Mix
Controls the amount of blending between adjacent octaves.
Octaves
Controls how many wave layers are simulated. Larger values yield more complex wave structures.
Pull
Adjusts the pull of larger waves is on smaller waves. A value of 0 is neutral; positive values pull smaller waves in a concave (cresting) while negative ones pull smaller waves convexly (pillowing).
Sample Width
Controls the resolution of the fractal effect on your world’s waves. A higher value results in a lower resolution, causing waves to appear smoother and more uniform.
Shape
Alters the core shape of your world’s waves. A value of 1 yields a true sine wave while values lower than 1 sharpen wave peaks and valleys.
Speed
Determines both the movement speed of the first wave in a sequence and the starting point for Speed Scaling.
Speed Scaling
Controls how much faster each subsequent wave moves. A value of 1 is neutral, while anything below it reduces wave speed and anything above it increases wave speed.
Global Lighting
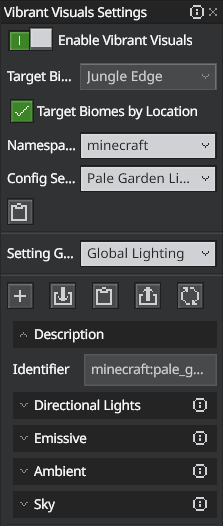
Directional Lights
Orbital
Sun
Illuminance:
Measures the brightness of the sun’s surface (in lux).
Color:
The color your world’s Sun contributes to direct surface lighting.
Note
Supports RGB Array and hex strings.
Moon
Illuminance:
Measures the brightness of the moon’s surface (in lux)
Color:
The color your world’s Moon contributes to direct surface lighting.
Note
Supports RGB Array and hex strings.
Orbital Offset Degrees
- Controls the angle the moon and sun are offset from their typical orbital paths, relative to the earth.
Flash
Use to adjust the color of the flash in the End
Emissive
Use the Desaturation slider to adjust the desaturation of emissive light sources in your world. By default, Desaturation is set to 0 (the lowest value).
Ambient
Controls how the surfaces of objects in your world are lit when no direct light source is present.
Sky
Use the Intensity slider to adjust the brilliance of your world’s sun. By default, your world’s Intensity is set to 1 (the highest value).
Atmospheric Scattering
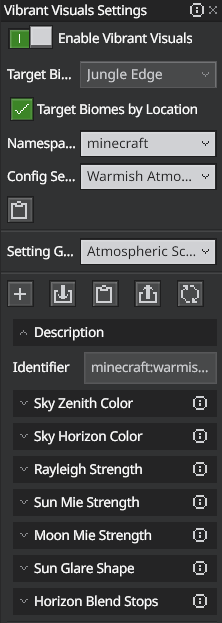
Sky Zenith Color
Controls the color of the atmosphere’s zenith.
Sky Horizon Color
Controls the color of the atmosphere’s horizon.
Rayleigh Strength
Adjusts the strength of the atmosphere’s Rayleigh scattering.
Tip
Rayleigh scattering refers to the way that particles that are significantly smaller/larger than a light ray’s wavelength scatter that light as it passes through them. For a more technical explanation, check out this article on Rayleigh scattering.
Sun Mie Strength
Adjusts the strength of the Sun’s Mie scattering.
Tip
Mie scattering refers to the way that particles about the size of a light ray’s wavelength scatter light as it passes through them. For a more technical explanation, check out this article on Mie scattering.
Moon Mie Strength
Adjusts the strength of your world’s Moon Mie scattering.
Tip
Mie scattering refers to the way that particles about the size of a light ray’s wavelength scatter light as it passes through them. For a more technical explanation, check out this article on Mie scattering.
Sun Glare Shape
Adjusts the shape of your world’s Mie scattering lobe.
Horizon Blend Stops
Adjusts how your world’s atmosphere layers are divided.
Color Grading
Lets you adjust things like saturation, contrast, gain, and pixel offset to fine-tune the look of your world.

Color Grading
Midtones
You can adjust the RGB values for each of the following fields to fine-tune the look and feel of your world:
- Contrast
- Gain
- Gamma
- Saturation
- Offset
Highlight
When enabled, the average luminance of the scene is multiplied by this factor to determine which pixels are considered highlights (ranges from 1 - 20). You can adjust the RGB values for each of the following fields to fine-tune the look and feel of your world:
- Contrast
- Gain
- Gamma
- Saturation
- Offset
Shadows
When enabled, the average luminance of the scene is multiplied by this factor to determine which pixels are considered shadows (ranges from 0 - 1). You can adjust the RGB values for each of the following fields to fine-tune the look and feel of your world:
- Contrast
- Gain
- Gamma
- Saturation
- Offset
Temperature
When enabled, this sets the temperature of your world in Kelvin (ranging from 1000 – 15000). Temperature adjusts the value of color temperature or the white balance according to the slider while Type determines whether the color temperature or the white balance is affected by the temperature slider.
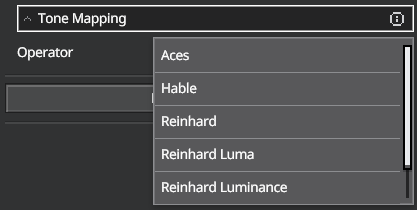
Tone Mapping
Use the Operator to define how a color gets remapped from HDR-space to SDR-space for modern displays.
Cubemap
Lighting
Affected by Atmospheric Scattering
Use this if the contents of your cubemap contains objects that are somewhat close to the surface of the world (e.g. cubemaps that convey clouds or airships or other objects in the sky).
Affected by Volumetric Scattering
This value is similar to atmospheric scattering, but it is more focused on the interaction of light with fog and light shafts. If your cubemap contains objects that are close to the surface of the world, and you want them to interact with fog and light shafts, then you should turn this on.
Direction Light Contribution
Controls how much the directional light (sun and moon) affects the cubemap. This value should be between 0.0 and 1.0, where 0.0 means no contribution from the directional light and 1.0 means full contribution from the directional light.
Sky Light Contribution
Controls how much the sky light affects the cubemap. This value should be between 0.0 and 1.0, where 0.0 means no contribution from the sky light and 1.0 means full contribution from the sky light.
Ambient Light Illuminance
Determines the amount of fixed ambient light applied to the cubemap.
Tip
Check out our article on Cubemaps for a more detailed explanation of Cubemap settings.
Shadows
Shadow settings determine the way shadows render in your world.
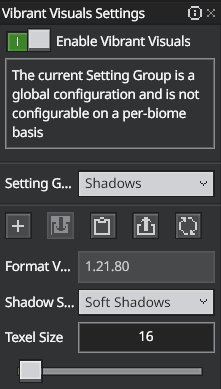
Shadow Style
Blocky Shadows
Renders shadows with hard edges that reflect the shape of the object casting them.
Soft Shadows
Renders shadows with softened edges that are inspired by shape of the object casting them.
Texel Size
Changes the size of texel-based shadows (ranges from 1 - 1024).
Tip
A texel is basically a pixel, but for a texture pack instead of an image. For a more detailed explanation, check out Mozilla’s article on Texels.
Biome Config Mapping
The Biome Config Mapping dialog lets you manage Vibrant Visuals settings on a per-biome basis. Access it from the Vibrant Visuals panel by clicking the biome mapping icon.
The dialog has two panels:
Left panel: A scrollable list of all biomes in your project. Use the filter dropdown to show All Biomes, Vanilla Only, or Custom Only. Biomes with unsaved changes display a green indicator.
Right panel: Shows the Vibrant Visuals configuration accessors for the selected biome, including atmospheric scattering, color grading, lighting, cubemap, and water settings.
Bulk operations
- Save All: Commits pending changes for every modified biome at once.
- Reset All: Reverts all biomes to their last saved state, discarding pending changes.
- Restore All Defaults: Resets every biome to the engine default Vibrant Visuals configuration and saves immediately.
Per-biome operations
- Save: Commits pending changes for the selected biome only.
- Reset: Reverts the selected biome to its last saved state.
- Restore Defaults: Resets the selected biome to engine defaults and saves.