Test whether an object will fit in a space using mixed reality
You can use the Measuring Camera control to determine whether an object of a known size will fit in a particular space. In this article, we'll create a canvas app to do just that.
Tip
The mixed-reality (MR) controls work best in well-lit environments with flat-textured surfaces. Tracking is better on LIDAR-enabled devices.
Add minimum dimensions input fields to a canvas app
First, we’ll create a blank canvas app. Then we'll add a way for the user to enter the minimum dimensions to test against (that is, the smallest space that will hold the object we want to fit).
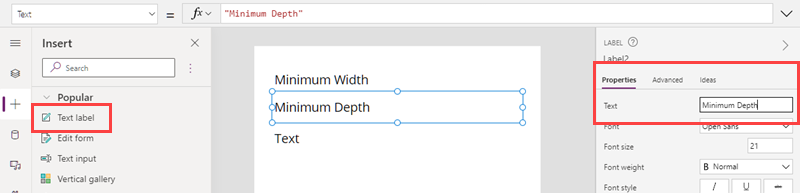
Select the Insert tab. Insert and place three Text label controls on the screen.
Change the Text property of the labels to Minimum Width, Minimum Depth, and Minimum Height, respectively.
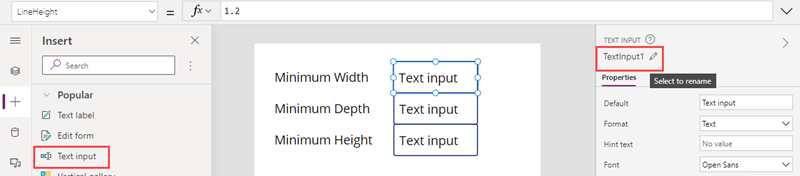
Select the Insert tab. Insert three Text Input controls, and place them to the right of the three labels.
Rename the text input controls to minWidth, minDepth, and minHeight, respectively.
Select all three text input controls. Change the group's Format property to Number and set the Default property to 1.0.

Add and bind the Measuring camera control
Next, we’ll add the Measuring camera control to allow the user to measure a three-dimensional space. We'll bind the measurements to a data table for later use.
Select the Insert tab, and expand Media.
Select Measuring camera to place the control in the app screen. Drag the control near the bottom of the screen.
Change the control's properties as follows:
Property name Value Where Unit of measurement Feet or Meters Select on the Properties tab Measurement type Volume Select on the Properties tab Box draw On Select on the Properties tab Items Table({label:"Test Volume"}) Enter on the Advanced tab ItemsLabels "label" Enter on the Advanced tab OnMixedRealitySelect Set(testVolume, LookUp(MeasureInMR1.Measurements, Label = "Test Volume")); Enter on the Advanced tab
The Items, ItemsLabels, and OnMixedRealitySelect properties of the Measuring camera control should look like the following examples when you're done:
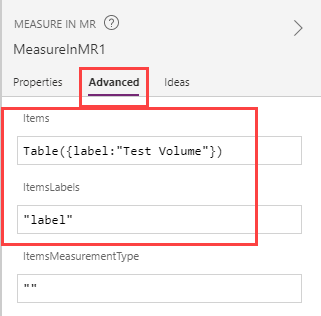
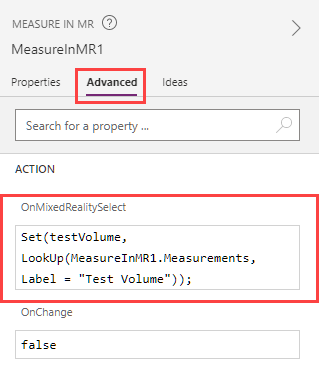
The formula in Items captures the dimensions of the measured space in a data table named "Test Volume." The formula in OnMixedRealitySelect sets a variable named "testVolume" to the values captured in the "Test Volume" table.
Display the results
Finally, we'll add text labels to display the measurements that were taken and the result of the test (that is, whether the object will fit in the measured space).
Select the Insert tab. Insert and place four Text label controls on the screen.
Change the Text property of the label controls as follows. (Hint: Copy each formula and paste it in the formula bar or on the Advanced properties tab, whichever you prefer.)
First label:
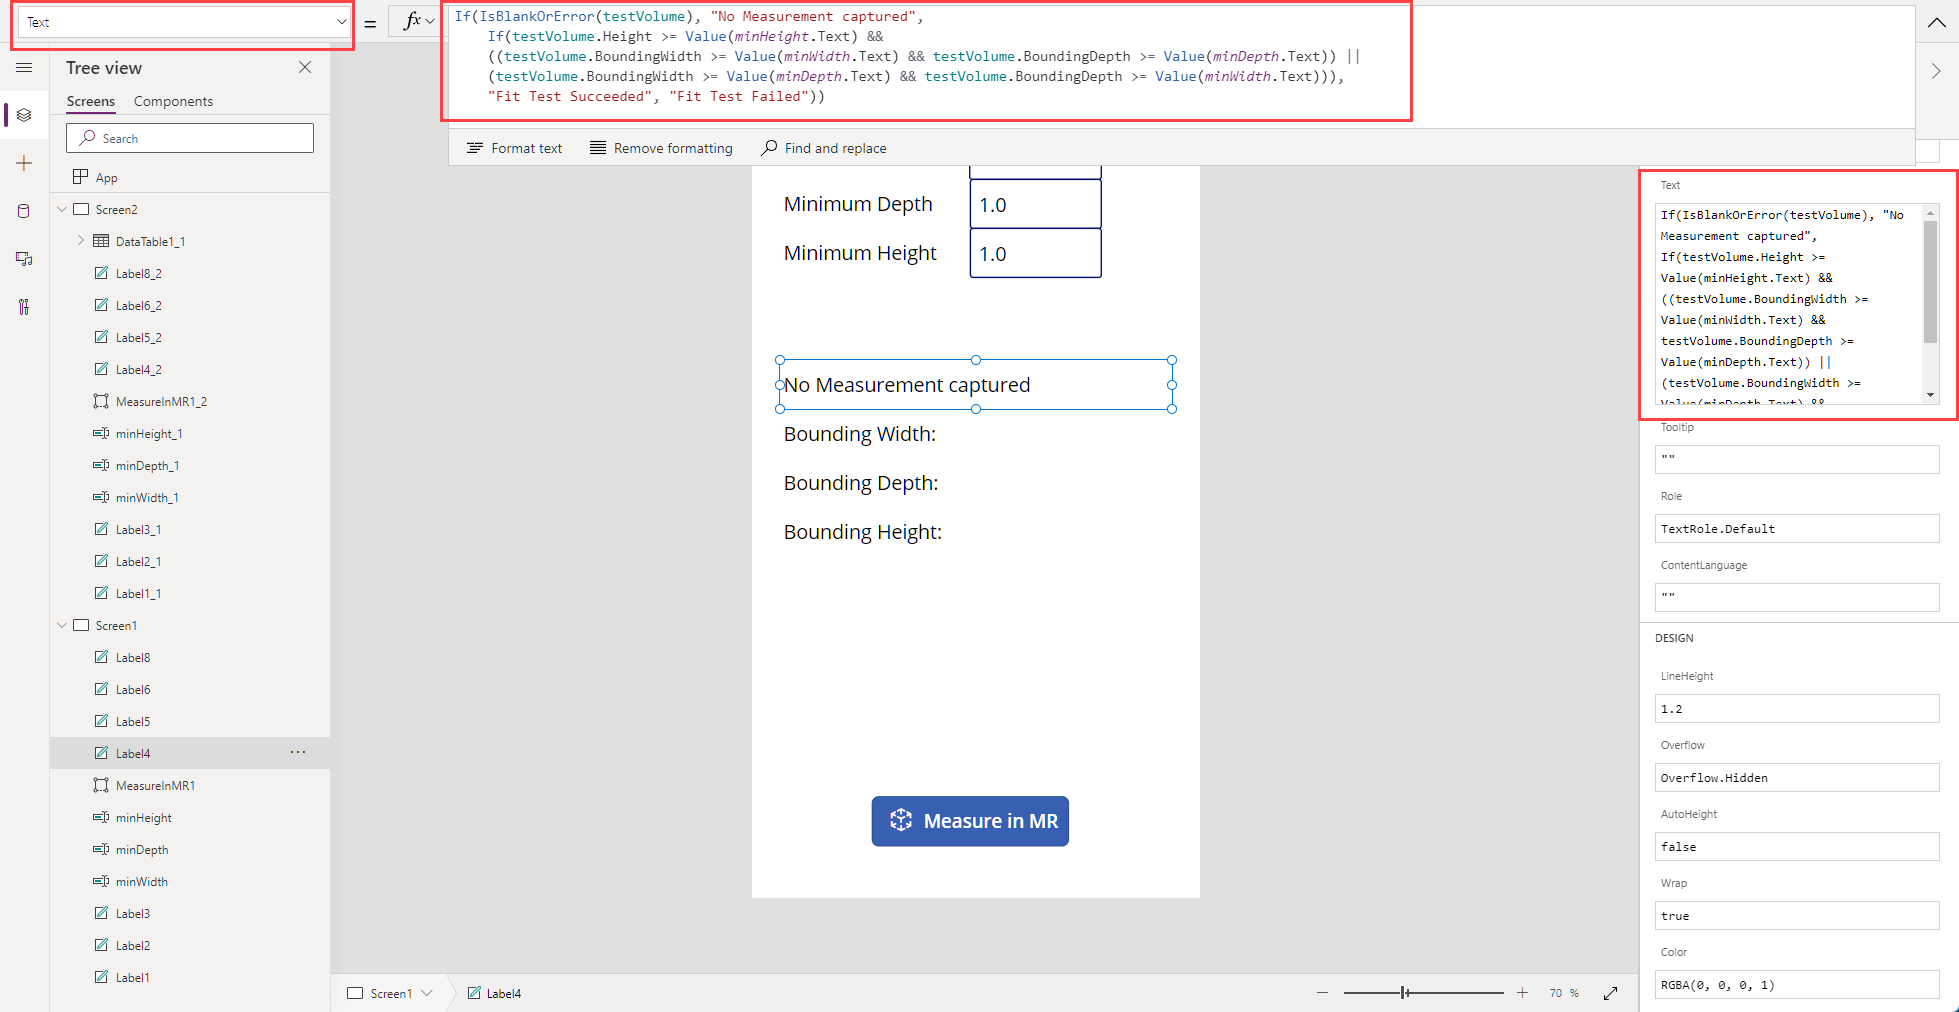
    If(IsBlankOrError(testVolume), "No Measurement captured",
        If(testVolume.Height >= Value(minHeight.Text) &&
        ((testVolume.BoundingWidth >= Value(minWidth.Text) && testVolume.BoundingDepth >= Value(minDepth.Text)) ||
        (testVolume.BoundingWidth >= Value(minDepth.Text) && testVolume.BoundingDepth >= Value(minWidth.Text))),
        "Fit Test Succeeded", "Fit Test Failed"))
This formula sets the label text according to whether the test succeeded or failed, based on the minimum dimensions required to hold the object we want to fit. If the test didn't run, either because no measurements were captured or an error occurred, the label text reflects that.
Second label:
Concatenate("Bounding Width: ", Text(testVolume.BoundingWidth))This formula sets the label text to "Bounding Width:" followed by the width dimension of the measured space.
Third label:
Concatenate("Bounding Depth: ", Text(testVolume.BoundingDepth))This formula sets the label text to "Bounding Depth: " followed by the depth dimension of the measured space.
Fourth label:
Concatenate("Bounding Height: ", Text(testVolume.Height))This formula sets the label text to "Bounding Height: " followed by the height dimension of the measured space.
The app screen should now look like this:
Test the app
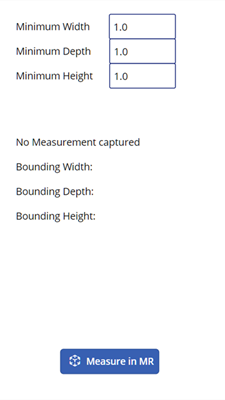
Select the preview button to run the app in preview mode. Select Measuring camera to populate the labels with data. To verify that the label bindings are working, enter new values in the text input fields.
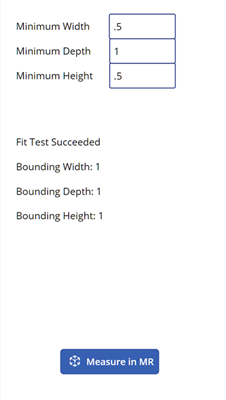
The values for Bounding Width and Bounding Depth can be swapped when you perform the test.
Save and publish your app. Open it on a mixed-reality–enabled device to test whether an object with the specified dimensions will fit within the bounds of any measurement captured.
Filtering a data source
The app we created tests a single set of dimensions that are specified by the user when the app runs. However, you can extend it to test against any data source by applying the formula as a Filter predicate.
For example, let's say that our app contains a reference to a Dataverse table named Products that includes three columns: Width, Depth, and Height (corresponding to each product's dimensions). To filter the collection to show only the measurements that would fit in a measured volume, we can apply the following formula.
    If(IsBlankOrError(testVolume), Products,
    Filter(Products, testVolume.Height >= Height &&
        ((testVolume.BoundingWidth >= Width && testVolume.BoundingDepth >= Depth) ||
        (testVolume.BoundingWidth >= Depth && testVolume.BoundingDepth >= Width))))
See also
Feedback
Coming soon: Throughout 2024 we will be phasing out GitHub Issues as the feedback mechanism for content and replacing it with a new feedback system. For more information see: https://aka.ms/ContentUserFeedback.
Submit and view feedback for