Note
Access to this page requires authorization. You can try signing in or changing directories.
Access to this page requires authorization. You can try changing directories.
Use GitHub Copilot CLI and GitHub Copilot in Visual Studio Code with models, MCP tools, and skills through Unity Gateway. Choose one of these setup options:
- Option 1: Use the Unity Gateway CLI (recommended). The Unity Gateway CLI (
ug) handles workspace sign-in and sets up models, MCP tools, and skills for Copilot CLI and Copilot in Visual Studio Code. - Option 2: Configure Copilot CLI manually. Set the connection yourself with a personal access token and run
copilotdirectly. This option sets up Copilot CLI only.
Use GitHub Copilot with supported open-source models through Unity Gateway to help reduce coding agent costs.
To connect tools to an existing Copilot CLI setup, go to Add MCP tools if you use ug, or Add MCP tools manually if you configured Copilot manually.
Prerequisites
You must have your Azure Databricks workspace URL and access to the models, MCP services, and skills you want to use.
- For Copilot CLI,
ugrequires GitHub Copilot CLI 1.0.91 or above. If it's missing or older,ugoffers to install or update it with npm. - For Copilot in Visual Studio Code, you must have Visual Studio Code 1.128 or above with the
codecommand available in your terminal. To use MCP tools in Visual Studio Code, you need Visual Studio Code 1.142 or above. - For manual setup, install Copilot CLI and have a Azure Databricks personal access token.
If your admin has already configured your device, follow your organization's setup instructions.
Option 1: Use the Unity Gateway CLI (recommended)
Step 1: Start Copilot CLI
Install ug, then run this command from your project directory:
ug copilot
Follow the prompts to select your workspace and sign in. ug configures the connection and opens GitHub Copilot CLI with a configured model. Start working with the same prompts and commands you already use. To change models, enter /model. The model picker also lists GitHub-hosted Copilot models under Unavailable models. Those models aren't available through Unity Gateway, so select a model from the other groups or type to search.
To start with a different model available in your workspace:
ug copilot --model "<model-name>"
Use the model's Unity Catalog name, such as system.ai.claude-sonnet-5-5. ug makes Claude, GPT, GLM, Kimi, and DeepSeek models available in Copilot. Other models, such as Gemini and gpt-oss, aren't available in Copilot.
Start Copilot CLI with ug copilot. Running copilot directly doesn't load the models that ug configures. To run copilot directly, use Option 2: Configure Copilot CLI manually.
To use your organization's external model provider, see Bring your own model providers.
Step 2: Use Copilot in Visual Studio Code
To set up GitHub Copilot in Visual Studio Code, run:
ug configure --agents copilot
ug configure sets up Copilot CLI and installs the Databricks Unity Gateway extension in Visual Studio Code. Quit and reopen Visual Studio Code, then open Copilot Chat and select a model from the Databricks group in the model picker. To set up only Copilot CLI, add --no-vscode.
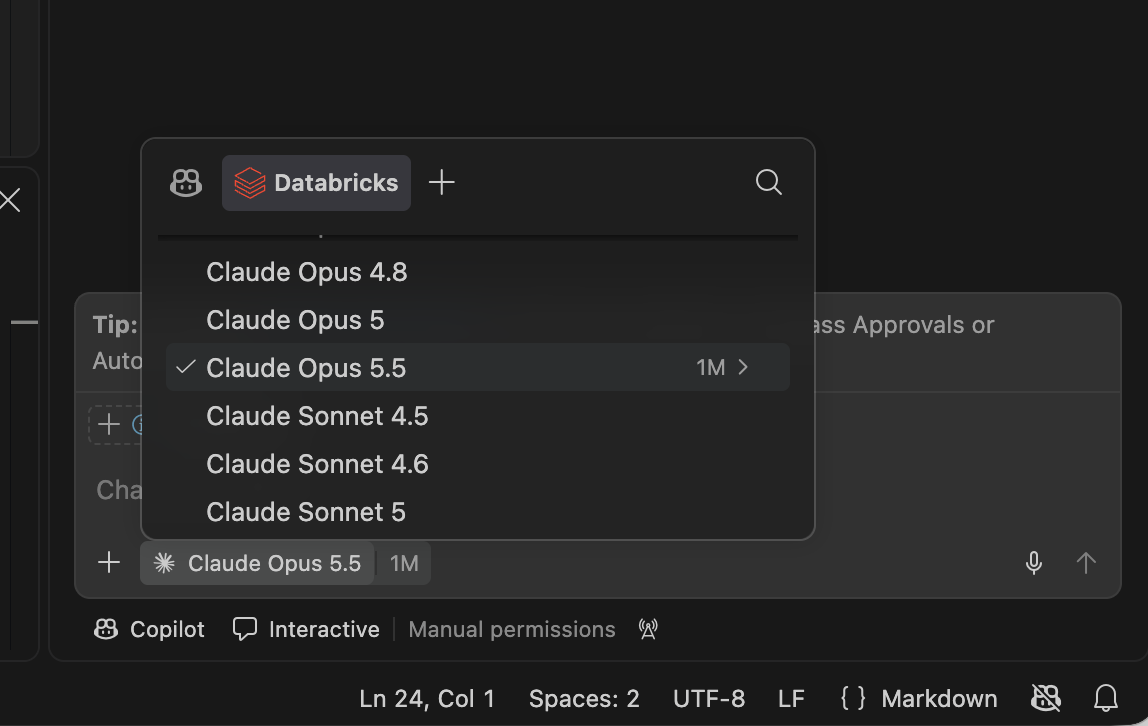
The extension gets workspace credentials from ug, so keep ug installed. Run ug configure again to pick up model or configuration changes, then restart Visual Studio Code. ug copilot doesn't change the Visual Studio Code setup.
If your workspace's coding agent configuration sets a default model, new chats start on it unless you have chosen your own default model in Visual Studio Code.
To remove the extension and the settings ug added, run ug revert.
Step 3: Add MCP tools
system.ai.dbsql, system.ai.sandbox, and system.ai.web_search are in Beta. To use them, an account admin must enable the Enhanced Unity Gateway preview from the account console Previews page. Unity Gateway itself is generally available. See Manage account previews.
Run:
ug mcp add --agents copilot
Select the services you want to add, then start a new session with ug copilot. Inside Copilot, enter /mcp to see connected servers. Ask the agent to use a tool by describing what you need.
ug adds the services to ~/.copilot/mcp-config.json, so Copilot CLI loads them in every session. Visual Studio Code 1.142 or above reads the same file. Restart Visual Studio Code after you add services. Visual Studio Code asks you to start and trust each server the first time you use it.
Step 4: Add skills
Unity Gateway skills are in Beta. See Govern skills for enablement and permissions.
Download published skills:
ug skills add
Choose the skills you want to use. Copilot CLI and Copilot in Visual Studio Code read the downloads from ~/.agents/skills/. In Copilot CLI, start a new session, or enter /skills reload, then use /skills list to see them. In Visual Studio Code, start a new chat to load new skills. Re-run the download command to get updated versions.
Option 2: Configure Copilot CLI manually
Use this option to run copilot directly, without ug. You need a Azure Databricks personal access token. This option doesn't set up Copilot in Visual Studio Code.
Step 1: Configure models
Set these variables in your terminal:
export COPILOT_PROVIDER_TYPE="openai"
export COPILOT_PROVIDER_BASE_URL="https://<workspace-hostname>/ai-gateway/mlflow/v1"
export COPILOT_PROVIDER_BEARER_TOKEN="<databricks-pat>"
export COPILOT_MODEL="system.ai.claude-sonnet-5-5"
export COPILOT_OFFLINE="true"
Replace the hostname, token, and model name. The openai provider type selects the gateway's Chat Completions API, including when you use a Claude model. Offline mode disables connections to GitHub's servers; model requests still go to Unity Gateway.
Start Copilot CLI from the same terminal:
copilot
See GitHub's custom model provider documentation for these settings.
Step 2: Add MCP tools manually
system.ai.dbsql, system.ai.sandbox, and system.ai.web_search are in Beta. To use them, an account admin must enable the Enhanced Unity Gateway preview from the account console Previews page. Unity Gateway itself is generally available. See Manage account previews.
Merge this entry into ~/.copilot/mcp-config.json:
{
  "mcpServers": {
    "dbsql": {
      "type": "http",
      "url": "https://<workspace-hostname>/ai-gateway/mcp-services/system.ai.dbsql",
      "headers": {
        "Authorization": "Bearer <databricks-pat>"
      },
      "tools": ["*"]
    }
  }
}
Replace the hostname and token. For another service, use a unique server name and replace system.ai.dbsql with its three-part Unity Catalog name. Keep existing server entries, then restart Copilot CLI.
See GitHub's MCP documentation.
Step 3: Add skills manually
For skill files you already have, place the complete folder, including SKILL.md and bundled files, in ~/.agents/skills/ or your project's .github/skills/. See GitHub's skills documentation.
To access the published skill registry through MCP, add a second server using the MCP configuration above. Name it databricks-skill-registry and use this URL with the same bearer authentication:
https://<workspace-hostname>/ai-gateway/skills/
Keep the trailing slash. Restart Copilot CLI and ask it to use a published skill by its full name. Registry skills are accessed through MCP; /skills list shows installed skills.
Unity Gateway skills are in Beta. See Govern skills for enablement and permissions.
Troubleshooting
A model request fails: Check the gateway URL, token expiration, full model name, and model permissions. ug excludes Gemini models from Copilot CLI and Copilot in Visual Studio Code because of a request compatibility issue.
Azure Databricks models don't appear in Visual Studio Code: Quit and reopen Visual Studio Code. Check that the code command works in your terminal, then run ug configure --agents copilot again. If your workspace's coding agent configuration turns off Copilot in Visual Studio Code, ug status shows it, and ug configure sets up only Copilot CLI.
An MCP server is missing: If you registered it with ug, start a new session with ug copilot. For manual setup, check ~/.copilot/mcp-config.json and the connection details in /mcp.
A downloaded skill is missing: Check that its folder contains SKILL.md in a supported directory, then enter /skills reload.
For workspace sign-in or ug setup problems, run ug doctor.