Note
Access to this page requires authorization. You can try signing in or changing directories.
Access to this page requires authorization. You can try changing directories.
This article shows you how to set a table's protection level, grant access to authorized users, and verify that your configuration works as expected. Protected tables use a "deny by default" model so that non-privileged standard and custom read roles can't access sensitive data until you explicitly grant permission through ABAC conditions.
Prerequisites
| Requirement | Details |
|---|---|
| Azure subscription | An active Azure subscription with a Log Analytics workspace. |
| Permissions | Owner or Log Analytics Contributor role on the workspace. You need the Microsoft.OperationalInsights/workspaces/tables/protectionLevel/write action to change a table's protection level. |
| RBAC and ABAC familiarity | Understanding of Azure RBAC and ABAC conditions. For background on ABAC in Log Analytics, see Granular RBAC in Azure Monitor. |
Set a table's protection level
Setting a table's protection level to Protected immediately prevents non-privileged standard read and custom roles from accessing the data in that table. Complete these steps for each table that contains sensitive telemetry.
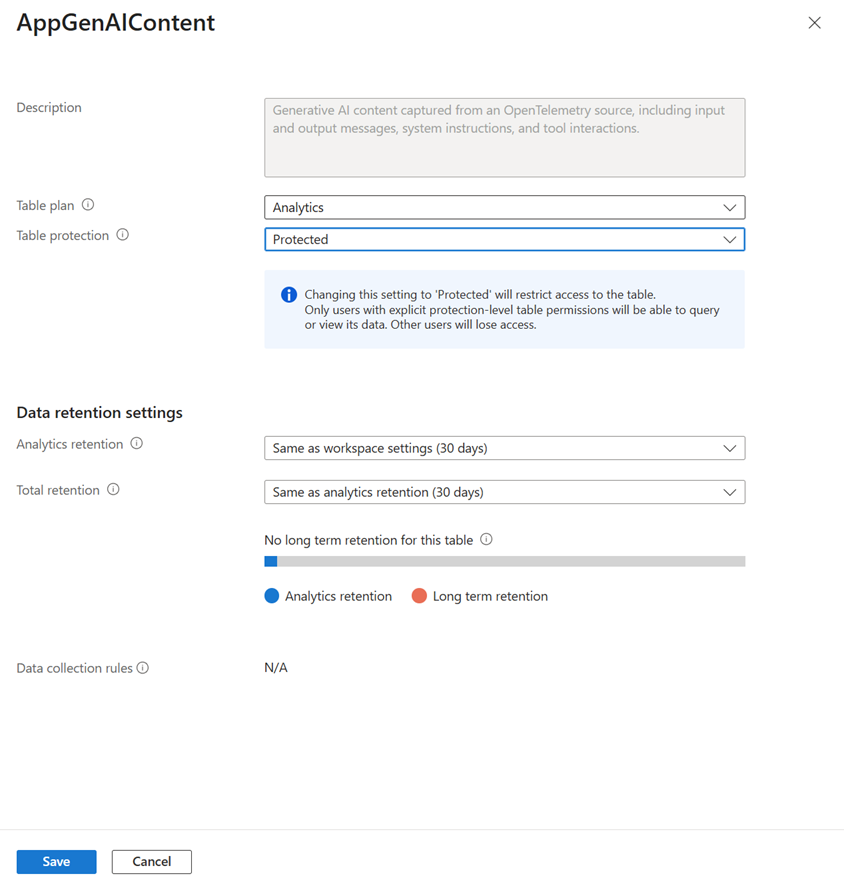
- In the Azure portal, go to Log Analytics workspaces and select your workspace.
- Under Settings, select Tables.
- Find the table you want to protect and select the ellipsis (...) menu.
- Select Manage table.
- Under Protection level, select Protected.
- Select Save.
Grant access to protected tables
After you protect a table, you must explicitly grant access to users who need the data. Use the built-in Privileged Monitoring Data Reader role for broad access, or create custom roles with protectionLevel ABAC conditions for more targeted access.
Assign the Privileged Monitoring Data Reader role
The Privileged Monitoring Data Reader built-in role grants read access to all protected tables at the assigned scope.
The Azure portal doesn't support adding ABAC conditions to built-in roles. This restriction is a UX safeguard to prevent user errors. To add custom conditions to this role, use ARM templates, the REST API, or other programmatic methods.
- In the Azure portal, go to the scope where you want to assign the role (subscription, resource group, workspace, or any supported Azure resource).
- Select Access control (IAM) > Add > Add role assignment.
- On the Role tab, search for Privileged Monitoring Data Reader and select it.
- On the Members tab, select the user, group, or managed identity.
- Select Review + assign.
Grant access to specific protected tables only
If you need to limit access to individual protected tables rather than all of them, create a custom role assignment with ABAC conditions that filter on both table name and protection level.
Create or select a custom role based on the access method you want to use.
- The
DataActionsrequired for workspace-centric access:Microsoft.OperationalInsights/workspaces/tables/data/read - The
DataActionsrequired for resource-centric access:Microsoft.Insights/logs/data/read
- The
When creating the role assignment, add a condition with two expressions joined by AND:
Expression Attribute Operator Value 1 Microsoft.OperationalInsights/workspaces/tables:nameStringEqualsThe specific table name (for example, AppTraces)2 Microsoft.OperationalInsights/workspaces/tables:protectionLevelStringEqualsProtectedThe condition in ABAC format looks like this:
(
  (
    !(ActionMatches{'Microsoft.OperationalInsights/workspaces/tables/data/read'})
  )
  OR
  (
    @Resource[Microsoft.OperationalInsights/workspaces/tables:name] StringEquals 'AppTraces'
    AND
    @Resource[Microsoft.OperationalInsights/workspaces/tables:protectionLevel] StringEquals 'Protected'
  )
)
Adjust the table name and operator as needed. For access to multiple tables, use
ForAllOfAnyValues:StringEqualswith a list of table names. For more details on expression syntax, see Granular RBAC in Azure Monitor.
Grant time-bound access with PIM
Use Microsoft Entra Privileged Identity Management (PIM) to grant just-in-time, time-limited access to protected tables.
- In PIM, create an eligible assignment for the Privileged Monitoring Data Reader role (or your custom role) at the desired scope.
- Set the maximum activation duration according to your organization's policy.
- When users need access, they activate the role in PIM. Access is automatically revoked when the activation window expires.
This pattern works well for incident response and support scenarios where engineers need temporary access to sensitive logs.
Enable DataActionsOnly mode
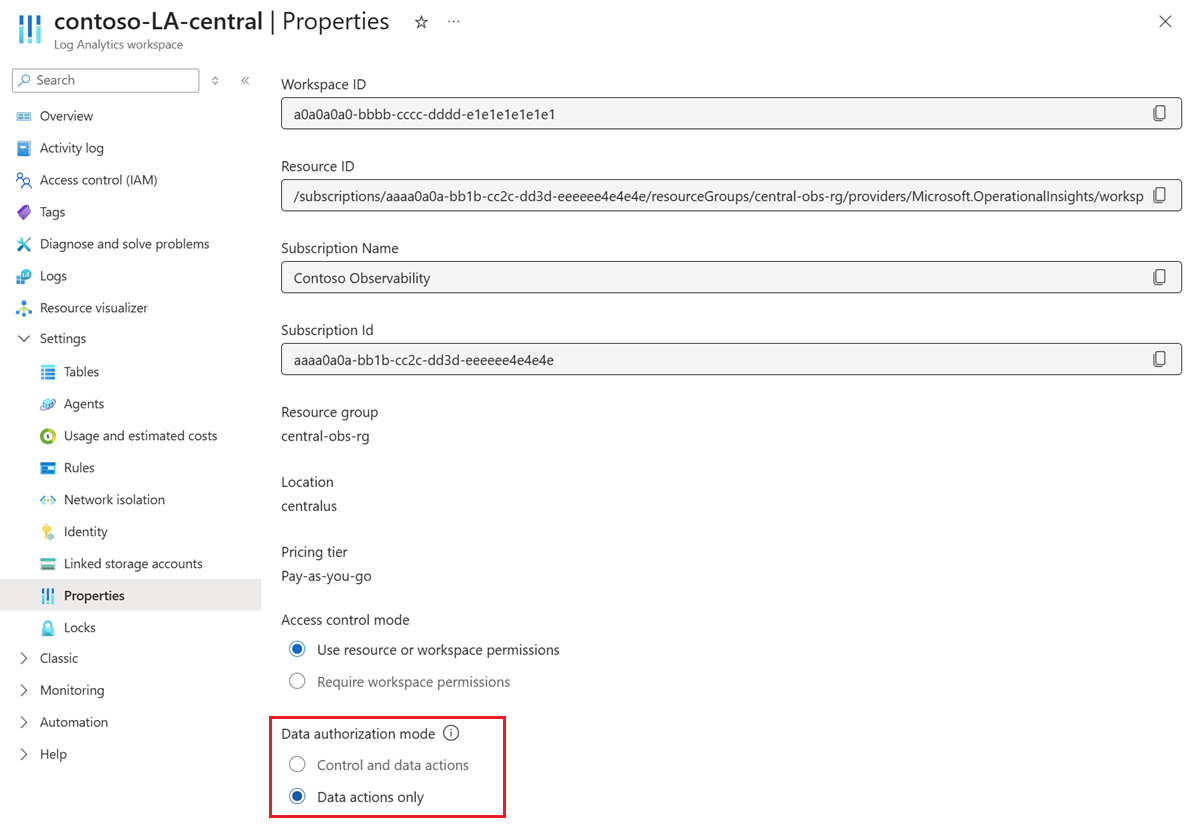
By default, some roles that are based on control plane actions, such as Reader and Monitoring Reader, provide implicit read access to log data. DataActionsOnly mode removes this access path so that only DataActions govern data access.
- In the Azure portal, go to Log Analytics workspaces and select your workspace.
- Under Settings, select Properties.
- Under Data authorization mode, select Data actions only.
After you enable DataActionsOnly mode, verify that users who previously relied on control plane roles for log access now receive appropriate role assignments based on DataActions.
Verify your configuration
Run these checks to confirm that protection and access grants are working correctly.
Confirm that non-privileged users see no data
Sign in as a user who has the Log Analytics Reader role but doesn't have the Privileged Monitoring Data Reader role or a custom role with a
protectionLevelcondition.Open the workspace in the Azure portal and go to Logs.
Run a query against the protected table.
ProtectedTableName
| take 10
Confirm that the query succeeds but returns zero rows.
Confirm that privileged users see data
- Sign in as a user who has the Privileged Monitoring Data Reader role or an appropriate custom role with ABAC conditions.
- Run the same query.
- Confirm that the query returns data rows.
Check Activity Log for configuration changes
Open Activity Log for the workspace and filter by the operation name Update Table. Look for entries that show changes to the protectionLevel property. These entries confirm when and by whom tables were protected.