Configure Virtual WAN for Azure NetApp Files
You can configure Azure NetApp Files volumes with Standard network features in one or more Virtual WAN spoke virtual networks (VNets). Virtual WAN spoke VNets allow access to the file storage service globally across your Virtual WAN environment.
Your Virtual WAN global deployments could include any combinations of different branches, Point-of-Presence (PoP), private users, offices, Azure virtual networks, and other multicloud deployments. You can use SD-WAN, site-to-site VPN, point-to-site VPN, and ExpressRoute to connect your different sites to a virtual hub. If you have multiple virtual hubs, all the hubs would be connected in full mesh in a standard Virtual WAN deployment.
Refer to What is Azure Virtual WAN? to learn more about Virtual WAN.
The following diagram shows the concept of deploying Azure NetApp Files volume in one or more spokes of a Virtual WAN and accessing the volumes globally.
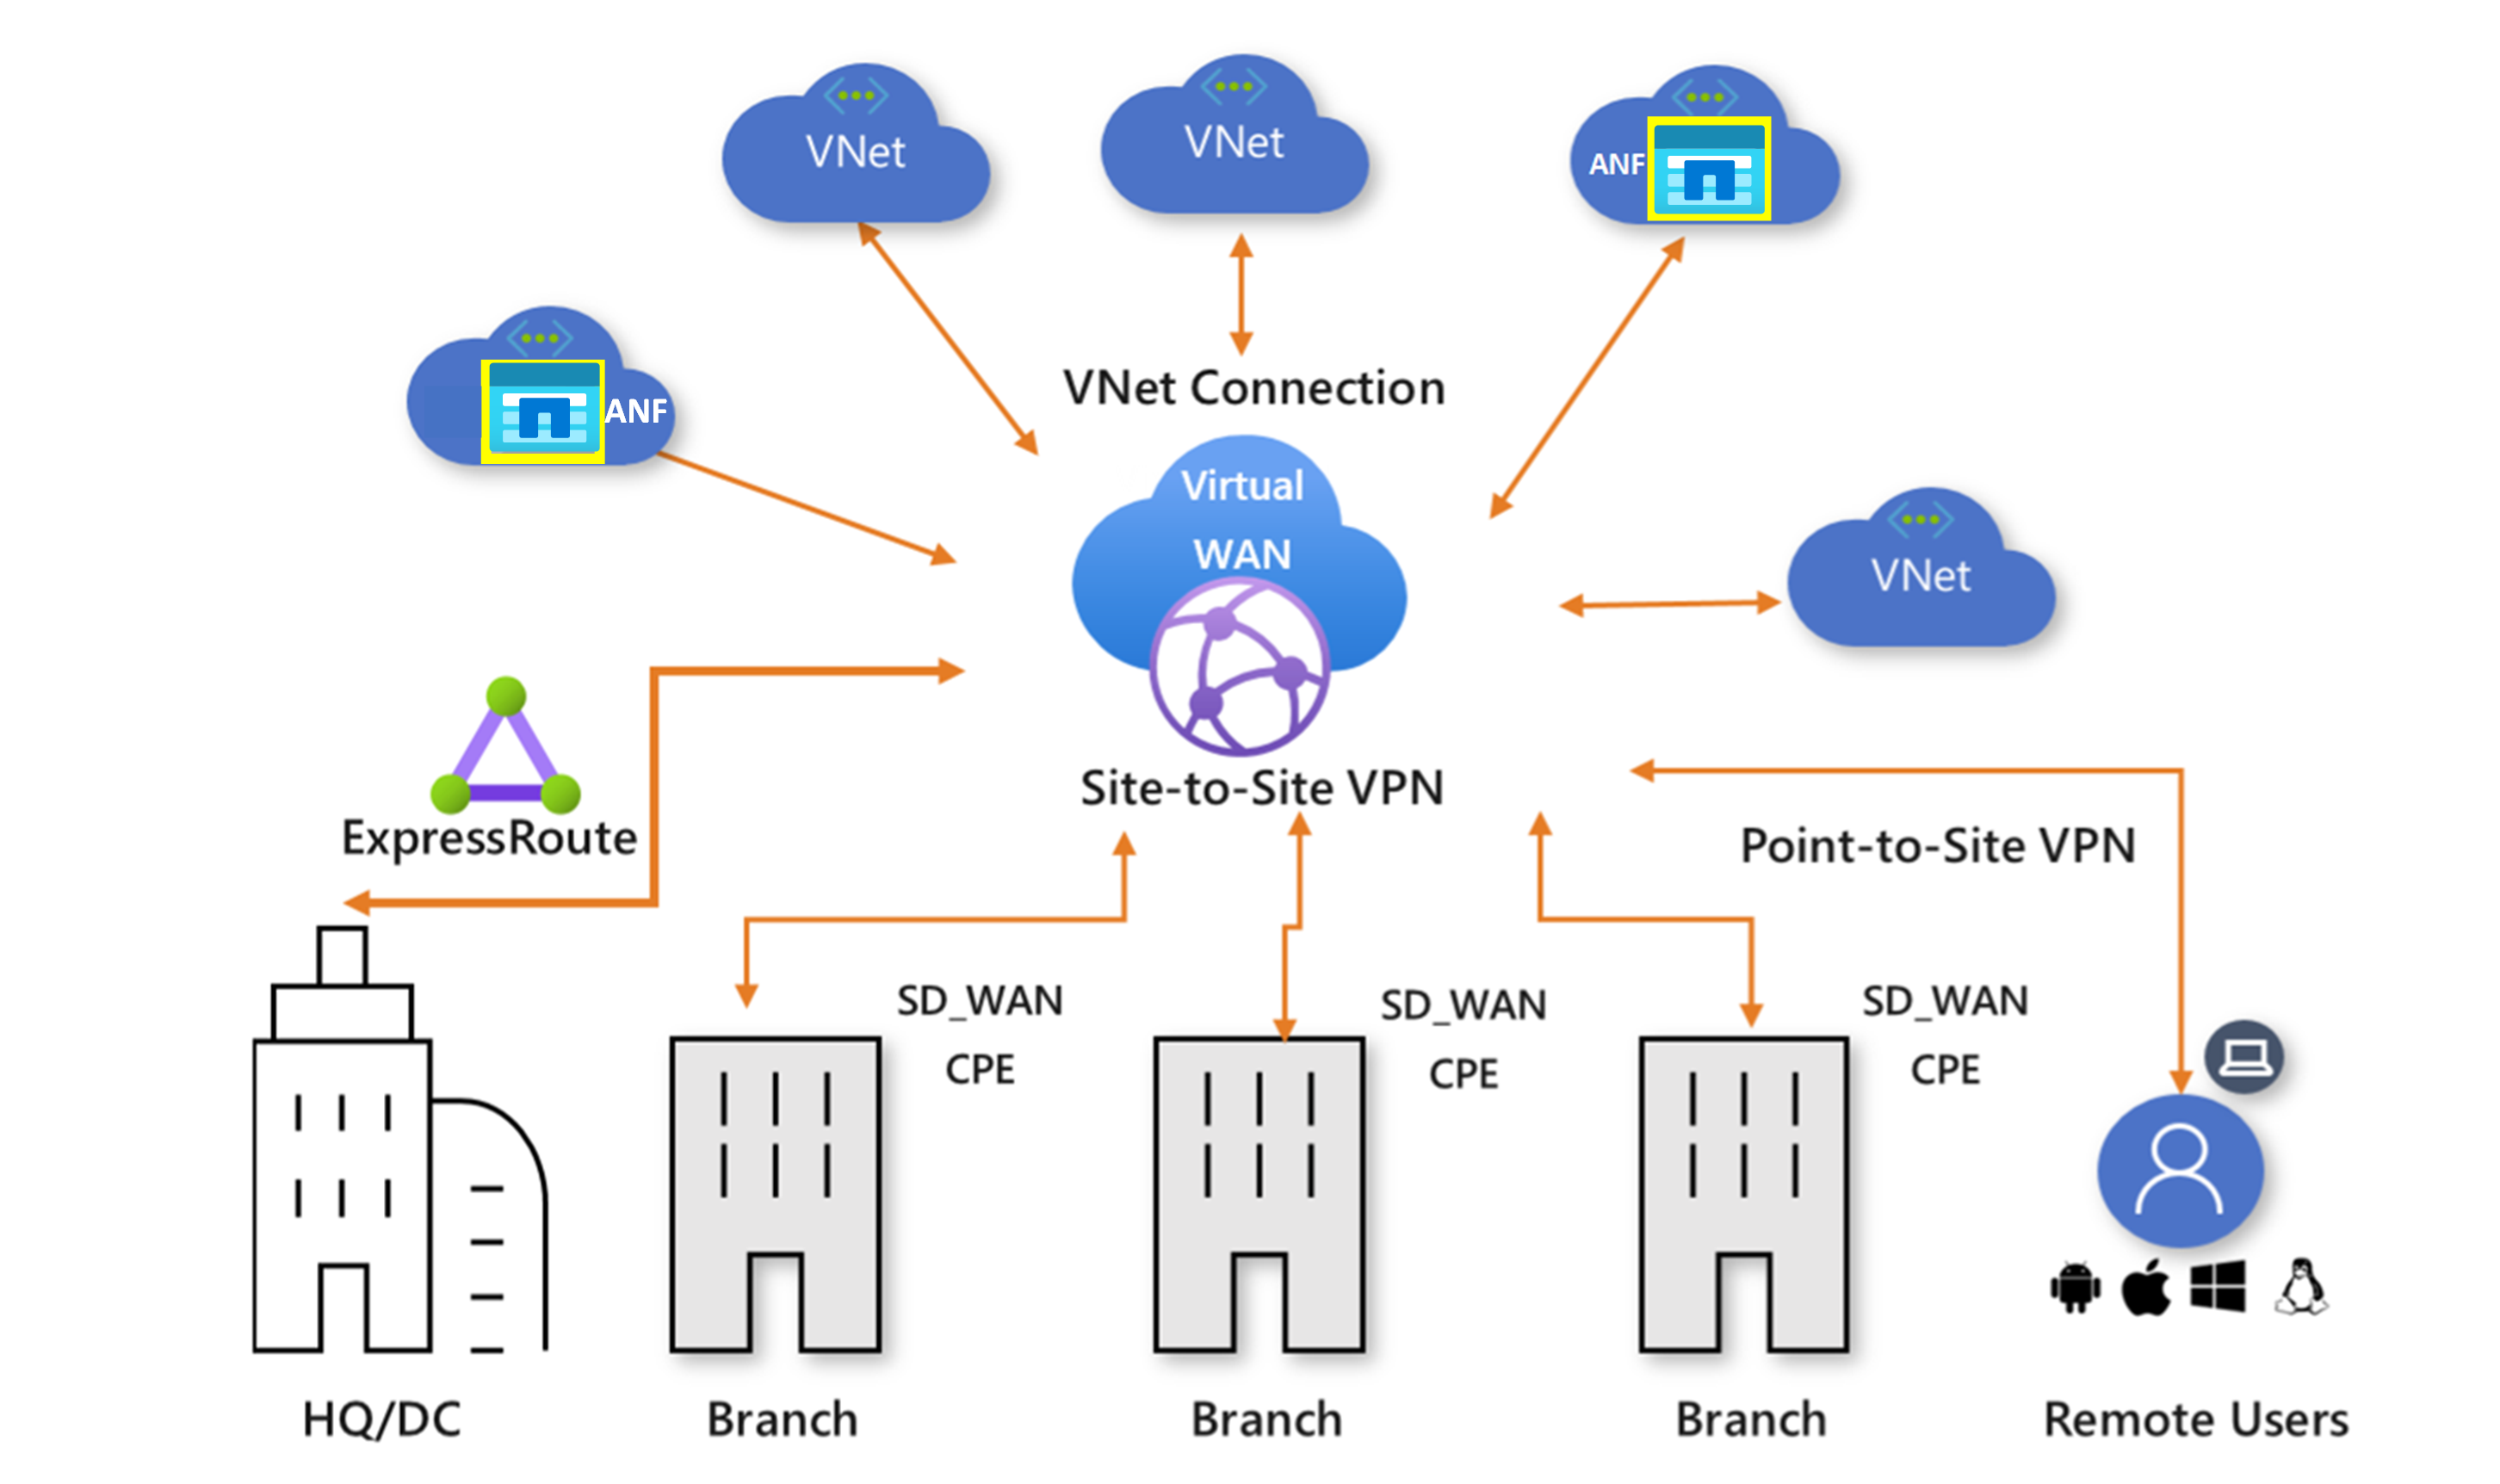
This article will explain how to deploy and access an Azure NetApp Files volume over Virtual WAN.
Considerations
- Azure NetApp Files connectivity over Virtual WAN is supported only when using Standard networking features. For more information see Supported network topologies.
Before you begin
Before you proceed with configuring virtual WAN for Azure NetApp Files, confirm:
- You've configured at least one virtual hub within your Virtual WAN environment. For help with the virtual hub settings, refer to About virtual hub settings.
- You've connected at least one spoke VNet to the virtual hub for deploying Azure NetApp Files volumes. For help, refer to Connect a virtual network to a Virtual WAN hub.
- You have sufficient address space within the selected spoke VNet (at the least a /28 space) for creating a subnet dedicated for Azure NetApp Files.
Deploy an Azure NetApp Files volume
Once you've selected a spoke VNet, you can create the delegated Azure NetApp Files subnet within the VNet as part of the Azure NetApp Files deployment process. If you've already created the subnet, refer Delegate a subnet to Azure NetApp Files.
Deploying Azure NetApp Files volume with Standard network features in a Virtual WAN spoke VNet is the same process as deploying it in any VNet. For deployment steps, refer to Configure network features for an Azure NetApp Files volume.
Route Azure NetApp Files traffic from on-premises via Azure Firewall
This diagram shows routing traffic from on-premises to an Azure NetApp Files volume in a Virtual WAN spoke VNet via a Virtual WAN hub with a VPN gateway and an Azure firewall deployed inside the virtual hub.
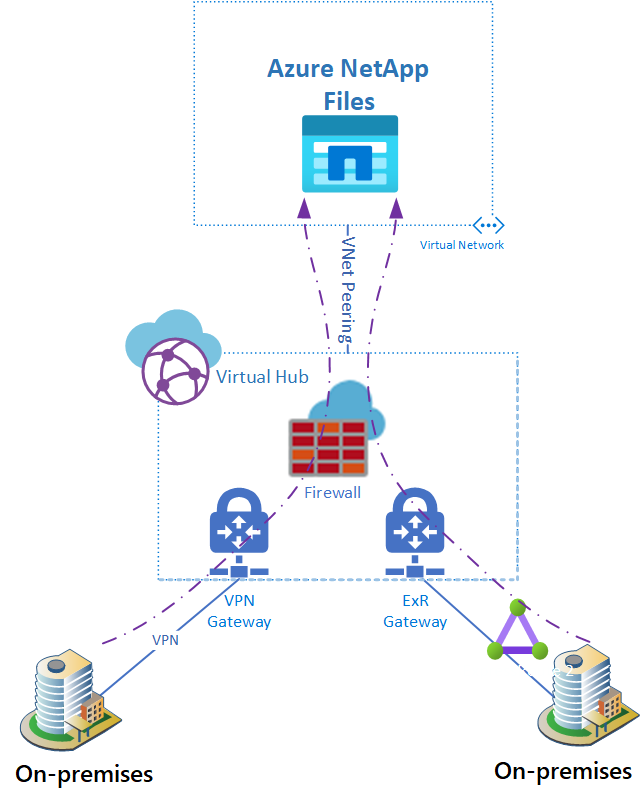
To learn how to install an Azure Firewall in a Virtual WAN hub, refer Configure Azure Firewall in a Virtual WAN hub.
To force different traffic flows via the Azure Firewall installed in the hub, see How to configure Virtual WAN Hub routing intent and routing policies.
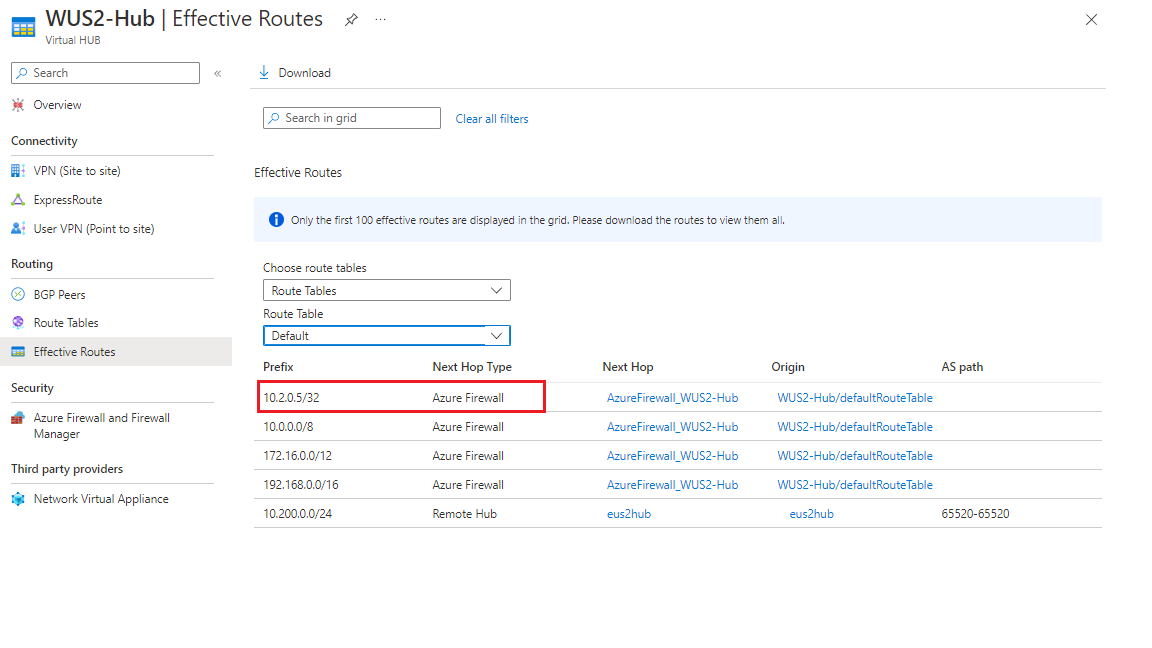
To force the Azure NetApp Files-bound traffic through Azure Firewall in the Virtual WAN hub, the effective routes of the virtual hub should have the specific IP address of the Azure NetApp Files volume pointing to the Azure Firewall.
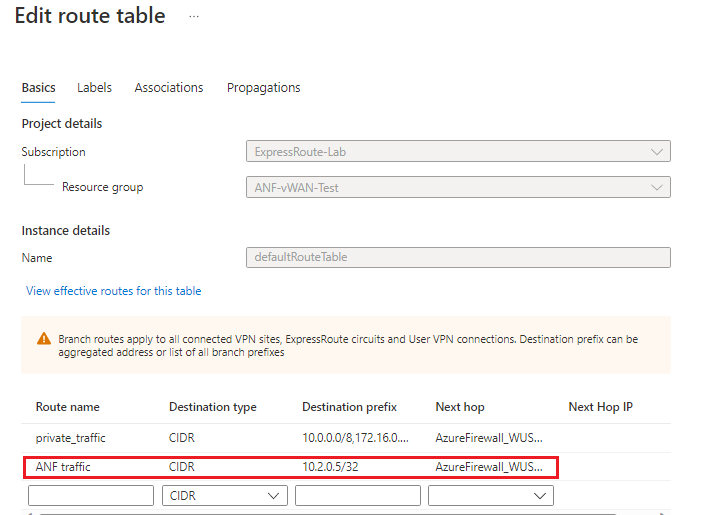
The following image of the Azure portal shows an example virtual hub of effective routes. In the first item, the IP address is listed as 10.2.0.5/32. The static routing entry's destination prefix is <IP-Azure NetApp Files-Volume>/32, and the next hop is Azure-Firewall-in-hub.
Important
Azure NetApp Files mount leverages private IP addresses within a delegated subnet. The specific IP address entry is required, even if a CIDR to which the Azure NetApp Files volume IP address belongs is pointing to the Azure Firewall as its next hop. For example, 10.2.0.5/32 should be listed even though 10.0.0.0/8 is listed with the Azure Firewall as the next hop.
List Azure NetApp Files volume IP under virtual hub effective routes
To identify the private IP address associated with your Azure NetApp Files volume:
- Navigate to the Volumes in your Azure NetApp Files subscription.
- Identify the volume you're looking for. The private IP address associated with an Azure NetApp Files volume is listed as part of the mount path of the volume.
Edit virtual hub effective routes
You can effect changes to a virtual hub's effective routes by adding routes explicitly to the virtual hub's route table.
- In the virtual hub, navigate to Route Tables.
- Select the route table you want to edit.
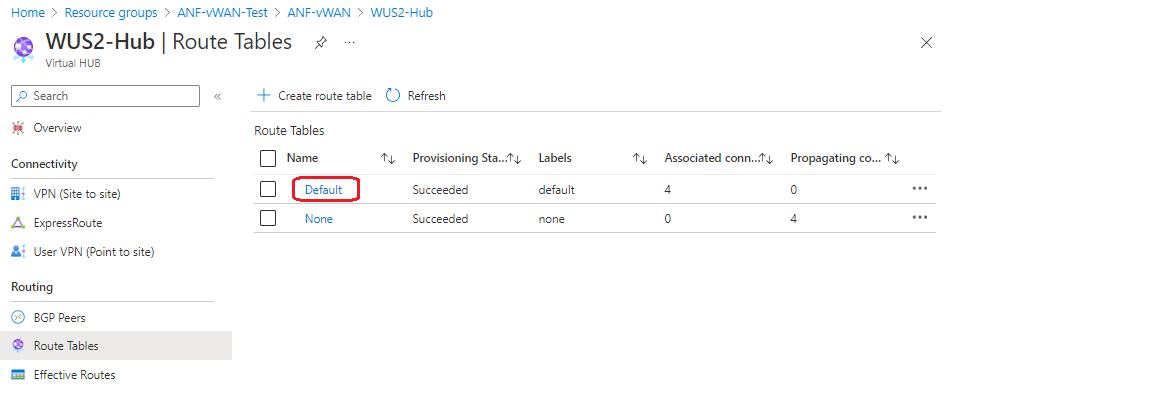
- Choose a Route name then add the Destination prefix and Next hop.
- Save your changes.
