Note
Access to this page requires authorization. You can try signing in or changing directories.
Access to this page requires authorization. You can try changing directories.
Except where this article explicitly refers to a trial account, an Azure AI Video Indexer account means the Azure AI Video Indexer resource in your Azure subscription. It doesn't refer to a user identity. The resource connects your deployment to your Azure subscription so you can manage access, billing, monitoring, and deployment through Azure. This resource is required for cloud-based production deployments and Azure Arc-enabled deployments. For an Azure Arc-enabled deployment, you must also deploy the Azure AI Video Indexer extension.
Note
To support our Responsible AI principles, access to face identification, customization, and celebrity recognition features is limited based on eligibility and usage criteria. These features are only available to Microsoft-managed customers and partners. Use the Face Recognition intake form to apply for access.
Choose an option based on your deployment:
- To evaluate the cloud-based service without an Azure subscription, use a free trial account. Trial accounts apply only to cloud-based Azure AI Video Indexer.
- For a cloud-based production deployment, create an Azure AI Video Indexer resource in your Azure subscription.
- For an Azure Arc-enabled deployment, create an Azure AI Video Indexer resource in your Azure subscription, and then deploy the Azure AI Video Indexer extension.
For more information about cloud-based account types, see Azure AI Video Indexer account types overview.
Prerequisites
Before you begin, make sure you have the following subscription and permissions:
- An Azure subscription
- At the subscription level, either the Owner role, or both Contributor and User Access Administrator roles
To determine what roles are currently assigned, see View the access a user has to Azure resources.
For Azure Government, you also need:
- An Azure Government subscription
- A Microsoft Entra ID account in Azure Government
Azure Government has the following limitations:
- Manual content moderation isn't available. In the public cloud, if content is deemed offensive based on content moderation, you can ask for a human review and potentially revert the decision.
- Bing descriptions aren't presented for identified celebrities and named entities.
Create the resource
Use the portal for your cloud to open the resource creation page, and then follow the same configuration steps.
Open the Create a Video Indexer resource page:
- In the Azure portal, select + Create a resource, search for and select Azure AI Video Indexer, and then select Create > Azure AI Video Indexer.
- In the Azure Government portal, go to Create Account.
On the Basics tab, provide the following information:
Field Description Subscription Select the Azure subscription where you want to create the resource. Resource group Select an existing resource group or create one. Resource name Enter a name for the Azure AI Video Indexer resource. Region Select the Azure region where you want to create the resource. Storage account Select an existing Standard general-purpose v2 storage account or create one. For more information, see Create a storage account. Azure OpenAI Resource Optional. Select an Azure OpenAI resource to connect it to Azure AI Video Indexer. For configuration requirements, see Create or update an Azure AI Video Indexer account with an Azure OpenAI connection. System-assigned Select this option to use a system-assigned managed identity. User-assigned Select this option to use an existing user-assigned managed identity or create one. If you select both identity types, the user-assigned managed identity is the default. 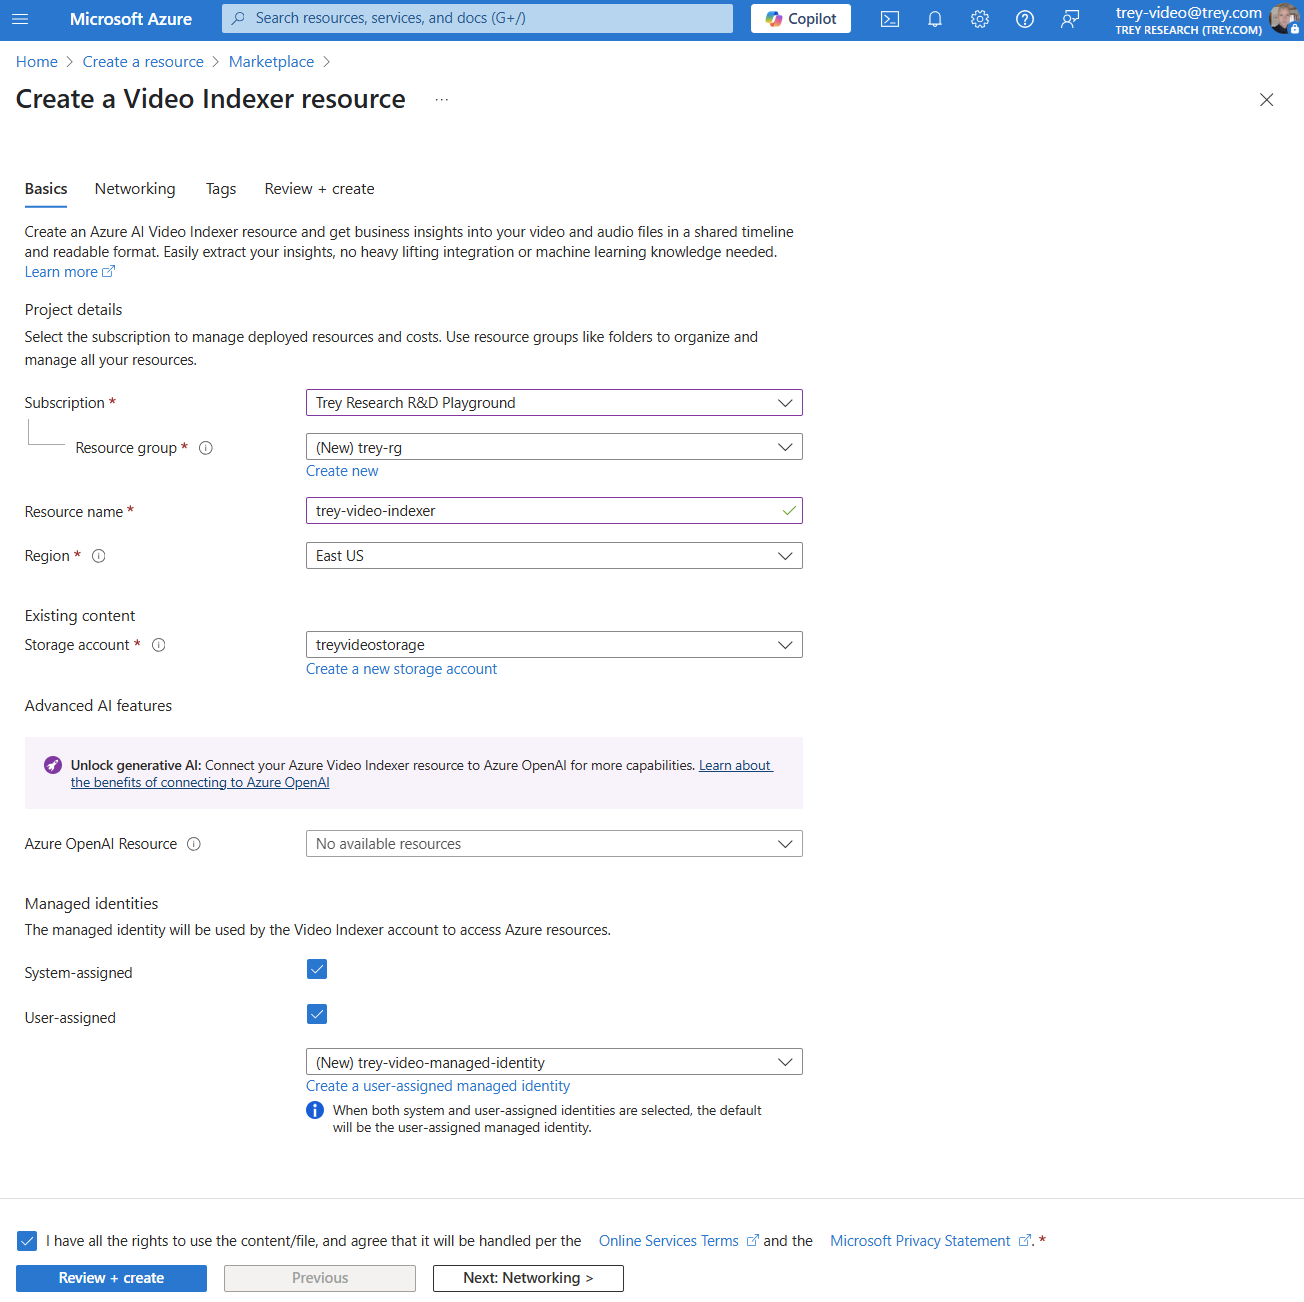
Agree to the terms and conditions by selecting the agreement box.
Select Review + create. Validation for the configuration starts.
When validation finishes, select Create.
When the deployment completes, select Go to resource. The Azure AI Video Indexer resource overview page appears.
If a notification says that the managed identity needs a role assignment to connect to the storage account, select Assign a role.
Next steps
- For cloud-based Azure AI Video Indexer, upload and index media.
- For Azure AI Video Indexer enabled by Azure Arc, deploy the Azure AI Video Indexer extension.