Create Azure DevTest Labs environments from ARM templates
In this article, you learn how to create Azure DevTest Labs environments from Azure Resource Manager (ARM) templates. You can use DevTest Labs environments to easily and consistently provision labs with multiple virtual machines (VMs) or platform-as-a-service (PaaS) resources. You might use this approach to create a lab for a multi-tier web application or a SharePoint farm.
Resources in a DevTest Labs environment share the same lifecycle and you can manage them together. You can track the cost of lab environments and PaaS resources in the same way you track costs for individual lab VMs.
You can configure Azure DevTest Labs to use ARM templates from a public or private GitHub repository. The following diagram shows how to create an environment with DevTest Labs from an ARM template in a public or custom template repository. The template repositories for labs section describes this process in detail.

Note
Azure Deployment Environments (ADE) is highly recommended for creating environments. ADE empowers developers to rapidly deploy app infrastructure using project-based templates, ensuring consistent and secure environments for your development teams.
To learn more about Azure Deployment Environments, see Azure Deployment Environments documentation.
Prerequisites
- It's helpful to have experience configuring lab environments in DevTest Labs. If you're new to working with labs, start by reviewing the instructions in the Configure public environment settings section. You need to understand how to configure template repositories, enable or disable public environments, and select templates to create labs.
Limitations
There are a few limitations to keep in mind when you create labs from ARM templates in DevTest Labs:
DevTest Labs doesn't support the virtual machine (VM) auto-shutdown feature for PaaS resources created from ARM templates.
DevTest Labs doesn't evaluate all lab policies when you deploy ARM templates. The following policies aren't evaluated:
- Number of VMs per lab user
- Number of premium VMs per user
- Number of premium desks per user
Suppose you have a lab policy that allows each user to create a maximum of five VMs. In DevTest Labs, each user can deploy an ARM environment template that creates dozens of VMs.
Create environments from templates
You can create an environment from the Azure DevTest Labs public template repository or you can add a private template repository to your lab.
Create an environment from a template by following these steps:
In the Azure portal, go to your DevTest Labs lab resource.
On the lab Overview page, expand the My lab section on the left menu, and select My environments.
On the My environments page, select Add on the toolbar.
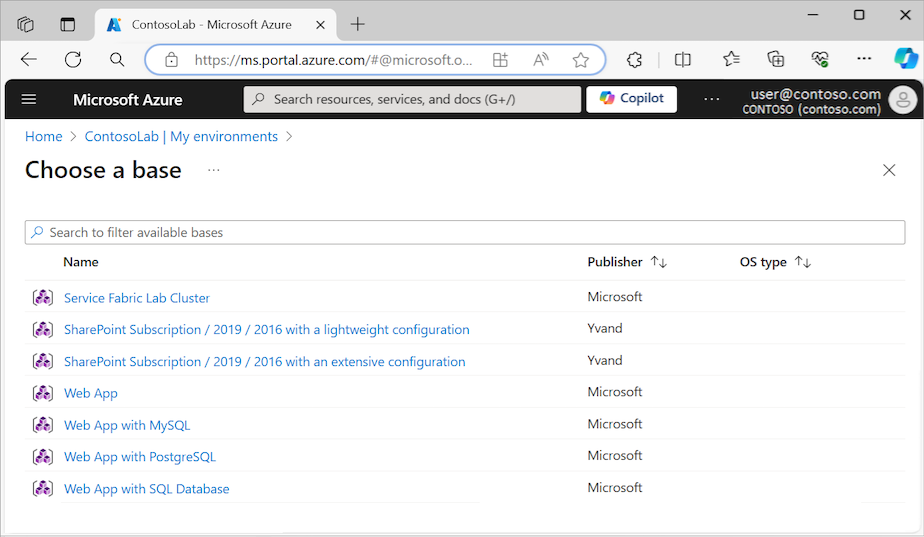
On the Choose a base page, select the ARM environment template to use:
On the Add pane, enter an Environment name, and configure the other parameter settings.
The type and number of parameters is unique for each ARM template. A red asterisk (*) indicates a required setting. You must enter values for all required settings.
Some parameter values in the ARM template file (azuredeploy.parameters.json) produce blank setting fields on the Add pane (no default value). These parameter values include
GEN-UNIQUE,GEN-UNIQUE-[N],GEN-SSH-PUB-KEY, andGEN-PASSWORD.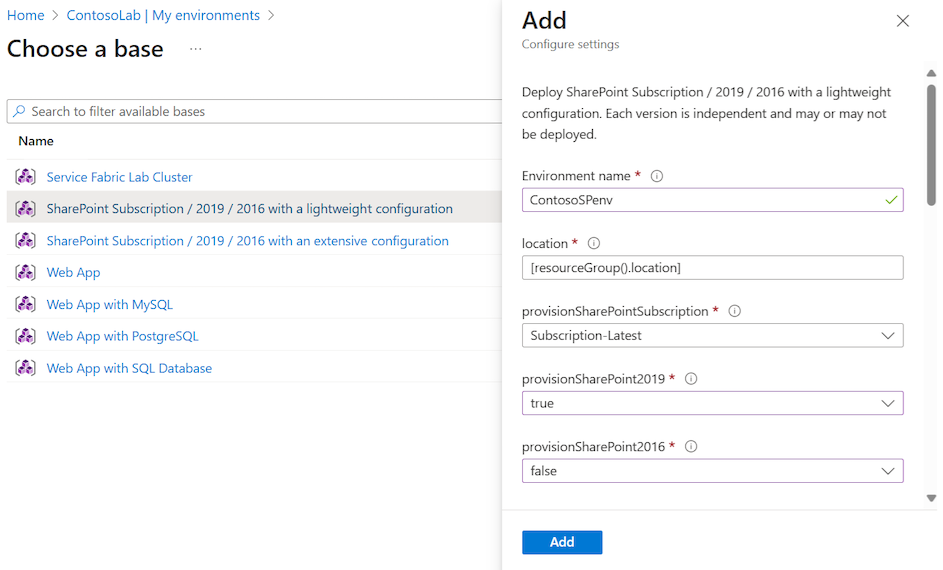
For secure string parameters like passwords, you can use secrets from Azure Key Vault. To learn how to store secrets in a key vault and use them when you create lab resources, see Store secrets in Azure Key Vault.
Select Add to create the environment. The environment starts provisioning immediately.
Note
The process to provision an environment can take a long time. The total time depends on the number of service instances, VMs, and other resources that DevTest Labs creates as part of the lab environment.
To monitor the provisioning status, return to the My environments page for the lab:
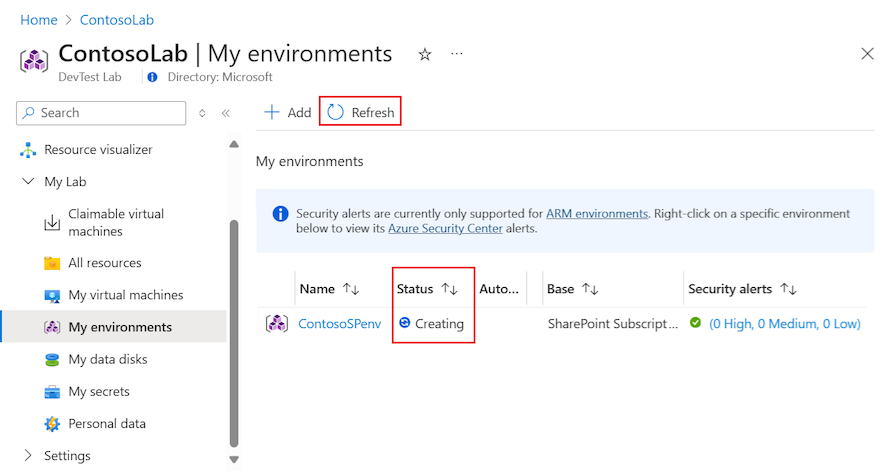
While provisioning is in progress, the environment status is Creating. After provisioning completes, the status changes to Ready. You can select Refresh on the toolbar to update the page view and check the current status.
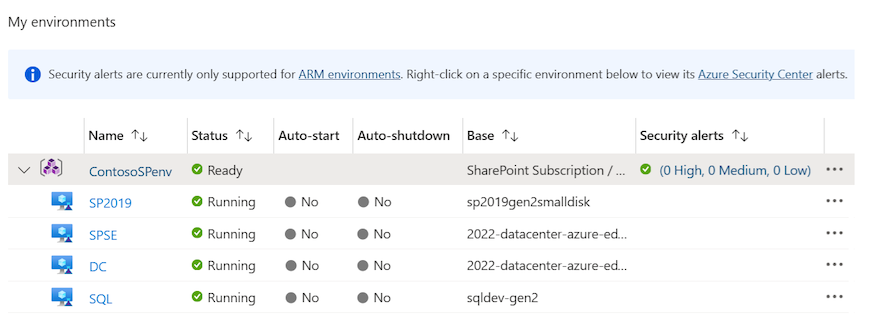
When the environment is ready, you can expand the environment in the My environments list to see the VMs provisioned by the template:
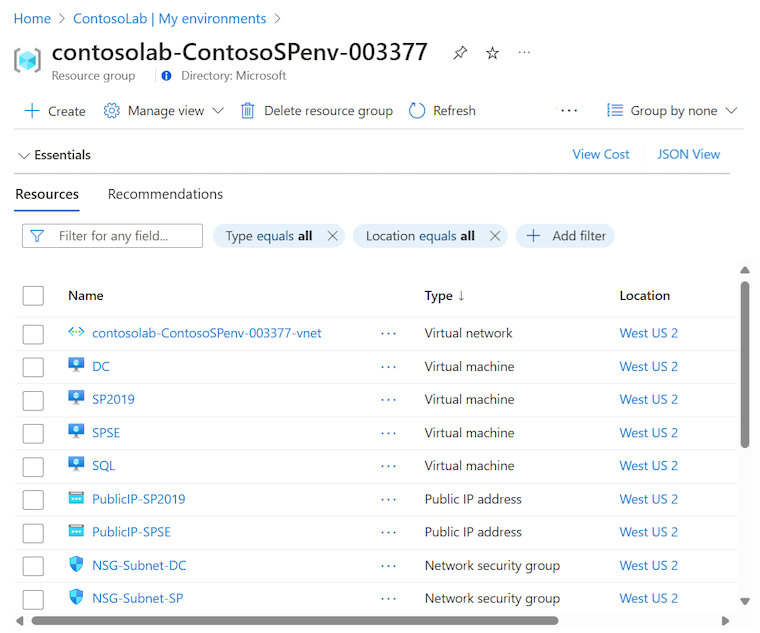
The deployment creates a new resource group to provision all the environment resources defined by the ARM template. Select the environment name in the My environments list to view the resource group and all resources created by the template:
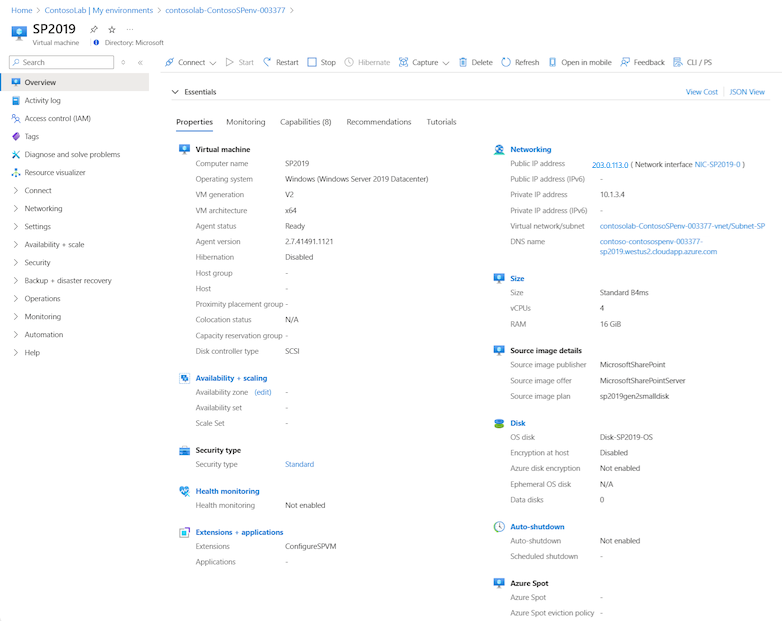
Select an environment VM in the list to see available actions for the VM, such as managing configuration, schedules, and policies:


Explore template repositories
The ARM templates for creating environments in DevTest Labs are available from two sources:
DevTest Labs has a public ARM template repository that includes preauthored environment templates for Azure Web Apps, an Azure Service Fabric cluster, and development SharePoint farms. The templates have minimal input parameters for a smooth getting-started experience with PaaS resources. You can use the public environment templates as-is or customize them to suit your needs. You can also suggest revisions or additions to a public template by submitting a pull request against the GitHub public template repository.
You can store environment templates in your own public or private GitHub repositories, and add those repositories to your lab to make your templates available to all lab users.
Configure public environment settings
You can configure your lab to enable the use of templates from the public template GitHub repository. When you enable the public template repository for a lab, users can quickly create a lab environment by selecting these templates directly in the Azure portal, similar to how they create a VM in a lab. In addition, you can select which templates are available for users to create lab environments.
Set public environment access for new lab
Configure public environment repository access for a new lab by following these steps:
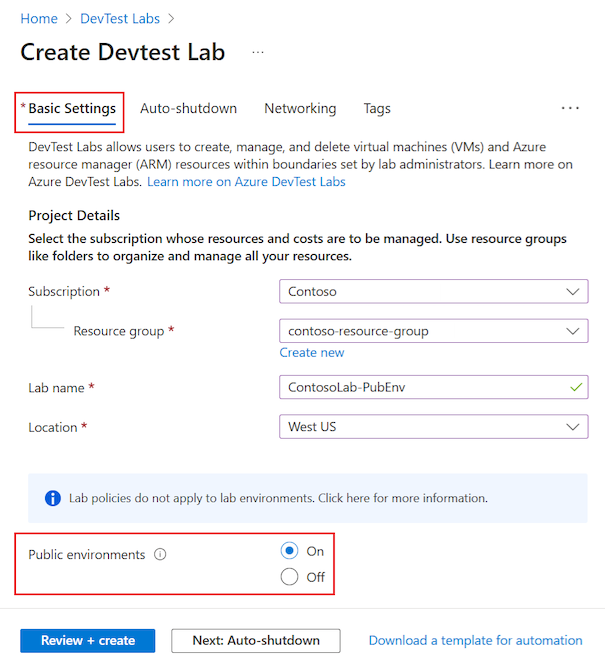
During the process to create a DevTest Labs resource, select the Basic Settings tab.
Set the Public environments option to On:

Set public environment access for existing labs
For existing labs, or labs that you create with an ARM template, public environments might not be enabled. You can control access to public environment repositories for any existing lab with the Enable Public Environments for this lab option.
Follow these steps to enable or disable the public environment repository access for any existing lab:
In the Azure portal, go to your DevTest Labs lab resource where you want to set public environment access.
On your lab Overview page, expand the Settings section in the left menu, and select Configuration and policies.
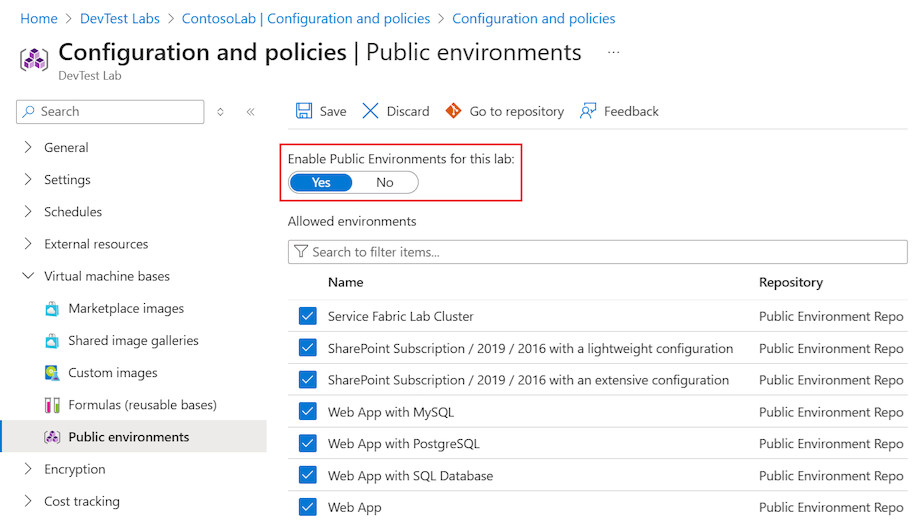
On the Configuration and policies page, expand the Virtual machine bases section in the left menu, and select Public environments.
On the Public environments page, set the Enable Public Environments for this lab option to Yes:
Select Save.

Select available public environment templates
When you set the Enable Public Environments for this lab option to control access to public environments for your lab, all the environment templates are selected by default. The option setting either allows or disallows access to all the environments based on your selection. You can use the selection checkboxes in the list to specify which environments your users can access.
Follow these steps to allow access to only specific environments for the lab:
On the Public environments page, set the Enable Public Environments for this lab option to Yes.
Deselect specific environments in the list to make them unavailable to lab users:

Select Save.

Configure environment user rights
By default, lab users are assigned the Reader role in public environment repositories. They can't change environment resources, and they can't stop or start resources.
Use the following steps to give lab users the Contributor role and allow them to edit environment resources:
In the Azure portal, go to your DevTest Labs lab resource where you want to adjust user role assignments.
On your lab Overview page, expand the Settings section in the left menu, and select Configuration and policies.
On the Configuration and policies page, expand the Settings section in the left menu, and select Lab settings.
On the Lab settings page, set the Environment access > Resource group user rights option to Contributor:
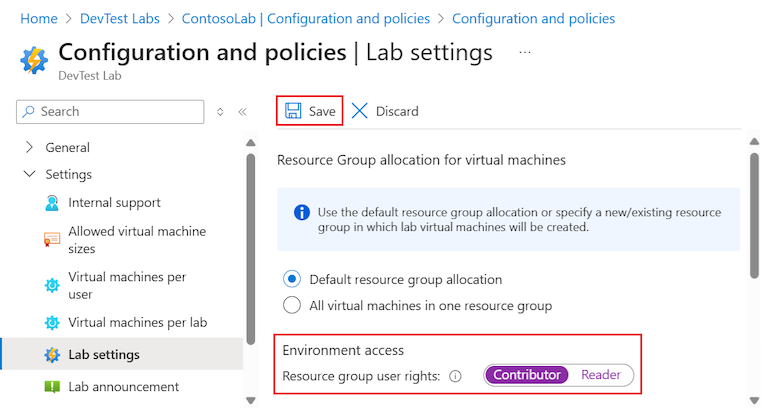
Select Save.

Automate environment creation
If you need to create multiple environments for development or testing scenarios, you can automate environment deployment with Azure PowerShell or the Azure CLI.
Lab owners and administrators can use Azure PowerShell to create VMs and environments from ARM templates. You can also automate deployment through the Azure CLI by using the az deployment group create command to create environments. For more information, see Deploy resources with ARM templates and the Azure CLI.
Note
We recommend that you use the Azure Az PowerShell module to interact with Azure. To get started, see Install Azure PowerShell. To learn how to migrate to the Az PowerShell module, see Migrate Azure PowerShell from AzureRM to Az.
Automate ARM environment template deployment with Azure PowerShell with these steps:
Store the ARM environment template into a GitHub repository.
Save the following PowerShell script to your computer with the filename deployenv.ps1. This script calls the ARM template to create the environment in the lab.
#Requires -Module Az.Resources

[CmdletBinding()]

param (
# ID of the Azure subscription for the lab
[string] [Parameter(Mandatory=$true)] $SubscriptionId,

# Name of the lab in which to create the environment
[string] [Parameter(Mandatory=$true)] $LabName,

# Name of the template repository connected to the lab
[string] [Parameter(Mandatory=$true)] $RepositoryName,

# Name of the template (folder name in the GitHub repository)
[string] [Parameter(Mandatory=$true)] $TemplateName,

# Name of the environment to create in the lab
[string] [Parameter(Mandatory=$true)] $EnvironmentName,

# The parameters to pass to the template. Each parameter is prefixed with "-param_".
# For example, if the template has a parameter named "TestVMName" with a value of "MyVMName",
# the string in $Params is "-param_TestVMName MyVMName".
# This convention allows the script to dynamically handle different templates.
[Parameter(ValueFromRemainingArguments=$true)]
    $Params
)

# Sign in to Azure, or comment out this statement to completely automate environment creation.
Connect-AzAccount

# Select the subscription for your lab.
Set-AzContext -SubscriptionId $SubscriptionId | Out-Null

# Get the user ID to use later in the script.
$UserId = $((Get-AzADUser -UserPrincipalName ((Get-AzContext).Account).Id).Id)

# Get the lab location.
$lab = Get-AzResource -ResourceType "Microsoft.DevTestLab/labs" -Name $LabName
if ($lab -eq $null) { throw "Unable to find lab $LabName in subscription $SubscriptionId." }

# Get information about the repository connected to your lab.
$repository = Get-AzResource -ResourceGroupName $lab.ResourceGroupName `
    -ResourceType 'Microsoft.DevTestLab/labs/artifactsources' `
    -ResourceName $LabName `
    -ApiVersion 2016-05-15 `
    | Where-Object { $RepositoryName -in ($_.Name, $_.Properties.displayName) } `
    | Select-Object -First 1
if ($repository -eq $null) { throw "Unable to find repository $RepositoryName in lab $LabName." }

# Get information about the ARM template base for the environment.
$template = Get-AzResource -ResourceGroupName $lab.ResourceGroupName `
    -ResourceType "Microsoft.DevTestLab/labs/artifactSources/armTemplates" `
    -ResourceName "$LabName/$($repository.Name)" `
    -ApiVersion 2016-05-15 `
    | Where-Object { $TemplateName -in ($_.Name, $_.Properties.displayName) } `
    | Select-Object -First 1
if ($template -eq $null) { throw "Unable to find template $TemplateName in lab $LabName." }

# Build the template parameters by using parameter names and values.
$parameters = Get-Member -InputObject $template.Properties.contents.parameters -MemberType NoteProperty | Select-Object -ExpandProperty Name
$templateParameters = @()

# Extract the custom parameters from $Params and format them as name/value pairs.
$Params | ForEach-Object {
    if ($_ -match '^-param_(.*)' -and $Matches[1] -in $parameters) {
        $name = $Matches[1]
    } elseif ( $name ) {
        $templateParameters += @{ "name" = "$name"; "value" = "$_" }
        $name = $null #reset name variable
    }
}

# Create an object to hold the necessary template properties.
$templateProperties = @{ "deploymentProperties" = @{ "armTemplateId" = "$($template.ResourceId)"; "parameters" = $templateParameters }; }

# Deploy the environment in your lab by using the New-AzResource command.
New-AzResource -Location $Lab.Location `
    -ResourceGroupName $lab.ResourceGroupName `
    -Properties $templateProperties `
    -ResourceType 'Microsoft.DevTestLab/labs/users/environments' `
    -ResourceName "$LabName/$UserId/$EnvironmentName" `
    -ApiVersion '2016-05-15' -Force

Write-Output "Environment $EnvironmentName completed."
Update the following placeholders in the script with your own lab values:
SubscriptionIdLabNameResourceGroupNameRepositoryNameTemplateName(template folder in the GitHub repository)EnvironmentName
The following snippet shows how to run the script with example parameter values:
./deployenv.ps1 -SubscriptionId "000000000-0000-0000-0000-0000000000000" -LabName "mydevtestlab" -ResourceGroupName "mydevtestlabRG000000" -RepositoryName "myRepository" -TemplateName "ARM template folder name" -EnvironmentName "myNewEnvironment"Run the script.