Troubleshoot artifacts on lab virtual machines in Azure DevTest Labs
This article guides you through possible causes and troubleshooting steps for artifact failures on your Azure DevTest Labs virtual machine (VM) resources.
Artifacts are tools, actions, or software you can install on lab VMs during or after VM creation. Lab owners can preselect mandatory artifacts to apply to all lab VMs at creation, and lab users can apply artifacts to VMs that they own. Several possible issues can cause artifacts to fail to install and apply to a lab or run correctly on a lab VM.
When an artifact appears to stop responding, the first step is to try to determine why the process is stuck. Artifact installation can be blocked during the initial request or fail during request execution. You can troubleshoot artifact failures from the Azure portal or from the VM where the artifact failure occurs.
Troubleshoot in the Azure portal
If an artifact isn't successfully applying to your lab VM, you can start by investigating the status of your VM in the Azure portal. You can find information about the state of the VM, confirm it's running, and verify artifacts can be applied. The Activity log data for the lab VM shows entries about installation processes. You can check the entries to find information about artifact failures.
Check VM status
Check the VM state in the Azure portal by following these steps:
Browse to the Overview page for the DevTest Labs lab VM and confirm the machine is Running:

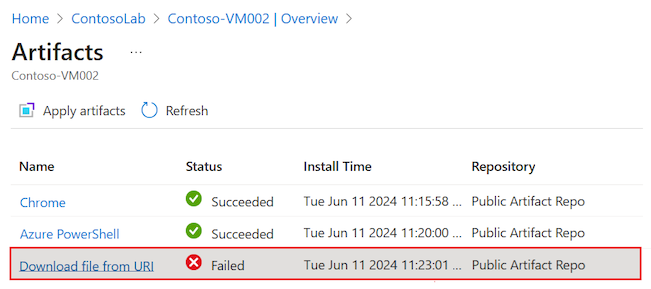
Select Artifacts and open the artifacts list for the lab VM:

Check the Apply artifacts option and confirm the lab VM is ready to accept applied artifacts:

When the Apply artifacts option is grayed, you can't apply artifacts to the lab VM and you see a notification message on the page:


Use PowerShell command
You can also use Azure PowerShell to check if your lab VM can receive applied artifacts.
The following GET command returns the canApplyArtifacts flag with a value of True or False. To run the command, replace the $LabName/$VmName parameter with your lab name and VM name, and specify your lab resource group in the $LabRgName parameter.
Select-AzSubscription -SubscriptionId $SubscriptionId | Out-Null
$vm = Get-AzResource `
        -Name "$LabName/$VmName" `
        -ResourceGroupName $LabRgName `
        -ResourceType 'microsoft.devtestlab/labs/virtualmachines' `
        -ApiVersion '2018-10-15-preview' `
        -ODataQuery '$expand=Properties($expand=ComputeVm)'
$vm.Properties.canApplyArtifacts
Investigate failed artifact details
An artifact can stop responding and eventually show as Failed in the artifacts list for the lab VM.
Investigate failed artifacts by following these steps:
Browse to the Artifacts list page for the lab VM, and select the artifact with the Failed status:
The Artifact details view opens. The details include the Deployment Message and Extension Message information about the artifact failure:


Inspect Activity logs
To install artifacts, DevTest Labs creates and deploys an Azure Resource Manager (ARM) template that requests use of the Custom Script Extension (CSE). An error at this level shows up in the Activity logs for the subscription and for the resource group that contains the lab VM.
Note
When you view the Activity logs, you might need to expand the installation process entries to see the failure error summaries.
Inspect the Activity log entries for failures related to installation or application of the artifact on the lab VM with these steps:
Browse to the Activity log page for the lab VM and locate the artifact with the Failed status:

Select the entry to open the details pane and view the log information:
If you're attempting to apply the artifact directly to your lab VM, look for failure errors related to the Create or Update Virtual Machine Extension installation process.
If you're creating a VM and applying the artifact during the process, look for failure errors reported for the Create or Update Virtual Machine installation process.
The pane title corresponds to the entry title, such as Apply artifacts to virtual machine:

On the details pane, select JSON to review the contents of the JSON payload. You can see the error at the end of the JSON document:


Investigate artifact repository and lab storage account
When DevTest Labs applies an artifact, it reads the artifact configuration and files from connected repositories. If an artifact fails to install or apply to your lab VM, the issue might be related to repository access.
By default, DevTest Labs has access to the DevTest Labs public Artifact repository. You can also connect a lab to a private repository to access custom artifacts. Depending on the configuration, lab VMs might not have direct access to the artifact repository. DevTest Labs caches the artifacts in a lab storage account created when the lab first initializes.
If a custom artifact fails to install, make sure the personal access token (PAT) for the private repository isn't expired. If the PAT is expired, the artifact isn't listed, and any scripts that refer to artifacts from that repository fail.
If access to the storage account is blocked, you might see an error similar to this example:
CSE Error: Failed to download all specified files. Exiting. Exception: Microsoft.WindowsAzure.Storage.StorageException: The remote server returned an error: (403) Forbidden. ---> System.Net.WebException: The remote server returned an error: (403) Forbidden.A scenario where you might encounter this error is when traffic is blocked from the VM to the Azure Storage service. The error appears in the Activity log of the resource group for the lab VM.
Identify repository connection issues to the Azure Storage account with these steps:
Check for added network security groups (NSGs). If a subscription policy is added to automatically configure NSGs in all virtual networks, it can affect the virtual network used for creating your lab VMs.
Verify all NSG rules:
Use IP flow verify to determine whether an NSG rule is blocking traffic to or from a VM.
Review effective security group rules to ensure an inbound Allow NSG rule exists. For more information, see Using effective security rules to troubleshoot VM traffic flow.
Check the default storage account for your lab.
The default storage account is the first storage account created during lab creation. The name usually starts with the letter "a" and ends with a multi-digit number, such as
a<labname>#.Browse to the Overview page for the DevTest Labs lab VM, and select Resource visualizer.
In the diagram, locate the Storage account that has a name that matches the described naming convention,
a<labname>#.Select the Storage account resource to see the popup menu, and then select View:

On the storage account Overview page, expand the Security + networking section on the left menu, and select Networking:

On the Firewalls and virtual networks tab, check the configuration for the Public network access option:
If Enabled from selected virtual networks and IP addresses is selected, confirm the list of allowed IP addresses shows the lab's virtual networks that can be used to create lab VMs:

Otherwise, confirm Enabled from all networks is selected:


For in-depth troubleshooting, see Configure Azure Storage firewalls and virtual networks.
Troubleshoot on the lab machine
You can connect to the lab VM where the artifact failed and investigate the issue.
Inspect Custom Script Extension log file
View the Custom Script Extension (CSE) log file for a Windows VM by following these steps:
Connect to your running DevTest Labs lab VM.
Open a File Explorer window and go to C:\Packages\Plugins\Microsoft.Compute.CustomScriptExtension\<CSE version>\Status\. An example <CSE version> is
1.10.12.
Open and inspect a STATUS file to view the error, such as 1.status.
For instructions on finding the log files on a Linux VM, see Use the Azure Custom Script Extension Version 2 with Linux virtual machines.
Check Azure Virtual Machine Agent
Ensure the Azure Virtual Machine Agent (VM Agent) for your lab VM is installed and ready.
When your lab VM first starts, or when the CSE first installs to serve the request to apply artifacts, the lab VM might need to upgrade the VM Agent or wait for the VM Agent to initialize. The VM Agent might depend on services that take a long time to initialize.
Determine whether the VM Agent is causing the artifact to stop responding by following these steps:
Connect to your running DevTest Labs lab VM.
Open a File Explorer window, and go to the folder that has the log files for your lab VM, such as C:\WindowsAzure\logs.
Open the WaAppAgent.log file.
In the log file, look for entries that show the VM Agent starting, finishing initialization, and sending the first heartbeat. Scan entries for time stamps around the time you experienced the artifact issue. The following snippet shows some example entries from the log file:
[00000006] [11/14/2019 05:52:13.44] [INFO]  WindowsAzureGuestAgent starting. Version 2.7.41491.949
...
[00000006] [11/14/2019 05:52:31.77] [WARN]  Waiting for OOBE to Complete ...
...
[00000006] [11/14/2019 06:02:30.43] [WARN]  Waiting for OOBE to Complete ...
[00000006] [11/14/2019 06:02:33.43] [INFO]  StateExecutor initialization completed.
[00000020] [11/14/2019 06:02:33.43] [HEART] WindowsAzureGuestAgent Heartbeat.
In this example, the VM Agent took 10 minutes and 20 seconds to start. The delay is because the out-of-box-experience (OOBE) service took a long time to start. The long start time for the VM Agent caused the artifact to stop responding.
For general information about Azure extensions, see Azure virtual machine extensions and features. For more troubleshooting ideas, see Azure Virtual Machine Agent overview.
Investigate script issues
Another reason the artifact installation might fail is due to the way the artifact installation script is authored.
Here are some examples of potential script issues:
The script has mandatory parameters, but an expected value isn't passed during script execution. This scenario can happen if the user is allowed to leave an expected parameter blank and a default value isn't specified in the artifactfile.json definition file. As a result, the script stops responding because it's waiting for user input. When the script requires parameter values, it's a good practice to define defaults and require the user to enter a value.
The script requires user action during script execution. This scenario can happen if there's a long delay in script execution while waiting for the user to take action. It's a good practice to author scripts that can work silently without requiring user intervention.
Determine whether the script is causing the artifact to stop responding by following these steps:
Connect to your running DevTest Labs lab VM.
Open a File Explorer window.
Go to the Download folder that has the artifact installation script for your VM, such as C:\Packages\Plugins\Microsoft.Compute.CustomScriptExtension\<CSE version>\Downloads\. An example <CSE version> is
1.10.12.For the subsequent steps, you can work with the script in this folder, or copy the script to a working folder on your VM.
Open a Command Prompt window with administrative privileges on your VM.
Run the artifact installation script in the Command Prompt window.
Follow the script prompts and enter the required parameter values. To investigate whether lack of user input or delayed user action causes an issue, try to reproduce the specific behavior.
Determine if the script demonstrates unexpected or problematic behavior.
As needed, correct the script on your lab VM, and run the script again to confirm the issues are resolved.
Check artifact structure
A custom artifact needs to have the proper structure. Be sure to confirm that custom artifacts in the artifact installation script implement the correct structure. The following resources provide information to help you complete this check:
- For information about how to correctly construct an artifact, see Create custom artifacts.
- For an example of a properly structured artifact, see the Test parameter types artifact.
- For more information about writing and correcting artifact scripts, see AUTHORING.
Request script update
You can submit proposed script corrections for artifacts hosted in the DevTest Labs public repository. For details, see the Contributions section in the README document.
Get support
If you need more help, try one of the following support channels:
Search the Microsoft Community website resources for information about Azure DevTest Labs and access posts on Stack Overflow.
Connect with @AzureSupport, the official Microsoft Azure account for improving customer experience. Azure Support connects the Azure community to answers, support, and experts.