Quickstart: using the Key Phrase Extraction client library and REST API
Reference documentation | More samples | Package (NuGet) | Library source code
Use this quickstart to create a key phrase extraction application with the client library for .NET. In the following example, you create a C# application that can identify key words and phrases found in text.
Prerequisites
- Azure subscription - Create one for free
- The Visual Studio IDE
Setting up
Create an Azure resource
To use the code sample below, you'll need to deploy an Azure resource. This resource will contain a key and endpoint you'll use to authenticate the API calls you send to the Language service.
Use the following link to create a language resource using the Azure portal. You will need to sign in using your Azure subscription.
On the Select additional features screen that appears, select Continue to create your resource.

In the Create language screen, provide the following information:
Detail Description Subscription The subscription account that your resource will be associated with. Select your Azure subscription from the drop-down menu. Resource group A resource group is a container that stores the resources you create. Select Create new to create a new resource group. Region The location of your Language resource. Different regions may introduce latency depending on your physical location, but have no impact on the runtime availability of your resource. For this quickstart, either select an available region near you, or choose East US. Name The name for your Language resource. This name will also be used to create an endpoint URL that your applications will use to send API requests. Pricing tier The pricing tier for your Language resource. You can use the Free F0 tier to try the service and upgrade later to a paid tier for production. 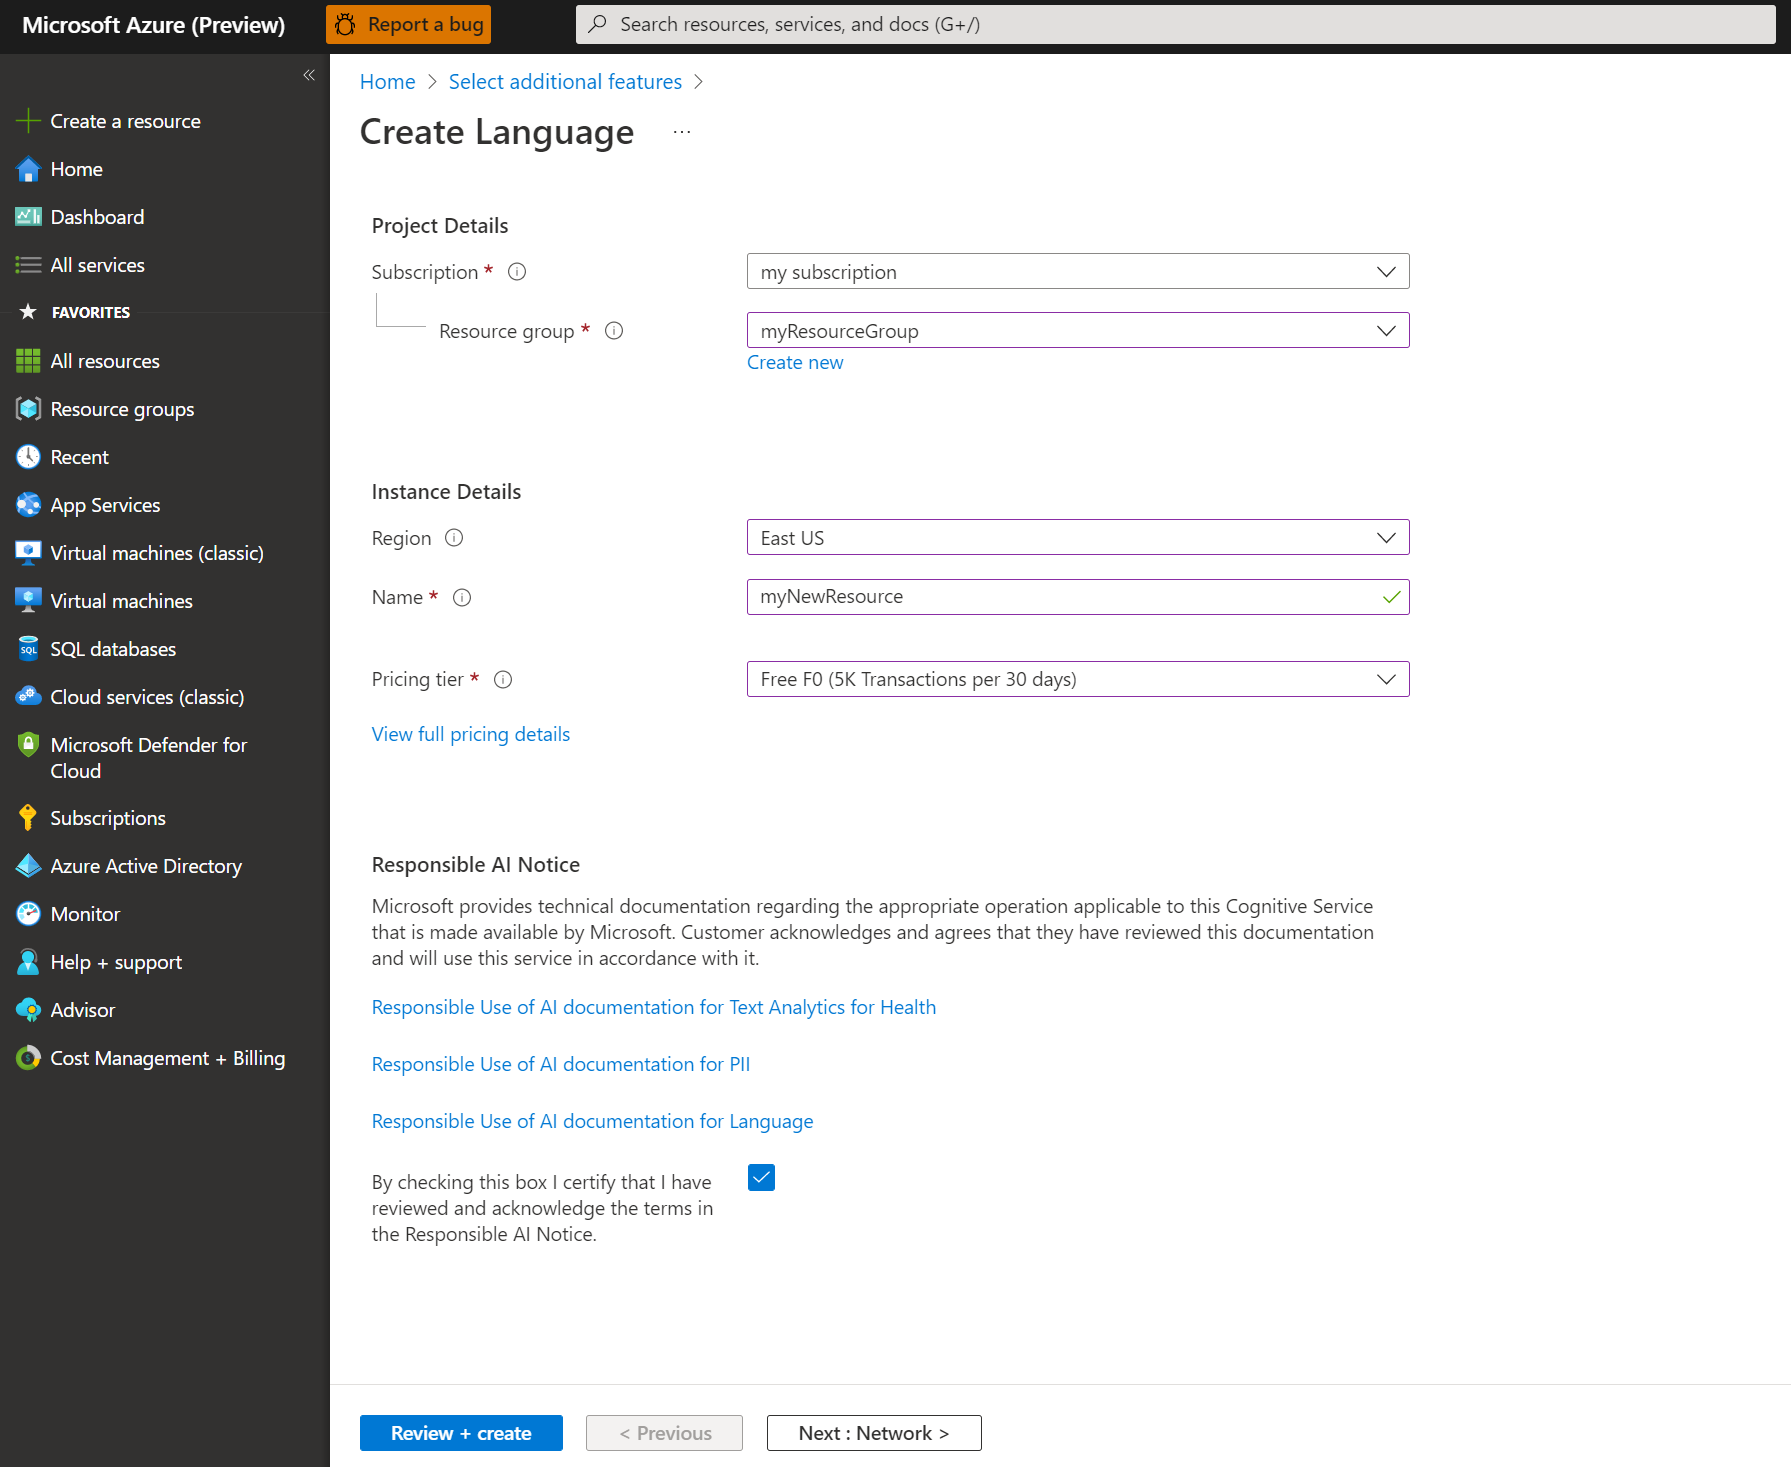
Make sure the Responsible AI Notice checkbox is checked.
Select Review + Create at the bottom of the page.
In the screen that appears, make sure the validation has passed, and that you entered your information correctly. Then select Create.


Get your key and endpoint
Next you will need the key and endpoint from the resource to connect your application to the API. You'll paste your key and endpoint into the code later in the quickstart.
After the Language resource deploys successfully, click the Go to Resource button under Next Steps.

On the screen for your resource, select Keys and endpoint on the left navigation menu. You will use one of your keys and your endpoint in the steps below.


Create environment variables
Your application must be authenticated to send API requests. For production, use a secure way of storing and accessing your credentials. In this example, you will write your credentials to environment variables on the local machine running the application.
Tip
Don't include the key directly in your code, and never post it publicly. See the Azure AI services security article for more authentication options like Azure Key Vault.
To set the environment variable for your Language resource key, open a console window, and follow the instructions for your operating system and development environment.
- To set the
LANGUAGE_KEYenvironment variable, replaceyour-keywith one of the keys for your resource. - To set the
LANGUAGE_ENDPOINTenvironment variable, replaceyour-endpointwith the endpoint for your resource.
setx LANGUAGE_KEY your-key
setx LANGUAGE_ENDPOINT your-endpoint
Note
If you only need to access the environment variables in the current running console, you can set the environment variable with set instead of setx.
After you add the environment variables, you may need to restart any running programs that will need to read the environment variables, including the console window. For example, if you are using Visual Studio as your editor, restart Visual Studio before running the example.
Create a new .NET Core application
Using the Visual Studio IDE, create a new .NET Core console app. This creates a "Hello World" project with a single C# source file: program.cs.
Install the client library by right-clicking on the solution in the Solution Explorer and selecting Manage NuGet Packages. In the package manager that opens select Browse and search for Azure.AI.TextAnalytics. Select version 5.2.0, and then Install. You can also use the Package Manager Console.
Code example
Copy the following code into your program.cs file. Then run the code.
using Azure;
using System;
using Azure.AI.TextAnalytics;

namespace KeyPhraseExtractionExample
{
    class Program
    {
        // This example requires environment variables named "LANGUAGE_KEY" and "LANGUAGE_ENDPOINT"
        static string languageKey = Environment.GetEnvironmentVariable("LANGUAGE_KEY");
        static string languageEndpoint = Environment.GetEnvironmentVariable("LANGUAGE_ENDPOINT");

        private static readonly AzureKeyCredential credentials = new AzureKeyCredential(languageKey);
        private static readonly Uri endpoint = new Uri(languageEndpoint);

        // Example method for extracting key phrases from text
        static void KeyPhraseExtractionExample(TextAnalyticsClient client)
        {
            var response = client.ExtractKeyPhrases(@"Dr. Smith has a very modern medical office, and she has great staff.");

            // Printing key phrases
            Console.WriteLine("Key phrases:");

            foreach (string keyphrase in response.Value)
            {
                Console.WriteLine($"\t{keyphrase}");
            }
        }

        static void Main(string[] args)
        {
            var client = new TextAnalyticsClient(endpoint, credentials);
            KeyPhraseExtractionExample(client);

            Console.Write("Press any key to exit.");
            Console.ReadKey();
        }

    }
}
Output
Key phrases:
    modern medical office
    Dr. Smith
    great staff
Reference documentation | More samples | Package (Maven) | Library source code
Use this quickstart to create a key phrase extraction application with the client library for Java. In the following example, you create a Java application that can identify key words and phrases found in text.
Prerequisites
- Azure subscription - Create one for free
- Java Development Kit (JDK) with version 8 or above
Setting up
Create an Azure resource
To use the code sample below, you'll need to deploy an Azure resource. This resource will contain a key and endpoint you'll use to authenticate the API calls you send to the Language service.
Use the following link to create a language resource using the Azure portal. You will need to sign in using your Azure subscription.
On the Select additional features screen that appears, select Continue to create your resource.
In the Create language screen, provide the following information:
Detail Description Subscription The subscription account that your resource will be associated with. Select your Azure subscription from the drop-down menu. Resource group A resource group is a container that stores the resources you create. Select Create new to create a new resource group. Region The location of your Language resource. Different regions may introduce latency depending on your physical location, but have no impact on the runtime availability of your resource. For this quickstart, either select an available region near you, or choose East US. Name The name for your Language resource. This name will also be used to create an endpoint URL that your applications will use to send API requests. Pricing tier The pricing tier for your Language resource. You can use the Free F0 tier to try the service and upgrade later to a paid tier for production.
Make sure the Responsible AI Notice checkbox is checked.
Select Review + Create at the bottom of the page.
In the screen that appears, make sure the validation has passed, and that you entered your information correctly. Then select Create.
Get your key and endpoint
Next you will need the key and endpoint from the resource to connect your application to the API. You'll paste your key and endpoint into the code later in the quickstart.
After the Language resource deploys successfully, click the Go to Resource button under Next Steps.
On the screen for your resource, select Keys and endpoint on the left navigation menu. You will use one of your keys and your endpoint in the steps below.
Create environment variables
Your application must be authenticated to send API requests. For production, use a secure way of storing and accessing your credentials. In this example, you will write your credentials to environment variables on the local machine running the application.
Tip
Don't include the key directly in your code, and never post it publicly. See the Azure AI services security article for more authentication options like Azure Key Vault.
To set the environment variable for your Language resource key, open a console window, and follow the instructions for your operating system and development environment.
- To set the
LANGUAGE_KEYenvironment variable, replaceyour-keywith one of the keys for your resource. - To set the
LANGUAGE_ENDPOINTenvironment variable, replaceyour-endpointwith the endpoint for your resource.
setx LANGUAGE_KEY your-key
setx LANGUAGE_ENDPOINT your-endpoint
Note
If you only need to access the environment variables in the current running console, you can set the environment variable with set instead of setx.
After you add the environment variables, you may need to restart any running programs that will need to read the environment variables, including the console window. For example, if you are using Visual Studio as your editor, restart Visual Studio before running the example.
Add the client library
Create a Maven project in your preferred IDE or development environment. Then add the following dependency to your project's pom.xml file. You can find the implementation syntax for other build tools online.
<dependencies>
     <dependency>
        <groupId>com.azure</groupId>
        <artifactId>azure-ai-textanalytics</artifactId>
        <version>5.2.0</version>
    </dependency>
</dependencies>
Code example
Create a Java file named Example.java. Open the file and copy the below code. Then run the code.
import com.azure.core.credential.AzureKeyCredential;
import com.azure.ai.textanalytics.TextAnalyticsClientBuilder;
import com.azure.ai.textanalytics.TextAnalyticsClient;


public class Example {

    // This example requires environment variables named "LANGUAGE_KEY" and "LANGUAGE_ENDPOINT"
    private static String languageKey = System.getenv("LANGUAGE_KEY");
    private static String languageEndpoint = System.getenv("LANGUAGE_ENDPOINT");

    public static void main(String[] args) {
        TextAnalyticsClient client = authenticateClient(languageKey, languageEndpoint);
        extractKeyPhrasesExample(client);
    }
    // Method to authenticate the client object with your key and endpoint
    static TextAnalyticsClient authenticateClient(String key, String endpoint) {
        return new TextAnalyticsClientBuilder()
                .credential(new AzureKeyCredential(key))
                .endpoint(endpoint)
                .buildClient();
    }
    // Example method for extracting key phrases from text
    static void extractKeyPhrasesExample(TextAnalyticsClient client)
    {
        // The text to be analyzed
        String text = "Dr. Smith has a very modern medical office, and she has great staff.";

        System.out.printf("Recognized phrases: %n");
        for (String keyPhrase : client.extractKeyPhrases(text)) {
            System.out.printf("%s%n", keyPhrase);
        }
    }
}
Output
Recognized phrases:

modern medical office
Dr. Smith
great staff
Reference documentation | More samples | Package (npm) | Library source code
Use this quickstart to create a key phrase extraction application with the client library for Node.js. In the following example, you create a JavaScript application that can identify key words and phrases found in text.
Prerequisites
- Azure subscription - Create one for free
- Node.js v14 LTS or later
Setting up
Create an Azure resource
To use the code sample below, you'll need to deploy an Azure resource. This resource will contain a key and endpoint you'll use to authenticate the API calls you send to the Language service.
Use the following link to create a language resource using the Azure portal. You will need to sign in using your Azure subscription.
On the Select additional features screen that appears, select Continue to create your resource.
In the Create language screen, provide the following information:
Detail Description Subscription The subscription account that your resource will be associated with. Select your Azure subscription from the drop-down menu. Resource group A resource group is a container that stores the resources you create. Select Create new to create a new resource group. Region The location of your Language resource. Different regions may introduce latency depending on your physical location, but have no impact on the runtime availability of your resource. For this quickstart, either select an available region near you, or choose East US. Name The name for your Language resource. This name will also be used to create an endpoint URL that your applications will use to send API requests. Pricing tier The pricing tier for your Language resource. You can use the Free F0 tier to try the service and upgrade later to a paid tier for production.
Make sure the Responsible AI Notice checkbox is checked.
Select Review + Create at the bottom of the page.
In the screen that appears, make sure the validation has passed, and that you entered your information correctly. Then select Create.
Get your key and endpoint
Next you will need the key and endpoint from the resource to connect your application to the API. You'll paste your key and endpoint into the code later in the quickstart.
After the Language resource deploys successfully, click the Go to Resource button under Next Steps.
On the screen for your resource, select Keys and endpoint on the left navigation menu. You will use one of your keys and your endpoint in the steps below.
Create environment variables
Your application must be authenticated to send API requests. For production, use a secure way of storing and accessing your credentials. In this example, you will write your credentials to environment variables on the local machine running the application.
Tip
Don't include the key directly in your code, and never post it publicly. See the Azure AI services security article for more authentication options like Azure Key Vault.
To set the environment variable for your Language resource key, open a console window, and follow the instructions for your operating system and development environment.
- To set the
LANGUAGE_KEYenvironment variable, replaceyour-keywith one of the keys for your resource. - To set the
LANGUAGE_ENDPOINTenvironment variable, replaceyour-endpointwith the endpoint for your resource.
setx LANGUAGE_KEY your-key
setx LANGUAGE_ENDPOINT your-endpoint
Note
If you only need to access the environment variables in the current running console, you can set the environment variable with set instead of setx.
After you add the environment variables, you may need to restart any running programs that will need to read the environment variables, including the console window. For example, if you are using Visual Studio as your editor, restart Visual Studio before running the example.
Create a new Node.js application
In a console window (such as cmd, PowerShell, or Bash), create a new directory for your app, and navigate to it.
mkdir myapp

cd myapp
Run the npm init command to create a node application with a package.json file.
npm init
Install the client library
Install the npm package:
npm install @azure/ai-language-text
Code example
Open the file and copy the below code. Then run the code.
"use strict";

const { TextAnalyticsClient, AzureKeyCredential } = require("@azure/ai-text-analytics");

// This example requires environment variables named "LANGUAGE_KEY" and "LANGUAGE_ENDPOINT"
const key = process.env.LANGUAGE_KEY;
const endpoint = process.env.LANGUAGE_ENDPOINT;

//example sentence for performing key phrase extraction
const documents = ["Dr. Smith has a very modern medical office, and she has great staff."];

//example of how to use the client to perform entity linking on a document
async function main() {
    console.log("== key phrase extraction sample ==");

    const client = new TextAnalysisClient(endpoint, new AzureKeyCredential(key));

    const results = await client.analyze("KeyPhraseExtraction", documents);

    for (const result of results) {
      console.log(`- Document ${result.id}`);
      if (!result.error) {
        console.log("\tKey phrases:");
        for (const phrase of result.keyPhrases) {
          console.log(`\t- ${phrase}`);
        }
      } else {
        console.error("  Error:", result.error);
      }
    }
  }

  main().catch((err) => {
    console.error("The sample encountered an error:", err);
  });
Output
== key phrase extraction sample ==
- Document 0
    Key phrases:
    - modern medical office
    - Dr. Smith
    - great staff
Reference documentation | More samples | Package (PyPi) | Library source code
Use this quickstart to create a key phrase extraction application with the client library for Python. In the following example, you create a Python application that can identify key words and phrases found in text.
Prerequisites
- Azure subscription - Create one for free
- Python 3.8 or later
Setting up
Create an Azure resource
To use the code sample below, you'll need to deploy an Azure resource. This resource will contain a key and endpoint you'll use to authenticate the API calls you send to the Language service.
Use the following link to create a language resource using the Azure portal. You will need to sign in using your Azure subscription.
On the Select additional features screen that appears, select Continue to create your resource.
In the Create language screen, provide the following information:
Detail Description Subscription The subscription account that your resource will be associated with. Select your Azure subscription from the drop-down menu. Resource group A resource group is a container that stores the resources you create. Select Create new to create a new resource group. Region The location of your Language resource. Different regions may introduce latency depending on your physical location, but have no impact on the runtime availability of your resource. For this quickstart, either select an available region near you, or choose East US. Name The name for your Language resource. This name will also be used to create an endpoint URL that your applications will use to send API requests. Pricing tier The pricing tier for your Language resource. You can use the Free F0 tier to try the service and upgrade later to a paid tier for production.
Make sure the Responsible AI Notice checkbox is checked.
Select Review + Create at the bottom of the page.
In the screen that appears, make sure the validation has passed, and that you entered your information correctly. Then select Create.
Get your key and endpoint
Next you will need the key and endpoint from the resource to connect your application to the API. You'll paste your key and endpoint into the code later in the quickstart.
After the Language resource deploys successfully, click the Go to Resource button under Next Steps.
On the screen for your resource, select Keys and endpoint on the left navigation menu. You will use one of your keys and your endpoint in the steps below.
Create environment variables
Your application must be authenticated to send API requests. For production, use a secure way of storing and accessing your credentials. In this example, you will write your credentials to environment variables on the local machine running the application.
Tip
Don't include the key directly in your code, and never post it publicly. See the Azure AI services security article for more authentication options like Azure Key Vault.
To set the environment variable for your Language resource key, open a console window, and follow the instructions for your operating system and development environment.
- To set the
LANGUAGE_KEYenvironment variable, replaceyour-keywith one of the keys for your resource. - To set the
LANGUAGE_ENDPOINTenvironment variable, replaceyour-endpointwith the endpoint for your resource.
setx LANGUAGE_KEY your-key
setx LANGUAGE_ENDPOINT your-endpoint
Note
If you only need to access the environment variables in the current running console, you can set the environment variable with set instead of setx.
After you add the environment variables, you may need to restart any running programs that will need to read the environment variables, including the console window. For example, if you are using Visual Studio as your editor, restart Visual Studio before running the example.
Install the client library
After installing Python, you can install the client library with:
pip install azure-ai-textanalytics==5.2.0
Code example
Create a new Python file and copy the below code. Then run the code.
# This example requires environment variables named "LANGUAGE_KEY" and "LANGUAGE_ENDPOINT"
language_key = os.environ.get('LANGUAGE_KEY')
language_endpoint = os.environ.get('LANGUAGE_ENDPOINT')

from azure.ai.textanalytics import TextAnalyticsClient
from azure.core.credentials import AzureKeyCredential

# Authenticate the client using your key and endpoint
def authenticate_client():
    ta_credential = AzureKeyCredential(language_key)
    text_analytics_client = TextAnalyticsClient(
            endpoint=language_endpoint,
            credential=ta_credential)
    return text_analytics_client

client = authenticate_client()

def key_phrase_extraction_example(client):

    try:
        documents = ["Dr. Smith has a very modern medical office, and she has great staff."]

        response = client.extract_key_phrases(documents = documents)[0]

        if not response.is_error:
            print("\tKey Phrases:")
            for phrase in response.key_phrases:
                print("\t\t", phrase)
        else:
            print(response.id, response.error)

    except Exception as err:
        print("Encountered exception. {}".format(err))

key_phrase_extraction_example(client)
Output
Key Phrases:
    modern medical office
    Dr. Smith
    great staff
Use this quickstart to send key phrase extraction requests using the REST API. In the following example, you use cURL to identify key words and phrases found in text.
Prerequisites
- Azure subscription - Create one for free
Setting up
Create an Azure resource
To use the code sample below, you'll need to deploy an Azure resource. This resource will contain a key and endpoint you'll use to authenticate the API calls you send to the Language service.
Use the following link to create a language resource using the Azure portal. You will need to sign in using your Azure subscription.
On the Select additional features screen that appears, select Continue to create your resource.
In the Create language screen, provide the following information:
Detail Description Subscription The subscription account that your resource will be associated with. Select your Azure subscription from the drop-down menu. Resource group A resource group is a container that stores the resources you create. Select Create new to create a new resource group. Region The location of your Language resource. Different regions may introduce latency depending on your physical location, but have no impact on the runtime availability of your resource. For this quickstart, either select an available region near you, or choose East US. Name The name for your Language resource. This name will also be used to create an endpoint URL that your applications will use to send API requests. Pricing tier The pricing tier for your Language resource. You can use the Free F0 tier to try the service and upgrade later to a paid tier for production.
Make sure the Responsible AI Notice checkbox is checked.
Select Review + Create at the bottom of the page.
In the screen that appears, make sure the validation has passed, and that you entered your information correctly. Then select Create.
Get your key and endpoint
Next you will need the key and endpoint from the resource to connect your application to the API. You'll paste your key and endpoint into the code later in the quickstart.
After the Language resource deploys successfully, click the Go to Resource button under Next Steps.
On the screen for your resource, select Keys and endpoint on the left navigation menu. You will use one of your keys and your endpoint in the steps below.
Create environment variables
Your application must be authenticated to send API requests. For production, use a secure way of storing and accessing your credentials. In this example, you will write your credentials to environment variables on the local machine running the application.
Tip
Don't include the key directly in your code, and never post it publicly. See the Azure AI services security article for more authentication options like Azure Key Vault.
To set the environment variable for your Language resource key, open a console window, and follow the instructions for your operating system and development environment.
- To set the
LANGUAGE_KEYenvironment variable, replaceyour-keywith one of the keys for your resource. - To set the
LANGUAGE_ENDPOINTenvironment variable, replaceyour-endpointwith the endpoint for your resource.
setx LANGUAGE_KEY your-key
setx LANGUAGE_ENDPOINT your-endpoint
Note
If you only need to access the environment variables in the current running console, you can set the environment variable with set instead of setx.
After you add the environment variables, you may need to restart any running programs that will need to read the environment variables, including the console window. For example, if you are using Visual Studio as your editor, restart Visual Studio before running the example.
Create a JSON file with the example request body
In a code editor, create a new file named test_kpe_payload.json and copy the following JSON example. This example request will be sent to the API in the next step.
{
    "kind": "KeyPhraseExtraction",
    "parameters": {
        "modelVersion": "latest"
    },
    "analysisInput":{
        "documents":[
            {
                "id":"1",
                "language":"en",
                "text": "Dr. Smith has a very modern medical office, and she has great staff."
            }
        ]
    }
}
Save test_kpe_payload.json somewhere on your computer. For example, your desktop.
Send a key phrase extraction API request
Use the following commands to send the API request using the program you're using. Copy the command into your terminal, and run it.
| parameter | Description |
|---|---|
-X POST <endpoint> |
Specifies your endpoint for accessing the API. |
-H Content-Type: application/json |
The content type for sending JSON data. |
-H "Ocp-Apim-Subscription-Key:<key> |
Specifies the key for accessing the API. |
-d <documents> |
The JSON containing the documents you want to send. |
Replace C:\Users\<myaccount>\Desktop\test_kpe_payload.json with the location of the example JSON request file you created in the previous step.
Command prompt
curl -X POST "%LANGUAGE_ENDPOINT%/language/:analyze-text?api-version=2022-05-01" ^
-H "Content-Type: application/json" ^
-H "Ocp-Apim-Subscription-Key: %LANGUAGE_KEY%" ^
-d "@C:\Users\<myaccount>\Desktop\test_kpe_payload.json"
PowerShell
curl.exe -X POST $env:LANGUAGE_ENDPOINT/language/:analyze-text?api-version=2022-05-01 `
-H "Content-Type: application/json" `
-H "Ocp-Apim-Subscription-Key: $env:LANGUAGE_KEY" `
-d "@C:\Users\<myaccount>\Desktop\test_kpe_payload.json"
JSON response
{
	"kind": "KeyPhraseExtractionResults",
	"results": {
		"documents": [{
			"id": "1",
			"keyPhrases": ["modern medical office", "Dr. Smith", "great staff"],
			"warnings": []
		}],
		"errors": [],
		"modelVersion": "2021-06-01"
	}
}
Clean up resources
If you want to clean up and remove an Azure AI services subscription, you can delete the resource or resource group. Deleting the resource group also deletes any other resources associated with it.
Next steps
Feedback
Coming soon: Throughout 2024 we will be phasing out GitHub Issues as the feedback mechanism for content and replacing it with a new feedback system. For more information see: https://aka.ms/ContentUserFeedback.
Submit and view feedback for