Implementing a Layered Security Architecture with App Service Environments
Important
This article is about App Service Environment v1. App Service Environment v1 and v2 are retired as of 31 August 2024. There's a new version of App Service Environment that is easier to use and runs on more powerful infrastructure. To learn more about the new version, start with the Introduction to the App Service Environment. If you're currently using App Service Environment v1, please follow the steps in this article to migrate to the new version.
As of 31 August 2024, Service Level Agreement (SLA) and Service Credits no longer apply for App Service Environment v1 and v2 workloads that continue to be in production since they are retired products. Decommissioning of the App Service Environment v1 and v2 hardware has begun, and this may affect the availability and performance of your apps and data.
You must complete migration to App Service Environment v3 immediately or your apps and resources may be deleted. We will attempt to auto-migrate any remaining App Service Environment v1 and v2 on a best-effort basis using the in-place migration feature, but Microsoft makes no claim or guarantees about application availability after auto-migration. You may need to perform manual configuration to complete the migration and to optimize your App Service plan SKU choice to meet your needs. If auto-migration isn't feasible, your resources and associated app data will be deleted. We strongly urge you to act now to avoid either of these extreme scenarios.
If you need additional time, we can offer a one-time 30-day grace period for you to complete your migration. For more information and to request this grace period, review the grace period overview, and then go to Azure portal and visit the Migration blade for each of your App Service Environments.
For the most up-to-date information on the App Service Environment v1/v2 retirement, see the App Service Environment v1 and v2 retirement update.
Since App Service Environments provide an isolated runtime environment deployed into a virtual network, developers can create a layered security architecture providing differing levels of network access for each physical application tier.
A common desire is to hide API back-ends from general Internet access, and only allow APIs to be called by upstream web apps. Network security groups (NSGs) can be used on subnets containing App Service Environments to restrict public access to API applications.
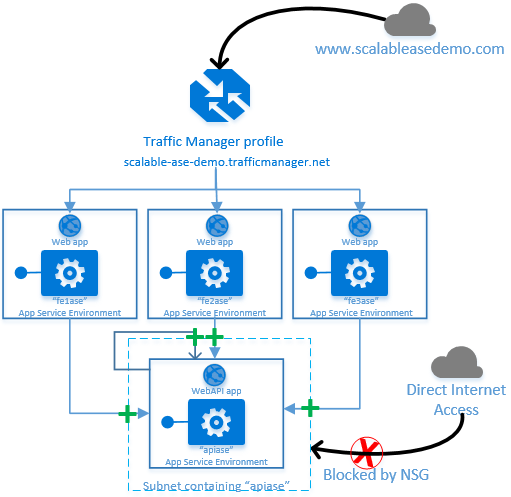
The diagram below shows an example architecture with a WebAPI based app deployed on an App Service Environment. Three separate web app instances, deployed on three separate App Service Environments, make back-end calls to the same WebAPI app.

The green plus signs indicate that the network security group on the subnet containing "apiase" allows inbound calls from the upstream web apps, as well calls from itself. However the same network security group explicitly denies access to general inbound traffic from the Internet.
The remainder of this article walks through the steps needed to configure the network security group on the subnet containing "apiase."
Determining the Network Behavior
In order to know what network security rules are needed, you need to determine which network clients will be allowed to reach the App Service Environment containing the API app, and which clients are blocked.
Since network security groups (NSGs) are applied to subnets, and App Service Environments are deployed into subnets, the rules contained in an NSG apply to all apps running on an App Service Environment. Using the sample architecture for this article, once a network security group is applied to the subnet containing "apiase," all apps running on the "apiase" App Service Environment will be protected by the same set of security rules.
- Determine the outbound IP address of upstream callers: What is the IP address or addresses of the upstream callers? These addresses need to be explicitly allowed access in the NSG. Since calls between App Service Environments are considered "Internet" calls, the outbound IP address assigned to each of the three upstream App Service Environments needs to be allowed access in the NSG for the "apiase" subnet. For more information on determining the outbound IP address for apps running in an App Service Environment, see the Network Architecture Overview article.
- Will the back-end API app need to call itself? A sometimes overlooked and subtle point is the scenario where the back-end application needs to call itself. If a back-end API application on an App Service Environment needs to call itself, it's also treated as an "Internet" call. In the sample architecture, this requires allowing access from the outbound IP address of the "apiase" App Service Environment as well.
Setting up the Network Security Group
Once the set of outbound IP addresses are known, the next step is to construct a network security group. Network security groups can be created for both Resource Manager based virtual networks, and classic virtual networks. The following examples show creating and configuring an NSG on a classic virtual network using PowerShell.
For the sample architecture, the environments are located in South Central US, so an empty NSG is created in that region:
New-AzureNetworkSecurityGroup -Name "RestrictBackendApi" -Location "South Central US"
-Label "Only allow web frontend and loopback traffic"
First an explicit allow rule is added for the Azure management infrastructure as noted in the article on inbound traffic for App Service Environments.
#Open ports for access by Azure management infrastructure
Get-AzureNetworkSecurityGroup -Name "RestrictBackendApi" | Set-AzureNetworkSecurityRule -Name "ALLOW AzureMngmt"
-Type Inbound -Priority 100 -Action Allow -SourceAddressPrefix 'INTERNET' -SourcePortRange '*'
-DestinationAddressPrefix '*' -DestinationPortRange '454-455' -Protocol TCP
Next, two rules are added to allow HTTP and HTTPS calls from the first upstream App Service Environment ("fe1ase").
#Grant access to requests from the first upstream web front-end
Get-AzureNetworkSecurityGroup -Name "RestrictBackendApi" | Set-AzureNetworkSecurityRule -Name "ALLOW HTTP fe1ase"
-Type Inbound -Priority 200 -Action Allow -SourceAddressPrefix '65.52.xx.xyz'  -SourcePortRange '*'
-DestinationAddressPrefix '*' -DestinationPortRange '80' -Protocol TCP
Get-AzureNetworkSecurityGroup -Name "RestrictBackendApi" | Set-AzureNetworkSecurityRule -Name "ALLOW HTTPS fe1ase"
-Type Inbound -Priority 300 -Action Allow -SourceAddressPrefix '65.52.xx.xyz'  -SourcePortRange '*'
-DestinationAddressPrefix '*' -DestinationPortRange '443' -Protocol TCP
Rinse and repeat for the second and third upstream App Service Environments ("fe2ase" and "fe3ase").
#Grant access to requests from the second upstream web front-end
Get-AzureNetworkSecurityGroup -Name "RestrictBackendApi" | Set-AzureNetworkSecurityRule -Name "ALLOW HTTP fe2ase"
-Type Inbound -Priority 400 -Action Allow -SourceAddressPrefix '191.238.xyz.abc'  -SourcePortRange '*'
-DestinationAddressPrefix '*' -DestinationPortRange '80' -Protocol TCP
Get-AzureNetworkSecurityGroup -Name "RestrictBackendApi" | Set-AzureNetworkSecurityRule -Name "ALLOW HTTPS fe2ase"
-Type Inbound -Priority 500 -Action Allow -SourceAddressPrefix '191.238.xyz.abc'  -SourcePortRange '*'
-DestinationAddressPrefix '*' -DestinationPortRange '443' -Protocol TCP

#Grant access to requests from the third upstream web front-end
Get-AzureNetworkSecurityGroup -Name "RestrictBackendApi" | Set-AzureNetworkSecurityRule -Name "ALLOW HTTP fe3ase"
-Type Inbound -Priority 600 -Action Allow -SourceAddressPrefix '23.98.abc.xyz'  -SourcePortRange '*'
-DestinationAddressPrefix '*' -DestinationPortRange '80' -Protocol TCP
Get-AzureNetworkSecurityGroup -Name "RestrictBackendApi" | Set-AzureNetworkSecurityRule -Name "ALLOW HTTPS fe3ase"
-Type Inbound -Priority 700 -Action Allow -SourceAddressPrefix '23.98.abc.xyz'  -SourcePortRange '*'
-DestinationAddressPrefix '*' -DestinationPortRange '443' -Protocol TCP
Lastly, grant access to the outbound IP address of the back-end API's App Service Environment so that it can call back into itself.
#Allow apps on the apiase environment to call back into itself
Get-AzureNetworkSecurityGroup -Name "RestrictBackendApi" | Set-AzureNetworkSecurityRule -Name "ALLOW HTTP apiase"
-Type Inbound -Priority 800 -Action Allow -SourceAddressPrefix '70.37.xyz.abc'  -SourcePortRange '*'
-DestinationAddressPrefix '*' -DestinationPortRange '80' -Protocol TCP
Get-AzureNetworkSecurityGroup -Name "RestrictBackendApi" | Set-AzureNetworkSecurityRule -Name "ALLOW HTTPS apiase"
-Type Inbound -Priority 900 -Action Allow -SourceAddressPrefix '70.37.xyz.abc'  -SourcePortRange '*'
-DestinationAddressPrefix '*' -DestinationPortRange '443' -Protocol TCP
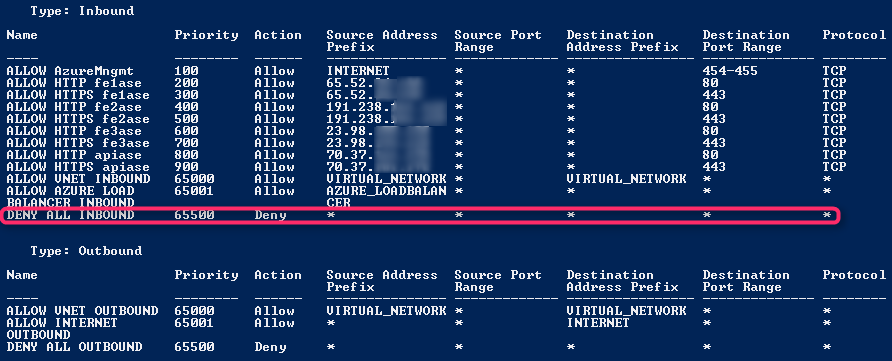
No other network security rules are required, because every NSG has a set of default rules that block inbound access from the Internet, by default.
The full list of rules in the network security group are shown. Note how the last rule, which is highlighted, blocks inbound access from all callers, other than callers that are explicitly granted access.

The final step is to apply the NSG to the subnet that contains the "apiase" App Service Environment.
#Apply the NSG to the backend API subnet
Get-AzureNetworkSecurityGroup -Name "RestrictBackendApi" | Set-AzureNetworkSecurityGroupToSubnet
-VirtualNetworkName 'yourvnetnamehere' -SubnetName 'API-ASE-Subnet'
With the NSG applied to the subnet, only the three upstream App Service Environments, and the App Service Environment containing the API back-end, are allowed to call into the "apiase" environment.
Extra Links and Information
Information about network security groups.
Understanding outbound IP addresses and App Service Environments.
Network ports used by App Service Environments.
Note
If you want to get started with Azure App Service before signing up for an Azure account, go to Try App Service, where you can immediately create a short-lived starter web app in App Service. No credit cards required; no commitments.