Create serverless APIs in Visual Studio using Azure Functions and API Management integration
REST APIs are often described using an OpenAPI definition (formerly known as Swagger) file. This file contains information about operations in an API and how the request and response data for the API should be structured.
In this tutorial, you learn how to:
- Create the code project in Visual Studio
- Install the OpenAPI extension
- Add an HTTP trigger endpoint, which includes OpenAPI definitions
- Test function APIs locally using built-in OpenAPI functionality
- Publish project to a function app in Azure
- Enable API Management integration
- Download the OpenAPI definition file
The serverless function you create provides an API that lets you determine whether an emergency repair on a wind turbine is cost-effective. Since you create both the function app and API Management instance in a consumption tier, your cost for completing this tutorial is minimal.
Prerequisites
Visual Studio 2022. Make sure you select the Azure development workload during installation.
An active Azure subscription, create a free account before you begin.
Create the code project
The Azure Functions project template in Visual Studio creates a project that you can publish to a function app in Azure. You'll also create an HTTP triggered function from a template that supports OpenAPI definition file (formerly Swagger file) generation.
From the Visual Studio menu, select File > New > Project.
In Create a new project, enter functions in the search box, choose the Azure Functions template, and then select Next.
In Configure your new project, enter a Project name for your project like
TurbineRepair, and then select Create.For the Create a new Azure Functions application settings, select one of these options for Functions worker, where the option you choose depends on your chosen process model:
.NET 8.0 Isolated (Long Term Support): Your C# functions run in the isolated worker model, which is recommended. For more information, see the isolated worker model guide.
For the rest of the options, use the values in the following table:
Setting Value Description Function template Empty This creates a project without a trigger, which gives you more control over the name of the HTTP triggered function when you add it later. Use Azurite for runtime storage account (AzureWebJobsStorage) Selected You can use the emulator for local development of HTTP trigger functions. Because a function app in Azure requires a storage account, one is assigned or created when you publish your project to Azure. Authorization level Function When running in Azure, clients must provide a key when accessing the endpoint. For more information, see Authorization level. Select Create to create the function project.
Next, you update the project by installing the OpenAPI extension for Azure Functions, which enables the discoverability of API endpoints in your app.
Install the OpenAPI extension
To install the OpenAPI extension:
From the Tools menu, select NuGet Package Manager > Package Manager Console.
In the console, run the following Install-Package command to install the OpenAPI extension:
NuGet\Install-Package Microsoft.Azure.Functions.Worker.Extensions.OpenApi -Version 1.5.1You might need to update the specific version, based on your version of .NET.
Now, you can add your HTTP endpoint function.
Add an HTTP endpoint function
In a C# class library, the bindings used by the function are defined by applying attributes in the code. To create a function with an HTTP trigger:
In Solution Explorer, right-click your project node and select Add > New Azure Function.
Enter Turbine.cs for the class, and then select Add.
Choose the Http trigger template, set Authorization level to Function, and then select Add. A Turbine.cs code file is added to your project that defines a new function endpoint with an HTTP trigger.
Now you can replace the HTTP trigger template code with code that implements the Turbine function endpoint, along with attributes that use OpenAPI to define endpoint.
Update the function code
The function uses an HTTP trigger that takes two parameters:
| Parameter name | Description |
|---|---|
| hours | The estimated time to make a turbine repair, up to the nearest whole hour. |
| capacity | The capacity of the turbine, in kilowatts. |
The function then calculates how much a repair costs, and how much revenue the turbine could make in a 24-hour period. Parameters are supplied either in the query string or in the payload of a POST request.
In the Turbine.cs project file, replace the contents of the class generated from the HTTP trigger template with the following code, which depends on your process model:
using Microsoft.AspNetCore.Http;
using Microsoft.AspNetCore.Mvc;
using Microsoft.Azure.Functions.Worker;
using Microsoft.Azure.WebJobs.Extensions.OpenApi.Core.Attributes;
using Microsoft.Azure.WebJobs.Extensions.OpenApi.Core.Enums;
using Microsoft.Extensions.Logging;
using Microsoft.OpenApi.Models;
using Newtonsoft.Json;
using System.Net;

namespace TurbineRepair
{
    public class Turbine
    {
        const double revenuePerkW = 0.12;
        const double technicianCost = 250;
        const double turbineCost = 100;

        private readonly ILogger<Turbine> _logger;

        public Turbine(ILogger<Turbine> logger)
        {
            _logger = logger;
        }

        [Function("TurbineRepair")]
        [OpenApiOperation(operationId: "Run")]
        [OpenApiSecurity("function_key", SecuritySchemeType.ApiKey, Name = "code", In = OpenApiSecurityLocationType.Query)]
        [OpenApiRequestBody("application/json", typeof(RequestBodyModel),
            Description = "JSON request body containing { hours, capacity}")]
        [OpenApiResponseWithBody(statusCode: HttpStatusCode.OK, contentType: "application/json", bodyType: typeof(string),
            Description = "The OK response message containing a JSON result.")]
        public static async Task<IActionResult> Run(
            [HttpTrigger(AuthorizationLevel.Function, "post", Route = null)] HttpRequest req,
            ILogger log)
        {
            // Get request body data.
            string requestBody = await new StreamReader(req.Body).ReadToEndAsync();
            dynamic? data = JsonConvert.DeserializeObject(requestBody);
            int? capacity = data?.capacity;
            int? hours = data?.hours;

            // Return bad request if capacity or hours are not passed in
            if (capacity == null || hours == null)
            {
                return new BadRequestObjectResult("Please pass capacity and hours in the request body");
            }
            // Formulas to calculate revenue and cost
            double? revenueOpportunity = capacity * revenuePerkW * 24;
            double? costToFix = hours * technicianCost + turbineCost;
            string repairTurbine;

            if (revenueOpportunity > costToFix)
            {
                repairTurbine = "Yes";
            }
            else
            {
                repairTurbine = "No";
            };

            return new OkObjectResult(new
            {
                message = repairTurbine,
                revenueOpportunity = "$" + revenueOpportunity,
                costToFix = "$" + costToFix
            });
        }
        public class RequestBodyModel
        {
            public int Hours { get; set; }
            public int Capacity { get; set; }
        }
    }
}
This function code returns a message of Yes or No to indicate whether an emergency repair is cost-effective. It also returns the revenue opportunity that the turbine represents and the cost to fix the turbine.
Run and verify the API locally
When you run the function, the OpenAPI endpoints make it easy to try out the function locally using a generated page. You don't need to provide function access keys when running locally.
Press F5 to start the project. When Functions runtime starts locally, a set of OpenAPI and Swagger endpoints are shown in the output, along with the function endpoint.
In your browser, open the RenderSwaggerUI endpoint, which should look like
http://localhost:7071/api/swagger/ui. A page is rendered, based on your OpenAPI definitions.Select POST > Try it out, enter values for
hoursandcapacityeither as query parameters or in the JSON request body, and select Execute.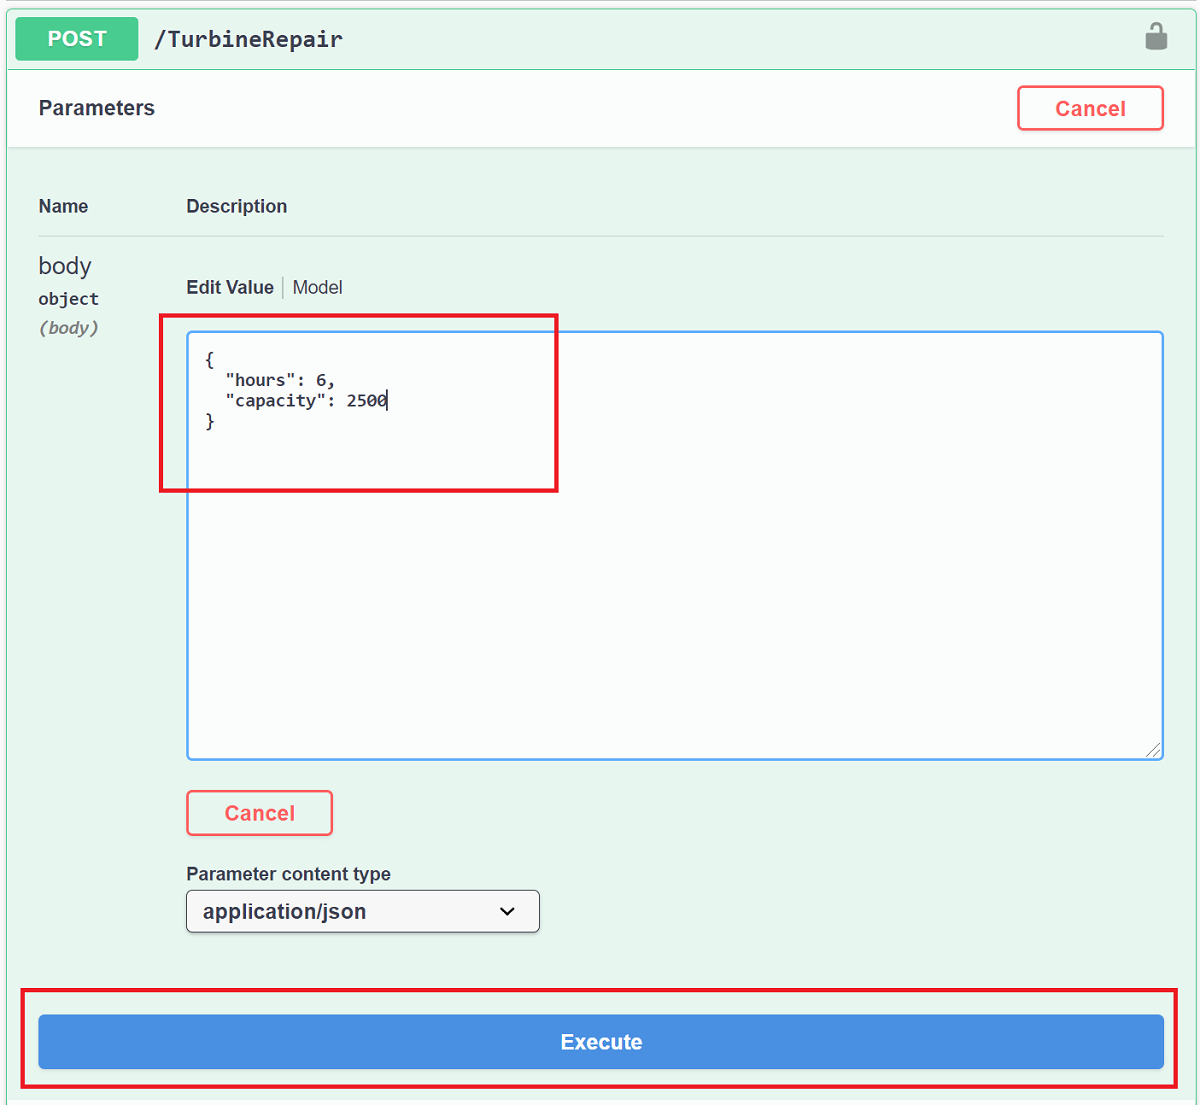
When you enter integer values like 6 for
hoursand 2500 forcapacity, you get a JSON response that looks like the following example: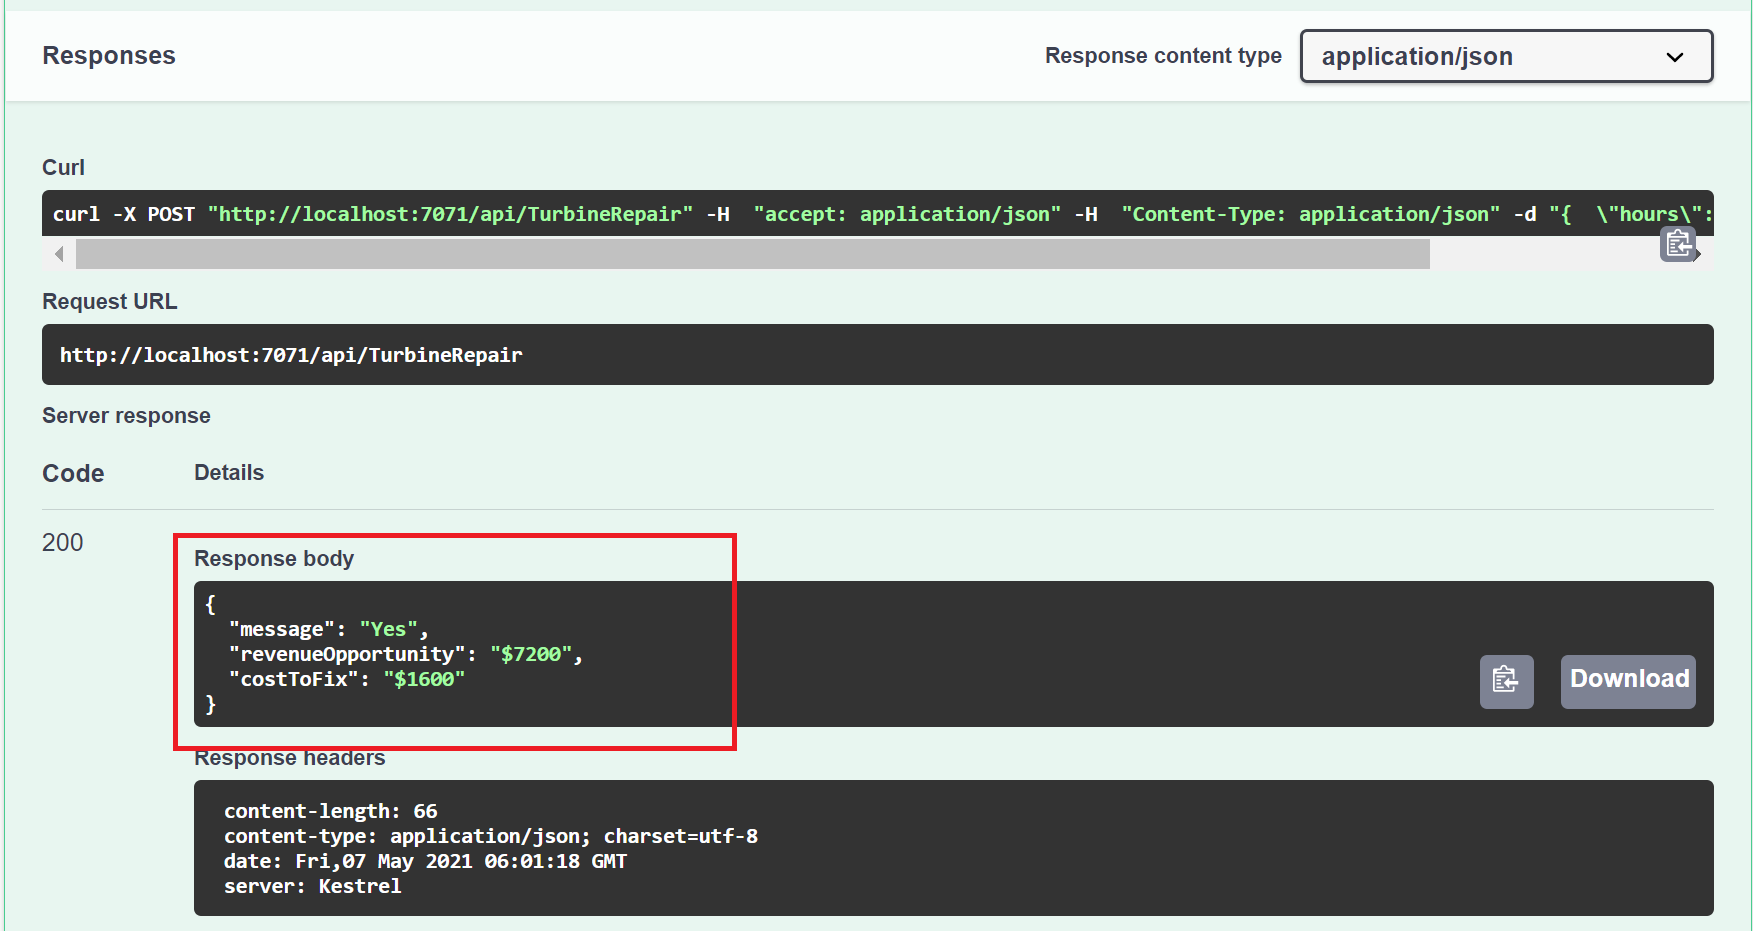
Now you have a function that determines the cost-effectiveness of emergency repairs. Next, you publish your project and API definitions to Azure.
Publish the project to Azure
Before you can publish your project, you must have a function app in your Azure subscription. Visual Studio publishing creates a function app the first time you publish your project. It can also create an API Management instance that integrates with your function app to expose the TurbineRepair API.
In Solution Explorer, right-click the project and select Publish and in Target, select Azure then Next.
For the Specific target, choose Azure Function App (Windows) to create a function app that runs on Windows, then select Next.
In Function Instance, choose + Create a new Azure Function....
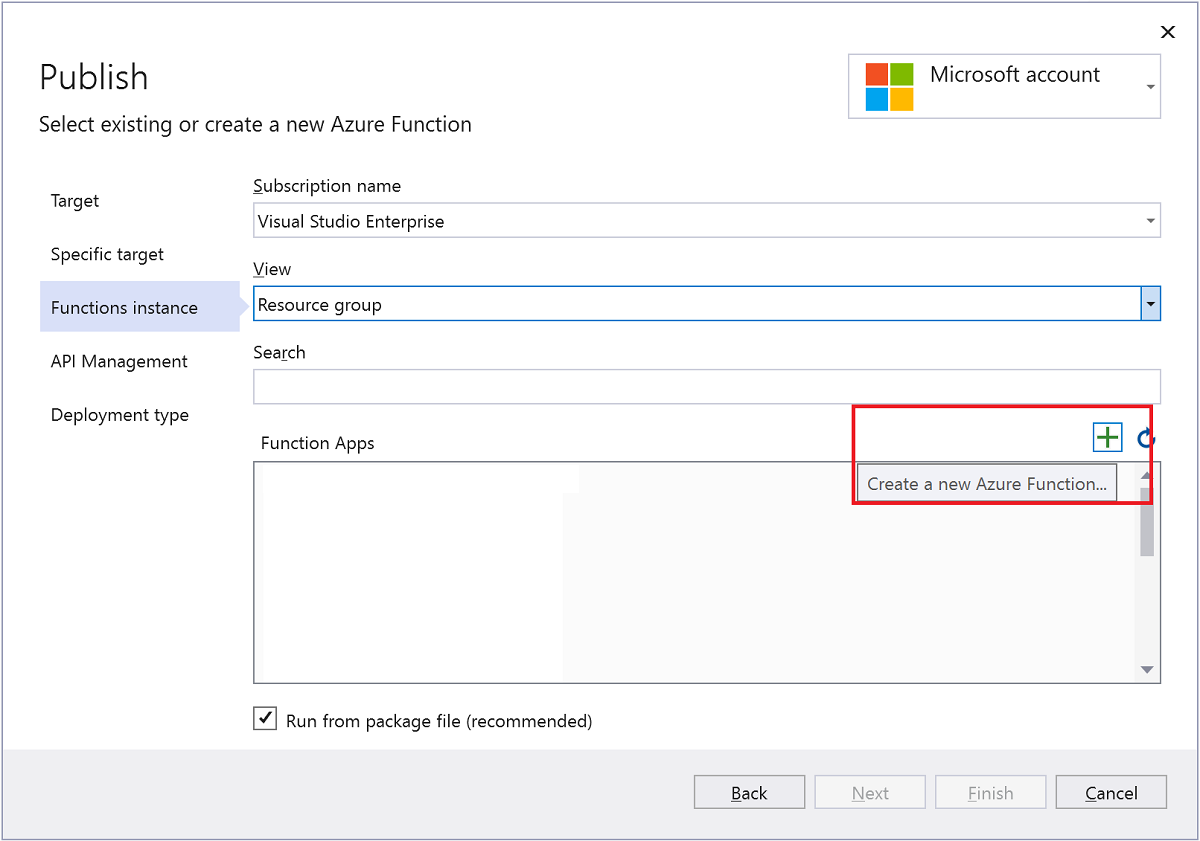
Create a new instance using the values specified in the following table:
Setting Value Description Name Globally unique name Name that uniquely identifies your new function app. Accept this name or enter a new name. Valid characters are: a-z,0-9, and-.Subscription Your subscription The Azure subscription to use. Accept this subscription or select a new one from the drop-down list. Resource group Name of your resource group The resource group in which to create your function app. Select an existing resource group from the drop-down list or choose New to create a new resource group. Plan Type Consumption When you publish your project to a function app that runs in a Consumption plan, you pay only for executions of your functions app. Other hosting plans incur higher costs. Location Location of the service Choose a Location in a region near you or other services your functions access. Azure Storage General-purpose storage account An Azure Storage account is required by the Functions runtime. Select New to configure a general-purpose storage account. You can also choose an existing account that meets the storage account requirements. 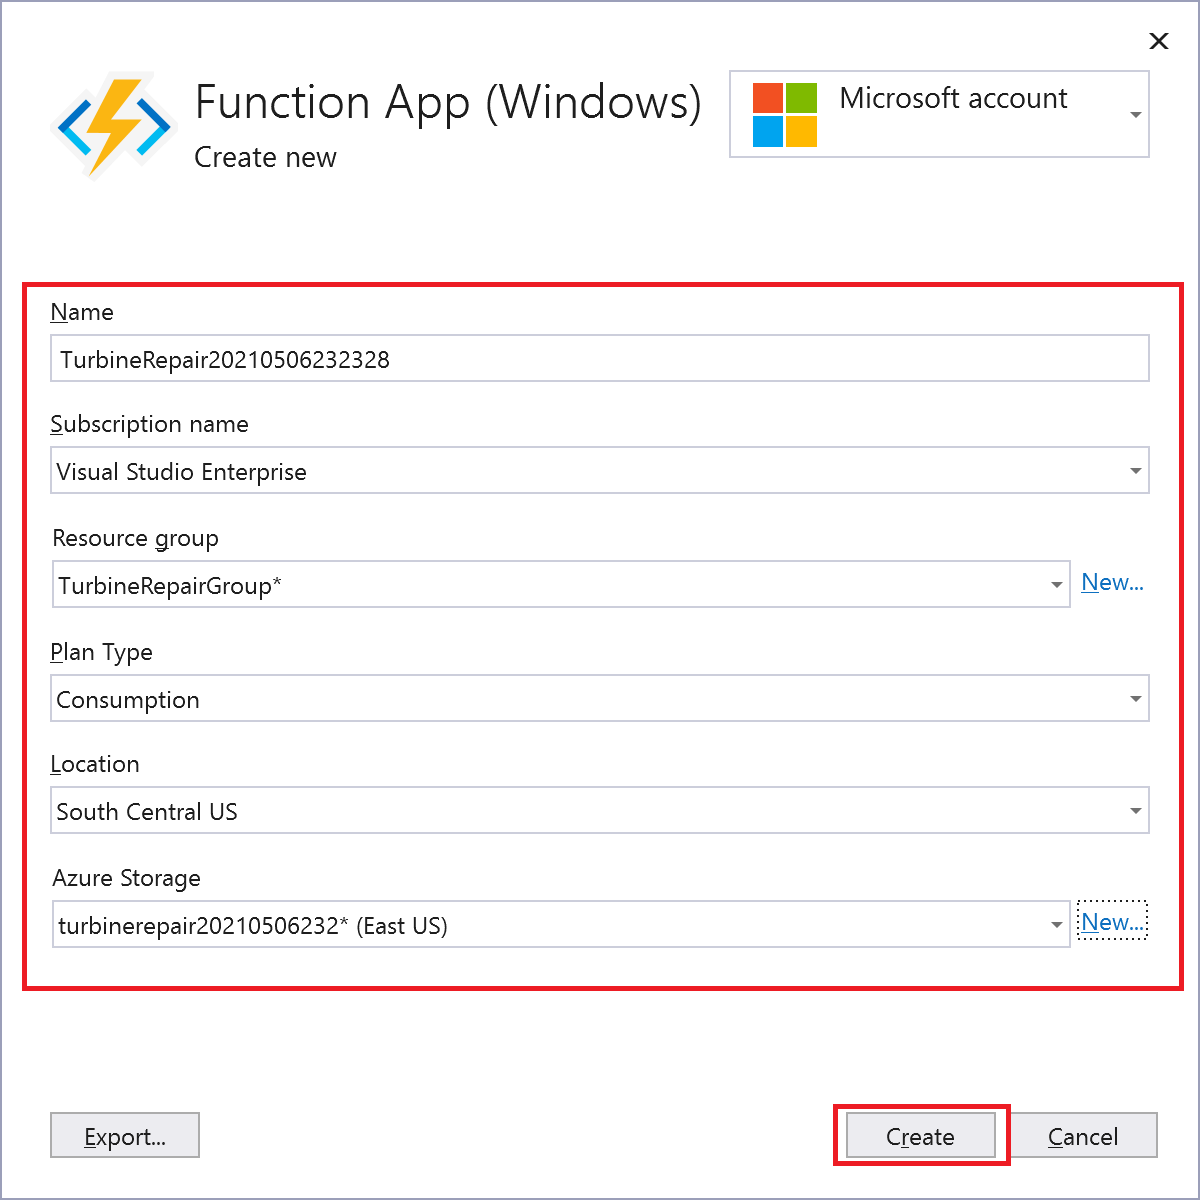
Select Create to create a function app and its related resources in Azure. Status of resource creation is shown in the lower left of the window.
Back in Functions instance, make sure that Run from package file is checked. Your function app is deployed using Zip Deploy with Run-From-Package mode enabled. This deployment method is recommended for your functions project, since it results in better performance.
Select Next, and in API Management page, also choose + Create an API Management API.
Create an API in API Management by using values in the following table:
Setting Value Description API name TurbineRepair Name for the API. Subscription name Your subscription The Azure subscription to use. Accept this subscription or select a new one from the drop-down list. Resource group Name of your resource group Select the same resource group as your function app from the drop-down list. API Management service New instance Select New to create a new API Management instance in the same location in the serverless tier. Select OK to create the instance. 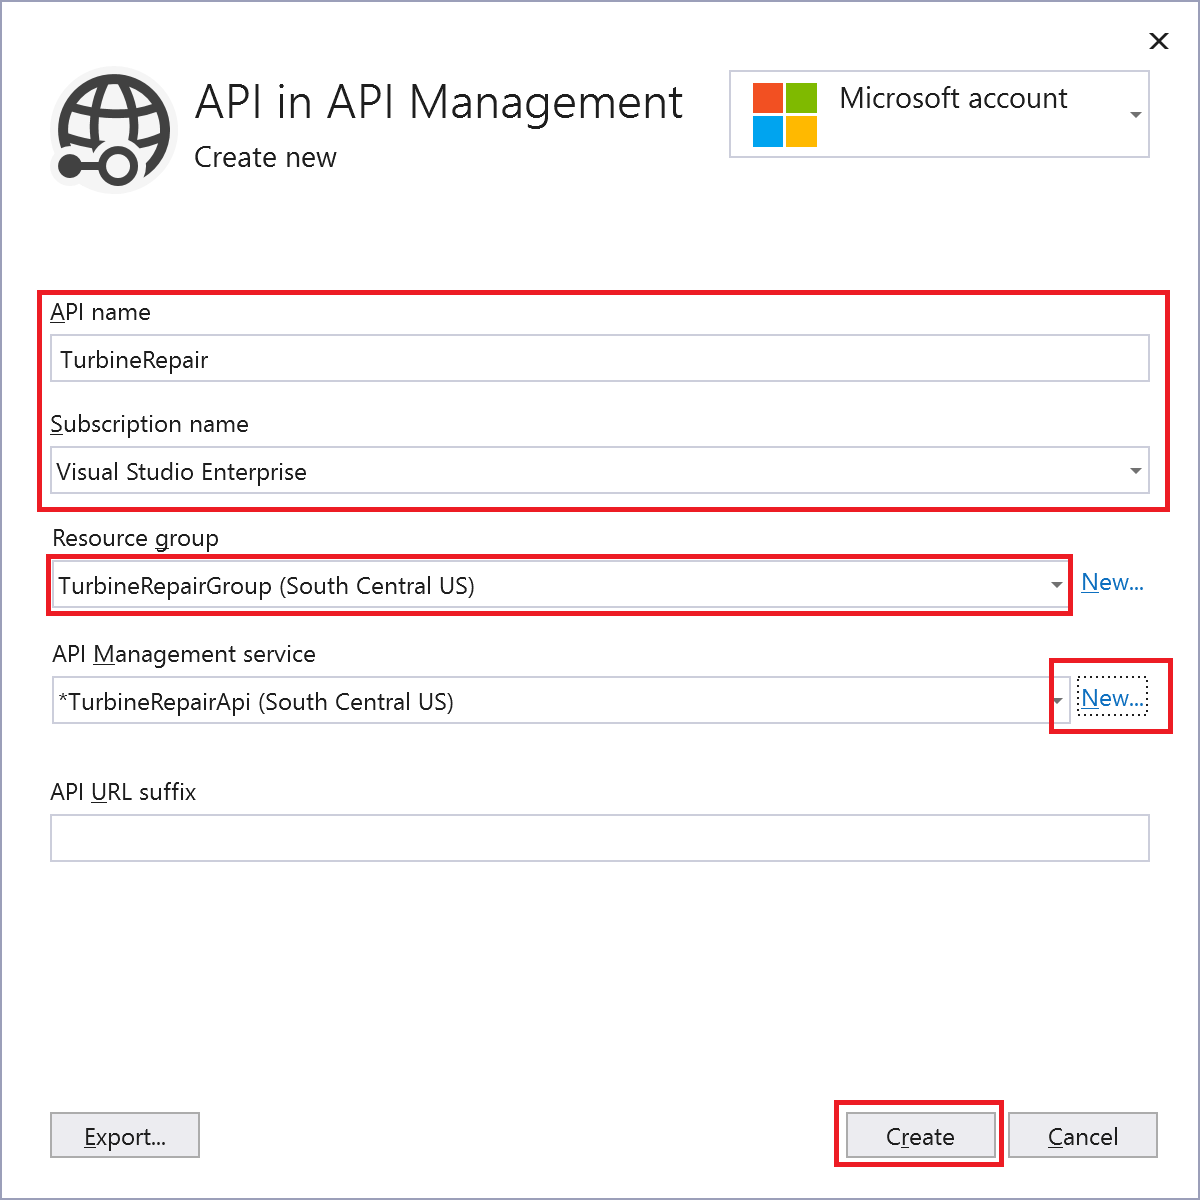
Select Create to create the API Management instance with the TurbineRepair API from the function integration.
Select Finish and after the publish profile creation process completes, select Close.
Verify the Publish page now says Ready to publish, and then select Publish to deploy the package containing your project files to your new function app in Azure.
After the deployment completes, the root URL of the function app in Azure is shown in the Publish tab.
Get the function access key
In the Publish tab, select the ellipses (...) next to Hosting and select Open in Azure portal. The function app you created is opened in the Azure portal in your default browser.
Under Functions on the Overview page, select > Turbine then select Function keys.
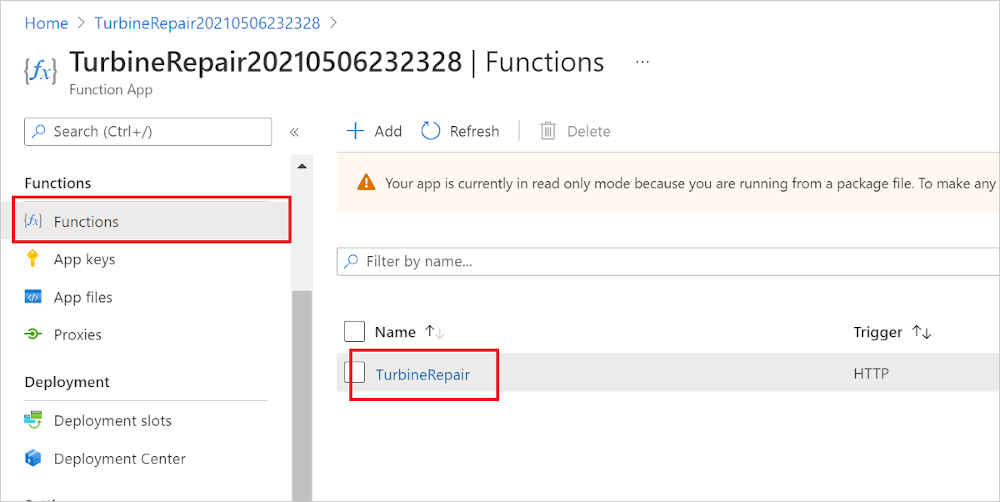
Under Function keys, select the copy to clipboard icon next to the default key. You can now set this key you copied in API Management so that it can access the function endpoint.
Configure API Management
In the function app page, expand API and select API Management.
If the function app isn't already connected to the new API Management instance, select it under API Management, select API > OpenAPI Document on Azure Functions, make sure Import functions is checked, and select Link API. Make sure that only TurbineRepair is selected for import and then Select.
Select Go to API Management at the top of the page, and in the API Management instance, expand APIs.
Under APIs > All APIs, select OpenAPI Document on Azure Functions > POST Run, then under Inbound processing select Add policy > Set query parameters.
Below Inbound processing, in Set query parameters, type
codefor Name, select +Value, paste in the copied function key, and select Save. API Management includes the function key when it passes calls through to the function endpoint.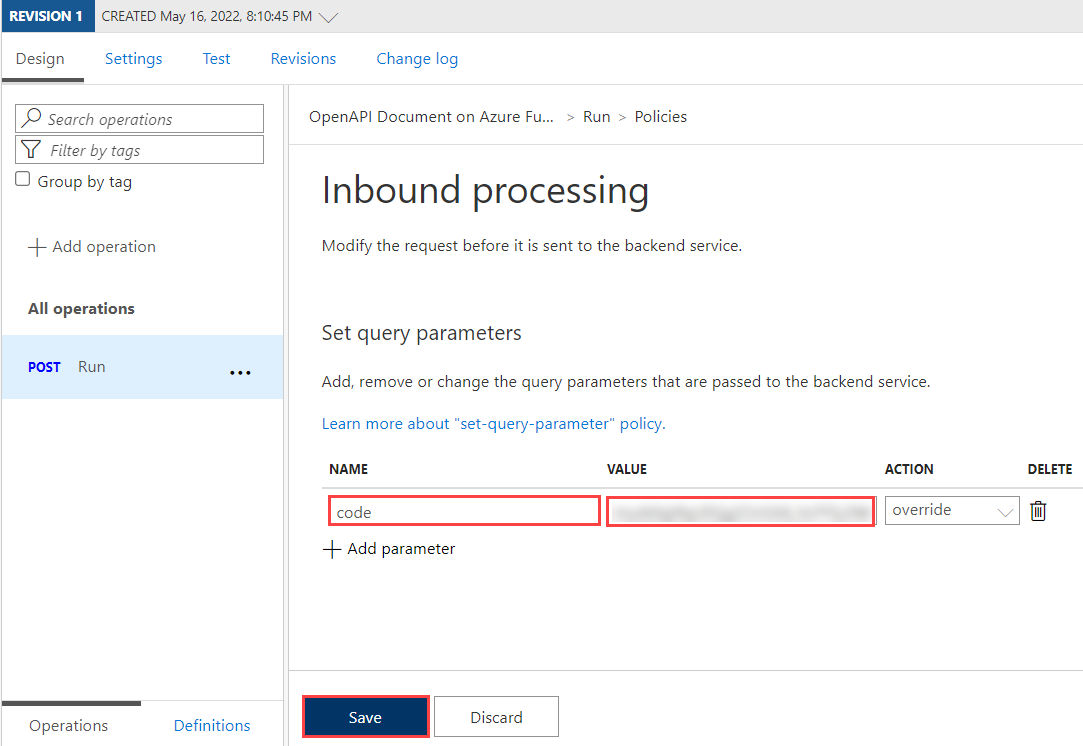
Now that the function key is set, you can call the turbine API endpoint to verify that it works when hosted in Azure.
Verify the API in Azure
In the API, select the Test tab and then POST Run, enter the following code in the Request body > Raw, and select Send:
{
    "hours": "6",
    "capacity": "2500"
}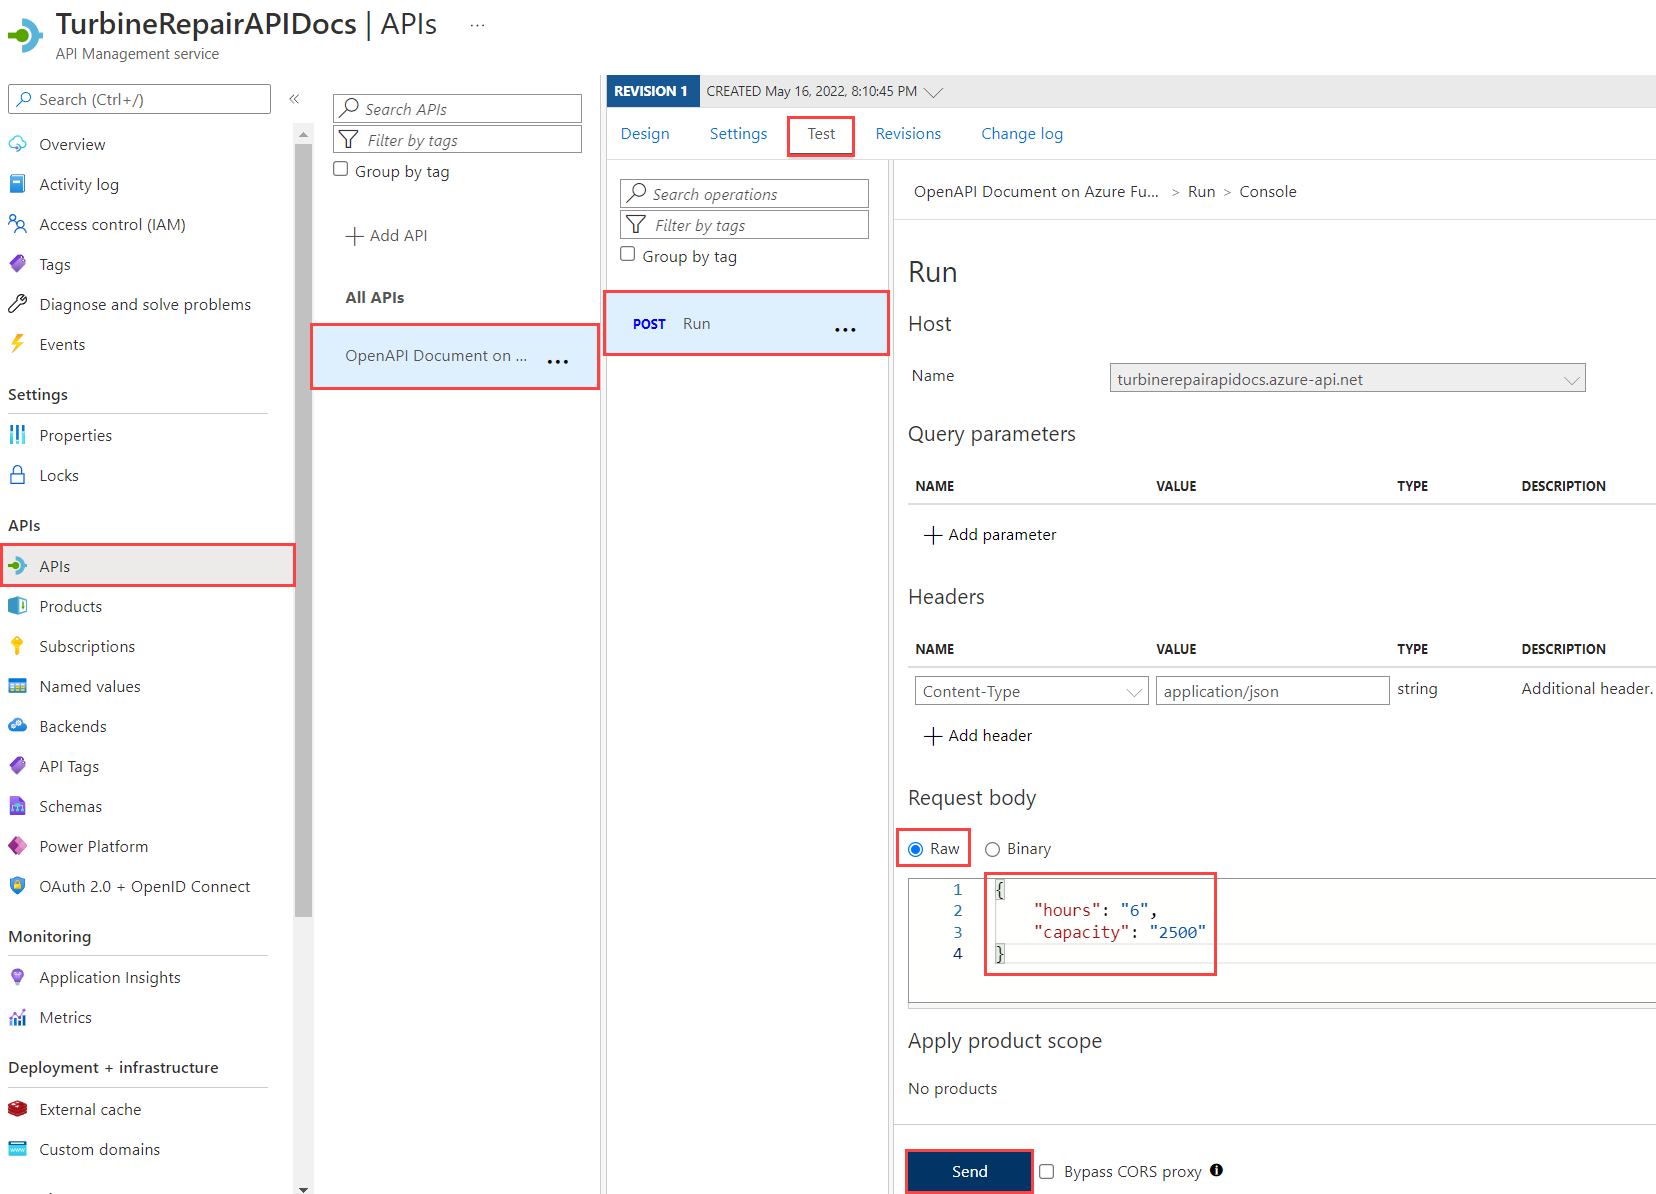
As before, you can also provide the same values as query parameters.
Select Send, and then view the HTTP response to verify the same results are returned from the API.
Download the OpenAPI definition
If your API works as expected, you can download the OpenAPI definition for the new hosted APIs from API Management.
-
- Under APIs, select OpenAPI Document on Azure Functions, select the ellipses (...), and select Export.

Choose the means of API export, including OpenAPI files in various formats. You can also export APIs from Azure API Management to the Power Platform.
Clean up resources
In the preceding steps, you created Azure resources in a resource group. If you don't expect to need these resources in the future, you can delete them by deleting the resource group.
From the Azure portal menu or Home page, select Resource groups. Then, on the Resource groups page, select the group you created.
On the myResourceGroup page, make sure that the listed resources are the ones you want to delete.
Select Delete resource group, type the name of your group in the text box to confirm, and then select Delete.
Next steps
You've used Visual Studio 2022 to create a function that's self-documenting because of the OpenAPI Extension and integrated with API Management. You can now refine the definition in API Management in the portal. You can also learn more about API Management.