Automatically scale units of an Azure SignalR Service
Important
Autoscaling is only available in Azure SignalR Service Premium tier.
Azure SignalR Service Premium tier supports an autoscale feature, which is an implementation of Azure Monitor autoscale. Autoscale allows you to automatically scale the unit count for your SignalR Service to match the actual load on the service. Autoscale can help you optimize performance and cost for your application.
Azure SignalR adds its own service metrics. However, most of the user interface is shared and common to other Azure services that support autoscaling. If you're new to the subject of Azure Monitor Metrics, review Azure Monitor Metrics aggregation and display explained before digging into SignalR Service Metrics.
Understanding autoscale in SignalR Service
Autoscale allows you to set conditions that will dynamically change the units allocated to SignalR Service while the service is running. Autoscale conditions are based on metrics, such as Server Load. Autoscale can also be configured to run on a schedule, such as every day between certain hours.
For example, you can implement the following scaling scenarios using autoscale.
- Increase units when the Connection Quota Utilization above 70%.
- Decrease units when the Server Load is below 20%.
- Create a schedule to add more units during peak hours and reduce units during off hours.
Multiple factors affect the performance of SignalR Service. No one metric provides a complete view of system performance. For example, if you're sending a large number of messages you might need to scale out even though the connection quota is relatively low. The combination of both Connection Quota Utilization and Server Load gives an indication of overall system load. The following guidelines apply.
- Scale out if the connection count is over 80-90%. Scaling out before your connection count is exhausted ensures that you'll have sufficient buffer to accept new connections before scale-out takes effect.
- Scale out if the Server Load is over 80-90%. Scaling early ensures that the service has enough capacity to maintain performance during the scale-out operation.
The autoscale operation usually takes effect 3-5 minutes after it's triggered. It's important not to change the units too often. A good rule of thumb is to allow 30 minutes from the previous autoscale before performing another autoscale operation. In some cases, you might need to experiment to find the optimal autoscale interval.
Custom autoscale settings
Open the autoscale settings page:
Go to the Azure portal.
Open the SignalR service page.
From the menu on the left, under Settings choose Scale out.
Select the Configure tab. If you have a Premium tier SignalR instance, you'll see two options for Choose how to scale your resource:
- Manual scale, which lets you manually change the number of units.
- Custom autoscale, which lets you create autoscale conditions based on metrics and/or a time schedule.
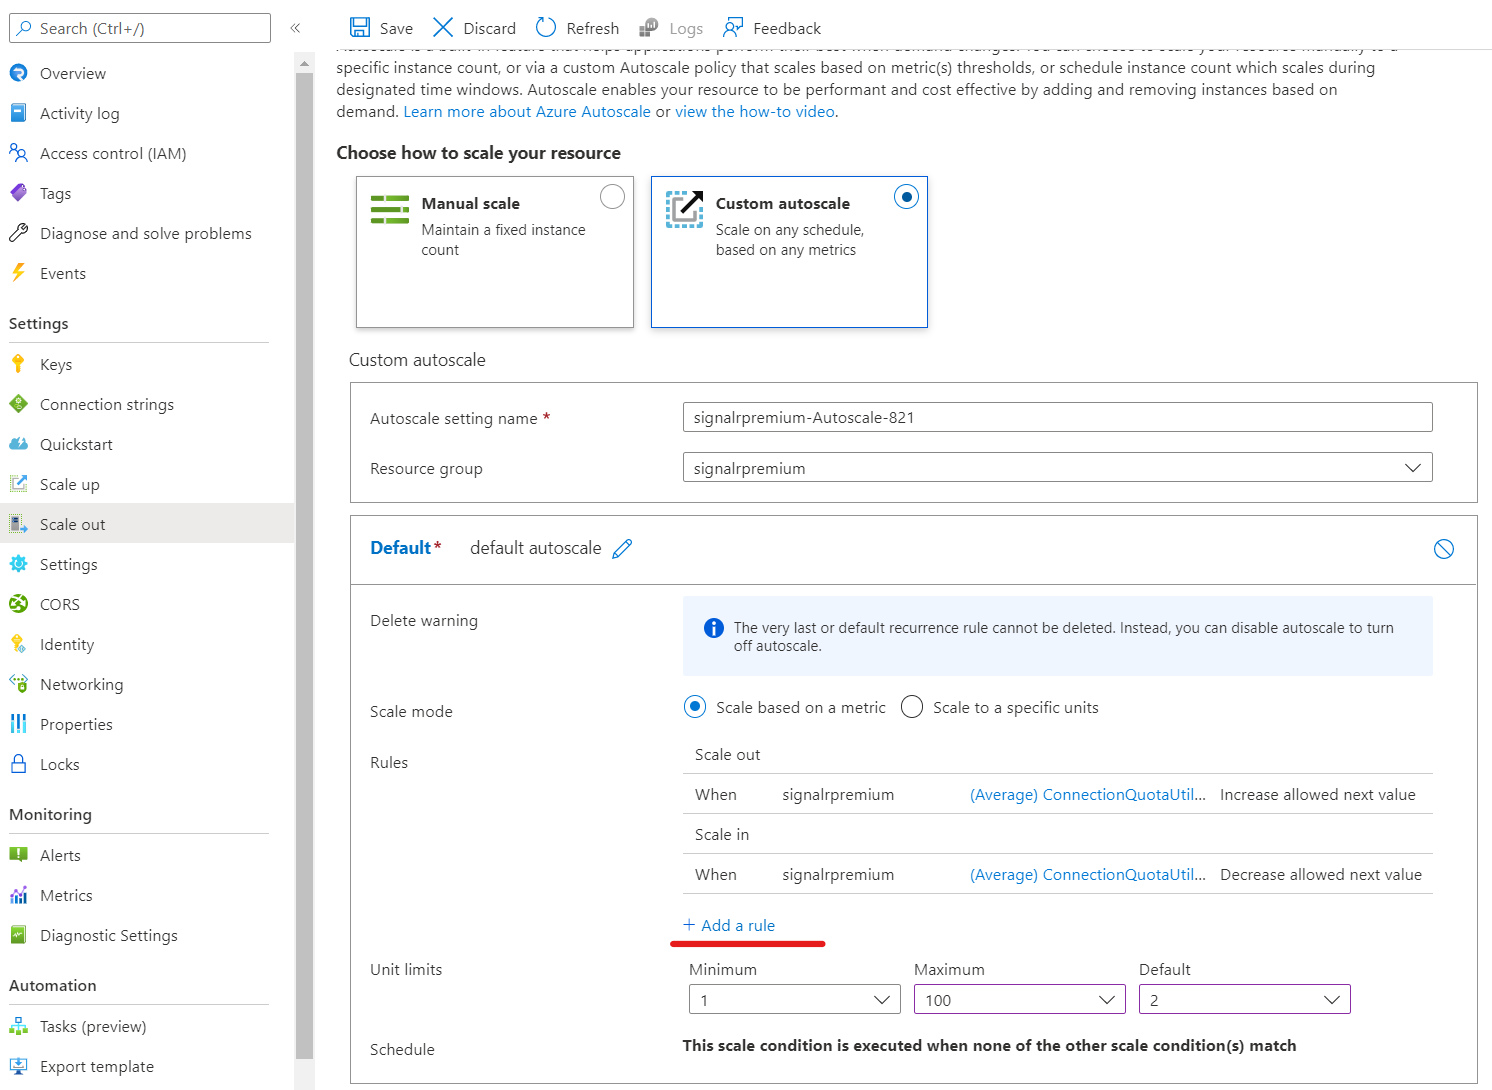
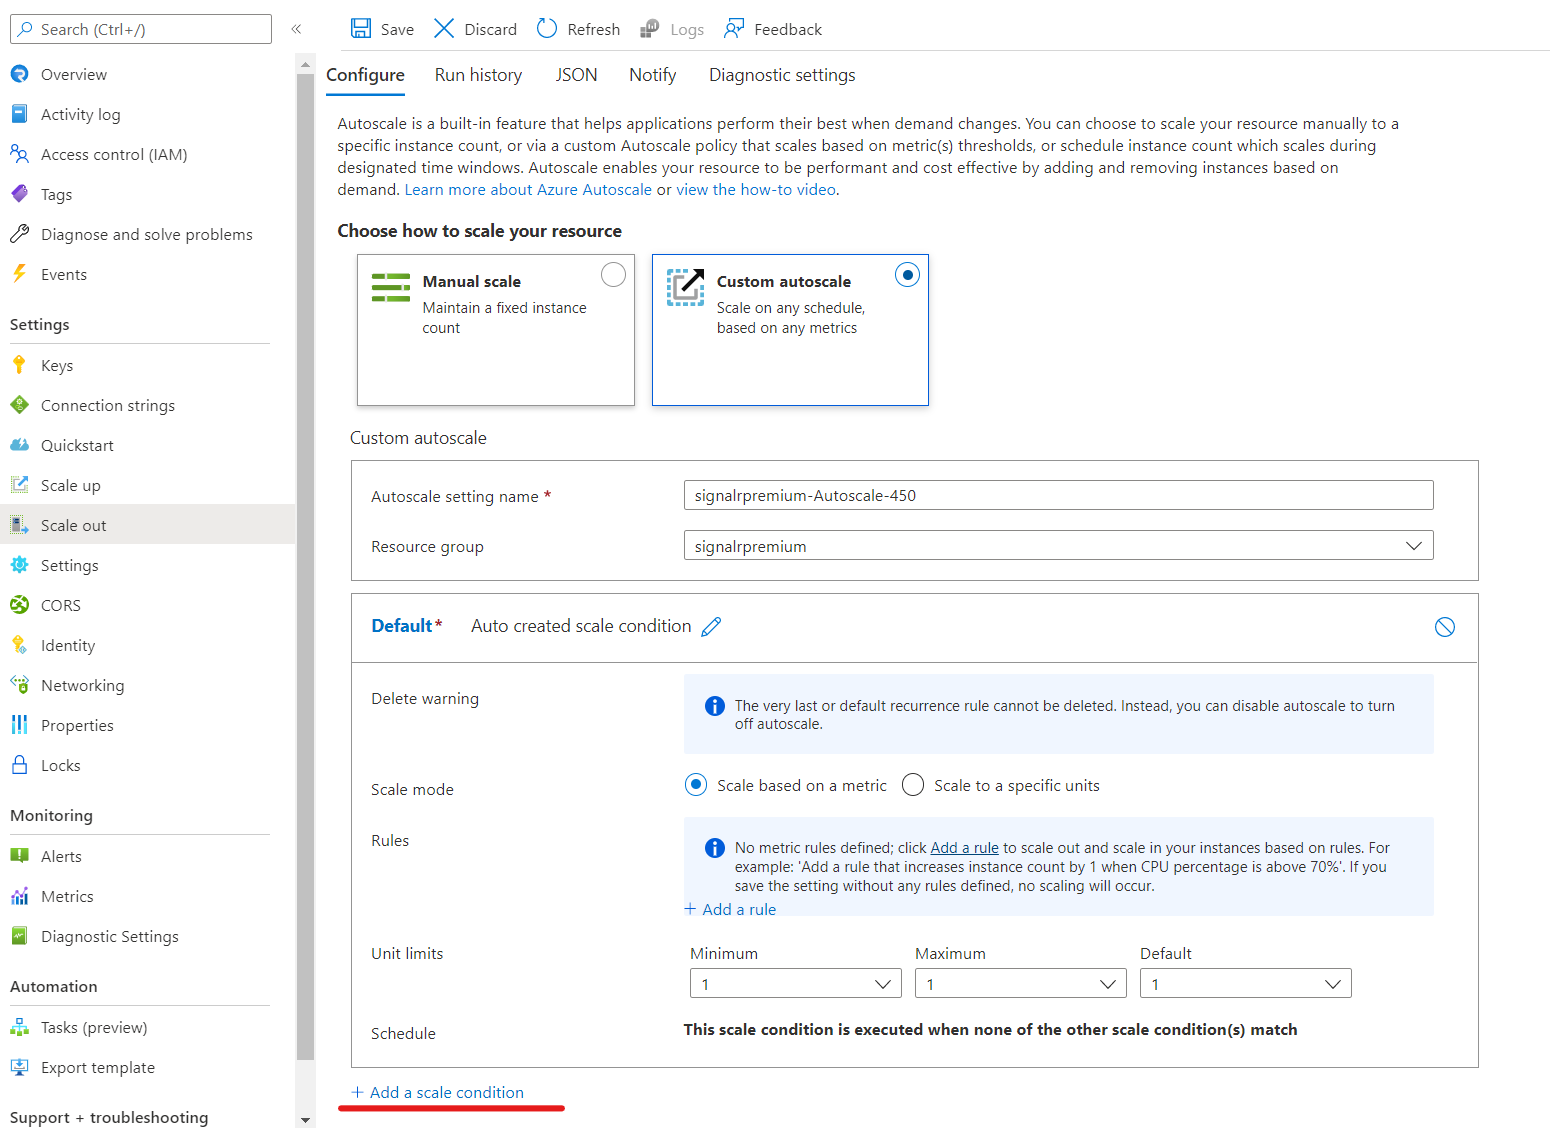
Choose Custom autoscale. Use this page to manage the autoscale conditions for your Azure SignalR service.
Default scale condition
When you open custom autoscale settings for the first time, you'll see the Default scale condition already created for you. This scale condition is executed when none of the other scale conditions match the criteria set for them. You can't delete the Default condition, but you can rename it, change the rules, and change the action taken by autoscale.
You can't set the default condition to autoscale on a specific days or date range. The default condition only supports scaling to a unit range. To scale according to a schedule, you'll need to add a new scale condition.
Autoscale doesn't take effect until you save the default condition for the first time after selecting Custom autoscale.
Add or change a scale condition
There are two options for how to scale your Azure SignalR resource:
- Scale based on a metric - Scale within unit limits based on a dynamic metric. One or more scale rules are defined to set the criteria used to evaluate the metric.
- Scale to specific units - Scale to a specific number of units based on a date range or recurring schedule.
Scale based on a metric
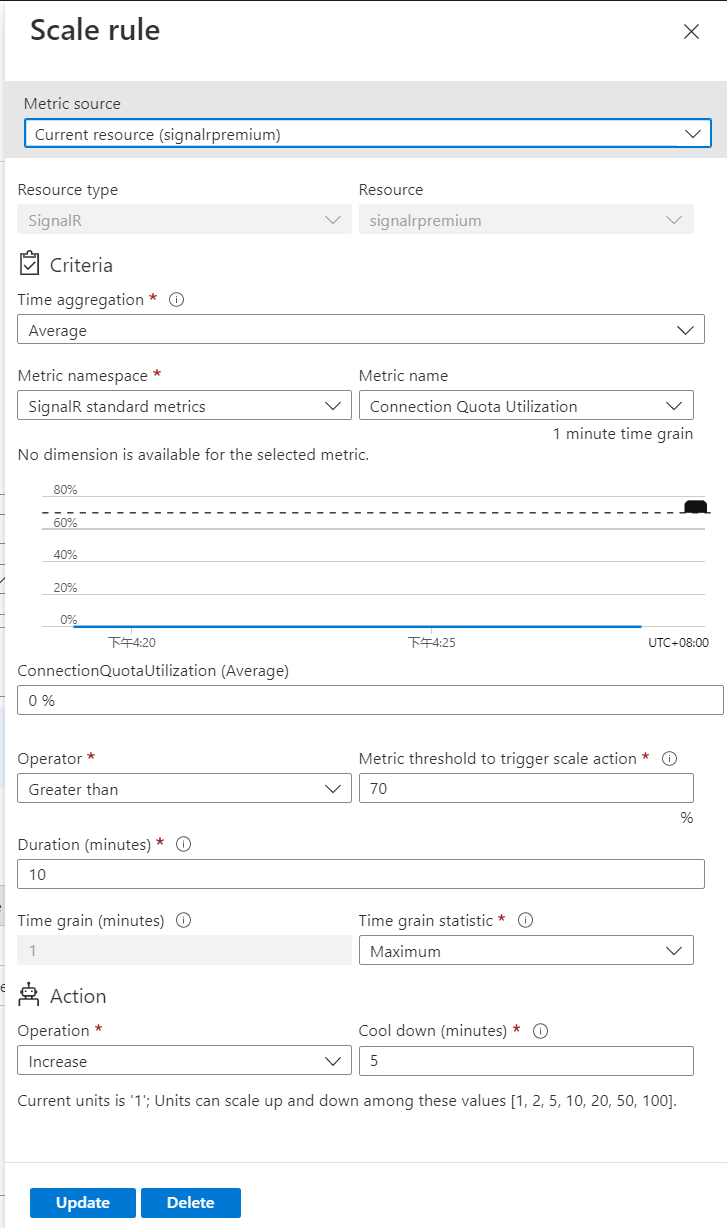
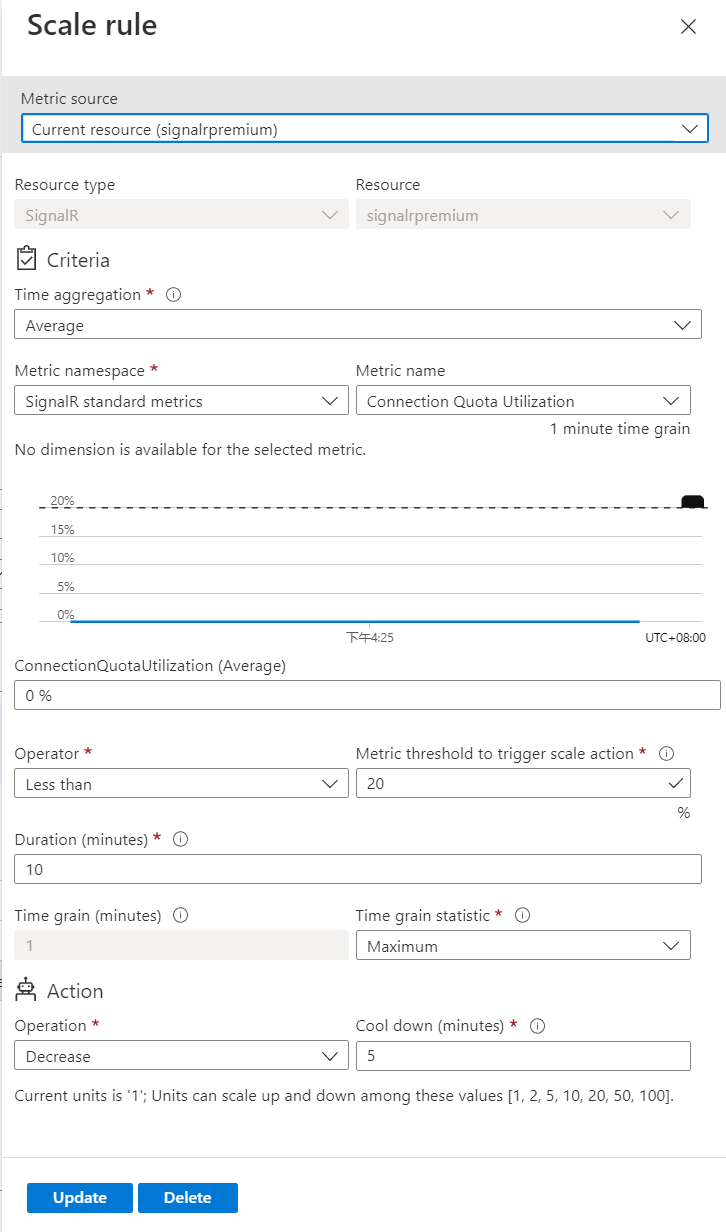
The following procedure shows you how to add a condition to increase units (scale out) when the Connection Quota Utilization is greater than 70% and decrease units (scale in) when the Connection Quota Utilization is less than 20%. Increments or decrements are done between available units.
On the Scale out page, select Custom autoscale for the Choose how to scale your resource option.
Select Scale based on a metric for Scale mode.
Select + Add a rule.
On the Scale rule page, follow these steps:
- Select a metric from the Metric name drop-down list. In this example, it's Connection Quota Utilization.
- Select an operator and threshold values. In this example, they're Greater than and 70 for Metric threshold to trigger scale action.
- Select an operation in the Action section. In this example, it's set to Increase.
- Then, select Add
Select + Add a rule again, and follow these steps on the Scale rule page:
- Select a metric from the Metric name drop-down list. In this example, it's Connection Quota Utilization.
- Select an operator and threshold values. In this example, they're Less than and 20 for Metric threshold to trigger scale action.
- Select an operation in the Action section. In this example, it's set to Decrease.
- Then, select Add
Set the minimum, maximum, and default number of units.
Select Save on the toolbar to save the autoscale setting.
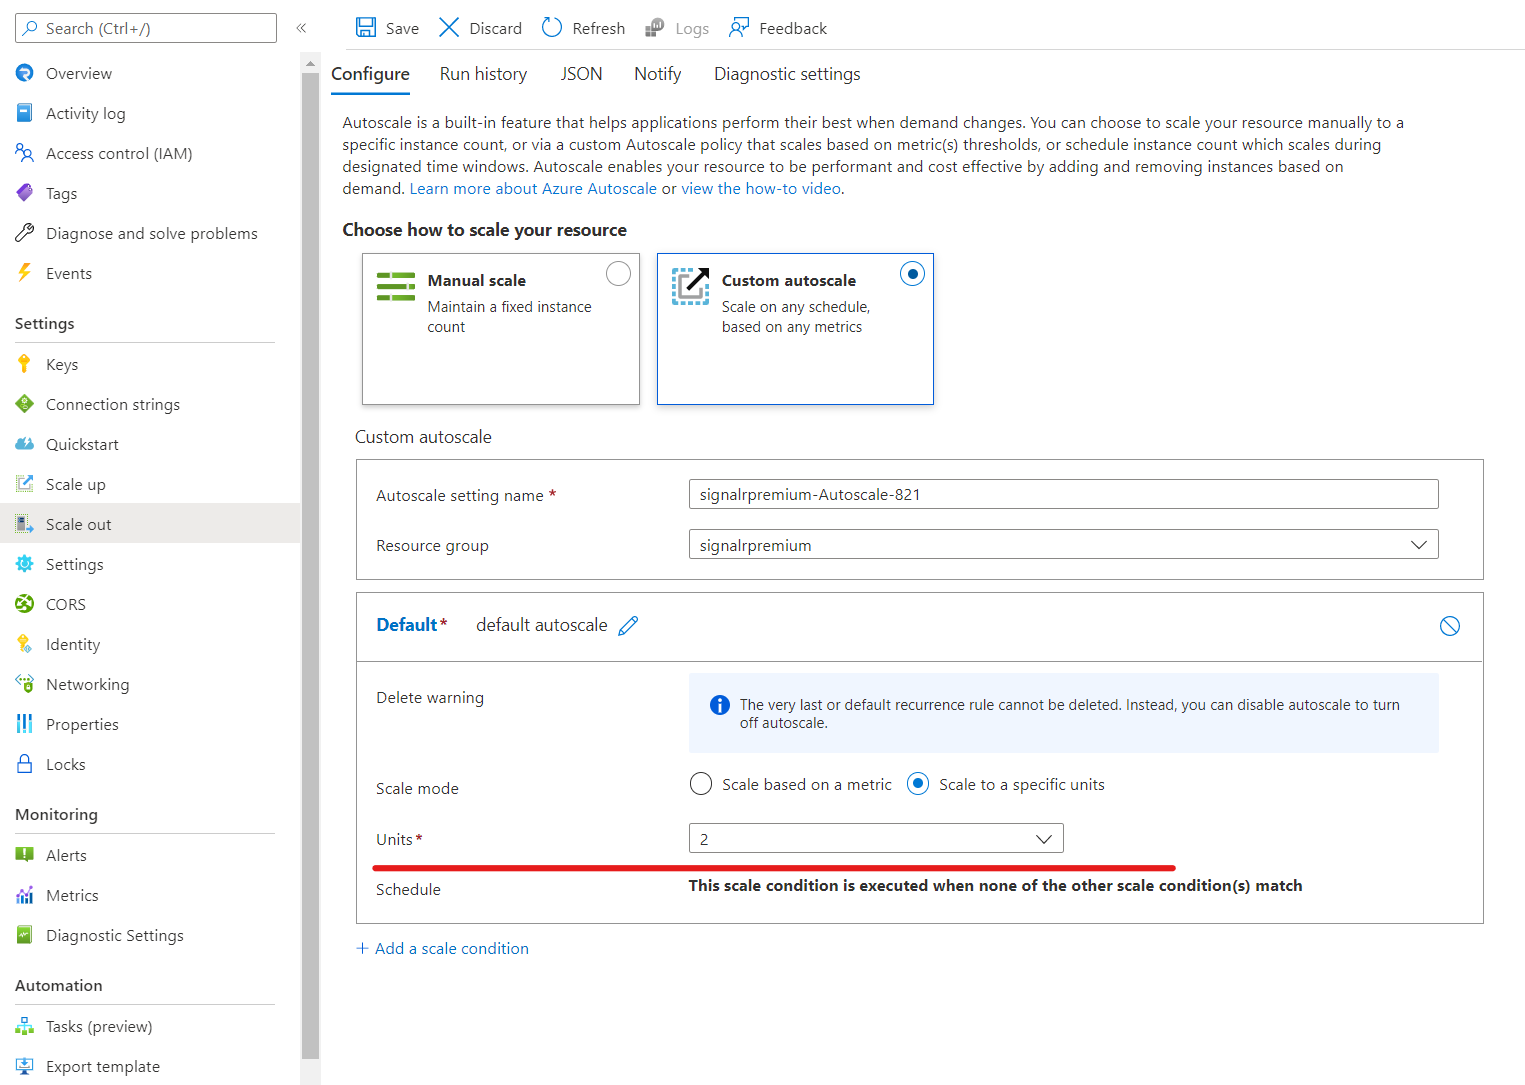
Scale to specific units
Follow these steps to configure the rule to scale to a specific unit range.
- On the Scale out page, select Custom autoscale for the Choose how to scale your resource option.
- Select Scale to a specific units for Scale mode.
- For Units, select the number of default units.
Add more conditions
The previous section showed you how to add a default condition for the autoscale setting. This section shows you how to add more conditions to the autoscale setting.
- On the Scale out page, select Custom autoscale for the Choose how to scale your resource option.
- Select Add a scale condition under the Default block.
- Confirm that the Scale based on a metric option is selected.
- Select + Add a rule to add a rule to increase units when the Connection Quota Utilization goes above 70%. Follow steps from the default condition section.
- Set the minimum and maximum and default number of units.
- You can also set a schedule on a custom condition (but not on the default condition). You can either specify start and end dates for the condition (or) select specific days (Monday, Tuesday, and so on.) of a week.
- If you select Specify start/end dates, select the Timezone, Start date and time and End date and time (as shown in the following image) for the condition to be in effect.
- If you select Repeat specific days, select the days of the week, timezone, start time, and end time when the condition should apply.
Next steps
For more information about managing autoscale from the Azure CLI, see az monitor autoscale.
Feedback
Coming soon: Throughout 2024 we will be phasing out GitHub Issues as the feedback mechanism for content and replacing it with a new feedback system. For more information see: https://aka.ms/ContentUserFeedback.
Submit and view feedback for