Run diagnostics, collect logs to troubleshoot Azure Stack Edge device issues
APPLIES TO:  Azure Stack Edge Pro - GPUAzure Stack Edge Pro 2Azure Stack Edge Pro RAzure Stack Edge Mini R
This article describes how to run diagnostics, collect a Support package, gather advanced security logs, and review logs to troubleshoot device upload and refresh issues on your Azure Stack Edge device.
Run diagnostics
To diagnose and troubleshoot any device errors, you can run the diagnostics tests. Do the following steps in the local web UI of your device to run diagnostic tests.
In the local web UI, go to Troubleshooting > Diagnostic tests. Select the test you want to run and select Run test. You are notified that the device is running tests.
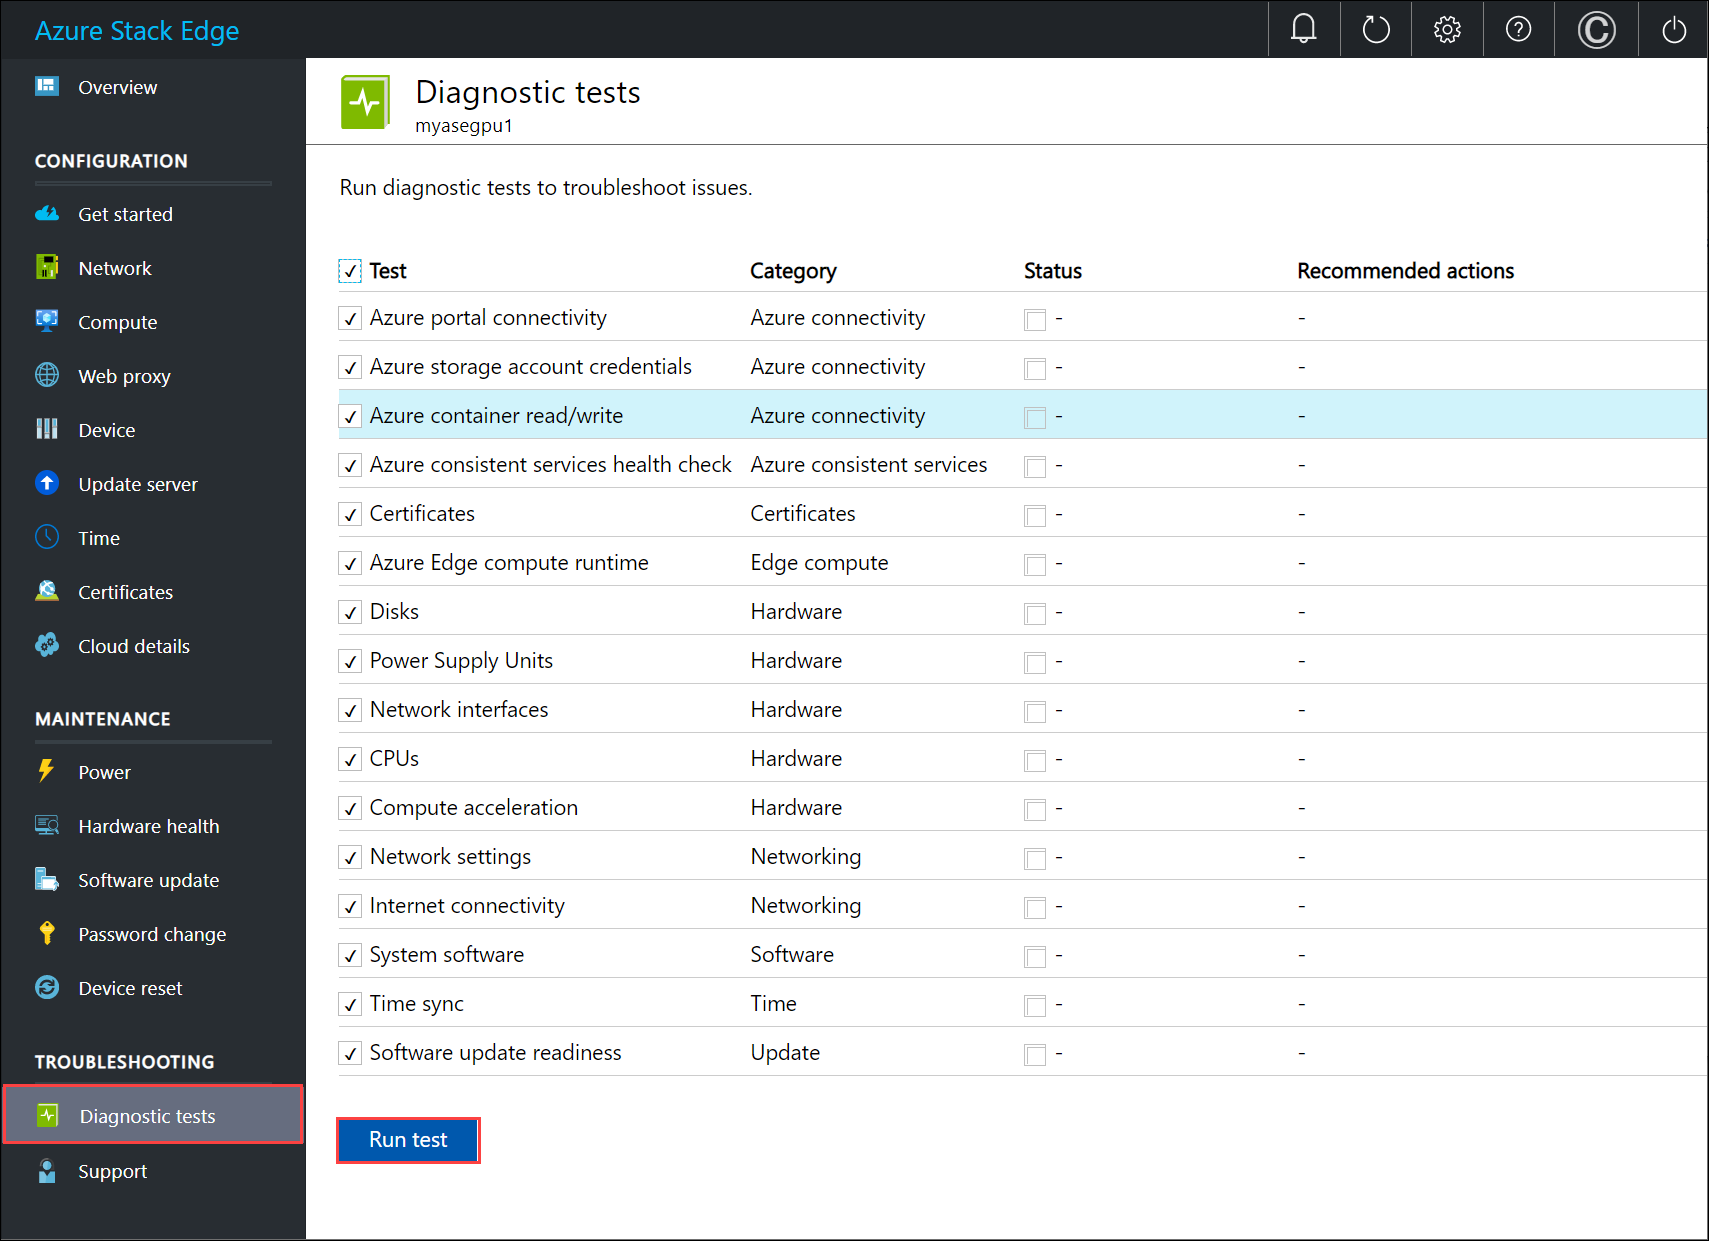
Here is a table that describes each of the diagnostics test that is run on your Azure Stack Edge device.
Test Name Description Azure portal connectivity The test validates the connectivity of your Azure Stack Edge device to Azure portal. Azure consistent health services Several services such as Azure Resource Manager, Compute resource provider, Network resource provider, and Blob storage service run on your device. These services together provide an Azure consistent stack. The health check ensures that these Azure consistent services are up and running. Certificates The test validates the expiration date and the device and DNS domain change impact on certificates. The health check verified that all the certificates are imported and applied on all the device nodes. Azure Edge Compute runtime The test validates that the Azure Stack Edge Kubernetes service is functioning as expected. This includes checking the Kubernetes VM health as well as the status of the Kubernetes services deployed by your device. Disks The test validates that all the device disks are connected and functional. This includes checking that the disks have the right firmware installed and Bitlocker is configured correctly. Power supply units (PSUs) The test validates all the power supplies are connected and working. Network interfaces The test validates that all the network interfaces are connected on your device and that the network topology for that system is as expected. Central Processing Units (CPUs) The test validates that CPUs on the system have the right configuration and that they are up and functional. Compute acceleration The test validates that the compute acceleration is functioning as expected in terms of both hardware and software. Depending on the device model, the compute acceleration could be a Graphical Processing Unit (GPU) or Vision Processing Unit (VPU) or a Field Programmable Gate Array (FPGA). Network settings This test validates the network configuration of the device. Internet connectivity This test validates the internet connectivity of the device. System software This test validates that the system storage and software stack is functioning as expected. Time sync This test validates the device time settings and checks that the time server configured on the device is valid and accessible. Software Update readiness This test validates that the update server configured is valid and accessible. After the tests have completed, the results are displayed.
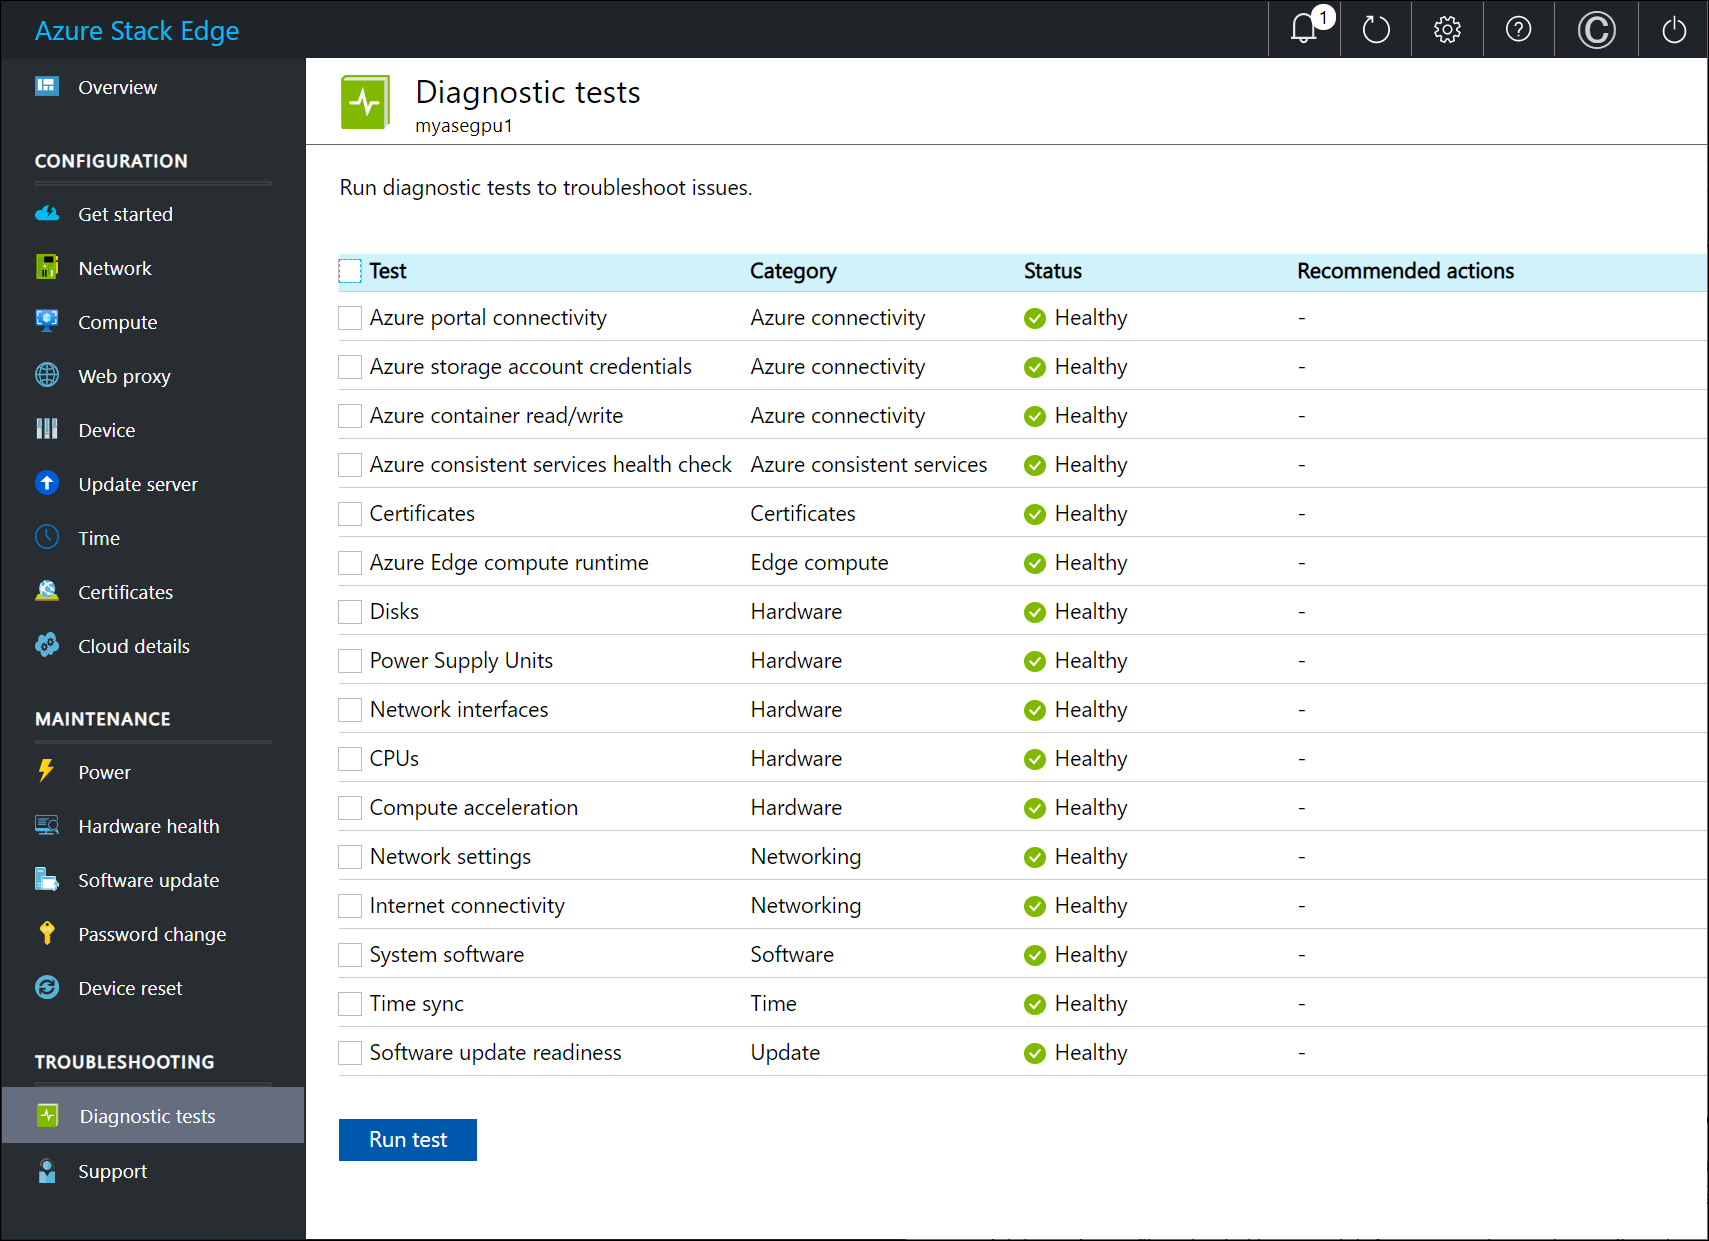
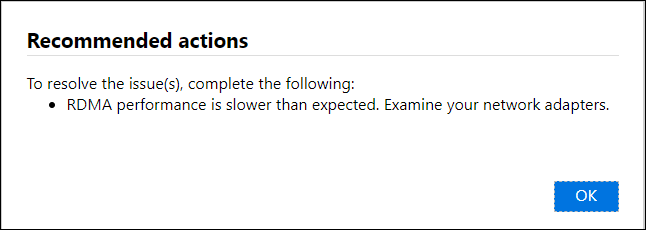
If a test fails, then a URL for recommended action is presented. Select the URL to view the recommended action.
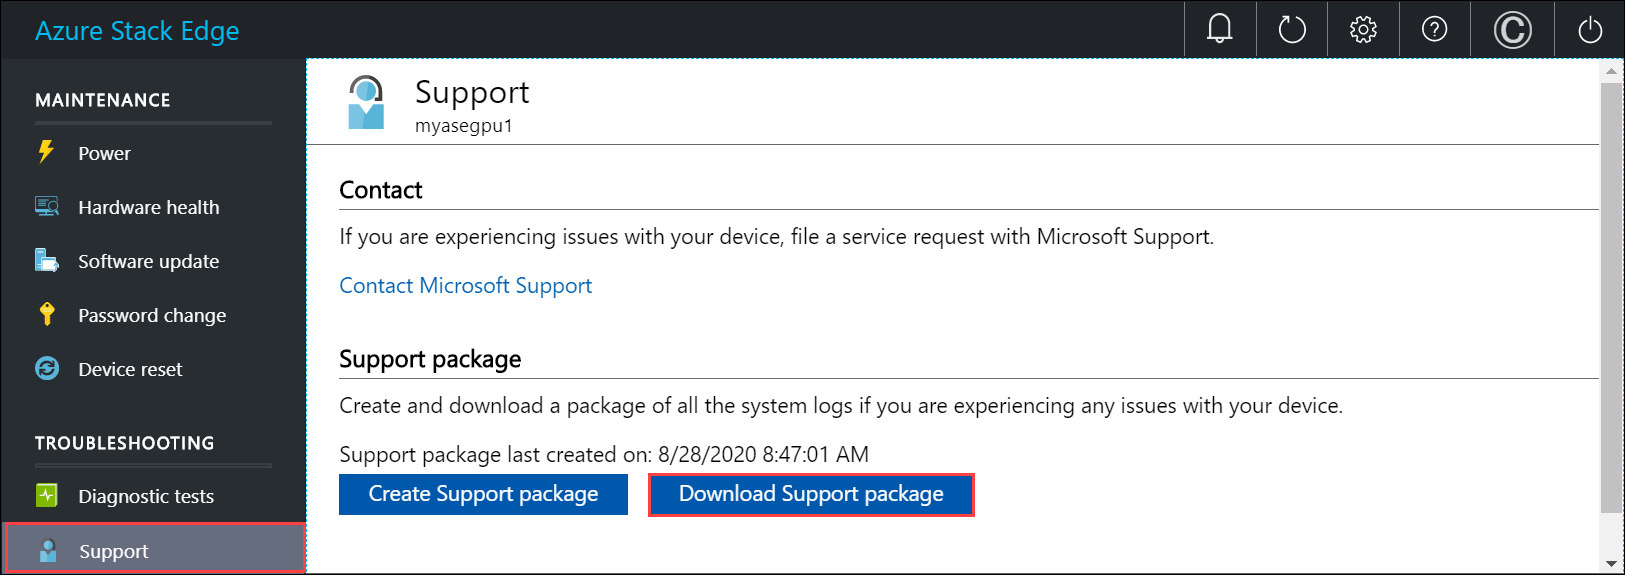
Collect Support package
A log package is composed of all the relevant logs that can help Microsoft Support troubleshoot any device issues. You can generate a log package via the local web UI.
Do the following steps to collect a Support package.
In the local web UI, go to Troubleshooting > Support. Select Create support package. The system starts collecting support package. The package collection may take several minutes.
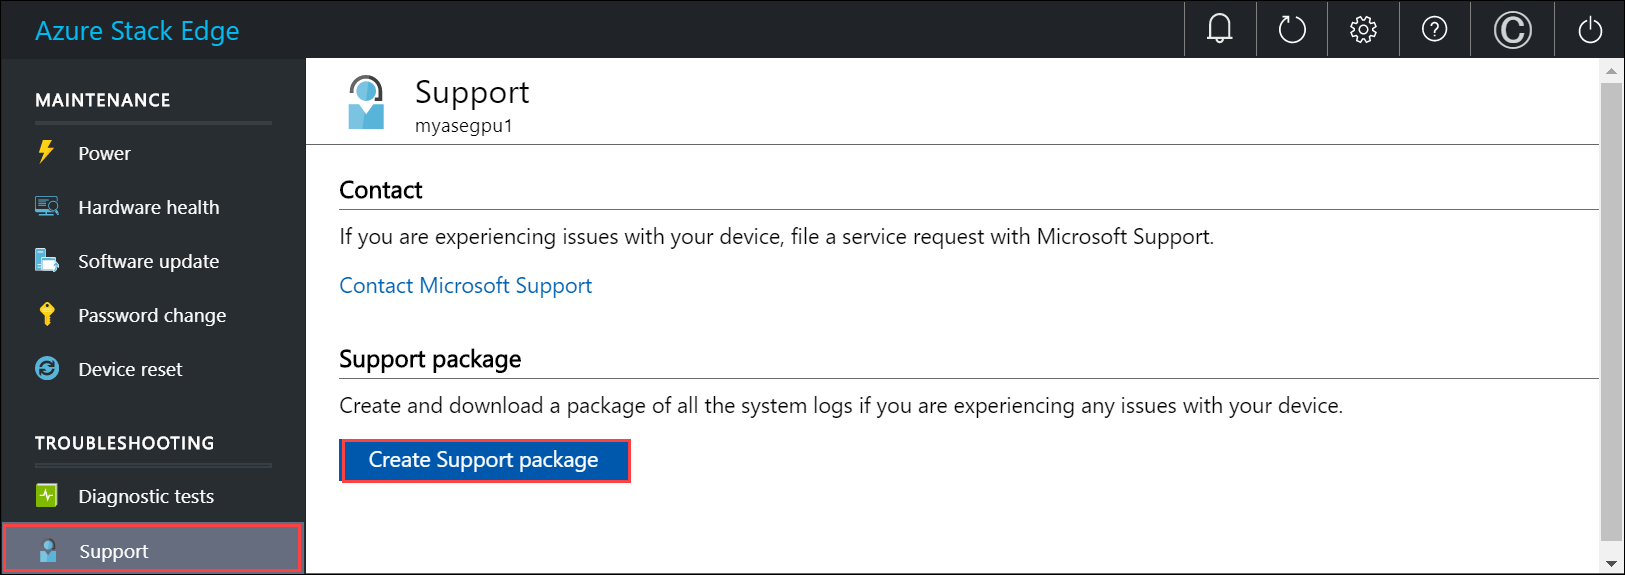
After the Support package is created, select Download Support package. A zipped package is downloaded on the path you chose. You can unzip the package and the view the system log files.
Gather advanced security logs
The advanced security logs can be software or hardware intrusion logs for your Azure Stack Edge Pro device.
Software intrusion logs
The software intrusion or the default firewall logs are collected for inbound and outbound traffic.
When the device is imaged at the factory, the default firewall logging is enabled. These logs are bundled in the support package by default when you create a support package via the local UI or via the Windows PowerShell interface of the device.
If only the firewall logs are needed in the support package to review any software (NW) intrusion in the device, use
-Include FirewallLogoption when creating the support package.If no specific include option is provided, firewall log is included as a default in the support package.
In the support package, firewall log is the
pfirewall.logand sits in the root folder. Here is an example of the software intrusion log for the Azure Stack Edge Pro device.#Version: 1.5 #Software: Microsoft Windows Firewall #Time Format: Local #Fields: date time action protocol src-ip dst-ip src-port dst-port size tcpflags tcpsyn tcpack tcpwin icmptype icmpcode info path 2019-11-06 12:35:19 DROP UDP 5.5.3.197 224.0.0.251 5353 5353 59 - - - - - - - RECEIVE 2019-11-06 12:35:19 DROP UDP fe80::3680:dff:fe01:9e88 ff02::fb 5353 5353 89 - - - - - - - RECEIVE 2019-11-06 12:35:19 DROP UDP fe80::3680:dff:fe01:9e88 ff02::fb 5353 5353 89 - - - - - - - RECEIVE 2019-11-06 12:35:19 DROP UDP fe80::3680:dff:fe01:9e88 ff02::fb 5353 5353 89 - - - - - - 2019-11-06 12:35:19 DROP UDP fe80::3680:dff:fe01:9d87 ff02::fb 5353 5353 79 - - - - - - - RECEIVE 2019-11-06 12:35:19 DROP UDP 5.5.3.193 224.0.0.251 5353 5353 59 - - - - - - - RECEIVE 2019-11-06 12:35:19 DROP UDP fe80::3680:dff:fe08:20d5 ff02::fb 5353 5353 89 - - - - - - - RECEIVE 2019-11-06 12:35:19 DROP UDP fe80::3680:dff:fe08:20d5 ff02::fb 5353 5353 89 - - - - - - - RECEIVE 2019-11-06 12:35:19 DROP UDP fe80::3680:dff:fe01:9e8b ff02::fb 5353 5353 89 - - - - - - - RECEIVE 2019-11-06 12:35:19 DROP UDP fe80::3680:dff:fe01:9e8b ff02::fb 5353 5353 89 - - - - - - - RECEIVE 2019-11-06 12:35:19 DROP UDP 5.5.3.33 224.0.0.251 5353 5353 59 - - - - - - - RECEIVE 2019-11-06 12:35:19 DROP UDP fe80::3680:dff:fe01:9e8b ff02::fb 5353 5353 89 - - - - - - - RECEIVE 2019-11-06 12:35:19 DROP UDP fe80::3680:dff:fe01:9e8a ff02::fb 5353 5353 89 - - - - - - - RECEIVE 2019-11-06 12:35:19 DROP UDP fe80::3680:dff:fe01:9e8b ff02::fb 5353 5353 89 - - - - - - - RECEIVE
Hardware intrusion logs
To detect any hardware intrusion into the device, currently all the chassis events such as opening or close of chassis, are logged.
The system event log from the device is read using the
racadmcmdlet. These events are then filtered for chassis-related event in to aHWIntrusion.txtfile.To get only the hardware intrusion log in the support package, use the
-Include HWSelLogoption when you create the support package.If no specific include option is provided, the hardware intrusion log is included as a default in the support package.
In the support package, the hardware intrusion log is the
HWIntrusion.txtand sits in the root folder. Here is an example of the hardware intrusion log for the Azure Stack Edge Pro device.09/04/2019 15:51:23 system Critical The chassis is open while the power is off. 09/04/2019 15:51:30 system Ok The chassis is closed while the power is off.
Troubleshoot device upload and refresh errors
Any errors experienced during the upload and refresh processes are included in the respective error files.
To view the error files, go to your share and select the share to view the contents.
Select the Microsoft Data Box Edge folder. This folder has two subfolders:
- Upload folder that has log files for upload errors.
- Refresh folder for errors during refresh.
Here is a sample log file for refresh.
<root container="test1" machine="VM15BS020663" timestamp="03/18/2019 00:11:10" />
<file item="test.txt" local="False" remote="True" error="16001" />
<summary runtime="00:00:00.0945320" errors="1" creates="2" deletes="0" insync="3" replaces="0" pending="9" />
When you see an error in this file (highlighted in the sample), note down the error code, in this case it is 16001. Look up the description of this error code against the following error reference.
Error code Error description 100 The container or share name must be between 3 and 63 characters. 101 The container or share name must consist of only letters, numbers, or hyphens. 102 The container or share name must consist of only letters, numbers, or hyphens. 103 The blob or file name contains unsupported control characters. 104 The blob or file name contains illegal characters. 105 Blob or file name contains too many segments (each segment is separated by a slash -/). 106 The blob or file name is too long. 107 One of the segments in the blob or file name is too long. 108 The file size exceeds the maximum file size for upload. 109 The blob or file is incorrectly aligned. 110 The Unicode encoded file name or blob is not valid. 111 The name or the prefix of the file or blob is a reserved name that isn't supported (for example, COM1). 2000 An etag mismatch indicates that there is a conflict between a block blob in the cloud and on the device. To resolve this conflict, delete one of those files – either the version in the cloud or the version on the device. 2001 An unexpected problem occurred while processing a file after the file was uploaded. If you see this error, and the error persists for more than 24 hours, contact support. 2002 The file is already open in another process and can't be uploaded until the handle is closed. 2003 Couldn't open the file for upload. If you see this error, contact Microsoft Support. 2004 Couldn't connect to the container to upload data to it. 2005 Couldn't connect to the container because the account permissions are either wrong or out of date. Check your access. 2006 Couldn't upload data to the account as the account or share is disabled. 2007 Couldn't connect to the container because the account permissions are either wrong or out of date. Check your access. 2008 Couldn't add new data as the container is full. Check the Azure specifications for supported container sizes based on type. For example, Azure File only supports a maximum file size of 5 TB. 2009 Couldn't upload data because the container associated with the share doesn't exist. 2997 An unexpected error occurred. This is a transient error that will resolve itself. 2998 An unexpected error occurred. The error may resolve itself but if it persists for more than 24 hours, contact Microsoft Support. 16000 Couldn't bring down this file. 16001 Couldn't bring down this file since it already exists on your local system. 16002 Couldn't refresh this file since it isn't fully uploaded.
Next steps
Feedback
Coming soon: Throughout 2024 we will be phasing out GitHub Issues as the feedback mechanism for content and replacing it with a new feedback system. For more information see: https://aka.ms/ContentUserFeedback.
Submit and view feedback for