Note
Access to this page requires authorization. You can try signing in or changing directories.
Access to this page requires authorization. You can try changing directories.
Important
Items marked (preview) in this article are currently in public preview. This preview is provided without a service-level agreement, and we don't recommend it for production workloads. Certain features might not be supported or might have constrained capabilities. For more information, see Supplemental Terms of Use for Microsoft Azure Previews.
Test your generative AI models and agents by running evaluations that measure performance, quality, and safety. Use evaluations before deployment to validate behavior, or after deployment to monitor production quality. Evaluations run your model or agent against test data and score the outputs using built-in or custom evaluators.
This article shows you how to create and run evaluations in the Foundry portal.
Prerequisites
An Azure subscription. Create one for free.
A Microsoft Foundry project. Create a project if you don't have one.
One of the following, depending on your evaluation target:
- Agent evaluation: An agent in your project.
- Model evaluation: A deployed model or access to instant models.
- Dataset evaluation: A test dataset in CSV or JSONL format containing preexisting model or agent outputs.
An Azure OpenAI connection with a deployed GPT model (for example,
gpt-4.1-mini). Required for AI-assisted quality evaluations.Foundry User role on the Foundry project. For more information, see Role-based access control for Microsoft Foundry.
Important
The Foundry RBAC roles were recently renamed. Foundry User, Foundry Owner, Foundry Account Owner, and Foundry Project Manager were previously named Azure AI User, Azure AI Owner, Azure AI Account Owner, and Azure AI Project Manager. You might still see the previous names in some places while the rename rolls out. The role IDs and core permissions are unchanged by the rename.
Choose an evaluation approach
Select an evaluation approach based on what you want to test:
| Target | Scope | Data source | Best for |
|---|---|---|---|
| Agent | Full conversations | Simulated data | Testing end-to-end agent behavior with synthetic scenarios before deployment. |
| Agent | Full conversations | Existing conversations | Evaluating real user interactions to monitor production quality. |
| Agent | Individual turns | Existing dataset | Debugging specific agent responses, testing tool usage, fine-grained analysis. |
| Agent | Individual turns | Synthetic data | Testing single-turn Q&A or RAG scenarios with generated queries. |
| Agent | Individual turns | Existing traces | Evaluating historical agent traces from your project. |
| Model | Individual turns | Synthetic data | Testing model completions with generated prompts. |
| Model | Individual turns | Existing dataset | Benchmarking model performance against a curated test set. |
| Dataset | Individual turns | (Dataset is target) | Evaluating preexisting outputs without re-running the model or agent. |
Tip
Start with Agent > Full conversations > Simulated data to test your agent's behavior in controlled scenarios. Use Existing conversations once your agent is in production to monitor real-world performance.
Create an evaluation
You can start an evaluation from several places in the Foundry portal:
- Evaluation page: From the left pane, select Evaluation > Create.
- Models page: Go to your model, select the Evaluation tab, then select Create.
- Agents page: Go to your agent, select the Evaluation tab, then select Create.
- Agent playground: Go to your agent, select the Playground tab, then select Metrics > Run full evaluation.
Step 1: Select evaluation target
When you create an evaluation, first choose the evaluation target. The target determines what the evaluation runs against:
| Target | Description |
|---|---|
| Agent | Evaluates the output generated by your selected agent and user-defined input. Works for both prompt agents and hosted agents. |
| Model | Evaluates the output generated by your selected model and user-defined prompt. |
| Dataset | Evaluates preexisting model or agent outputs from a test dataset. |
| Traces | Evaluates agent interactions already captured in Application Insights. Select the agent and time range, and the portal retrieves the matching traces for evaluation. For the SDK equivalent, see Trace evaluation. |
Tip
Instant models: Instant models are deployment-less models that you can use immediately without creating a deployment. When creating an evaluation, you can select an instant model as either the evaluation target or the judge model directly from the model picker.
Step 2: Select evaluation scope
Note
This step appears for Agent and Dataset targets only. Model evaluations always use individual turns.
Choose how you want to evaluate your agent's performance:
| Scope | Description | Best for |
|---|---|---|
| Full conversations (preview) | Evaluates complete multi-turn conversations from start to finish. Measures overall conversation quality, task completion, and user satisfaction. | Testing end-to-end agent experiences, customer satisfaction, and conversation flow. |
| Individual turns | Evaluates individual agent responses within conversations. Measures per-turn metrics like tool selection accuracy and response quality. | Debugging specific agent behaviors, testing tool usage, and fine-grained analysis. |
Step 3: Select data source
The data source options depend on your evaluation target and scope.
For conversation evaluations (agent > full conversations) (preview)
Choose where your conversation data comes from:
Simulated data
Generate synthetic conversations by running your agent against scenario descriptions from a dataset. Use this option to test your agent's behavior in controlled scenarios before deployment.
Select Simulated data.
Select Generate to open the simulation configuration dialog.
Select your file: Choose a dataset containing scenario descriptions. Each row in your dataset describes a scenario that you use to generate a simulated conversation.
Select model: Choose the model that simulates the user in the conversation:
gpt-4.1(recommended for complex scenarios)gpt-4ogpt-4o-minigpt-4.1-mini
Configure simulation settings:
- Number of simulated conversations per scenario: How many conversations to generate for each row in your dataset (1-5). Multiple conversations per scenario help identify variance in agent behavior.
- Number of turns per conversation: Maximum turns allowed per conversation (1-50). The conversation ends when the task is complete or this limit is reached.
Select Confirm to save your simulation configuration.

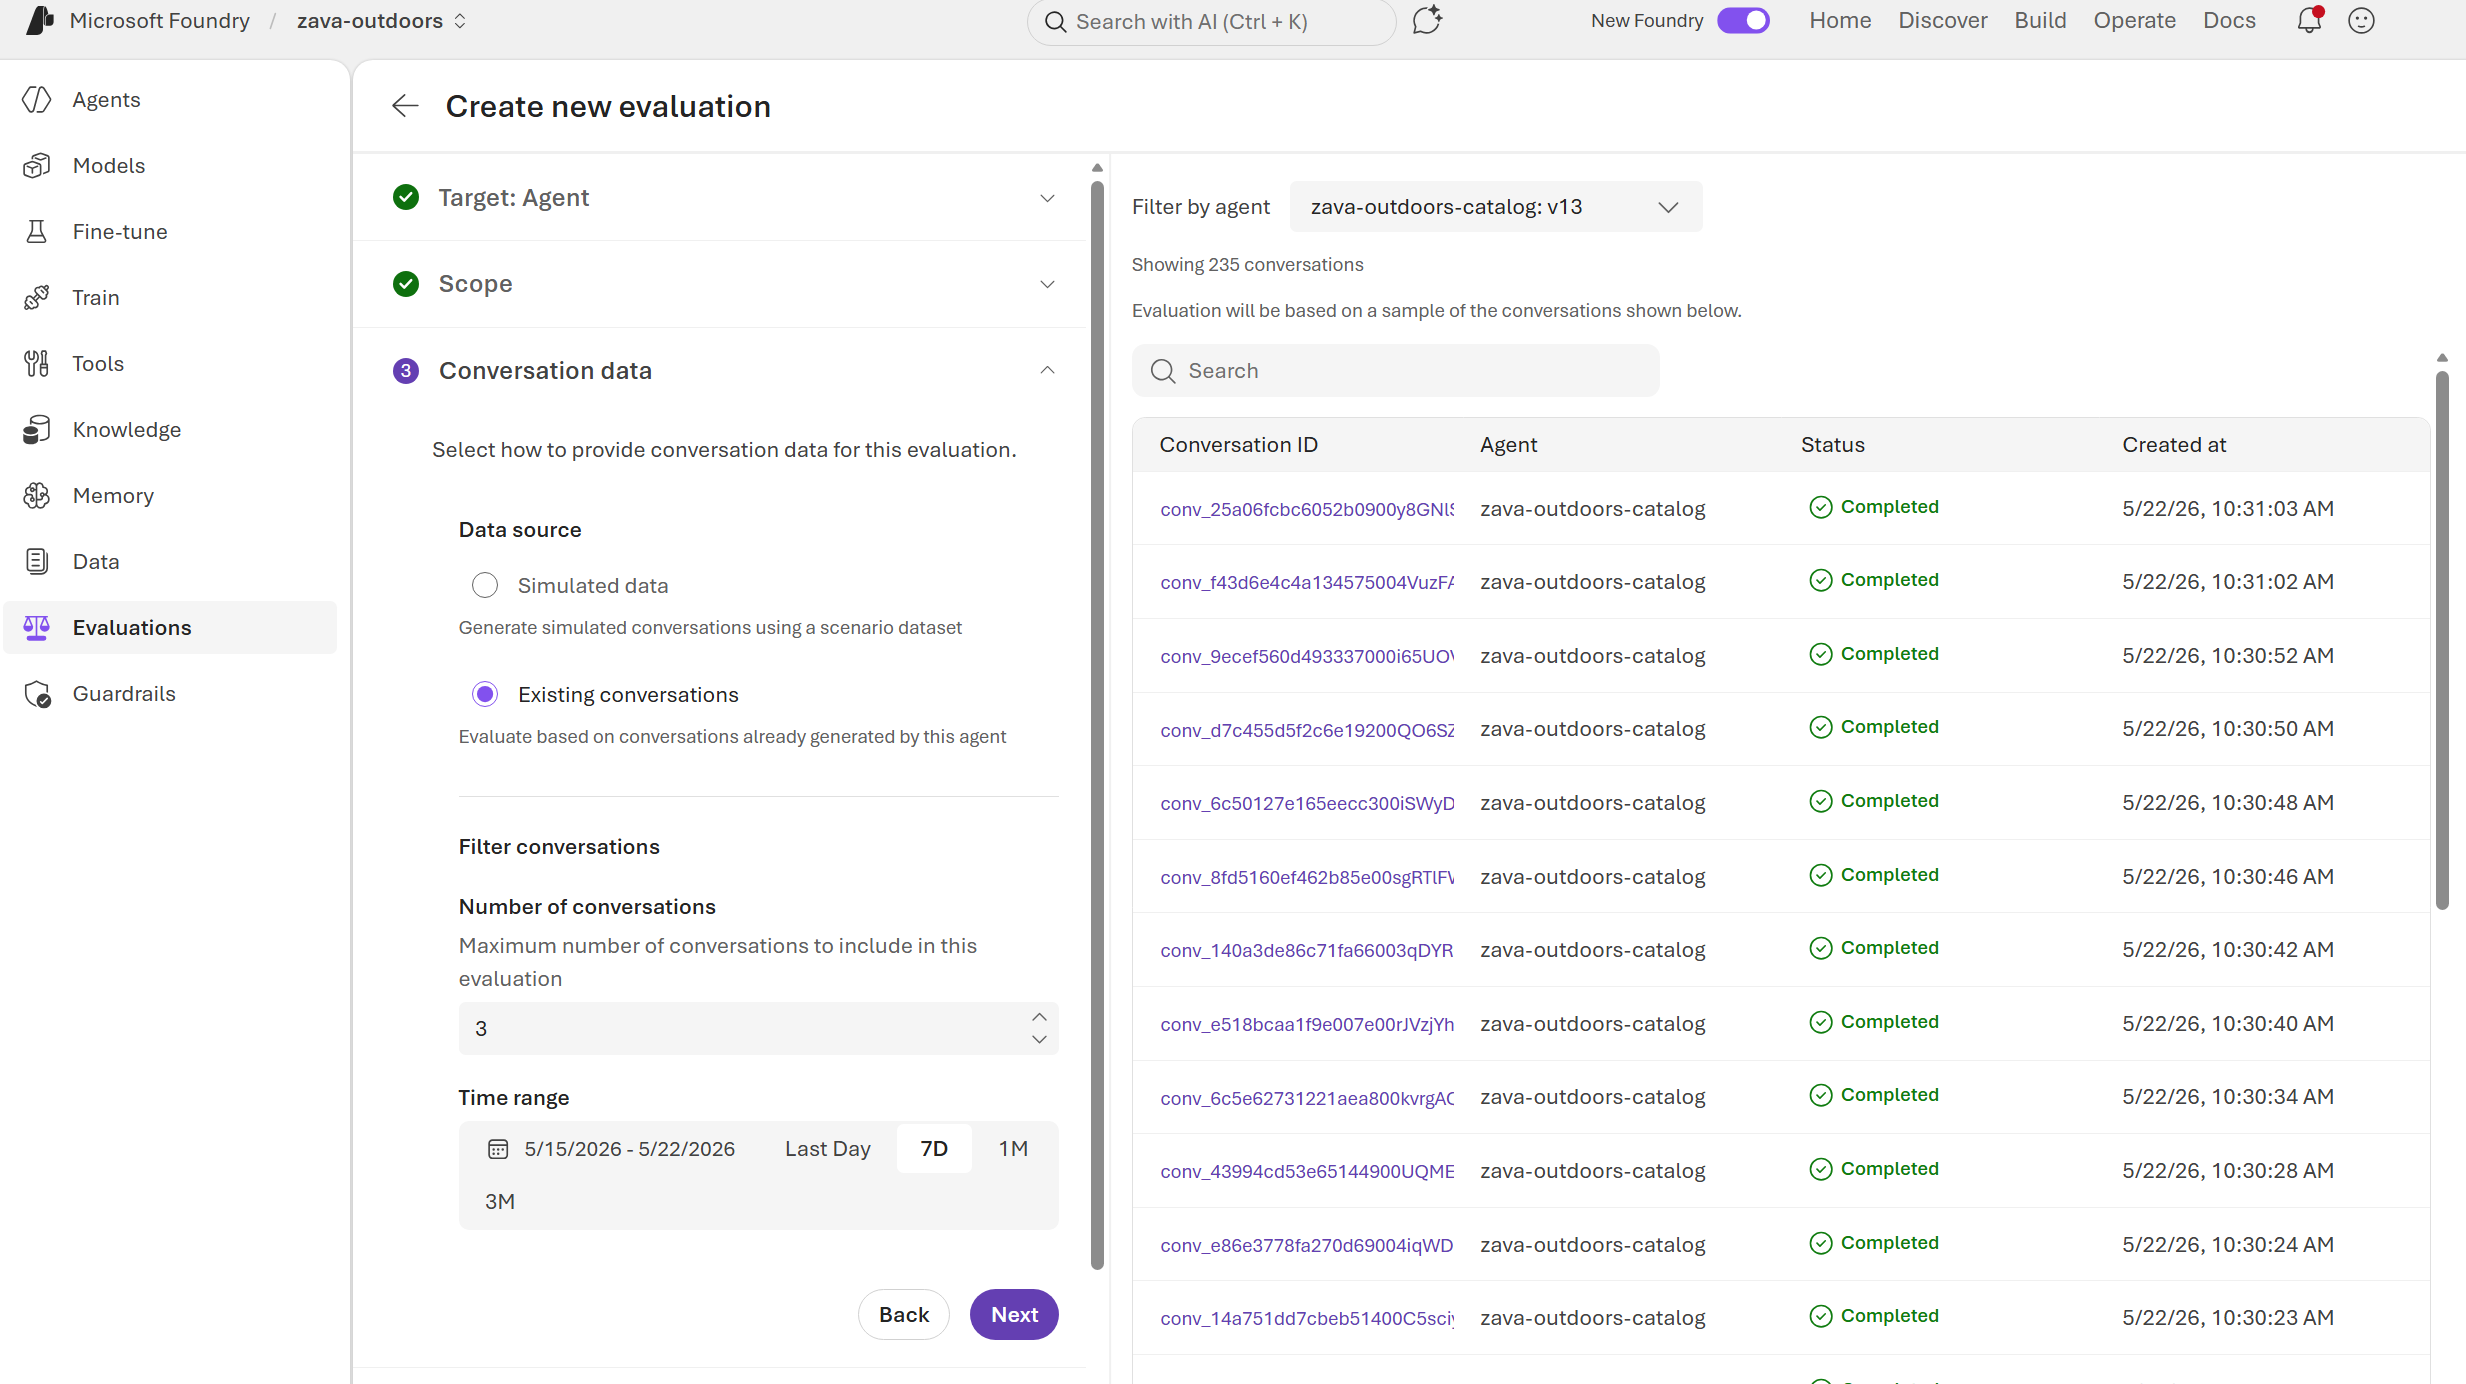
Existing conversations
Evaluate real conversations that your agent already had with users.
- Select Existing conversations.
- Configure filtering options:
- Number of conversations: Maximum number of conversations to sample from the date range (1-100).
- Time range: Filter conversations by time period. Use quick filters (Last Day, 7D, 1M, 3M) or select a custom date range.
- Browse and select specific conversations to include in the evaluation.
For individual turn evaluations
Choose where your evaluation data comes from:
Synthetic data
Generate test queries by using AI. Select Synthetic and configure the number of rows and a prompt that describes the data to generate. You can also upload files to improve relevance.
Note
Synthetic data generation requires a model with Responses API capability. For availability, see Responses API region availability.
Existing dataset
Use a prepared dataset in CSV or JSONL format. Select Existing dataset and choose a file from your project's data assets. Only CSV and JSONL file formats are supported.
Existing traces (agent only)
Evaluate historical agent traces from your project. Select Existing traces and filter by date range to select traces.
Multimodal content (preview)
All evaluation targets support image and audio content. Each content type uses a specific JSONL schema:
Image content:
image_url: The image as a data URI (for example,data:image/png;base64,...) or a publicly accessible URL.caption: A text description of the image content.
{"image_url": "data:image/png;base64,iVBOR...", "caption": "A red to blue color gradient"}
Audio content:
audio_data: The audio as a data URI with base64-encoded WAV data (for example,data:audio/wav;base64,...).expected: A text description of the expected audio content.
Note
Only WAV audio format is currently supported.
{"audio_data": "data:audio/wav;base64,UklGR...", "expected": "A short beep tone at 440 Hz"}
Datasets can also use the chat message conversation format, where audio and image data are embedded within a single chat message column as data URIs or publicly accessible URLs.
The following example shows a conversation dataset column with embedded image and audio content:
[
  {
    "role": "system",
    "content": "..."
  },
  {
    "role": "user",
    "content": [
      {
        "type": "text",
        "text": "What are in these images?"
      },
      {
        "type": "image_url",
        "image_url": {
          "url": "https://example.com/path/image.png"
        }
      },
      {
        "type": "image_url",
        "image_url": {
          "url": "data:image/png;base64,iVBORw0KGgo..."
        }
      }
    ]
  },
  {
    "role": "assistant",
    "content": "..."
  },
  {
    "role": "user",
    "content": [
      {
        "type": "text",
        "text": "Tell me the tones for the voices?"
      },
      {
        "type": "input_audio",
        "input_audio": {
          "data": "https://example.com/path/voice.wav",
          "format": "wav"
        }
      },
      {
        "type": "input_audio",
        "input_audio": {
          "data": "data:audio/wav;base64,UklGRigAAA...",
          "format": "wav"
        }
      }
    ]
  }
]
You can preview images and play audio clips directly in the evaluation creation flow and in the evaluation results view.
Step 4: Configure agents
Note
This step appears for Agent evaluations only.
Customize how your agent behaves during the evaluation:
- Review the list of agents involved in your evaluation.
- For each agent, select Configure to customize its behavior:
- System prompt: Modify the agent's instructions for the evaluation.
- User prompt: Specify how each dataset item is sent to your agent during evaluation.
- The evaluation run preserves agent configurations.
User prompt configuration
The user prompt defines how test inputs are passed to your agent. By default, the portal uses {{item.query}} to pass the dataset query directly to your agent.
In most cases, you can use the default. Only change this value if your agent expects a different input format. For example, if your agent uses a hosted agent protocol or requires structured input with additional fields.
Common patterns:
| Format | When to use |
|---|---|
{{item.query}} |
Default. Passes the query field from your dataset directly. |
{{item.messages}} |
For agents expecting conversation history as input. |
| Custom JSON | For hosted agents or APIs that require structured request bodies. |
Tip
Use custom prompts to test edge cases or specific scenarios that might not occur naturally in your dataset.
Step 5: Configure field mapping
Note
This step appears when you use existing data (existing conversations, existing dataset, or existing traces).
Map your data fields to the fields each evaluator expects. The required fields depend on your evaluation scope.
For conversation evaluations (multi-turn)
| Field | Description | Required |
|---|---|---|
| messages | The conversation messages in chat format. | Yes |
| tool_definitions | Tool or function definitions available to the agent. | Yes |
For individual turn evaluations (single-turn)
| Field | Description | Required |
|---|---|---|
| query | The user query or prompt. | Yes |
| response | The model or agent response. | Yes |
| context | Retrieved context for RAG scenarios. | No |
| ground_truth | Expected correct answer for comparison. | No |
| tool_calls | Tool calls made by the agent. | No |
| tool_definitions | Available tool definitions. | No |
The portal automatically attempts to map your dataset fields. If a field shows as Unassigned, select the dropdown to manually assign a column from your dataset.
Note
Required fields are marked with an asterisk (*). Evaluators fail if required fields are left unassigned.
Step 6: Select testing criteria
Select the evaluators to use for your evaluation. Microsoft Foundry provides three categories of built-in evaluators. The available evaluators depend on your evaluation scope.
Agent evaluators
Evaluate how effectively agents handle tasks, tools, and user intent. Available for Individual turns scope only.
| Evaluator | Description |
|---|---|
| Intent Resolution | Measures whether the agent correctly identified and addressed the user's intent. |
| Task Adherence | Measures how well the agent followed instructions and constraints. |
| Tool Call Success | Evaluates whether tool calls executed successfully. |
| Tool Selection | Measures whether the agent selected appropriate tools for the task. |
| Tool Output Utilization | Evaluates how effectively the agent used tool outputs in responses. |
| Tool Input Accuracy | Measures whether the agent provided correct inputs to tools. |
| Tool Call Accuracy | Overall accuracy of tool usage. |
Quality evaluators
Measure the overall quality of generated responses. Most quality evaluators are available for all evaluation scopes. Evaluators marked with ★ support both conversation-level and turn-level analysis.
| Evaluator | Description | Conversation support |
|---|---|---|
| Customer Satisfaction | Predicts user satisfaction with the agent interaction. | ★ |
| Task Completion | Evaluates whether the agent successfully completed the requested task. | ★ |
| Coherence | Measures logical flow and consistency of responses. | ★ |
| Groundedness | Measures whether responses are grounded in provided context. | ★ |
| Response Completeness | Evaluates whether responses fully address user queries. | — |
| Fluency | Evaluates natural language quality. | — |
| Relevance | Evaluates how relevant responses are to the query. | — |
Safety evaluators
Identify potential content and security risks. Available for Individual turns scope only.
| Evaluator | Description |
|---|---|
| Violence | Detects violent content in responses. |
| Sexual | Detects sexual content. |
| Self-harm | Detects self-harm related content. |
| Hate/Unfairness | Detects hateful or biased content. |
The portal preselects recommended evaluators based on your evaluation target and scope:
- Full conversations: Customer Satisfaction, Task Completion, Coherence, Groundedness
- Individual turns (existing data): All Agent evaluators plus Quality and Safety evaluators
- Individual turns (synthetic/traces): Relevance, Groundedness, Fluency, Coherence
Tip
You can add or remove evaluators as needed. Select Custom evaluators to use evaluators you defined in your project.
Step 7: Review and submit
- Enter a name for your evaluation.
- Review your configuration:
- Evaluation target and scope
- Data source and dataset
- Selected evaluators
- Field mappings (if applicable)
- Select Submit to start the evaluation.
After you submit, the evaluation run starts. Evaluations typically complete within a few minutes, depending on dataset size and the number of conversations being simulated.
To verify your evaluation started successfully:
- In the left pane, select Evaluation.
- Find your evaluation in the list. The Status column shows the current state:
- In Progress: The evaluation is running.
- Completed: The evaluation finished successfully.
- Partial: Some evaluators completed but others failed.
- Failed: The evaluation encountered an error.
To view detailed results, select the evaluation name or see View the evaluation results.
Tip
For programmatic evaluation workflows, use the Azure AI Evaluation SDK. See How to run batch evaluation with the SDK.
Troubleshooting
Evaluation times out or runs slowly
- Reduce the number of conversations or dataset rows.
- For simulations, decrease the maximum turns per conversation.
- Check that your judge model has sufficient quota.
Field mapping errors
- Verify your dataset contains the required columns for your evaluation scope.
- For conversation evaluations, ensure the messages column contains properly formatted chat messages.
- Check that column names in your dataset match the expected field names.
Model quota exceeded
- The judge model used for AI-assisted evaluations counts against your Azure OpenAI quota.
- Use a smaller dataset or wait for quota to refresh.
- Consider using
gpt-4.1-miniinstead ofgpt-4.1for cost-effective evaluations.
Best practices
For simulation-based evaluations
- Start small: Begin with 1 conversation per scenario and 5-10 turns to validate your setup before scaling up.
- Diverse scenarios: Include a variety of scenario descriptions to test different agent capabilities.
- Iterate on prompts: If agents behave unexpectedly, use the Configure agents step to adjust prompts.
For existing conversation evaluations
- Representative sample: Select conversations that represent typical user interactions.
- Include edge cases: Don't just evaluate successful conversations—include challenging scenarios.
- Regular evaluation: Schedule recurring evaluations to track agent performance over time.
For model evaluations
- Benchmark datasets: Use standardized datasets to compare model performance across versions.
- Test both deployed and instant models: Compare your fine-tuned deployments against base models.
For dataset evaluations
- Pre-compute outputs: Generate outputs offline and evaluate in bulk for cost efficiency.
- Version your datasets: Track which dataset version produced which evaluation results.
General tips
- Compare evaluators: Run the same data through multiple evaluators to get a comprehensive view.
- Track trends: Use evaluation history to identify performance improvements or regressions.
- Act on results: Use evaluation insights to refine agent prompts, tool definitions, and configurations.
Related content
Learn more about evaluating your generative AI models and agents: