Setup disaster recovery for Azure virtual machines using shared disk (preview)
This article describes how to protect, monitor, failover, and reprotect your workloads that are running on Windows Server Failover Clusters (WSFC) on Azure virtual machines using a shared disk.
Azure shared disks is a feature for Azure managed disks that allow you to attach a managed disk to multiple virtual machines simultaneously. Attaching a managed disk to multiple virtual machines allows you to either deploy new or migrate existing clustered applications to Azure.
Using Azure Site Recovery for Azure shared disks, you can replicate and recover your WSFC-clusters as a single unit throughout the disaster recovery lifecycle, while you create cluster-consistent recovery points that are consistent across all the disks (including the shared disk) of the cluster.
Using Azure Site Recovery for shared disks, you can:
- Protect your clusters.
- Create recovery points (App and Crash) that are consistent across all the virtual machines and disks of the cluster.
- Monitor protection and health of the cluster and all its nodes from a single page.
- Failover the cluster with a single click.
- Change recovery point and reprotect the cluster after failover with a single click.
- Failback the cluster to the primary region with minimal data loss and downtime.
Follow these steps to protect shared disks with Azure Site Recovery:
Sign in to Azure
If you don't have an Azure subscription, create a free account before you begin. Then sign in to the Azure portal.
Prerequisites
Before you start, ensure you have:
- A recovery services vault. If you don't have one, create recovery services vault.
- A virtual machine as a part of the Windows Server Failover Cluster.
Enable replication for shared disks
To enable replication for shared disks, follow these steps:
Navigate to your recovery services vault that you use for protecting your cluster.
Note
Recovery services vault can be created in any region except the source region of the virtual machines.
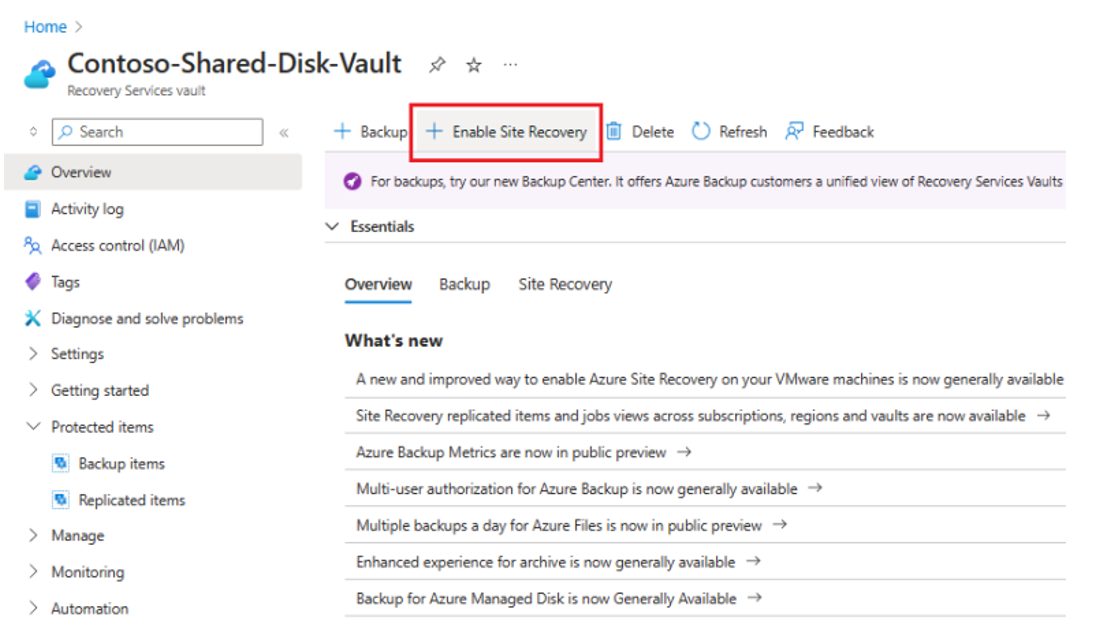
Select Enable Site Recovery.
In the Enable replication page, do the following:
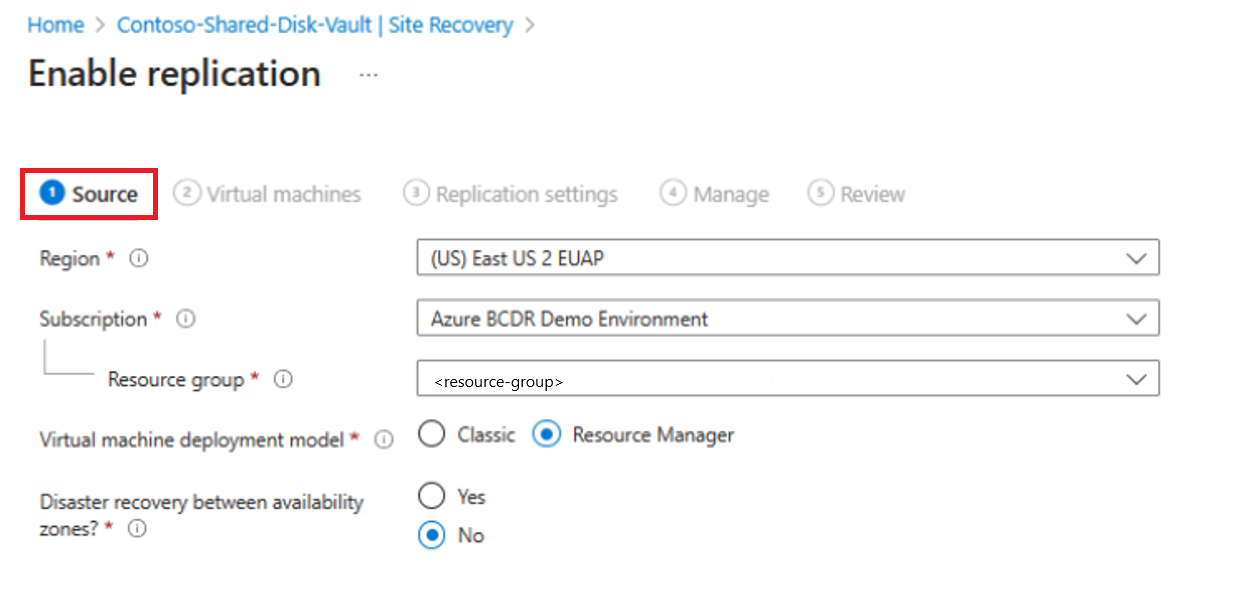
Under the Source tab,
- Select the Region, Subscription, and the Resource group your virtual machines are in.
- Retain values for the Virtual machine deployment model and Disaster recovery between availabiity zone? fields.
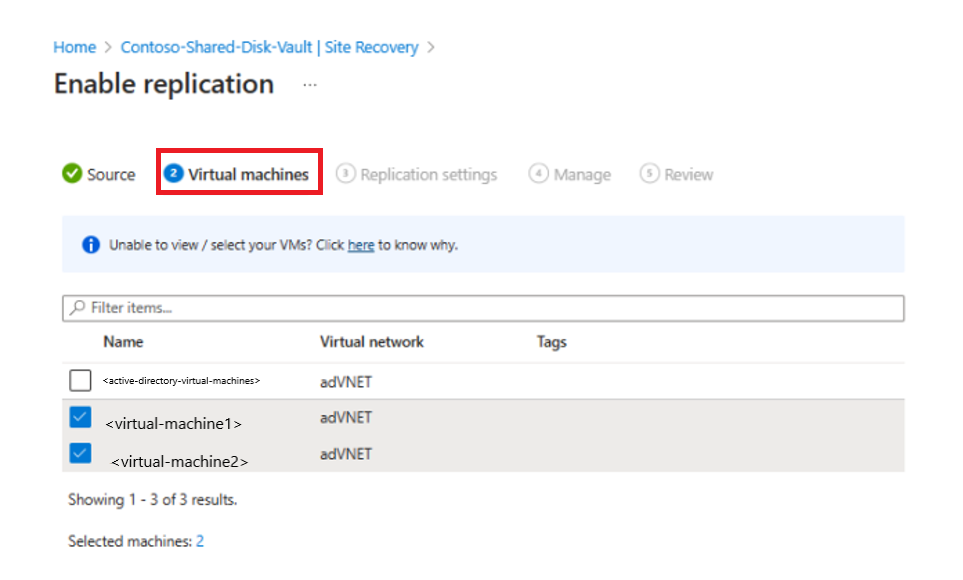
Under the Virtual machines tab, select all the virtual machines that are part of your cluster.
Note
- If you wish to protect multiple clusters, select all the virtual machines of all the clusters in this step.
- If you don't select all the virtual machines, Site Recovery prompts you to choose the ones you missed. If you continue without selecting them, then the shared disks for those machines won't be protected.
- Don’t select the Active Directory virtual machines as Azure Site Recovery shared disk doesn't support Active Directory virtual machines.
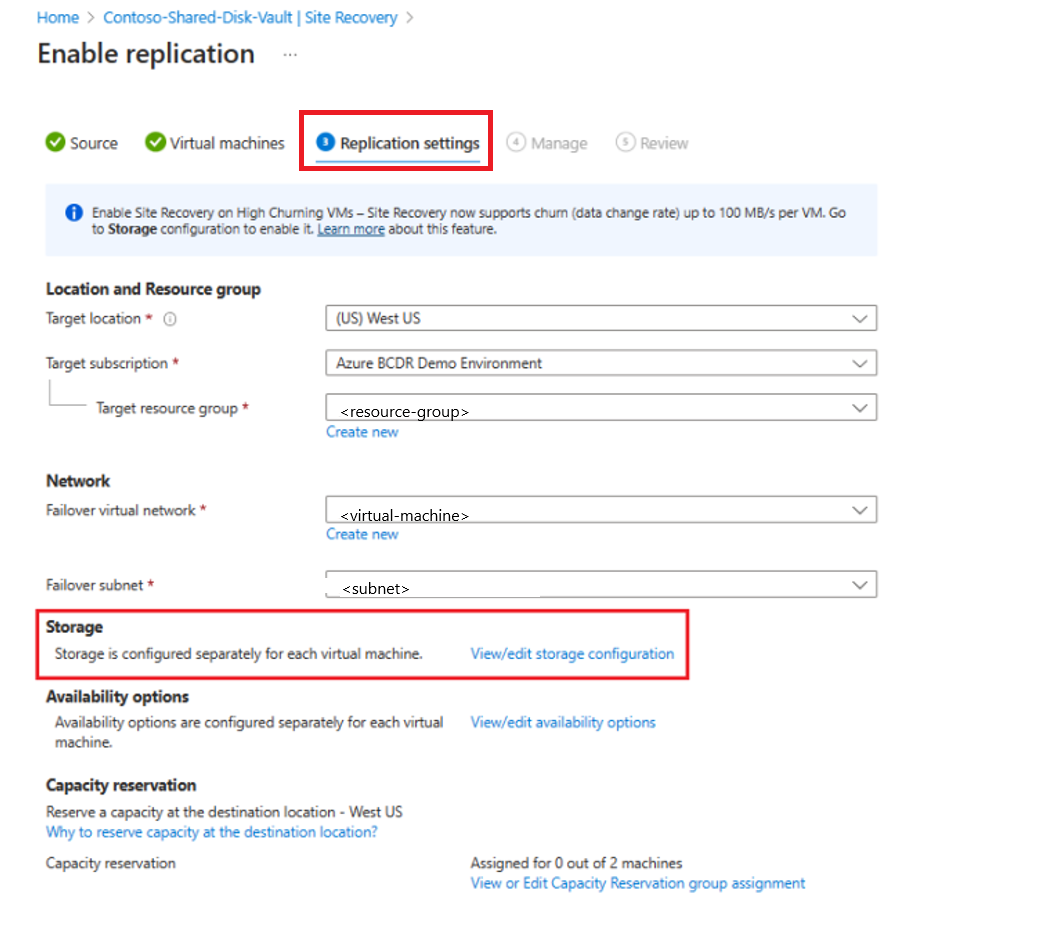
Under Replication settings tab, retain values for all fields. In the Storage section, select View/edit storage configuration.
If your virtual machines have a protected shared disk, on the Customize target settings page > Shared disks tab, do the following:
- Verify the name and recovery disk type of the shared disks.
- To enable high churn, select the Churn for the virtual machine option for your disk.
- Select Confirm Selection.
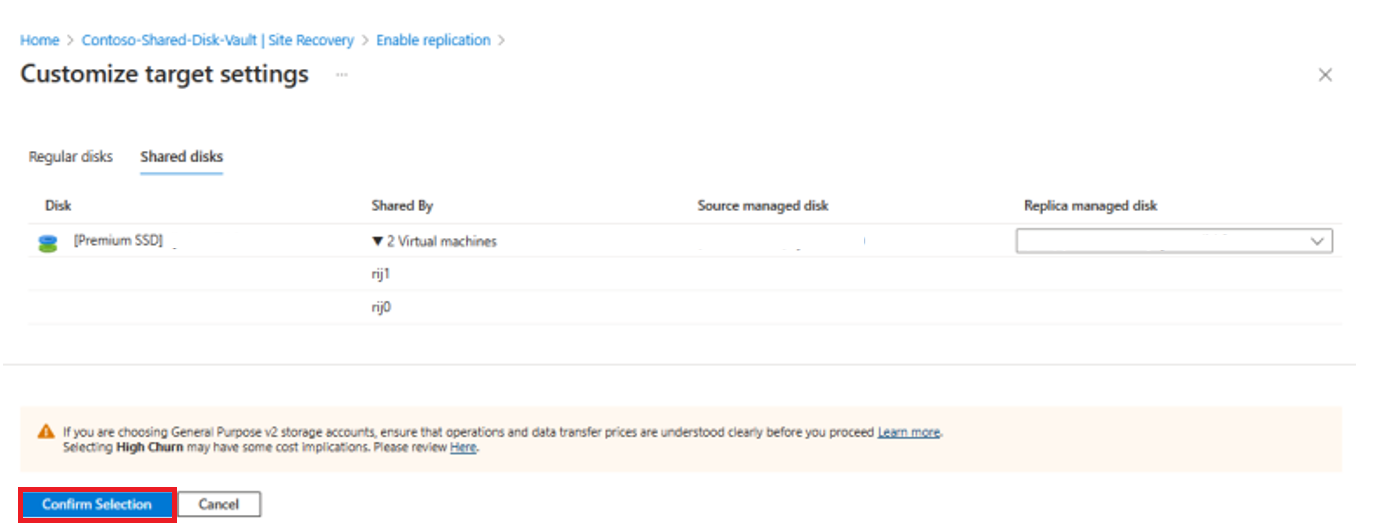
On the Replication settings page, select Next.
Under the Manage tab, do the following:
In the Shared disk clusters section, assign a Cluster name for the group, which is used to represent the group throughout their disaster recovery lifecycle.
This name is used to trigger any operations, monitor, or operate via PowerShell/REST.
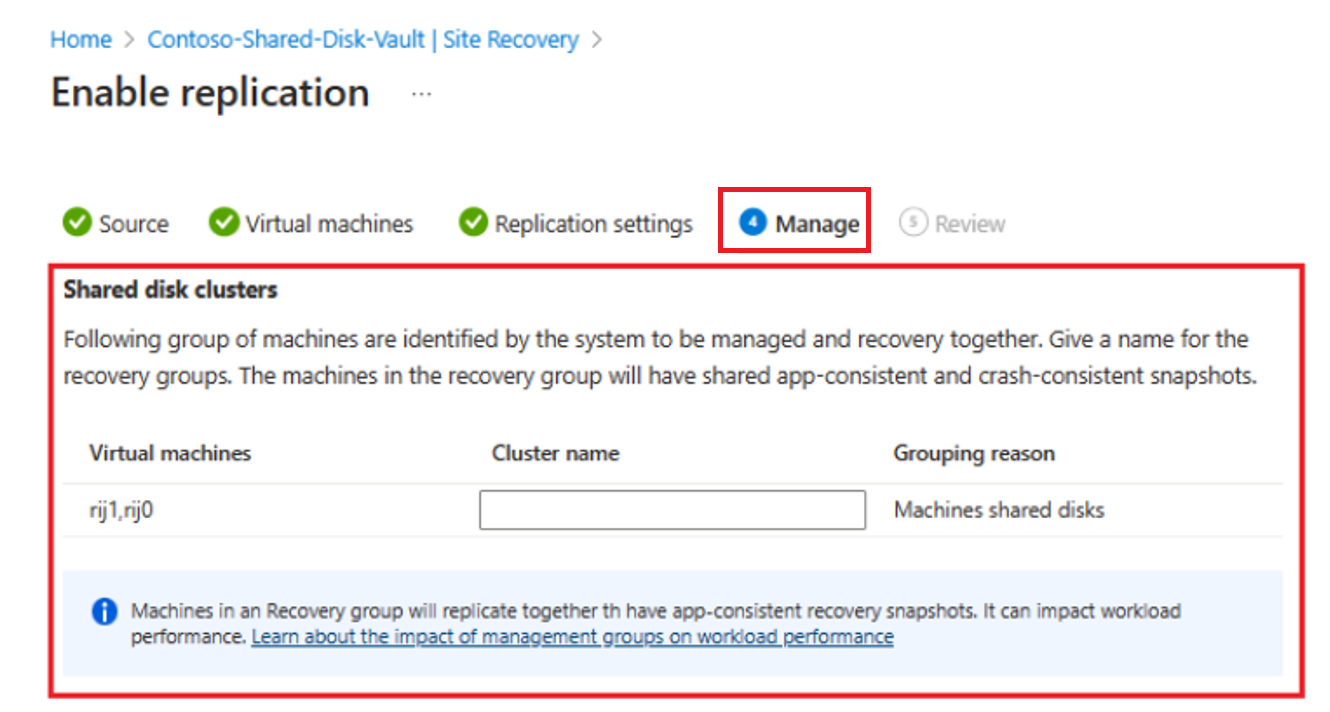
We recommend that you use the same name as your cluster.
Under Replication policy section, select an appropriate replication policy and extension update settings.
Review the information and select Enable replication.
Note
The replication gets enabled in 1-2 hours.
Run a failover
To initiate a failover, navigate to the chosen cluster page and select Monitoring > Failover for the entire cluster. Trigger the failover through the cluster monitoring page as you can't initiate the failover of each node separately.
Following are the two possible scenarios during a failover:
- Recovery point is consistent across all the virtual machines.
- Recovery point is consistent only for a few virtual machines.
Recovery point is consistent across all the virtual machines
The recovery point is consistent across all the virtual machines when all the virtual machines in the cluster are available when the recovery point was taken.
To failover to a recovery point that is consistent across all the virtual machines, follow these steps:
Navigate to the Failover page from the shared disk vault.
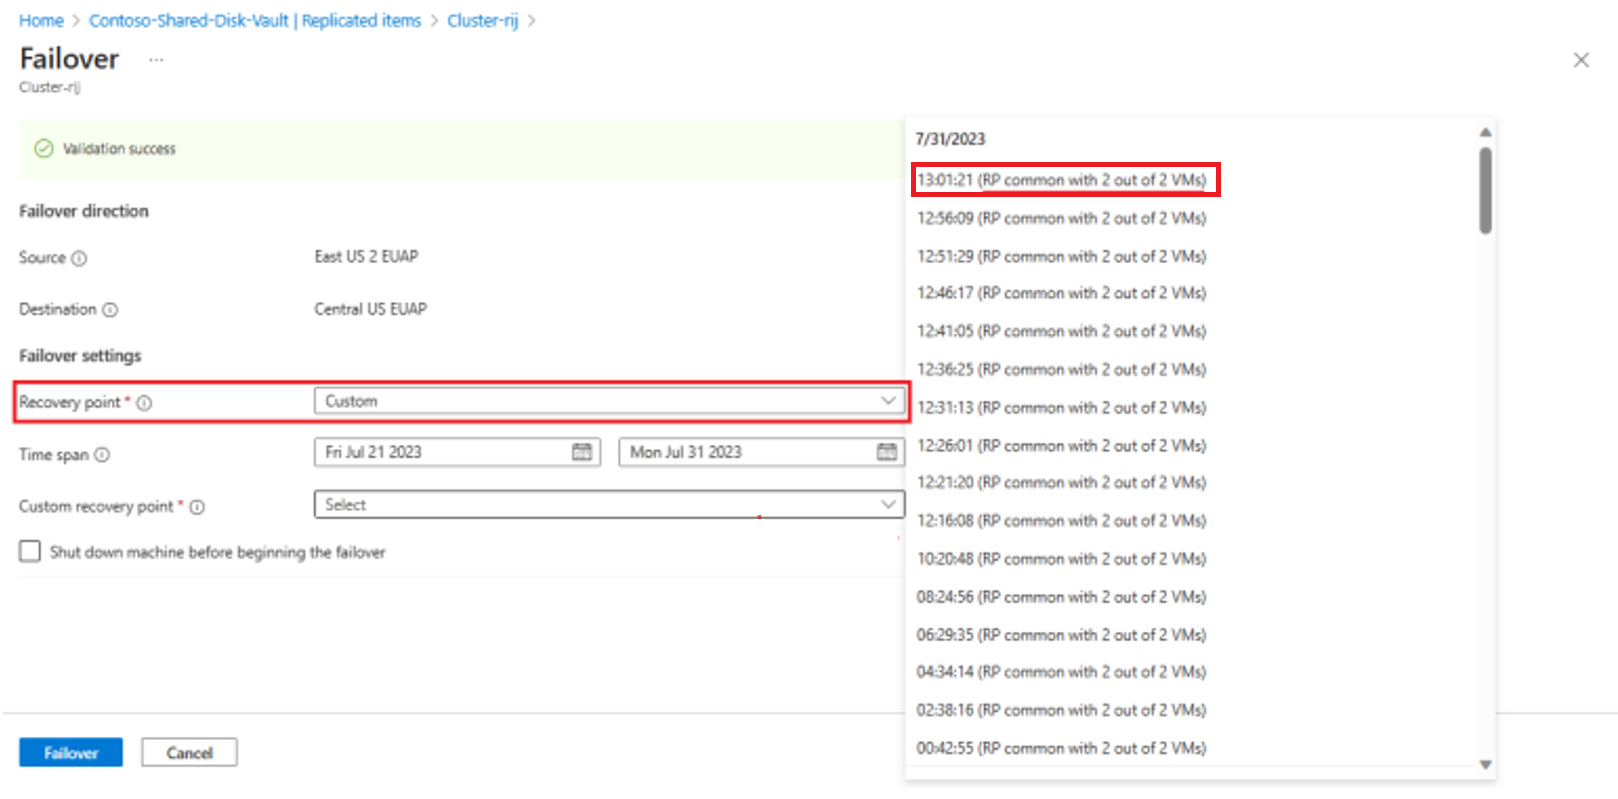
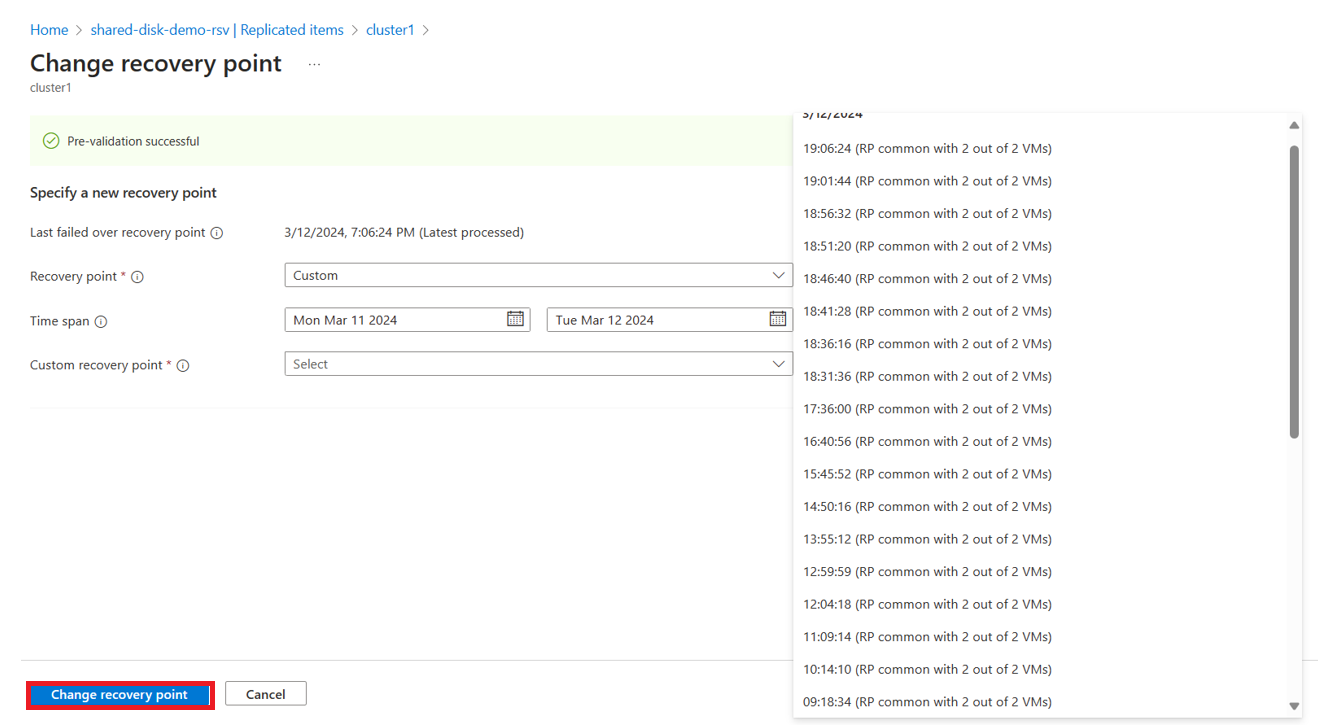
In the Recovery point field, select Custom and choose a recovery point.
Retain the values in Time span field.
In the Custom recovery point field, select the desired time span.
Note
In the Custom recovery point field, the available options shows the number of nodes of the cluster that were protected in a healthy state when the recovery point was taken.
Select Failover.
On failing over to this recovery point, the virtual machines come up at that same recovery point and a cluster can be started. The shared disk is also attached to all the nodes.
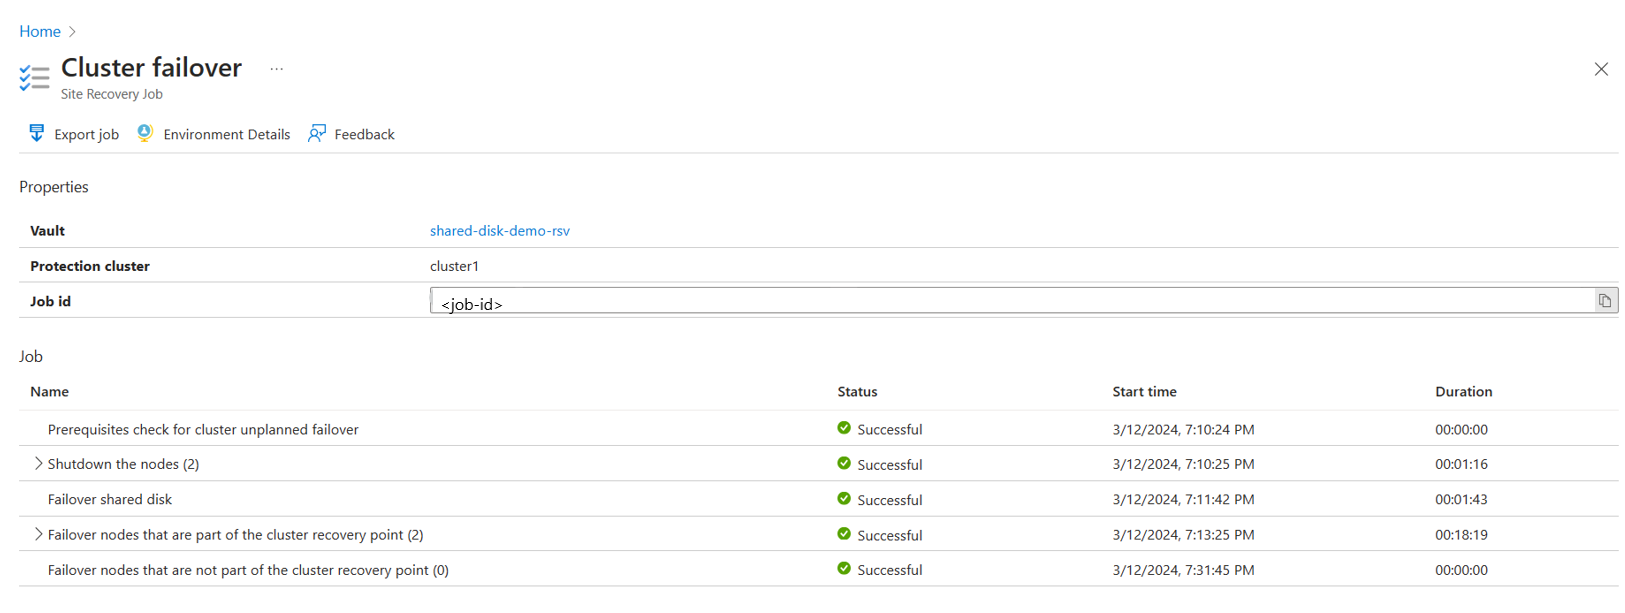
Once the failover is complete, the Cluster failover site recovery job shows all the jobs as completed.
Recovery point is consistent only for a few virtual machines
The recovery point is consistent only for a subset of virtual machines when a few of the virtual machines in the cluster are unavailable or evicted from the cluster, down for maintenance, or shut down when a recovery point was taken.
The virtual machines that are part of the cluster recovery point, failover at the selected recovery point with the shared disk attached to them. You can boot up the cluster in these nodes after failover.
To failover the cluster to a recovery point, follow these steps:
Navigate to the Failover page from the shared disk vault.
In the Recovery point field, select Custom and choose a recovery point.
Retain values for the Time span field.
Select an individual recovery point for the virtual machines that are not part of the cluster recovery point.
These virtual machines then failover like independent virtual machines and the shared disk is attached to them.
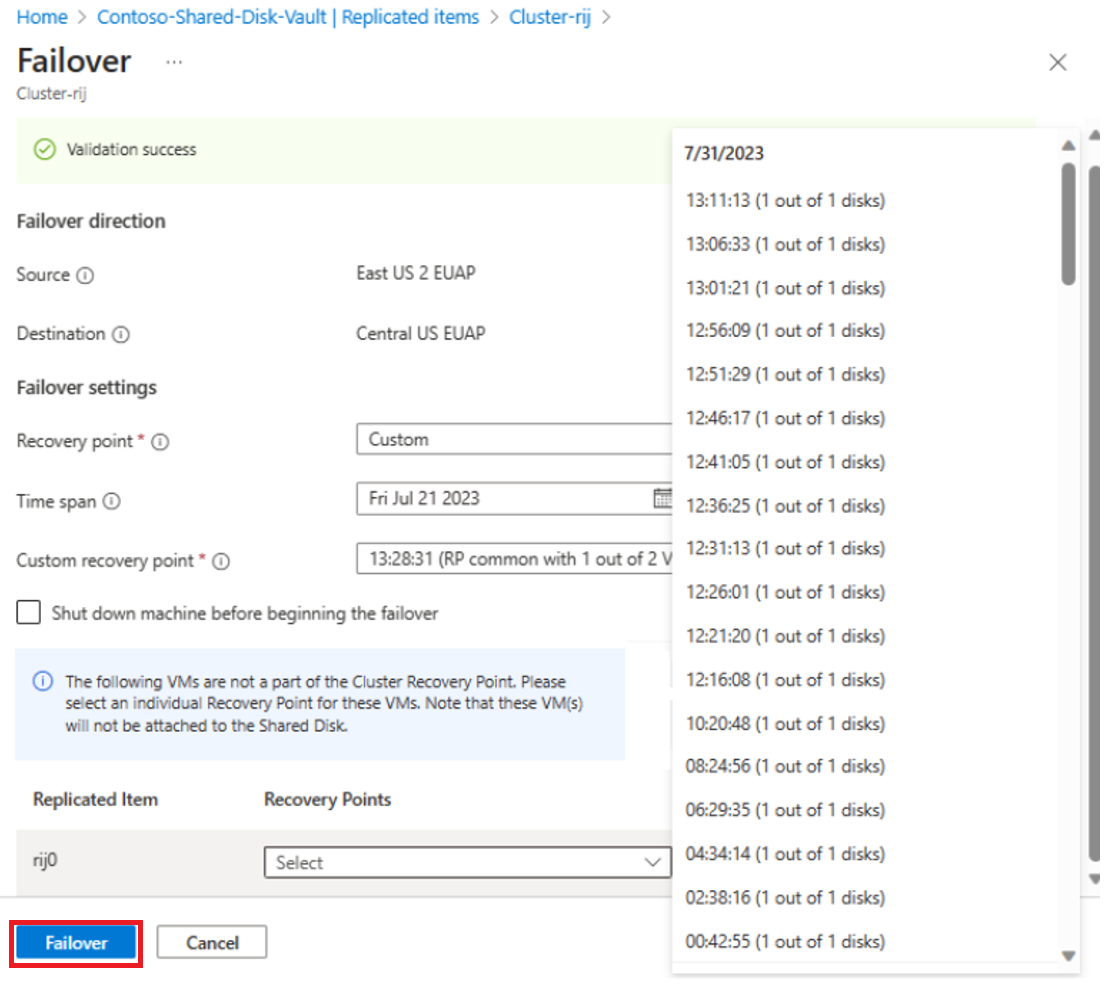
Select Failover.
Join these virtual machines back to the cluster (and shared disk) manually after validating any ongoing maintenance activity and data integrity. Once the failover is complete, the Cluster failover site recovery job shows all the jobs as successful.
Change recovery point
After the failover, the Azure virtual machine created in the target region appear on the Virtual machines page. Ensure that the virtual machine is running and sized appropriately.
If you want to use a different recovery point for the virtual machine, do the following:
Navigate to the virtual machine Overview page and select Change recovery point.
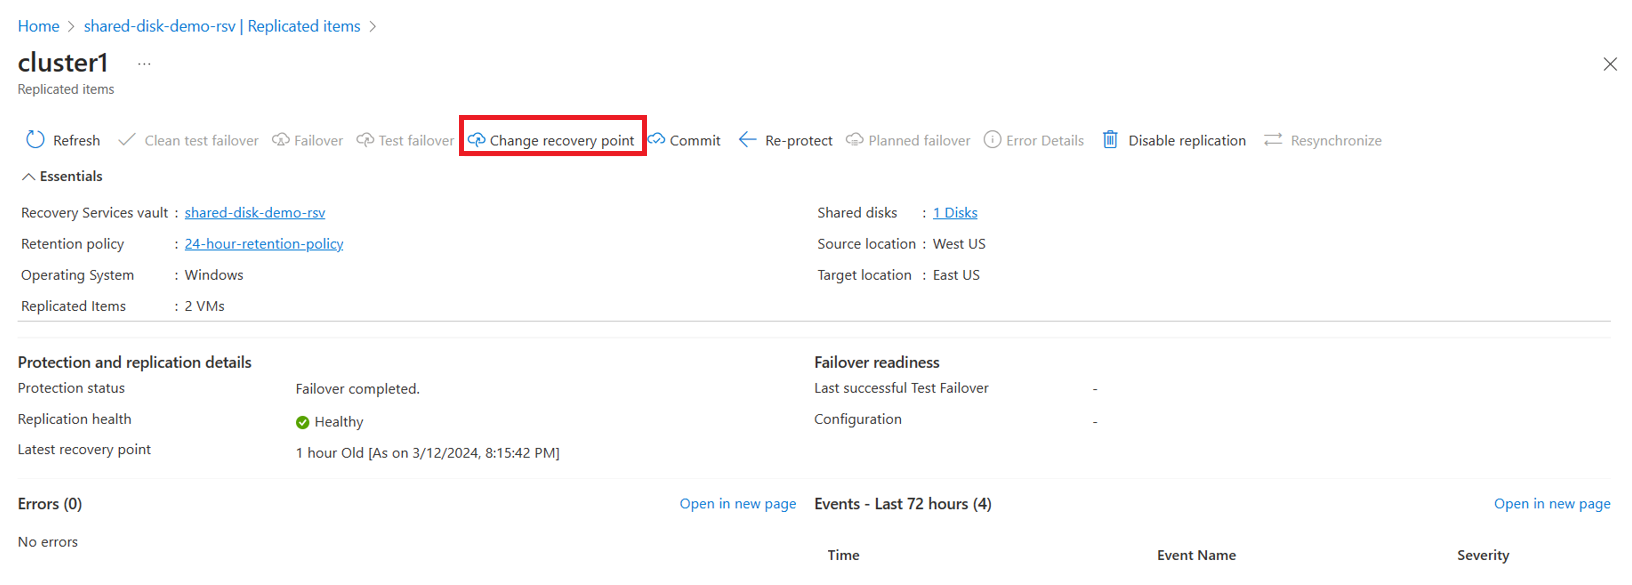
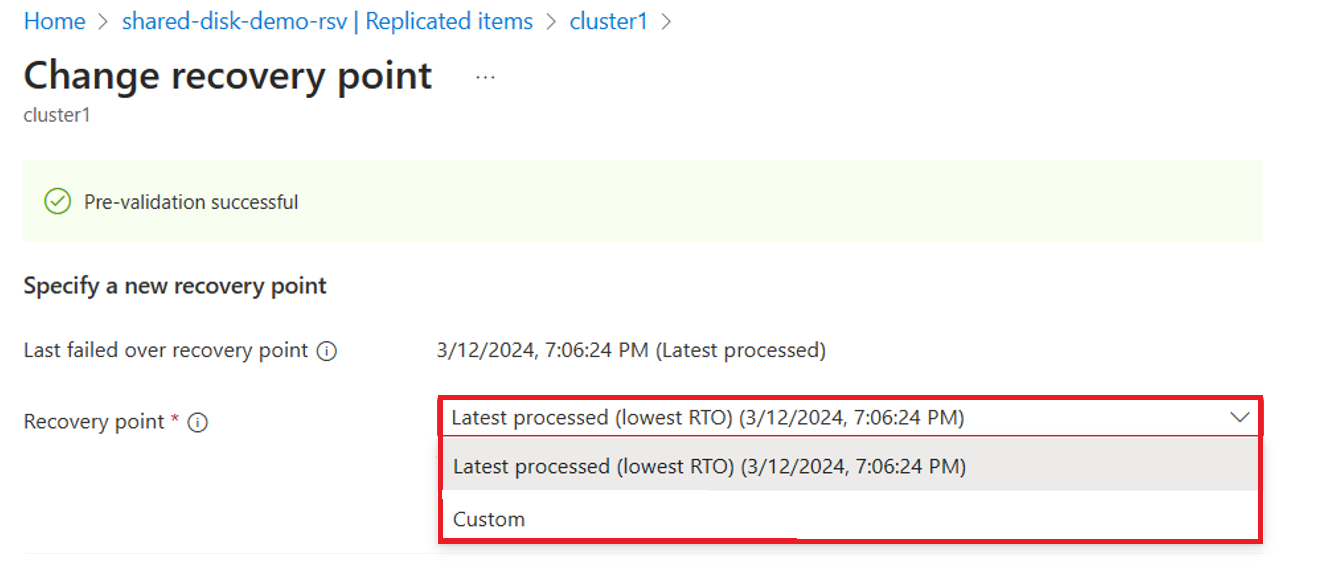
On the Change recovery point page, select either the lowest RTO recovery point or a custom date for the recovery point needed.
Select Change recovery point.
Commit failover
To complete the failover, select Commit on the Overview page. This deletes seed disks with namespace ending in -ASRReplica from the recovery resource group.

Reprotect virtual machines
Before you begin, ensure that:
- The virtual machine status is Failover committed.
- You have access to the primary region and the necessary permissions to create a virtual machine.
To reprotect the virtual machine, follow these steps:
- Navigate to the virtual machine Overview page.
- Select Re-protect to view protection and replication details.
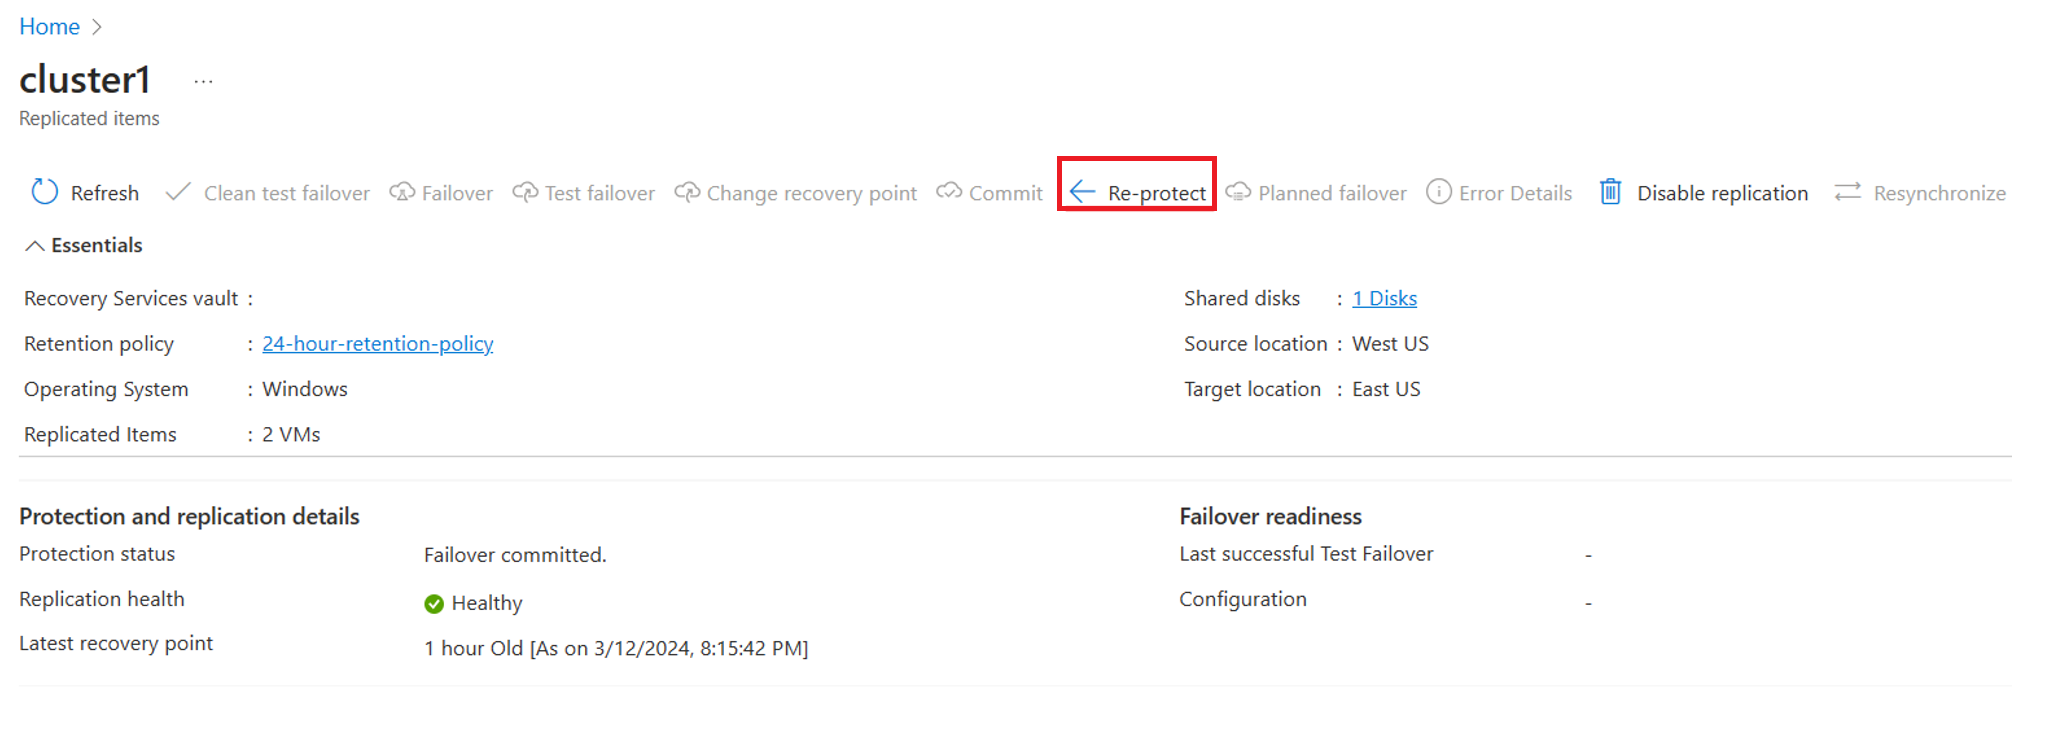
- Review the details and select OK.
Monitor protection
Once the enable replication is in progress, you can view the protected cluster by navigating to the Protected items > Replicated items.
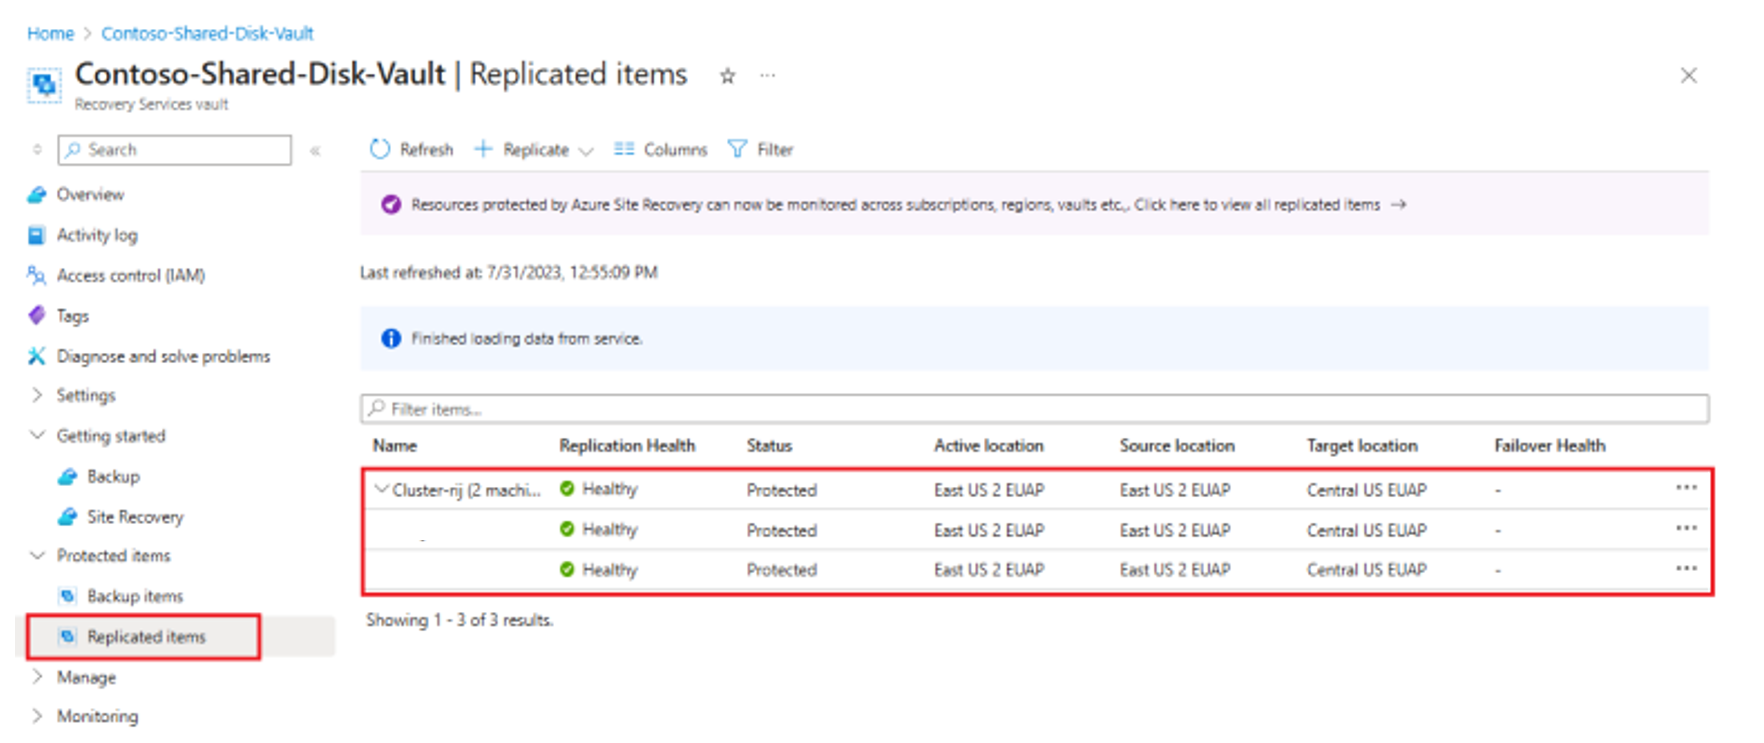
The Replicated items page displays a hierarchical grouping of the clusters with the Cluster Name you provided in the Enable replication step.
From this page, you can monitor the protection of your cluster and its nodes, including the replication health, RPO, and replication status. You can also failover, reprotect, and disable replication actions.
Disable replication
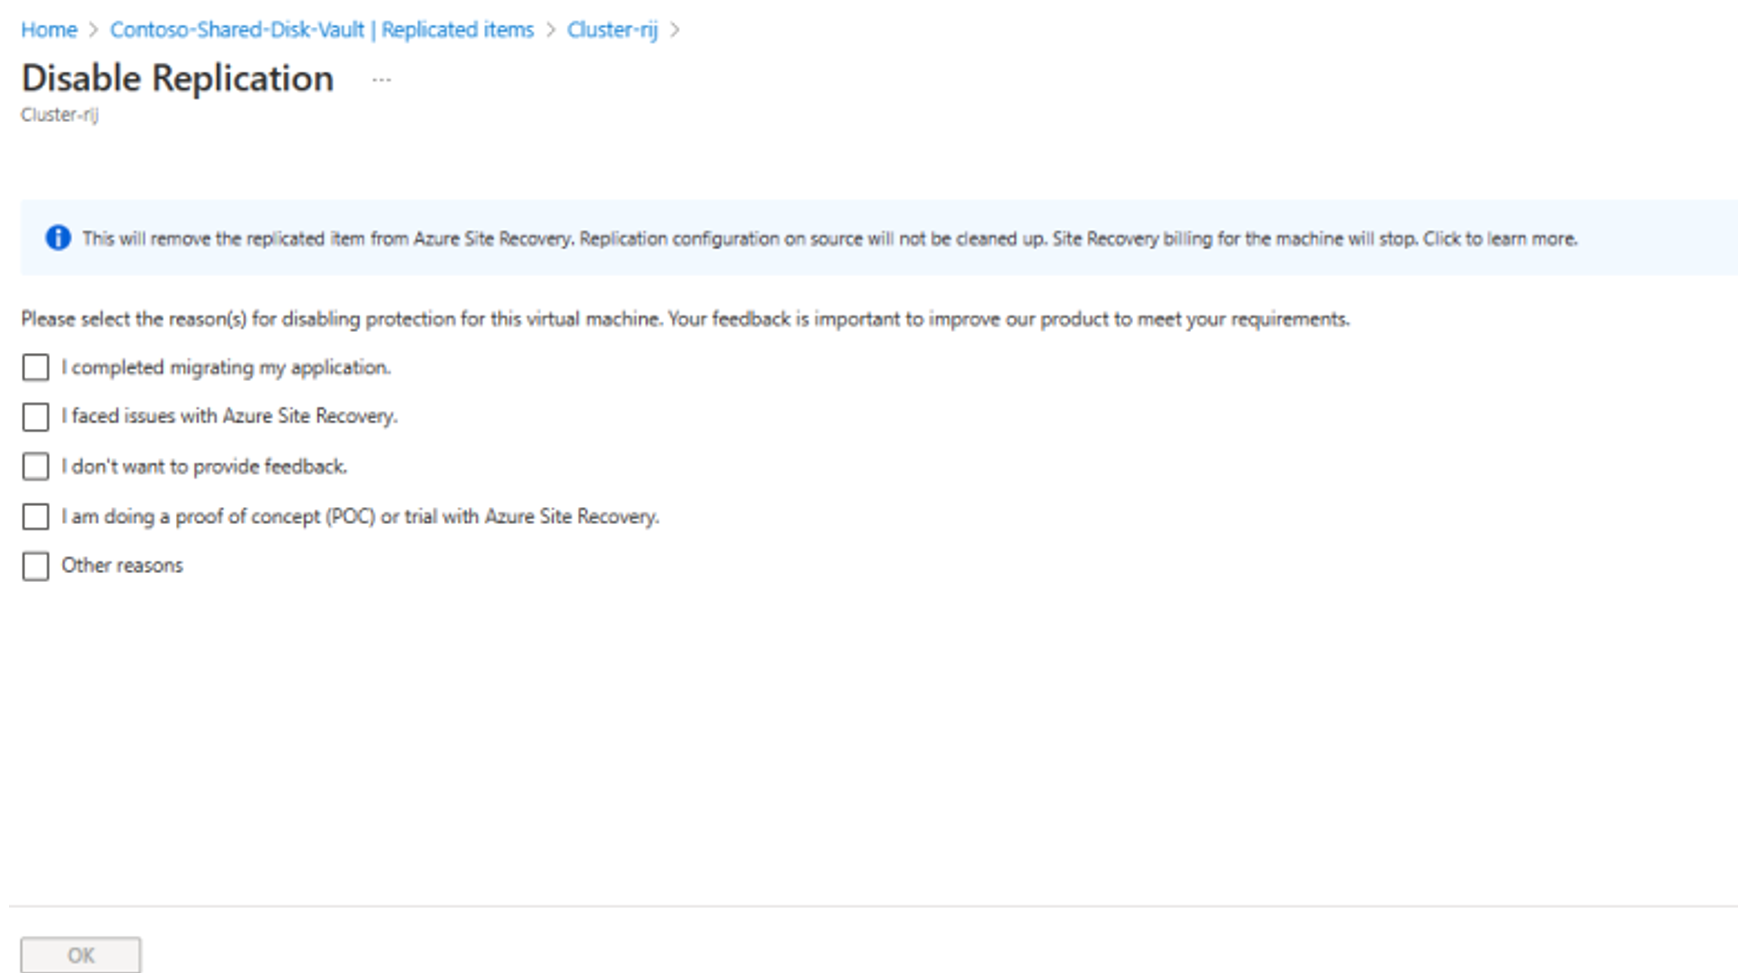
To disable replication of your cluster with Azure Site Recovery, follow these steps:
Select Cluster Monitoring on the virtual machine Overview page.
On the Disable Replication page, select the applicable reason to disable protection.
Select OK.
Commonly asked questions
Does Azure Site Recovery support Linux VMs with shared disks?
No, Azure Site Recovery does not support Linux VMs with shared disks. Only VMs with WSFC-based shared disks are supported.
Is PowerShell supported for Azure Site Recovery with shared disks?
No, PowerShell support for shared disks is currently unavailable.
Can we enable replication for only some of the VMs attached to a shared disk?
No, enable replication can only be enabled successfully when all the VMs attached to a shared disk are selected.
Is it possible to exclude shared disks and enable replication for only some of the VMs in a cluster?
Yes, the first time you don’t select all the VMs in Enable Replication, a warning appears mentioning the unselected VMs attached to the shared disk. If you still proceed, unselect the shared disk replication by selecting ‘No’ for the storage option in Replication Settings tab.
Can new shared disks be added to a protected cluster?
No, if new shared disks need to be added, disable the replication for the already protected cluster. Enable a new cluster protection with a new cluster name for the modified infrastructure.
Can we select both crash-consistent and app-consistent recovery points?
Yes, both types of recovery points are generated. However, during Public Preview only crash-consistent and the Latest Processed recovery points are supported. App-consistent recovery points and Latest recovery point will be available as part of General Availability.
Can we use recovery plans to failover Azure Site Recovery enabled VMs with shared disks?
No, recovery plans are not supported for shared disks in Azure Site Recovery.
Why is there no health status for VMs with shared disks in the monitoring plane, whether test failover is completed or not?
The health status warning due to test failover will be available as part of General Availability.
Next steps
Learn more about:
Feedback
Coming soon: Throughout 2024 we will be phasing out GitHub Issues as the feedback mechanism for content and replacing it with a new feedback system. For more information see: https://aka.ms/ContentUserFeedback.
Submit and view feedback for