Tutorial: Configure Azure Front Door for Azure Static Web Apps
By adding Azure Front Door as the CDN for your static web app, you benefit from a secure entry point for fast delivery of your web applications.
With Static Web Apps, you have two options to integrate with Azure Front Door. You can add Azure Front Door to your static web app by enabling enterprise-grade edge, a managed integration of Azure Front Door with Static Web Apps. Alternatively, you can configure an Azure Front Door resource manually in front of your static web app.
Consider the advantages below to determine which option best suits your needs.
Enterprise-grade edge provides:
- Zero configuration changes
- No downtime
- Automatically managed SSL certifications and custom domains
A manual Azure Front Door setup gives you full control over the CDN configuration including the chance to:
- Limit traffic origin by origin
- Add a web application firewall (WAF)
- Route across multiple applications
- Use more advanced features of Azure Front Door
In this tutorial, you learn to add Azure Front Door to your static web app.
Prerequisites
- Custom domain configured for your static web app with a time to live (TTL) set to less than 48 hrs.
- An application deployed with Azure Static Web Apps that uses the Standard hosting plan.
Enable enterprise-grade edge on the Static Web Apps resource
Go to your static web app in the Azure portal.
Select Enterprise-grade edge in the left menu.
Check the box labeled Enable enterprise-grade edge.
Select Save.
Select OK to confirm the save.
Enabling this feature incurs extra costs.
Prerequisites
- An Azure account with an active subscription. Create an account for free
- An Azure Static Web Apps site. Build your first static web app
- Azure Static Web Apps Standard and Azure Front Door Standard / Premium plans. For more information, see Static Web Apps pricing
- Consider using enterprise-grade edge for faster page loads, enhanced security, and optimized reliability for global applications.
Create an Azure Front Door
Sign in to the Azure portal.
From the home page or the Azure menu, select + Create a resource. Search for Front Door and CDN profiles, and then select Create > Front Door and CDN profiles.
On the Compare offerings page, select Quick create, and then select Continue to create a Front Door.
On the Create a Front Door profile page, enter or select the following settings.
Setting Value Subscription Select your Azure subscription. Resource group Enter a resource group name. This name is often the same group name used by your static web app. Resource group location If you create a new resource group, enter the location nearest you. Name Enter my-static-web-app-front-door. Tier Select Standard. Endpoint name Enter a unique name for your Front Door host. Origin type Select Static Web App. Origin host name Select the host name of your static web app from the dropdown. Caching Check the Enable caching checkbox. Query string caching behavior Select Use Query String Compression Select Enable compression WAF policy Select Create new or select an existing Web Application Firewall policy from the dropdown if you want to enable this feature. Note
When you create an Azure Front Door profile, you must select an origin from the same subscription the Front Door is created in.
Select Review + create, and then select Create. The creation process may take a few minutes to complete.
When deployment completes, select Go to resource.
Disable cache for auth workflow
Note
The cache expiration, cache key query string and origin group override actions are deprecated. These actions can still work normally, but your rule set can't change. Replace these overrides with new route configuration override actions before changing your rule set.
Add the following settings to disable Front Door's caching policies from trying to cache authentication and authorization-related pages.
Add a condition
From your Front Door, under Settings, select Rule set.
Select Add.
In the Rule set name textbox, enter Security.
In the Rule name textbox, enter NoCacheAuthRequests.
Select Add a condition.
Select Request path.
Select the Operator drop-down, and then Begins With.
Select the Edit link above the Value textbox.
Enter
/.authin the textbox, and then select Update.Select no options from the String transform dropdown.
Add an action
Select the Add an action dropdown.
Select Route configuration override.
Select Disabled in the Caching dropdown.
Select Save.
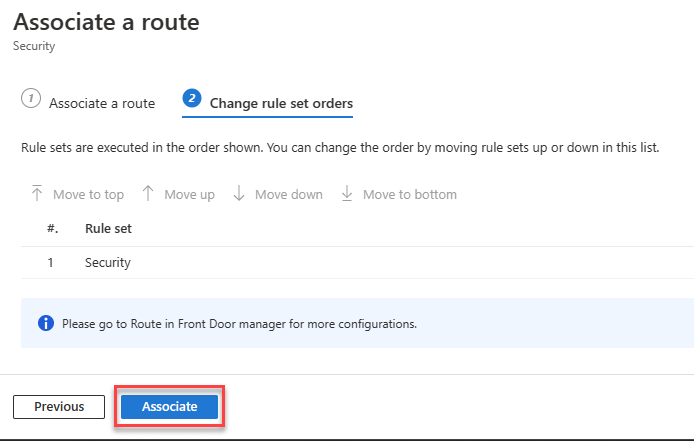
Associate rule to an endpoint
Now that the rule is created, apply the rule to a Front Door endpoint.
From your Front Door, select Rule set, and then the Unassociated link.
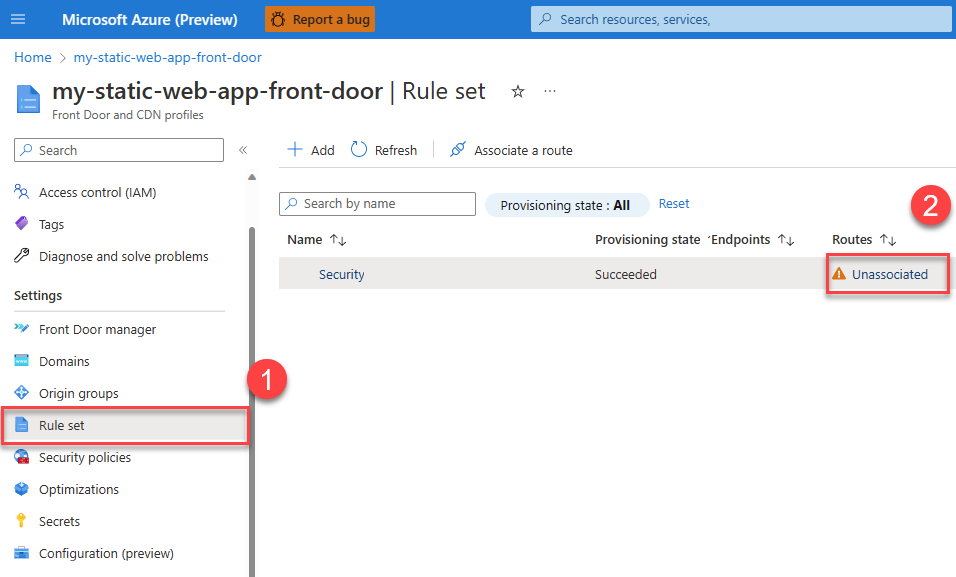
Select the endpoint name to which you want to apply the caching rule, and then select Next.
Select Associate.
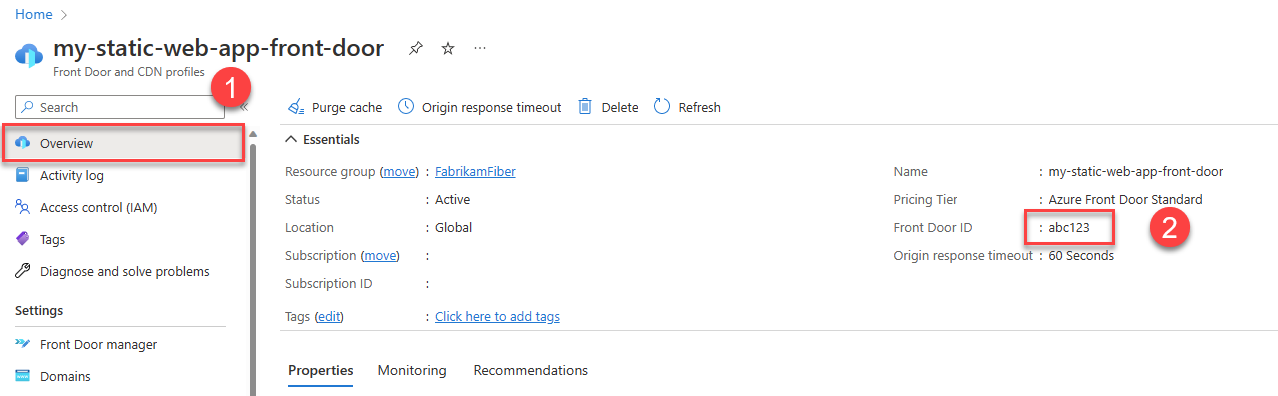
Copy Front Door ID
Use the following steps to copy the Front Door instance's unique identifier.
From your Front Door, select the Overview link on the left-hand navigation.
Copy the value labeled Front Door ID and paste it into a file for later use.
Update static web app configuration
To complete the integration with Front Door, you need to update the application configuration file to do the following functions:
- Restrict traffic to your site only through Front Door
- Restrict traffic to your site only from your Front Door instance
- Define which domains can access your site
- Disable caching for secured routes
Open the staticwebapp.config.json file for your site and make the following changes.
Restrict traffic to only use Front Door by adding the following section to the configuration file:
"networking": {
  "allowedIpRanges": ["AzureFrontDoor.Backend"]
}
To define which Azure Front Door instances and domains can access your site, add the
forwardingGatewaysection."forwardingGateway": { "requiredHeaders": { "X-Azure-FDID" : "<YOUR-FRONT-DOOR-ID>" }, "allowedForwardedHosts": [ "my-sitename.azurefd.net" ] }First, configure your app to only allow traffic from your Front Door instance. In every backend request, Front Door automatically adds an
X-Azure-FDIDheader that contains your Front Door instance ID. By configuring your static web app to require this header, it restricts traffic exclusively to your Front Door instance. In theforwardingGatewaysection in your configuration file, add therequiredHeaderssection and define theX-Azure-FDIDheader. Replace<YOUR-FRONT-DOOR-ID>with the Front Door ID you set aside earlier.Next, add the Azure Front Door hostname (not the Azure Static Web Apps hostname) into the
allowedForwardedHostsarray. If you have custom domains configured in your Front Door instance, also include them in this list.In this example, replace
my-sitename.azurefd.netwith the Azure Front Door hostname for your site.For all secured routes in your app, disable Azure Front Door caching by adding
"Cache-Control": "no-store"to the route header definition.{ ... "routes": [ { "route": "/members", "allowedRoles": ["authenticated", "members"], "headers": { "Cache-Control": "no-store" } } ] ... }
With this configuration, your site is no longer available via the generated *.azurestaticapps.net hostname, but exclusively through the hostnames configured in your Front Door instance.
Considerations
Custom domains: Now that Front Door is managing your site, you no longer use the Azure Static Web Apps custom domain feature. Azure Front Door has a separate process for adding a custom domain. Refer to Add a custom domain to your Front Door. When you add a custom domain to Front Door, you'll need to update your static web app configuration file to include it in the
allowedForwardedHostslist.Traffic statistics: By default, Azure Front Door configures health probes that may affect your traffic statistics. You may want to edit the default values for the health probes.
Serving old versions: When you deploy updates to existing files in your static web app, Azure Front Door may continue to serve older versions of your files until their time-to-live expires. Purge the Azure Front Door cache for the affected paths to ensure the latest files are served.
Clean up resources
If you no longer want to use the resources created in this tutorial, delete the Azure Static Web Apps and Azure Front Door instances.
Next steps
Feedback
Coming soon: Throughout 2024 we will be phasing out GitHub Issues as the feedback mechanism for content and replacing it with a new feedback system. For more information see: https://aka.ms/ContentUserFeedback.
Submit and view feedback for