Note
Access to this page requires authorization. You can try signing in or changing directories.
Access to this page requires authorization. You can try changing directories.
A directory extension adds an attribute to the Microsoft Entra schema that Microsoft Entra ID owns. When you provision from Microsoft Entra ID to Active Directory, you can put that attribute to two uses: decide which objects are provisioned, or carry a value into an Active Directory attribute. Both uses work for users and for groups.
This article walks through one example of each. Select the Groups or Users tab in each step to follow the example you want. Your selection carries through the rest of the article.
| Tab | Example | Use |
|---|---|---|
| Groups | WritebackEnabled |
Provision only the groups whose extension value is true. |
| Users | EmployeeCode |
Write the extension value into an Active Directory user attribute. |
For background on directory extensions, see Directory extensions for provisioning Microsoft Entra ID to Active Directory. For the general mapping interface and expression syntax, see Configure provisioning to Active Directory.
Note
Microsoft Entra ID provides a built-in isWritebackEnabled property on groups that you can set through Microsoft Graph. You can filter on that property directly by using attribute value filtering, so you don't need a custom extension attribute to control which groups are written back. Use the steps in this article when you need to scope on a value that the built-in property doesn't cover.
Groups support attribute mapping as well. For a group whose Source of Authority is converted to Microsoft Entra ID, the GroupDN extension preserves the original organizational unit and common name. To create that extension, see Preserve a group's organizational unit and name. For the expression that reads it, see Preserve a group's original organizational unit.
Before you begin
Both examples need the same starting point:
- A working environment that synchronizes users to Microsoft Entra ID.
- A healthy provisioning agent connected to the target Active Directory domain.
- A Microsoft Entra ID to Active Directory configuration, or permission to create one.
Each example then needs its own objects.
This example uses the following environment:
- Four synchronized users: Britta Simon, Lola Jacobson, Anna Ringdahl, and John Smith.
- Three organizational units in Active Directory: Sales, Marketing, and Groups.
- The Britta Simon and Anna Ringdahl user accounts reside in the Sales OU.
- The Lola Jacobson and John Smith user accounts reside in the Marketing OU.
- The Groups OU is where groups from Microsoft Entra ID are provisioned.
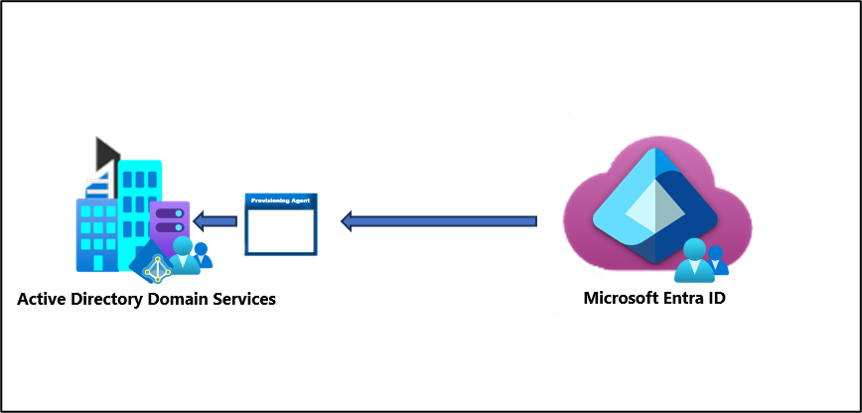
You can use the environment you create in this article for testing or for getting more familiar with cloud sync.
Tip
For a better experience executing Microsoft Graph PowerShell SDK cmdlets, use Visual Studio Code with ms-vscode.powershell extension in ISE Mode.
Install and connect Microsoft Graph PowerShell SDK
If not yet installed, follow Microsoft Graph PowerShell SDK documentation to install the main modules of Microsoft Graph PowerShell SDK:
Microsoft.Graph.Open PowerShell with Administrative privileges.
To set the execution policy, run (press [A] Yes to all when prompted):
Set-ExecutionPolicy -ExecutionPolicy RemoteSigned -Scope CurrentUserConnect to your tenant (be sure to accept on-behalf of when signing in):
Connect-MgGraph -Scopes "Directory.ReadWrite.All", "Application.ReadWrite.All", "User.ReadWrite.All", "Group.ReadWrite.All"Important
Authenticate interactively. Don't put account passwords in scripts.
Create the CloudSyncCustomExtensionsApp application and service principal
Both examples store their extension on the same application, so you only need to do this once.
Important
Directory extension for Microsoft Entra Cloud Sync is only supported for applications with the identifier URI api://<tenantId>/CloudSyncCustomExtensionsApp and the Tenant Schema Extension App created by Microsoft Entra Connect.
Get the Tenant ID:
$tenantId = (Get-MgOrganization).Id
$tenantId
Note
This outputs your current Tenant ID. You can confirm this Tenant ID by navigating to Microsoft Entra admin center > Entra ID > Overview.
Using the
$tenantIdvariable from the previous step, check to see if the CloudSyncCustomExtensionsApp exists.$cloudSyncCustomExtApp = Get-MgApplication -Filter "identifierUris/any(uri:uri eq 'api://$tenantId/CloudSyncCustomExtensionsApp')" $cloudSyncCustomExtAppIf a CloudSyncCustomExtensionsApp exists, skip to the next step. Otherwise, create the new CloudSyncCustomExtensionsApp app:
$cloudSyncCustomExtApp = New-MgApplication -DisplayName "CloudSyncCustomExtensionsApp" -IdentifierUris "api://$tenantId/CloudSyncCustomExtensionsApp"
$cloudSyncCustomExtApp
Check if the CloudSyncCustomExtensionsApp application has a service principal associated. If you just created a new app, skip to the next step.
Get-MgServicePrincipal -Filter "AppId eq '$($cloudSyncCustomExtApp.AppId)'"If you just created a new app, or a service principal isn't returned, create a service principal for CloudSyncCustomExtensionsApp:
New-MgServicePrincipal -AppId $cloudSyncCustomExtApp.AppId
Note
Creating a directory extension in Microsoft Entra ID doesn't require a provisioning agent restart. Restart the agent only when it needs to discover a newly added Active Directory schema attribute.
Prepare the objects to provision
Create two groups in Microsoft Entra ID. One group is Sales and the other is Marketing.
- Sign in to the Microsoft Entra admin center as at least a Hybrid Identity Administrator.
- Browse to Entra ID > Groups > All groups.
- At the top, select New group.
- Make sure the Group type is set to security.
- For the Group Name, enter Sales.
- For Membership type, keep it at assigned.
- Select Create.
- Repeat this process using Marketing as the Group Name.
Now add users to the groups you created.
- Browse to Entra ID > Groups > All groups.
- At the top, in the search box, enter Sales.
- Select the new Sales group.
- On the left, select Members.
- At the top, select Add members.
- Put a check next to Britta Simon and Anna Ringdahl, and then select Select.
- On the far left, select All groups and repeat this process using the Marketing group, adding Lola Jacobson and John Smith.
Note
When adding users to the Marketing group, make note of the group ID on the overview page. This ID is used later to add the newly created property to the group.
Create the directory extension
Tip
This example creates a custom extension attribute called WritebackEnabled to use in a Microsoft Entra Cloud Sync scoping filter, so that only groups with WritebackEnabled set to true are written back to on-premises Active Directory. It works similarly to the built-in isWritebackEnabled property described earlier in this article.
Under the CloudSyncCustomExtensionsApp, create the extension attribute and assign it to Group objects:
New-MgApplicationExtensionProperty -ApplicationId $cloudSyncCustomExtApp.Id -Name 'WritebackEnabled' -DataType 'Boolean' -TargetObjects 'Group'
This cmdlet creates an extension attribute that looks like extension_<AppIdWithoutHyphens>_WritebackEnabled.
Set the extension value
Set a value on the newly created property for the Marketing group.
Get the extension property:
$gwbEnabledExtAttrib = Get-MgApplicationExtensionProperty -ApplicationId $cloudSyncCustomExtApp.Id |
    Where-Object {$_.Name -Like '*WritebackEnabled'} | Select-Object -First 1
$gwbEnabledExtName = $gwbEnabledExtAttrib.Name
Get the
Marketinggroup:$marketingGrp = Get-MgGroup -ConsistencyLevel eventual -Filter "DisplayName eq 'Marketing'"Set the value
Truefor the Marketing group:Update-MgGroup -GroupId $marketingGrp.Id -AdditionalProperties @{$gwbEnabledExtName = $true}To confirm, read the property value:
$marketingGrp = Get-MgGroup -ConsistencyLevel eventual -Filter "DisplayName eq 'Marketing'" -Property Id,$gwbEnabledExtName
$marketingGrp.AdditionalProperties.$gwbEnabledExtName
Set the extension value by using Microsoft Graph Explorer
You can set the value through Microsoft Graph Explorer instead of PowerShell. Make sure you consented to the required permission by selecting Modify permissions.
Navigate to Microsoft Graph Explorer and consent to
Group.ReadWrite.All.Sign in using your tenant administrator account. A Hybrid Identity Administrator account was used to create this scenario and might be sufficient.
At the top, change GET to PATCH.
In the address box, enter
https://graph.microsoft.com/v1.0/groups/<Group Id>.In the request body, enter:
{
  "extension_<AppIdWithoutHyphens>_WritebackEnabled": true
}
Select Run query.
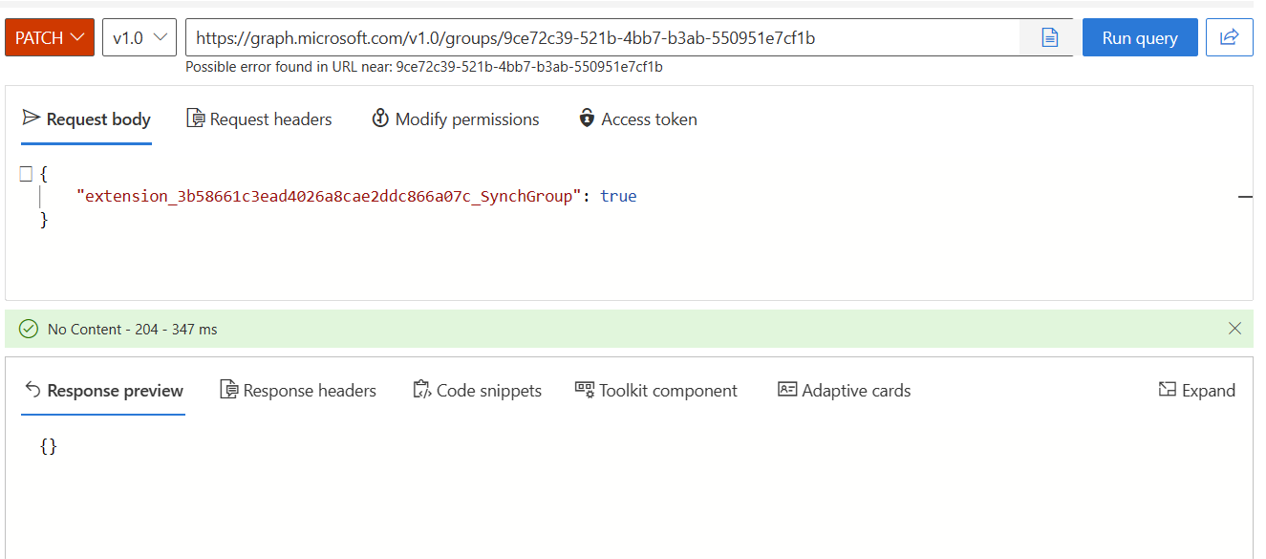
If done correctly, you see
[].At the top, change PATCH to GET and look at the properties of the Marketing group. Select Run query. You should see the newly created attribute.
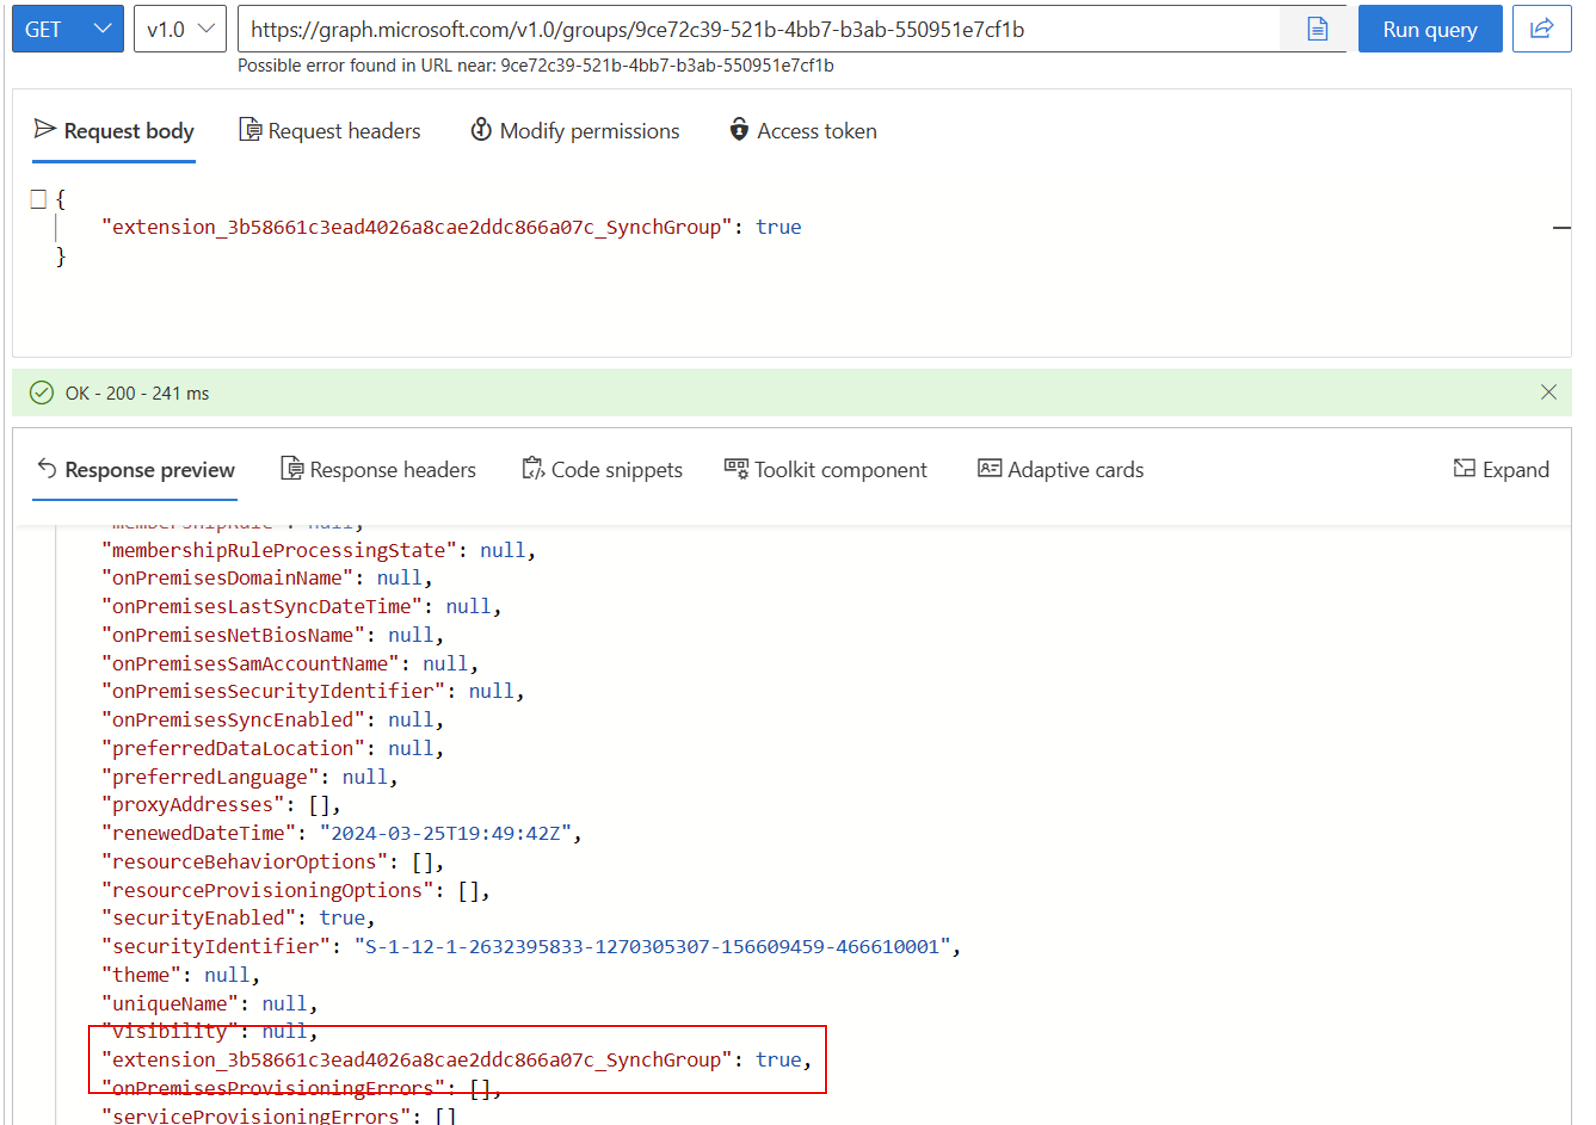
Use the extension in your cloud sync configuration
Sign in to the Microsoft Entra admin center as at least a Hybrid Identity Administrator.
Browse to Entra ID > Entra Connect > Cloud sync.
Select New configuration.
Select Microsoft Entra ID to AD sync.
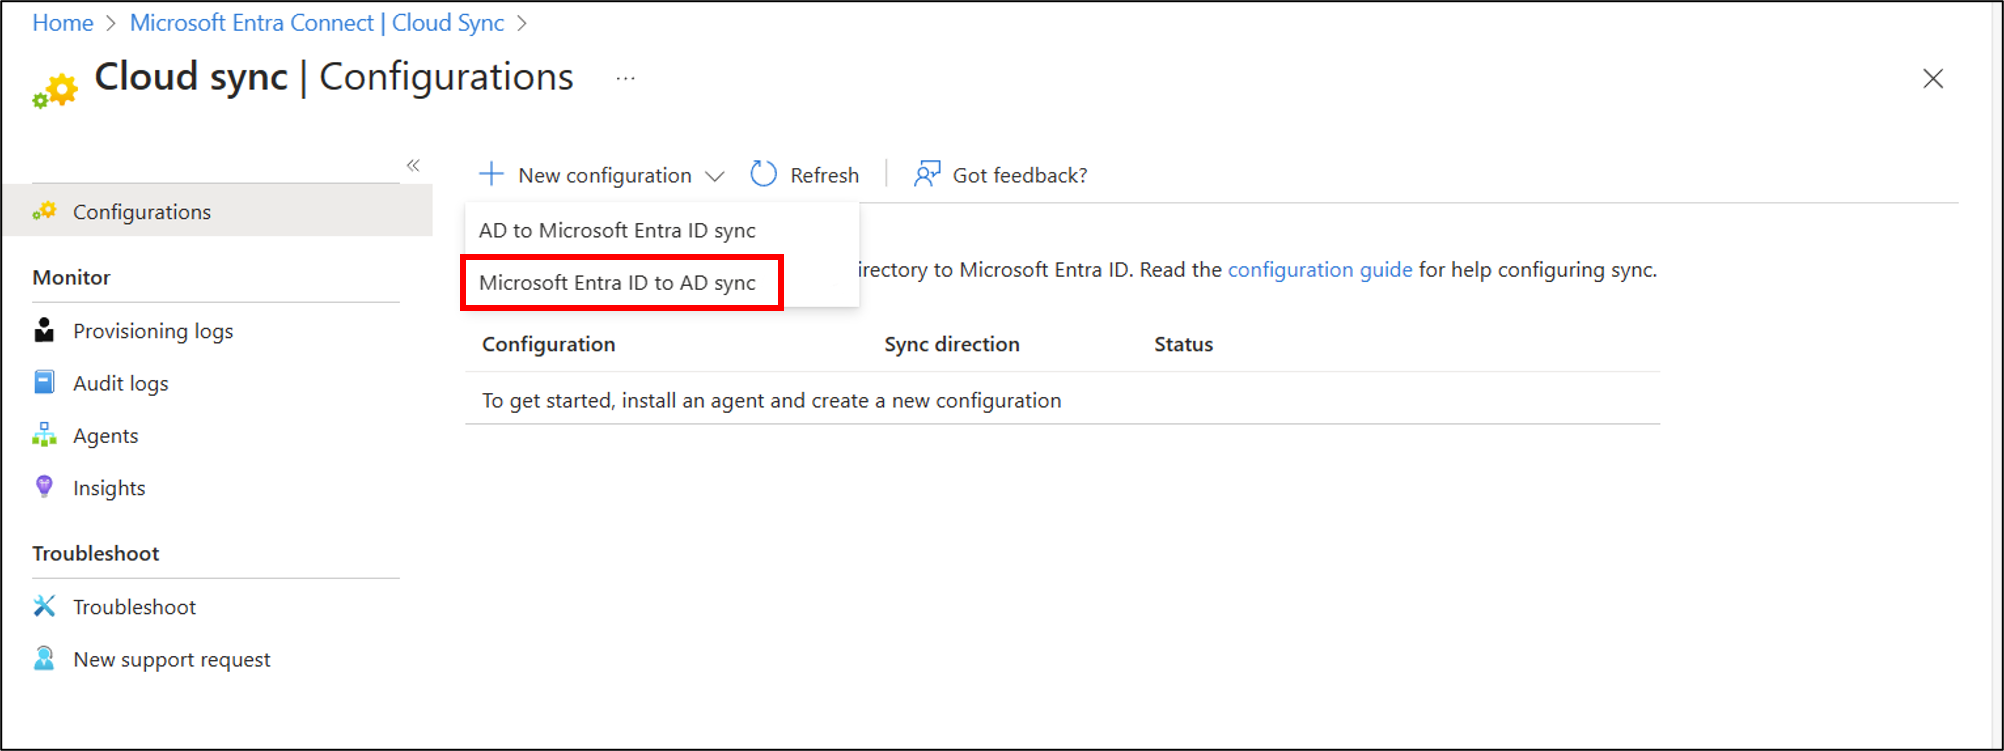
On the configuration screen, select your domain. Select Create.
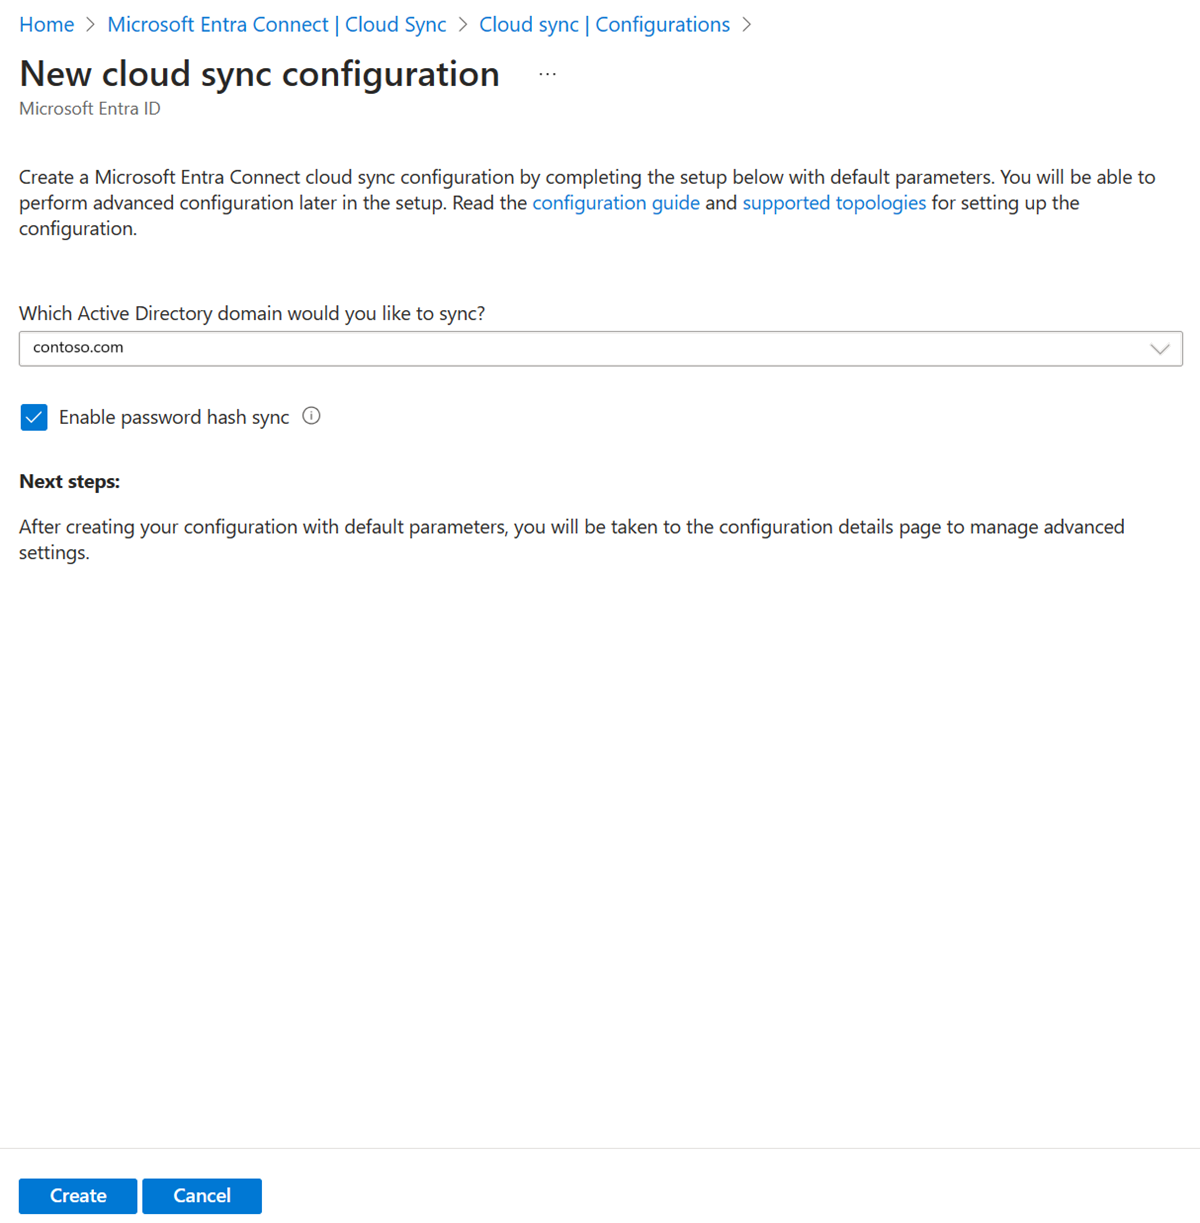
The Get started screen opens. From here, you can continue configuring cloud sync.
On the left, select Scoping filters, then select Group scope > All groups.
Select Edit attribute mapping and change the Target Container to
OU=Groups,DC=Contoso,DC=com. Select Save.Select Add Attribute scoping filter.
Type a name for the scoping filter:
Filter groups with Writeback Enabled.Under Target Attribute, select the newly created attribute that looks like
extension_<AppIdWithoutHyphens>_WritebackEnabled.Important
Some of the target attributes displayed in the dropdown list might not be usable as a scoping filter because not all properties can be managed in Microsoft Entra ID, for example
extensionAttribute[1-15]. That's why we recommend creating a custom extension property for this purpose.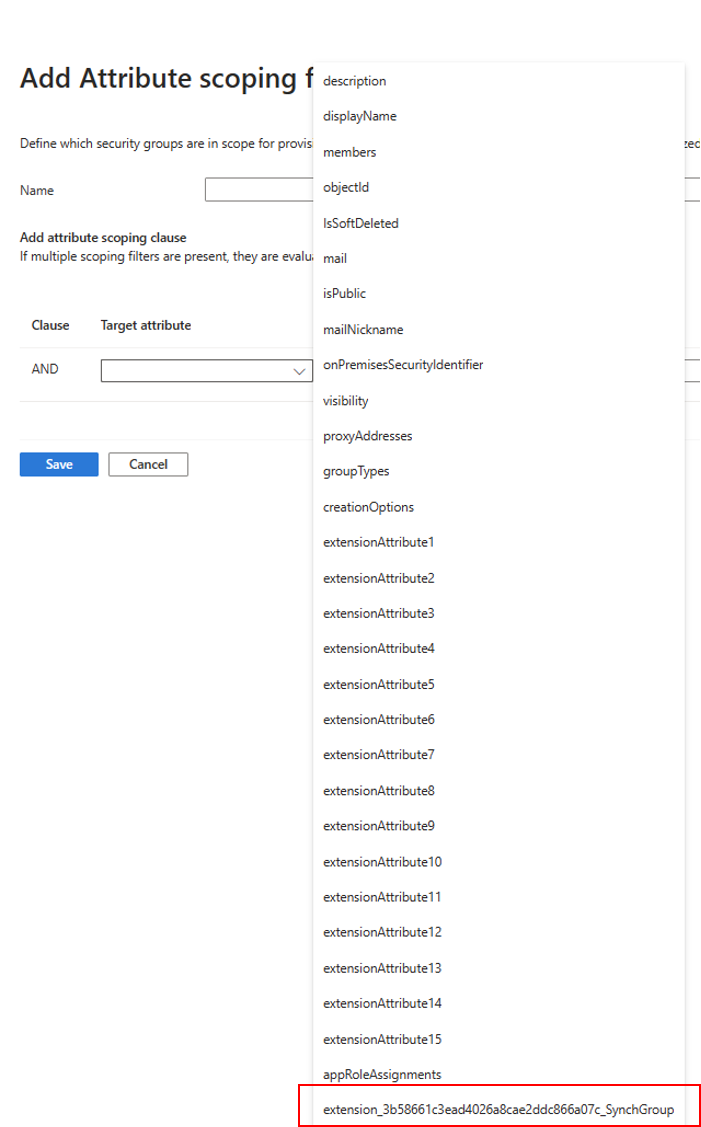
Under Operator, select IS TRUE.
Select Save, and then select Save.
Leave the configuration disabled and come back to it.
Test and verify
Note
When using on-demand provisioning, members aren't automatically provisioned. You need to select which members you wish to test on, and there's a five member limit.
Sign in to the Microsoft Entra admin center as at least a Hybrid Identity Administrator.
Browse to Entra ID > Entra Connect > Cloud sync.
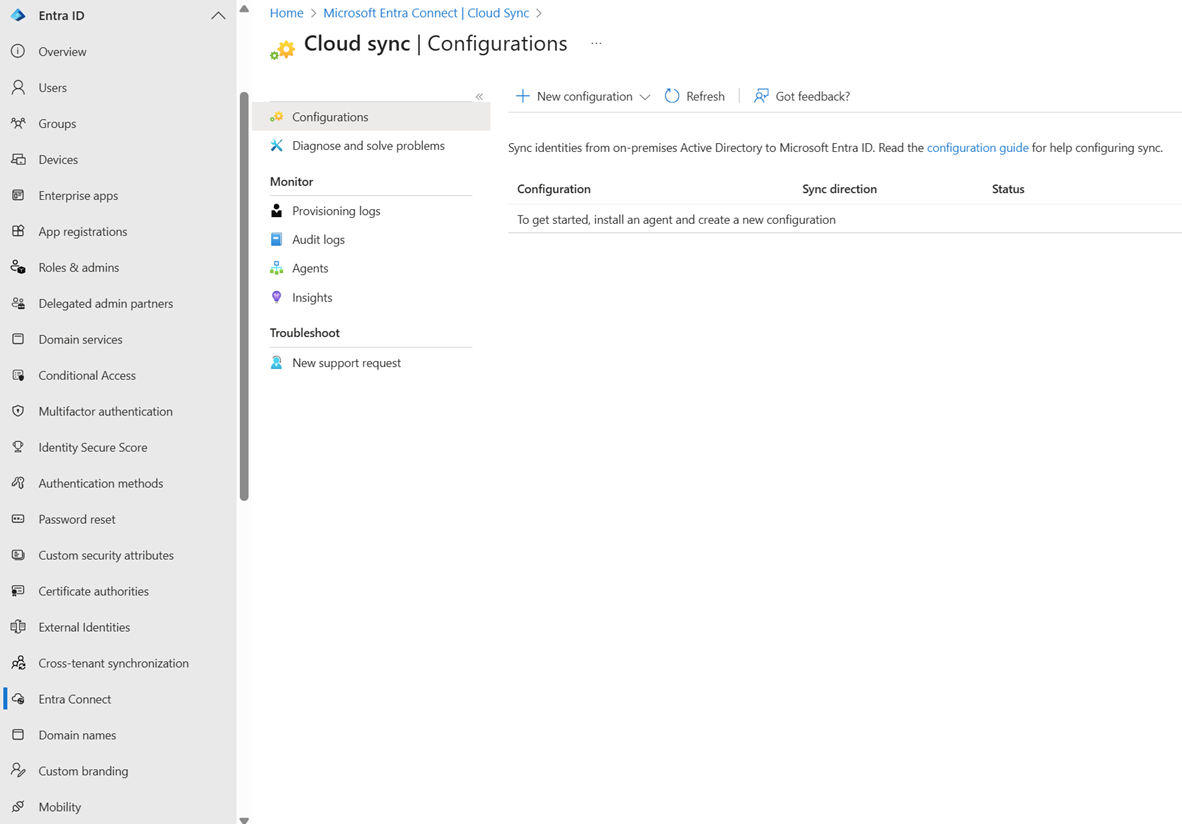
Under Configuration, select your configuration.
On the left, select Provision on demand.
Enter Marketing in the Selected group box.
From the Selected users section, select Lola Jacobson and John Smith.
Select Provision. It should successfully provision.
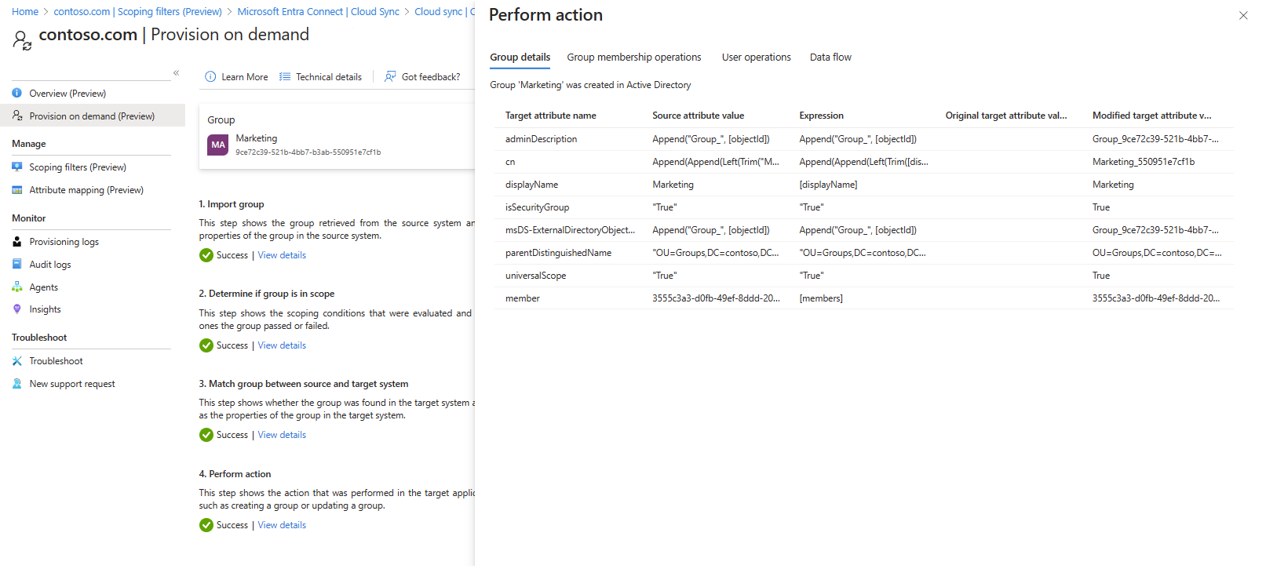
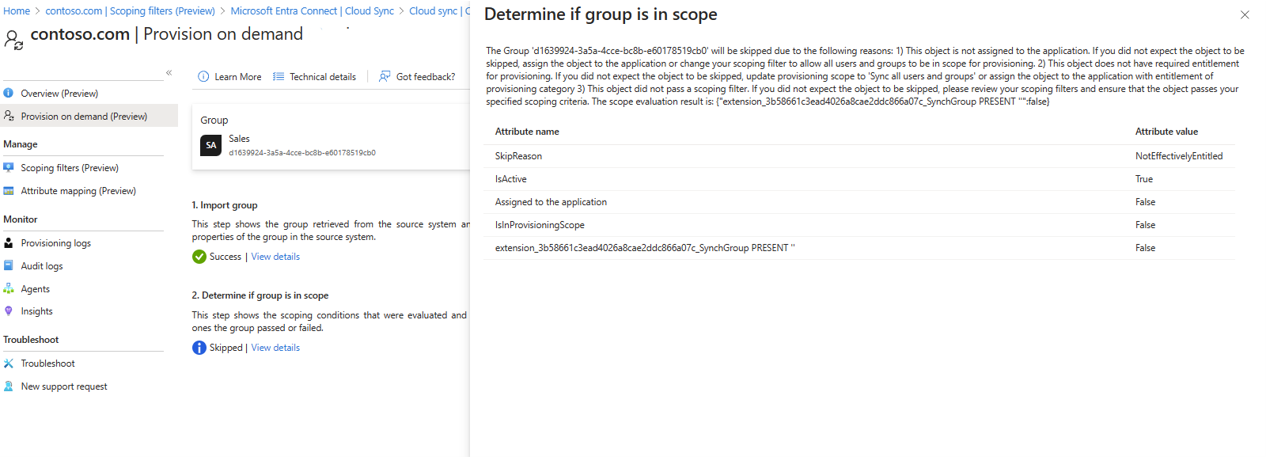
Now try with the Sales group and add Britta Simon and Anna Ringdahl. This shouldn't provision, because the Sales group doesn't have the extension value set.
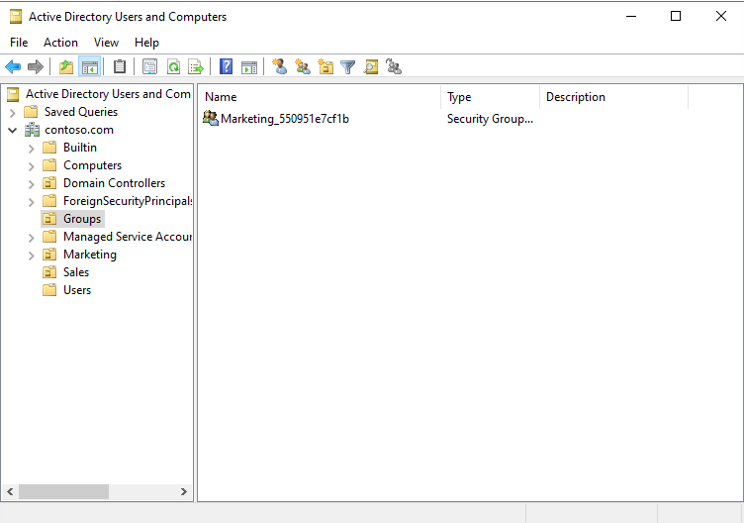
In Active Directory, you should see the newly created Marketing group.
You can now browse to Entra ID > Entra Connect > Cloud sync > Overview to review and enable your configuration and start synchronizing.
Directory extensions on users converted from Active Directory
When you convert a user's Source of Authority to Microsoft Entra ID, the attributes that Active Directory previously owned must already be visible in Microsoft Entra ID, either as directory attributes or as directory schema extensions. For the full list of preconditions, see Prepare your environment to convert user Source of Authority.
That means a converted user usually already has the extension values it needs, so you don't create new extensions for those attributes. Instead, you map from the extensions that already hold the values.
Extensions created by Microsoft Entra Connect live on the Tenant Schema Extension App, which is supported as a mapping source alongside CloudSyncCustomExtensionsApp. Add the mapping the same way as in the Users tab, selecting the existing extension as the source attribute. Converting Source of Authority doesn't require you to re-register or recreate the extension.