Exchange Server: Turn off access to the Exchange admin center
The Exchange admin center (EAC) is the primary management interface for Exchange 2013 or later. For more information, see Exchange admin center in Exchange Server. By default, access to the EAC isn't restricted, and access to Outlook on the web (formally known as Outlook Web App) on an on an Internet-facing Exchange server also gives access to the EAC. You still need valid credentials to sign in to the EAC, but organizations may want to restrict access to the EAC for client connections from the Internet.
In Exchange Server 2019, you can use Client Access Rules to block client access to the EAC. For more information, see Client Access Rules in Exchange Server.
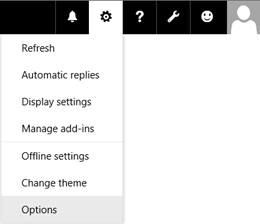
The EAC virtual directory is named ECP, and is managed by the *- ECPVirtualDirectory cmdlets. When you set the AdminEnabled parameter to the value $false on the EAC virtual directory, you disable access to the EAC for internal and external client connections, without affecting access to the Settings > Options page in Outlook on the web.
But, this configuration introduces a new problem: access to the EAC is completely disabled on the server, even for administrators on the internal network. To fix this issue, you have two choices:
Configure a second Exchange server that's only accessible from the internal network to handle internal EAC connections.
On the existing Exchange server, create a new Internet Information Services (IIS) web site with new virtual directories for the EAC and Outlook on the web that's only accessible from the internal network.
Note: You need to configure the EAC and Outlook on the web in the new web site, because the EAC requires the Outlook on the web authentication module from the same web site.
What do you need to know before you begin?
Estimated time to complete each procedure: 5 minutes.
You need to be assigned permissions before you can perform this procedure or procedures. To see what permissions you need, see the "Exchange admin center connectivity" entry in the Exchange infrastructure and PowerShell permissions topic.
For information about keyboard shortcuts that may apply to the procedures in this topic, see Keyboard shortcuts in the Exchange admin center.
Tip
Having problems? Ask for help in the Exchange forums. Visit the forums at: Exchange Server, Exchange Online, or Exchange Online Protection.
Step 1: Use the Exchange Management Shell to disable access to the EAC
Remember, this step disables access to the EAC on the server for internal and external connections, but still allows users to access their own Settings > Options page in Outlook on the web.
To disable access to the EAC on an Exchange server, use the following syntax:
Set-ECPVirtualDirectory -Identity "<Server>\ecp (Default Web Site)" -AdminEnabled $false
This example turns disables access to the EAC on the server named MBX01.
Set-ECPVirtualDirectory -Identity "MBX01\ecp (Default Web Site)" -AdminEnabled $false
How do you know this step worked?
To verify that you've disabled access to the EAC on the server, replace <Server> with the name of your Exchange server, and run the following command to verify the value of the AdminEnabled property:
Get-ECPVirtualDirectory -Identity "MBX01\ecp (Default Web Site)" | Format-List AdminEnabled
When you open https://<servername>/ecp or from the internal network, your own Settings > Options page in Outlook on the web opens instead of the EAC.
Step 2: Give access to the EAC on the internal network
Choose either of the following options.
Option 1: Configure a second Exchange server that's only accessible from the internal network
The default value of the AdminEnabled property is True on the default EAC virtual directory. To confirm this value on the second server, replace <Server> with the name of the server, and run the following command:
Get-ECPVirtualDirectory -Identity "<Server>\ecp (Default Web Site)" | Format-List AdminEnabled
If the value is False, replace <Server> with the name of the server, and run the following command:
Set-ECPVirtualDirectory -Identity "<Server>\ecp (Default Web Site)" -AdminEnabled $true
Option 2: Create a new web site on the existing Exchange server, and configure the EAC and Outlook on the web in the new web site for the internal network
The required steps are:
Add a second IP address to the Exchange server.
Create a new web site in IIS that uses the second IP address, and assign file and folder permissions.
Copy the contents of the default web sites to the new web site.
Create new EAC and Outlook on the web virtual directories for the new web site.
Restart IIS for the changes to take effect.
Important
When you install an Exchange Server Cumulative Update (CU), the CU won't update files in the new web site and virtual directories. After you apply the CU, you need to completely remove the new web site, virtual directories, and content in the folders and then re-create the new web site, virtual directories, and content in the folders.
Step 2a: Add a second IP address to the Exchange server
You can add a second network adapter and assign the IP address to the second network adapter, or you can assign a second IP address to the existing network adapter.
The steps to assign a second IP address to the existing network adapter are described below.
Open the properties of the network adapter. For example:
a. From a Command Prompt window, the Exchange Management Shell, or the Run dialog, run
ncpa.cpl.b. Right-click on the network adapter, and then choose Properties.
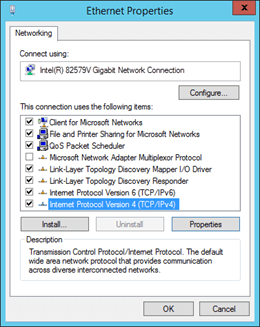
In the properties of the network adapter, select Internet Protocol Version 4 (TCP/IPv4), and then click Properties.
In the Internet Protocol Version 4 (TCP/IPv4) Properties window that opens, on the General tab, click Advanced.
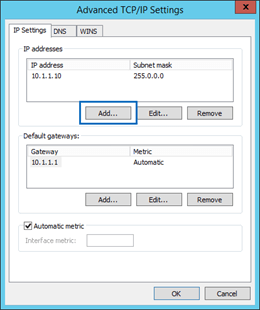
In the Advanced TCP/IP Settings window that opens, on the IP Settings tab, in the IP addresses section, click Add and enter the IP address.
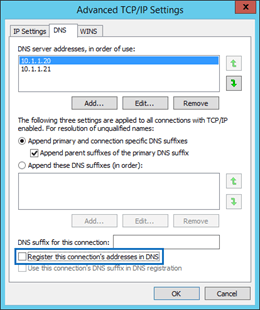
Note: If you add a second network adapter, in the Advanced TCP/IP Settings window, on the DNS tab, un-check Register this connection's address in DNS.
Step 2b: Create a new web site in IIS that uses the second IP address, and assign file and folder permissions
Open IIS Manager on the Exchange server. An easy way to do this in Windows Server 2012 or later is to press Windows key + Q, type inetmgr, and select Internet Information Services (IIS) Manager in the results.
In the Connections pane, expand the server, select Sites, and in the Actions pane, click Add Website.

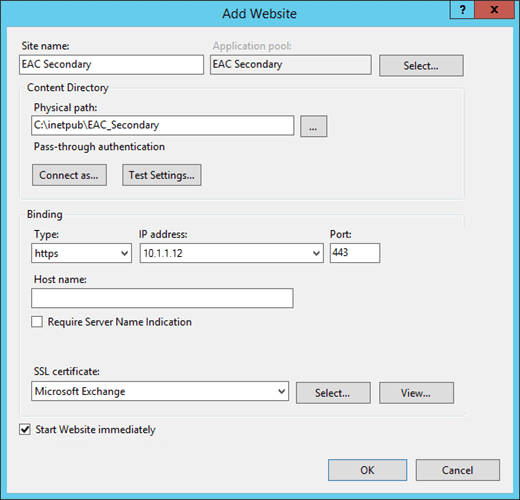
In the Add Website window that appears, configure the following settings:
Site name:
EAC_SecondaryPhysical path:
C:\inetpub\EAC_SecondaryBinding
Type: https
IP address: Select the second IP address that you added in the previous step.
Port: 443
SSL certificate: Choose the certificate that you want to use (for example, the default Exchange certificate named Microsoft Exchange).
When you're finished, click OK.
Create
ecpandowafolders inC:\inetpub\EAC_Secondary.a. In IIS Manager, select the
EAC_Secondaryweb site, and in the Actions pane, click Explore.
b. In the File Explorer window that opens, create the following folders in
C:\inetpub\EAC_Secondary:ecpowa
When you're finished, close File Explorer.
Assign Read & Execute permissions to the local security group named IIS_IUSRS on the
C:\inetpub\EAC_Secondaryfolder.a. In IIS Manger, select the
EAC_Secondaryweb site, and in the Actions pane, click Edit Permissions.b. In the EAC_Secondary Properties window that opens, click the Security tab, and then click Edit.
c. In the Permissions for EAC_Secondary window that opens, click Add.
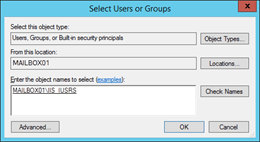
d. In the Select Users, Computers, Service Accounts or Groups window that opens, perform the following steps:
i. Click Locations, and in the Locations dialog box that opens, select the local server, and then click OK.
ii. In the Enter the object names to select field, type IIS_IUSRS, click Check Names, and then click OK.
e. Back on the Permissions for EAC_Secondary window, select IIS_IUSRS, and in the Allow column, select Read & Execute (which automatically selects the List Folder Contents and Read permissions), and then click OK twice.
Step 2c: Copy the contents of the default web sites to the new web site
Copy all files and folders from the Default Web Site (
C:\inetpub\wwwroot) toC:\inetpub\EAC_Secondary. You can skip the following files that can't be copied:MacCertification.asmxMobileDeviceCertification.asmxdecomission.asmxeditissuancelicense.asmx
Copy all files and folders from
%ExchangeInstallPath%FrontEnd\HttpProxy\ecptoC:\inetpub\EAC_Secondary\ecp.Copy all files and folders from
%ExchangeInstallPath%FrontEnd\HttpProxy\owatoC:\inetpub\EAC_Secondary\owa.
Step 2d: Use the Exchange Management Shell to create new EAC and Outlook on the web virtual directories for the new web site
To learn how to open the Exchange Management Shell in your on-premises Exchange organization, see Open the Exchange Management Shell.
Replace <Server> with the name of your server, and run the following commands to create the new EAC and Outlook on the web virtual directories for the new web site.
New-EcpVirtualDirectory -Server <Server> -Role ClientAccess -WebSiteName EAC_Secondary -Path "C:\inetpub\EAC_Secondary\ecp"
New-OwaVirtualDirectory -Server <Server> -Role ClientAccess -WebSiteName EAC_Secondary -Path "C:\inetpub\EAC_Secondary\owa"
Step 2e: Restart IIS
In IIS Manager, in the Connections pane, select the server.
In the Actions pane, click Restart.
Note: To restart IIS from the command line, open an elevated command prompt (a Command Prompt window that you opened by selecting Run as administrator) and run the following commands:
net stop w3svc /y
net start w3svc
How do you know this task worked?
To verify that you have successfully disabled access to the EAC on an Exchange server, perform the following steps:
Test your organization's internal and external URL for Outlook on the web. For example, if the external URL is https://mail.contoso.com/owa, and the internal URL is https://mbx01.contoso.com/owa use the following procedures to verify your configuration:
Verify that internal and external users can open their mailboxes by using Outlook on the web, including the Settings > Options page.
Verify that https://mail.contoso.com/ecp and https://mbx01.contoso.com/ecp return either of the following results:
404 - website not found
The user is redirected to their Settings > Options page in Outlook on the web.
Verify that administrators can access the EAC on the internal network based on your configuration selection:
Second Exchange server: If the second Exchange server is named MBX02, verify that https://mbx02.contoso.com/ecp opens the EAC.
New EAC web site on the existing Exchange server: If the IP address of the new EAC web site is 10.1.1.12, verify that https://10.1.1.12/ecp opens the EAC.