Note
Access to this page requires authorization. You can try signing in or changing directories.
Access to this page requires authorization. You can try changing directories.
As part of the process of deploying Microsoft 365 or Office 365, you can choose to migrate the contents of user mailboxes from an Internet Mail Access Protocol (IMAP) email service to Microsoft 365 or Office 365.
Looking for PowerShell commands for general IMAP migrations? See Use PowerShell to perform an IMAP migration to Microsoft 365 or Office 365.
Migration tasks for IMAP mailboxes
Here are the tasks to do when you're ready to get started with migrating your IMAP mailboxes.
Notes:
- You need to create your users in Microsoft 365 or Office 365 before you migrate their IMAP mailboxes from the source email environment. Each user must have a target Microsoft 365 or Office 365 mailbox for the IMAP migration.
- If you use an email domain in your IMAP email environment, and you also want to use the email domain in Microsoft 365 or Office 365, you need to add the domain to Microsoft 365 or Office 365 as an accepted domain before you create users in Microsoft 365 or Office 365. For instructions, see Add a domain to Microsoft 365.
- If you're using Office 365 operated by 21Vianet in China, see Add a domain to Microsoft 365.
- To add users, see Add users individually or in bulk.
Step 1: Find the full name of your current email server
Microsoft 365 or Office 365 needs the name of the source email server to migrate mailboxes from. There are many ways to get the name of your email system. The easiest way is by using an email client that's connected to your email system. In this task, we describe how to get the name of the system by using Outlook on the web (formerly known as Outlook Web App). If your email client isn't described here, contact support for your source email system.
Get the name of your source email server using Outlook on the web
Open your mailbox in Outlook on the web.
On the toolbar, choose Settings
 .
.In the Search all settings box, start typing "pop", and in the results, select POP and IMAP.
In POP and IMAP settings, your IMAP server name is listed in the IMAP setting section.
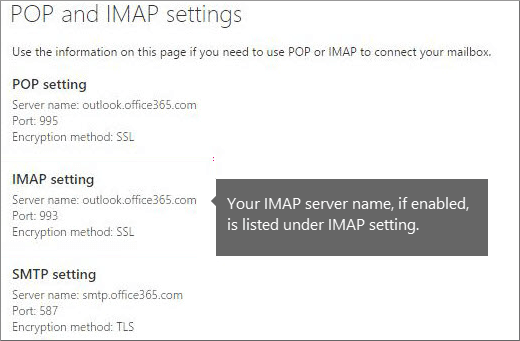
For more information about IMAP connections in Microsoft 365 or Office 365, see POP and IMAP account settings.
Step 2: Create the list of mailboxes to migrate
You need access to user mailboxes before you can migrate them to Microsoft 365 or Office 365. The steps that are required to create the target mailboxes depend on how you access the mailboxes.
You either know the password of each user's mailbox, or you need to reset the passwords to new passwords that you do know. Follow the steps in Create the list of user mailboxes when you know the user passwords, or you'll reset the passwords.
Your source email system lets you use mailbox admin credentials to access user mailboxes, which means you don't need to know the passwords or reset them. Follow the steps in Create a list of user mailboxes using admin credentials to access them to learn how to access user mailboxes.
Create the list of user mailboxes when you know the user passwords, or you'll reset the passwords
For this task, you create a migration file that contains a list of mailboxes to migrate to Microsoft 365 or Office 365. We use Excel in the instructions because it's the easiest way to create the migration file. You can use Excel 2013, Excel 2010, or Excel 2007.
When you create the migration file, you must know the password of each mailbox to be migrated. We're assuming you don't know user passwords, so you'll probably need to assign temporary passwords (by resetting the passwords) to all mailboxes during the migration.
You don't have to migrate all mailboxes at once. You can do them in batches at your convenience. You can include up to 50,000 mailboxes (one row for each user) in your migration file, which can be as large as 10 MB.
For more information, see CSV files for IMAP migration batches.
Go to your source email system (the one you're migrating from), and navigate to the list of mailboxes you want to migrate.
We'd give you the exact steps if we could, but there are so many different email systems out there that you need to find this out on your own. When you find the list of mailboxes, keep this window open.
Go to the Microsoft 365 admin center.
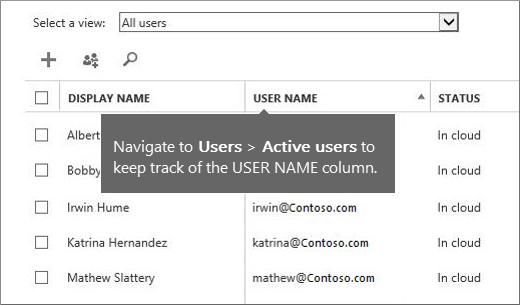
Navigate to Users > Active users. Keep an eye on the username column. You'll use this information in a minute. Keep the admin center open, too.
Start Excel.
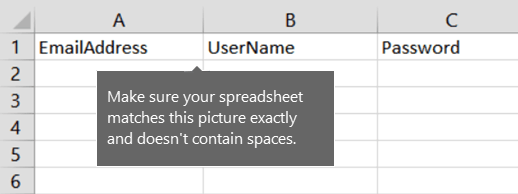
Use the following screenshot as a template to create the migration file in Excel. Start with the headings in row 1. Make sure they match the picture exactly and don't contain spaces. The exact heading names are:
EmailAddress in cell A1.
UserName in cell B1.
Password in cell C1.
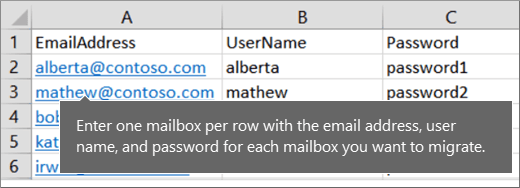
Next, enter the email address, username, and password for each mailbox you want to migrate. Enter one mailbox per row:
Column A is the email address of the Microsoft 365 or Office 365 mailbox. This is what is shown in the username column under Users > Active users in the Microsoft 365 admin center.
Column B is the sign-in name (for example, alberta@contoso.com) for the user's mailbox on the source email system.
Note
A lot of email systems use the entire email address as the sign-in name. Note also, if you are using the same domain in Microsoft 365 or Office 365 and your source email system, the columns A and B can be identical.
Column C is the password for the user's mailbox.
If you don't know the users' passwords, you'll need to reset them to passwords that you do know, and then enter those passwords in the migration file. This is inconvenient for users, but there's no way around this unless your source email system supports using superuser credentials.
If you want users to have access to the source email system, you can distribute new passwords to the source email system after the migration is finished. We'll deal with getting the new passwords distributed after the migration is finished.
Reset the passwords, and note the new passwords in your migration file. The exact steps will depend on your source email system. You can probably find the option to reset a password when you view the user's email account.
Save the file as a CSV file type, and close Excel.

Create a list of user mailboxes using admin credentials to access them
For this task, you create a migration file that contains a list of mailboxes to migrate to Microsoft 365 or Office 365. The easiest way to create the migration file is by using Excel, so we use Excel in these instructions. You can use Excel 2013, Excel 2010, or Excel 2007.
When you create a migration file in this task, you type your mailbox admin credentials and usernames using a special format. This allows you to access user mailboxes without knowing or resetting the user passwords. We provide the format used by Exchange, Dovecot, and Mirapoint IMAP servers. If your source email system isn't listed here and you don't know the correct format, you still have the option of resetting user passwords. Skip this task and go to Create the list of user mailboxes when you know the user passwords, or you'll reset the passwords.
You don't have to migrate all mailboxes at once. You can migrate them in batches at your convenience. You can include up to 50,000 mailboxes (one row for each user) in your migration file, which can be as large as 10 MB.
Go to your source email system (the one you're migrating from), and navigate to the list of mailboxes you want to migrate. We'd give you the exact steps if we could, but there are so many different email systems out there that you need to find out these steps on your own. When you find the list of mailboxes, keep the window open so you can refer to them.
Go to the Microsoft 365 admin center.
Navigate to Users > Active users. Keep an eye on the username column. You'll use this information in a minute. Keep the Microsoft 365 admin center page open, too.
Start Excel.
Use the following screenshot as a template to create the migration file in Excel. Start with the headings in row 1. Make sure they match the screenshot exactly and don't contain spaces. The exact heading names are:
EmailAddress in cell A1.
UserName in cell B1.
Password in cell C1.
Next, enter the email address, username, and password for each mailbox you want to migrate. Enter one mailbox per row.
Column A is the email address of the user's Microsoft 365 or Office 365 mailbox. This is what's shown in the username column under Users > Active users in the Microsoft 365 admin center.
Column B is the combination of the mailbox admin name and username that's specific to your source email system. See Format mailbox admin credentials for different IMAP servers for formatting instructions.
Column C is the password for the mailbox admin account.
Save the file as a CSV file type, and then close Excel.
Format mailbox admin credentials for different IMAP servers
In the migration file, each cell in the UserName column consists of two combined names: the username of the person whose email is being migrated, and the username of the mailbox admin account. The supported format for mailbox admin credentials is different depending on your source email system. Here are the formats for several types of source email systems.
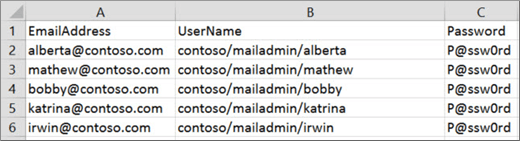
Microsoft Exchange
If you're migrating email from the IMAP implementation for Exchange, use the format Domain/Admin_UserName/User_UserName for the UserName attribute in the migration file.
Let's say you're migrating email from Exchange for Alberta Greene, Bobby Overby, Irwin Hume, and Mathew Slater. You have a mailbox admin account, where the username is admin and the password is P@ssw0rd. Here's what your migration file would look like:
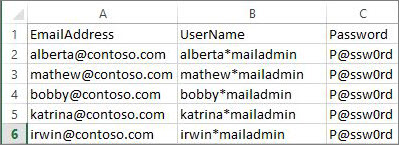
Dovecot
Source email systems such as a Dovecot IMAP server that support Simple Authentication and Security Layer (SASL), use the format User_UserName*Admin_UserName. Let's say you're migrating email from a Dovecot IMAP server using the mailbox admin credentials admin and P@ssw0rd. Here's what your migration file would look like:
Mirapoint
If you're migrating email from Mirapoint Message Server, use the format #user@domain#Admin_UserName#. Let's say you're migrating email using the mailbox admin credentials admin and P@ssw0rd. Here's what your migration file would look like:

Courier IMAP and Oracle IMAP
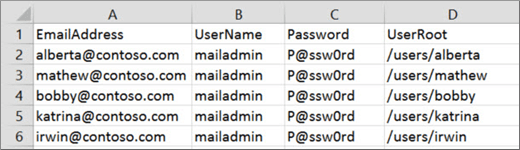
Some source email systems such as Courier IMAP and Oracle IMAP don't support using mailbox admin credentials to migrate mailboxes to Microsoft 365 or Office 365. Instead, you can set up your source email system to use virtual shared folders. Virtual shared folders allow you to use the mailbox admin credentials to access user mailboxes on the source email system. For more information about how to configure virtual shared folders for Courier IMAP, see Shared Folders.
To migrate mailboxes after you set up virtual shared folders on your source email system, you have to include the optional attribute UserRoot in the migration file. This attribute specifies the location of each user's mailbox in the virtual shared folder structure on the source email system. For example, the path to Alberta's mailbox is /users/alberta.
Here's an example of a migration file that contains the UserRoot attribute:
Step 3: Connect Microsoft 365 or Office 365 to your email system
To migrate email successfully, Microsoft 365 or Office 365 needs to connect and communicate with the source email system. To do this, Microsoft 365 or Office 365 uses a migration endpoint. This is a technical term that describes the settings that are used to create the connection. You create the migration endpoint in this task.
In the Exchange admin center, go to Migration.
Click Endpoints in the top right corner of the page.
On the Endpoints page, Click Add
 to create a new migration endpoint.
On the Add Endpoint page, choose IMAP as the migration type.
Enter the appropriate information in the following fields:
- Migration endpoint name: Type a unique endpoint name, for example, Test5-endpoint
- IMAP server: Type the messaging server name (for example, imap.contoso.com) of the source email server.
- Leave the remaining information as the default settings; these will work for most cases.
Click Create.
You successfully created the migration endpoint!
Step 4: Create a migration batch and migrate your mailboxes using EAC
To migrate email successfully, Microsoft 365 or Office 365 needs to connect and communicate with the source email system. To do this, Microsoft 365 or Office 365 uses a migration endpoint. This is a technical term that describes the settings that are used to create the connection. You create the migration endpoint and migration batch in this task.
In the Exchange admin center, go to Migration.
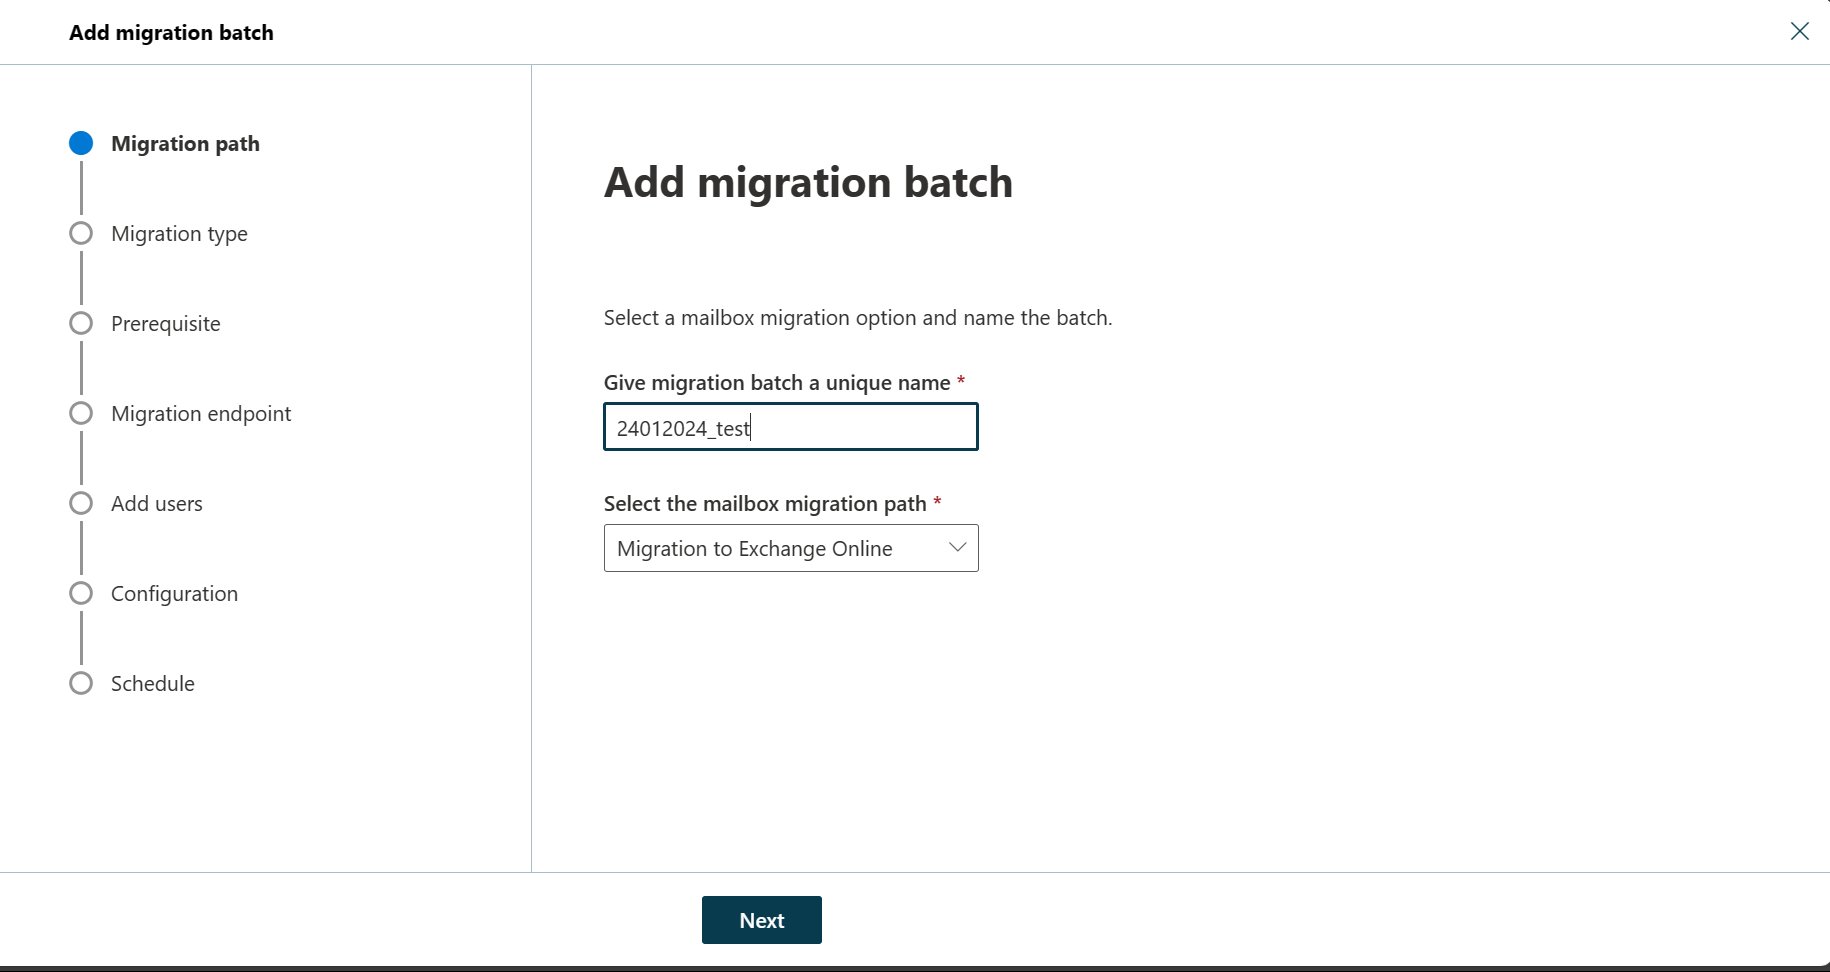
Click Add migration batch.
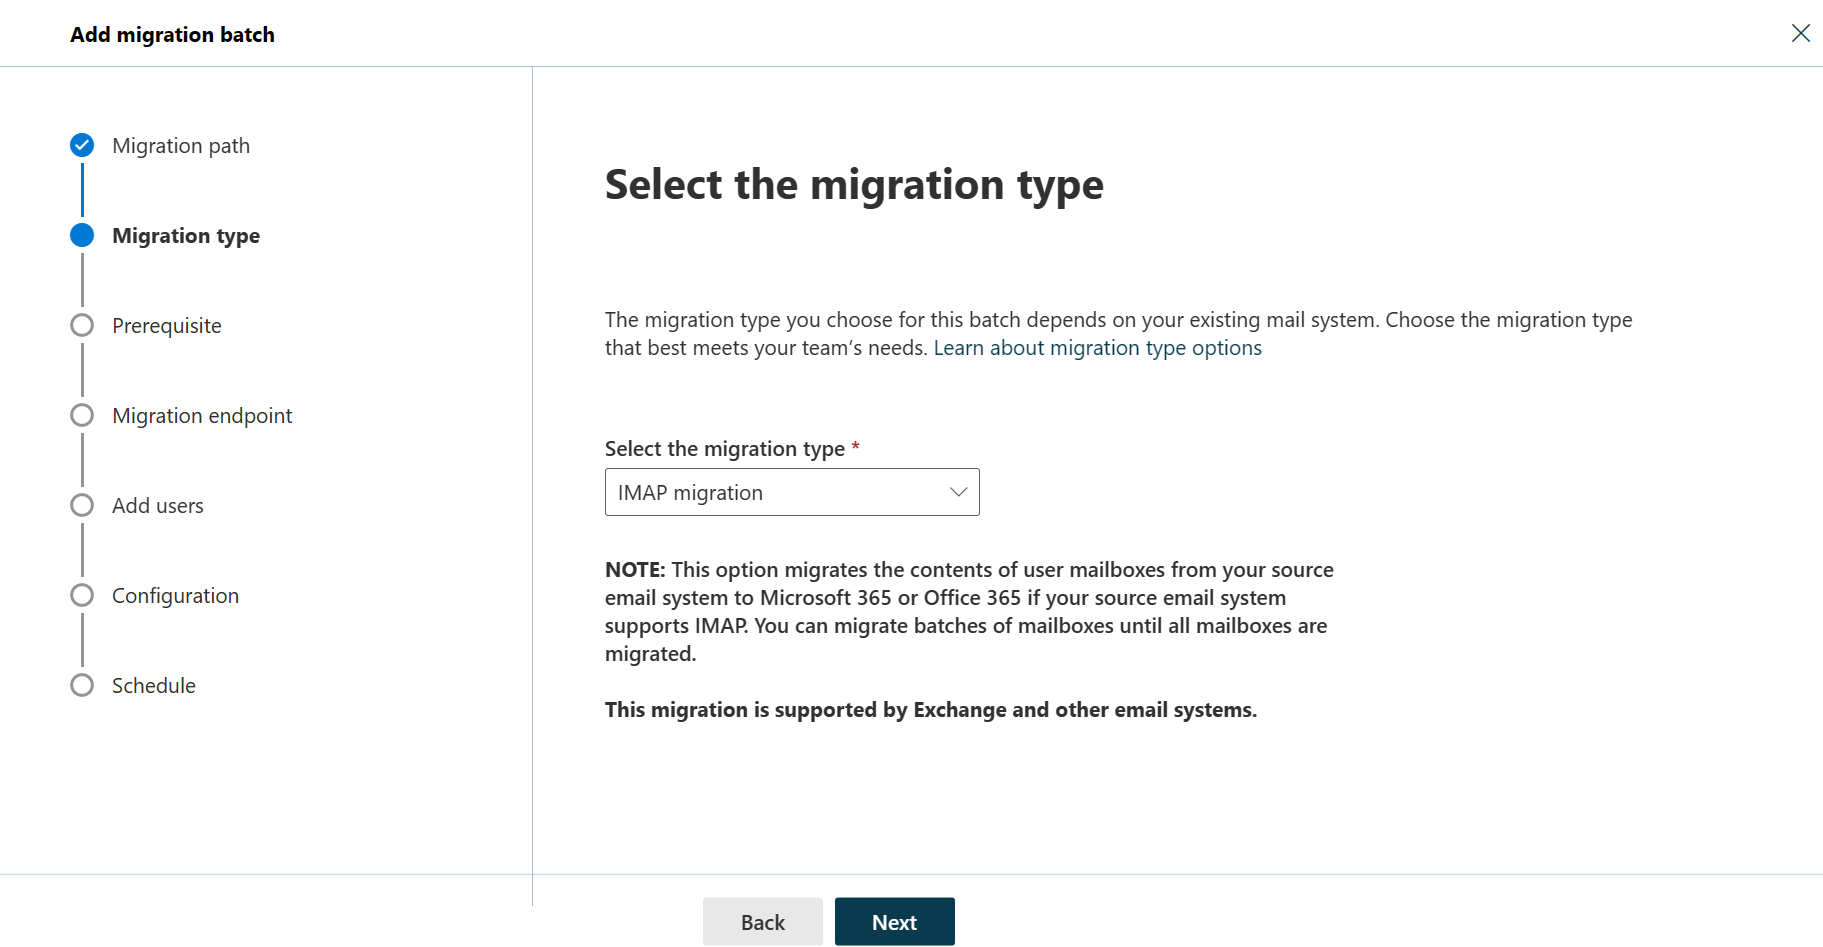
On the Add migration batch page, type the name (no spaces or special characters) of the migration batch, and then select Migrate to Exchange Online in the dropdown as migration type. Click Next when you're done.
On the Select the migration type page, select IMAP migration as migration type and then click Next.
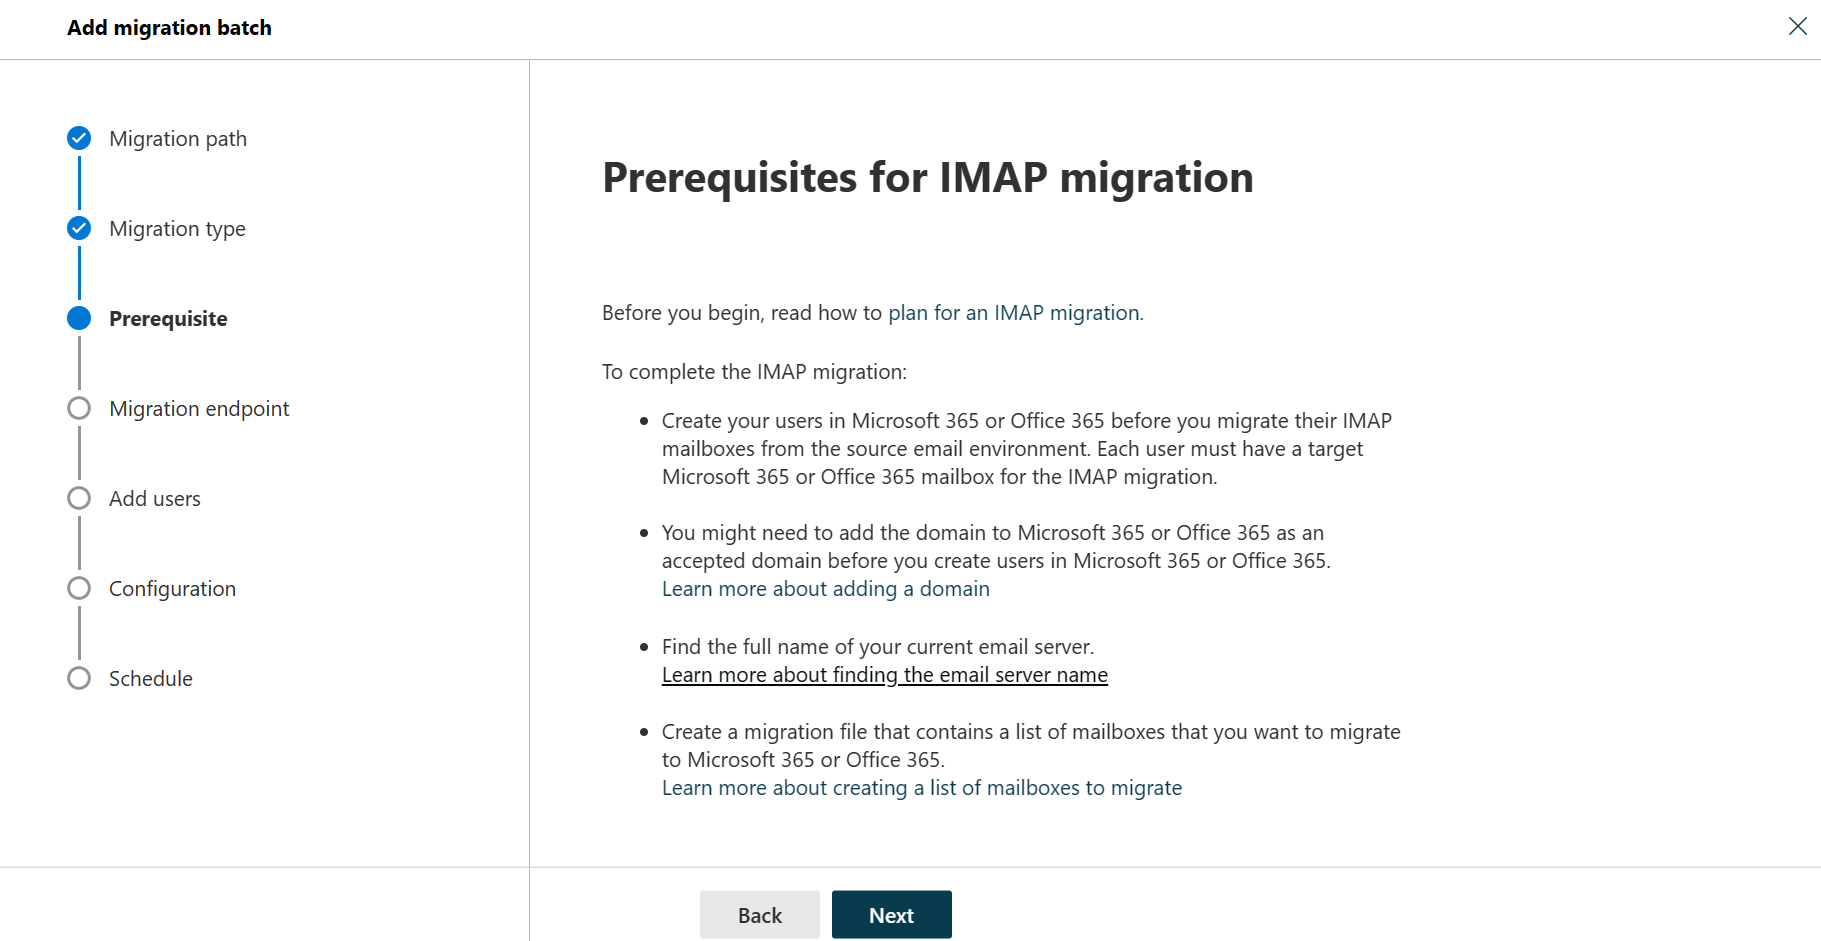
On the Prerequisites for IMAP migration page, check to see if you completed all the prerequisites and then click Next.
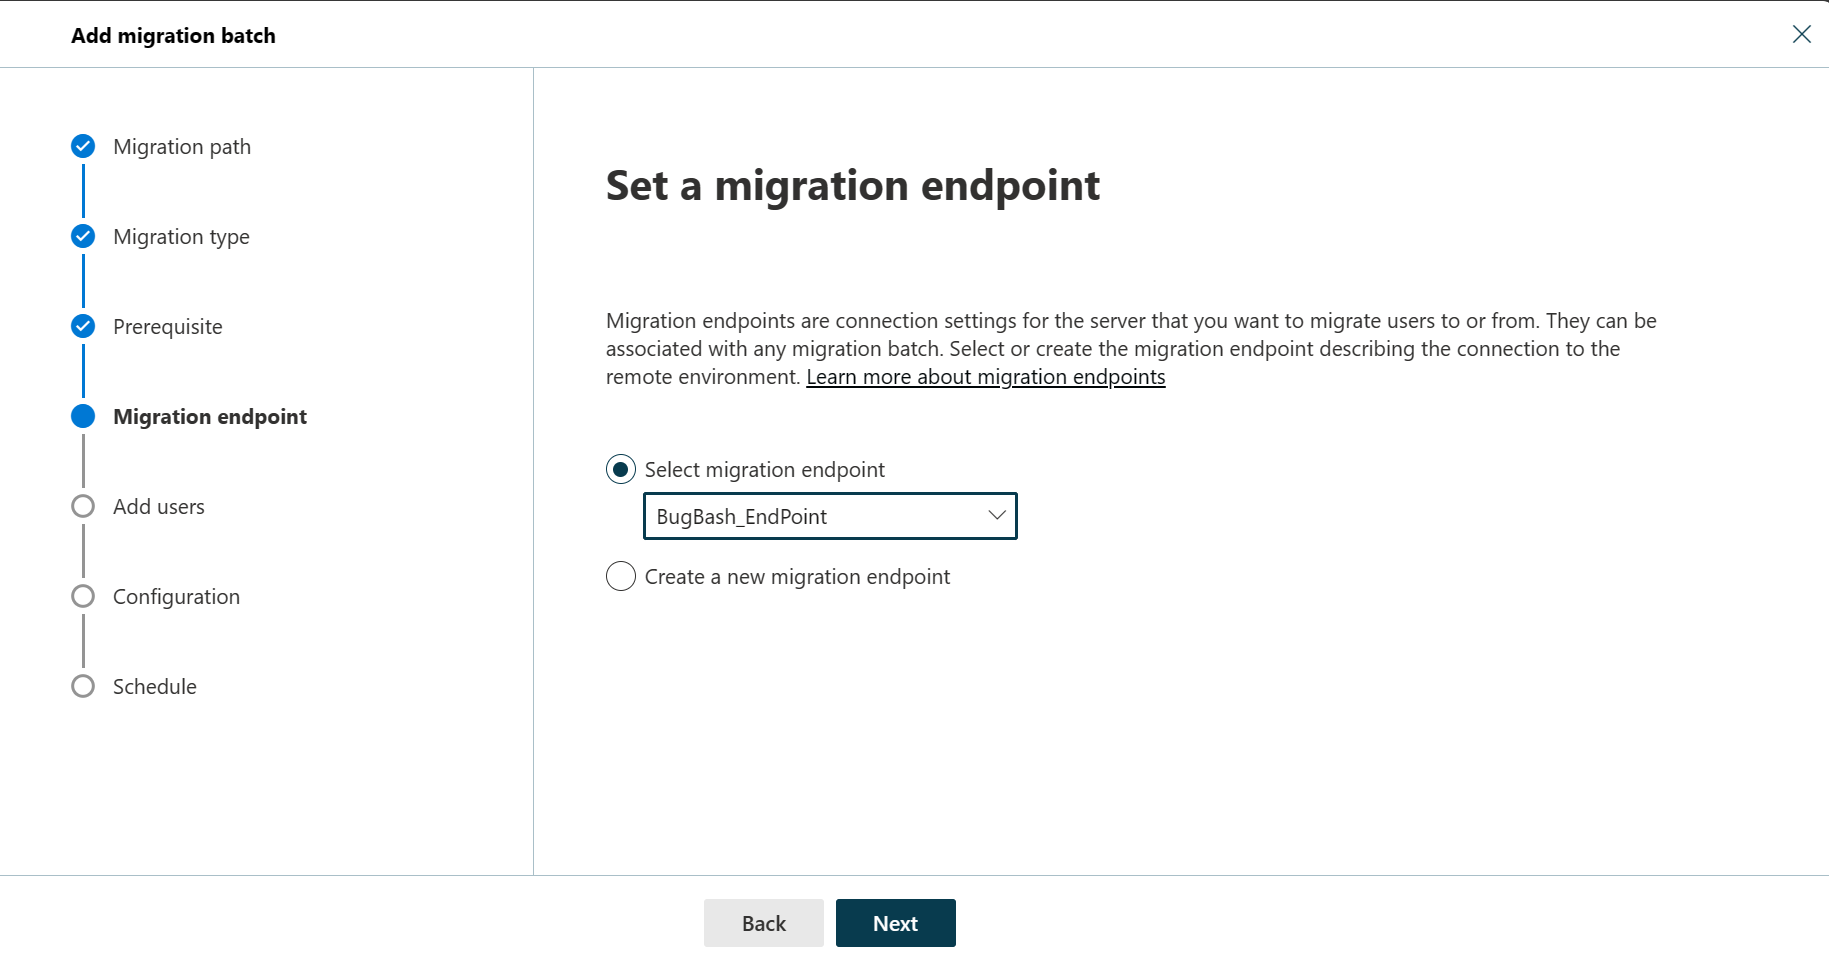
On the Set a migration endpoint page, select a migration endpoint from the dropdown list and then click Next.
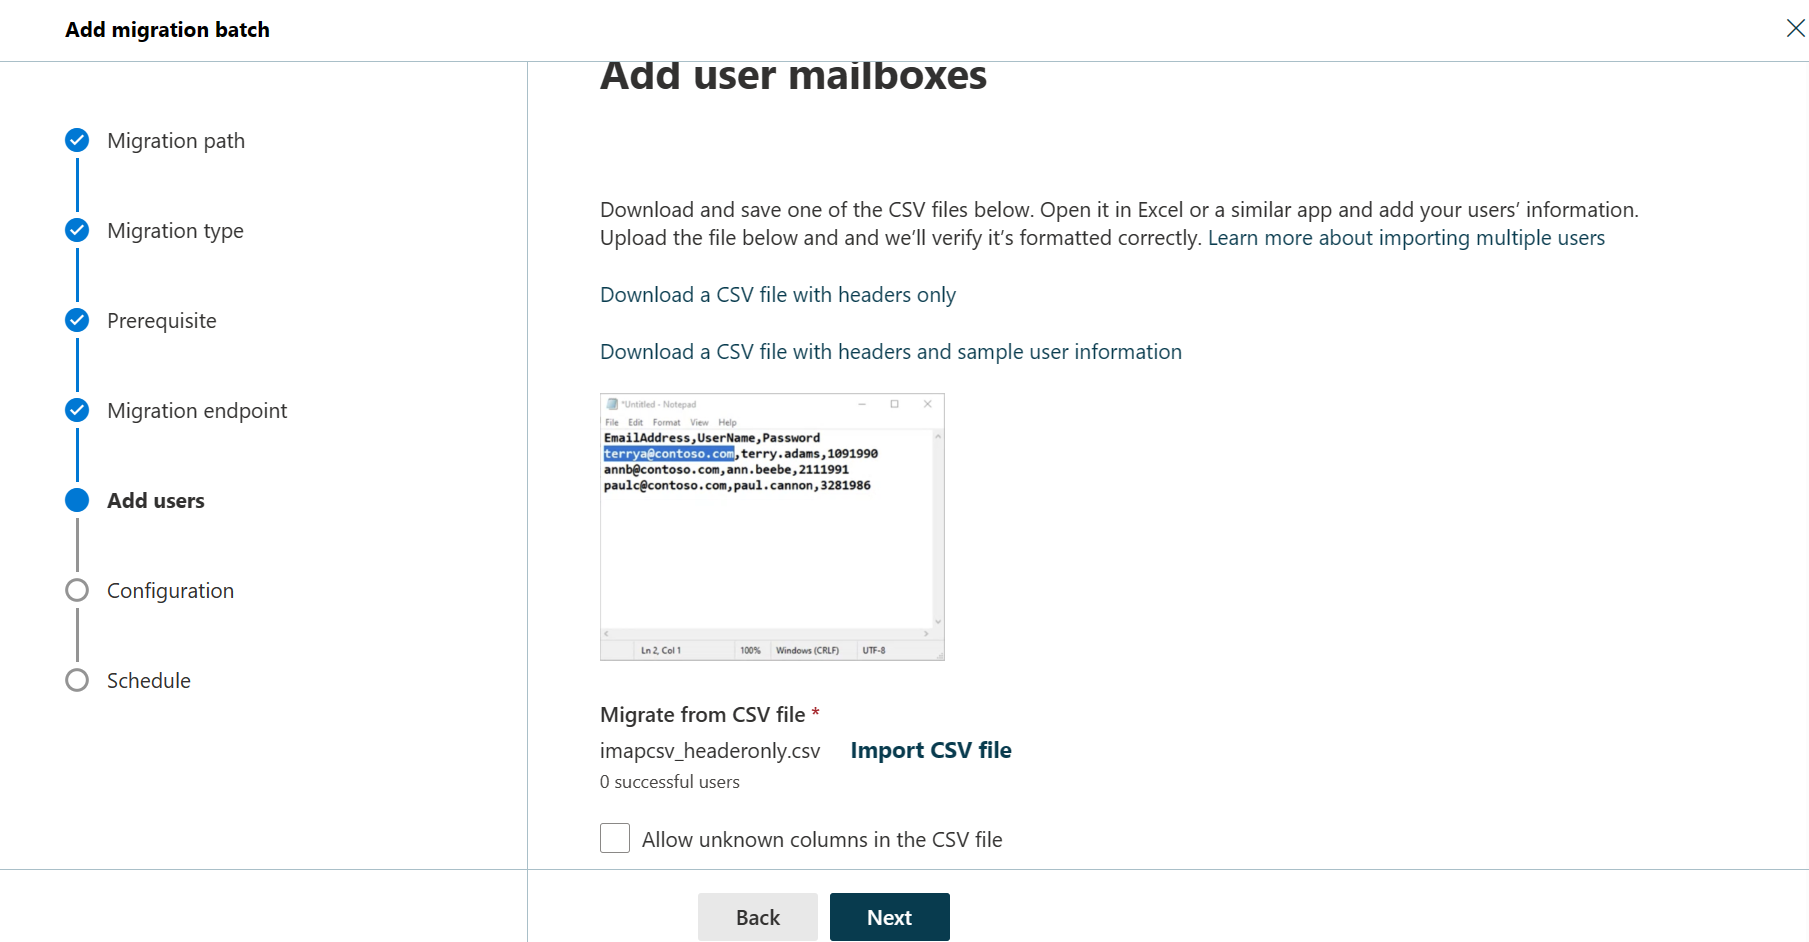
On the Add user mailboxes page,
- Download a CSV file with headers only or with sample user information using the link provided.
- Open the downloaded file in Excel or other similar app to add the users' information that needs to be migrated
- Click Import CSV file and upload the file with the users' information
After finishing, click Next.
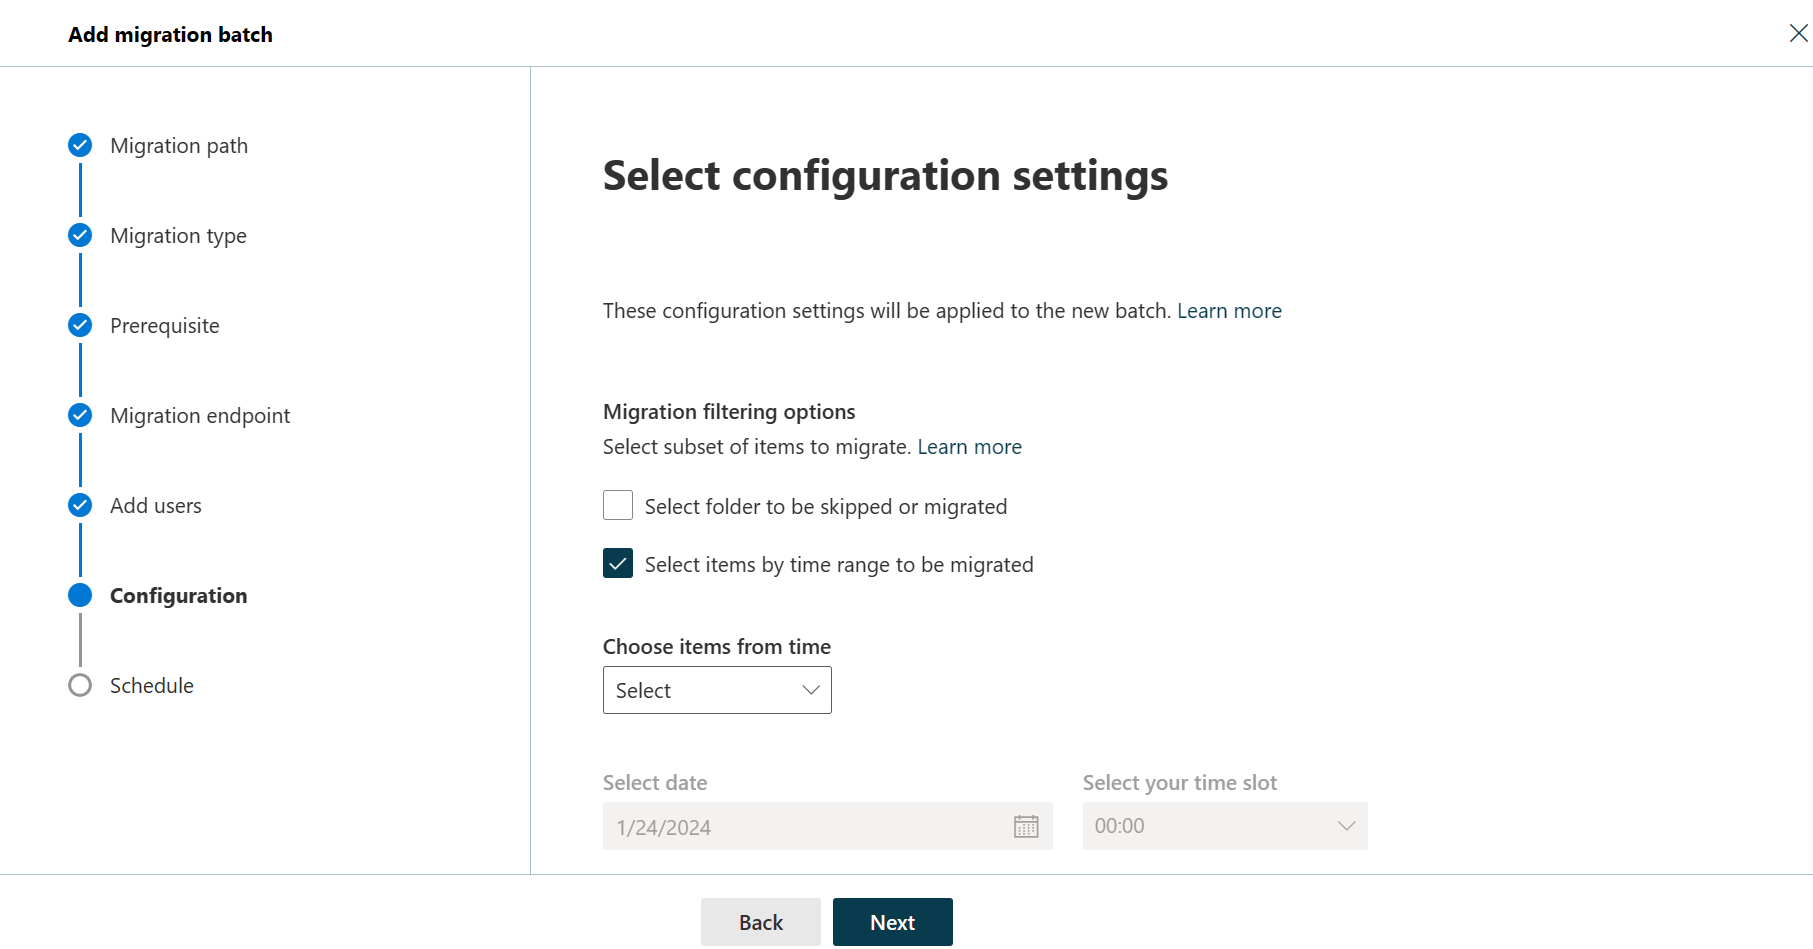
On the Select configuration settings page, configure any exceptions or inclusions using the Migration filtering options (if any), and click Next.
In the Schedule batch migration page, select the desired options for reporting and start and end migration batch modes.
Click Save and then click Done.
Verify that this task worked
In the Exchange admin center, go to Migration, select the migration batch and then in the details pane, under Migration details, click View details. For more information, see Migration users status report.
If this step task fails, check the associated Mailbox status reports for specific errors, and double-check that your migration file has the correct Microsoft 365 or Office 365 email address in the EmailAddress column.
Verify a successful mailbox migration to Microsoft 365 or Office 365
Ask users with migrated mailboxes to complete the following tasks:
Sign in to Microsoft 365 or Office 365 with your work or school account. Use your temporary password.
Update your password, and set your time zone. It's important that you select the correct time zone to make sure your calendar and email settings are correct.
When Outlook on the web opens, send an email message to another Microsoft 365 or Office 365 user to verify that you can send email.
Choose Outlook, and check that your email messages and folders are all there.
Optional: Reduce email delays
This task is optional. You don't need to do this task, but if you skip it, it might take longer for email to start showing up in your new Microsoft 365 or Office 365 mailboxes.
When people outside of your organization send you email, their email systems don't double-check where to send that email every time. Instead, their systems save the location of your email system based on a setting in your DNS server known as a time-to-live (TTL). If you change the location of your email system before the TTL expires, they'll try to send an email at the old location first before figuring out that the location changed. This can result in a mail delivery delay. One way to avoid this is to lower the TTL that your DNS server gives to servers outside of your organization. This makes the other organizations refresh the location of your email system more often.
A short interval, such as 3,600 seconds (one hour) or less, means that most email systems will ask for an updated location every hour. We recommend that you set the interval at least this low before you start the email migration. This allows all the systems that send you email enough time to process the change. Then, when you make the final switch over to Microsoft 365 or Office 365, you can change the TTL back to a longer interval.
The place to change the TTL setting is on your email system's mail exchanger record, also called an MX record. This lives on your public facing DNS system. If you have more than one MX record, you need to change the value on each record to 3,600 or less.
Don't worry if you skip this task. It might take longer for email to start showing up in your new Microsoft 365 or Office 365 mailboxes, but it will get there.
If you need some help configuring your DNS settings, head over to Add DNS records to connect your domain. If you're using Office 365 operated by 21Vianet in China, see this version of the article instead: Create DNS records for Office 365 when you manage your DNS records.
Step 5: Route your email directly to Microsoft 365 or Office 365
Email systems use a DNS record called an MX record to figure out where to deliver emails. During the email migration process, we left your MX record pointing to your source email system. Now that the email migration to Microsoft 365 or Office 365 is complete, it's time to point your MX record at Microsoft 365 or Office 365. This helps ensure that email is delivered to your Microsoft 365 or Office 365 mailboxes. Moving the MX record will also let you turn off your old email system when you're ready.
For many DNS providers, we have specific instructions to change your MX records, see Add DNS records to connect your domain. If you're using Office 365 operated by 21Vianet in China, see this version of the article instead: Create DNS records for Office 365 when you manage your DNS records. If your DNS provider isn't included, or you want to get a sense of the general directions, we've provided general MX record instructions as well, see Add DNS records to connect your domain, or for Office 365 in China, see this version of the article: Add DNS records to connect your domain.
It can take up to 72 hours for the email systems of your customers and partners to recognize the changed MX record. Wait at least 72 hours before you proceed to the next task to stop email synchronization.
Step 6: Stop email synchronization
During the last task, you changed the MX record. Now it's time to verify that all your email is being routed to Microsoft 365 or Office 365, and then you can go ahead and delete the migration batch. Doing this stops the synchronization between your source email system and Microsoft 365 or Office 365. Before you do, make sure of a few things:
Your users are using Microsoft 365 or Office 365 exclusively for email. After you delete the migration batch, email that is sent to mailboxes on your source email system isn't copied to Microsoft 365 or Office 365. This means your users can't get that email, so make sure that users are all on the new system.
Let the migration batch run for at least 72 hours before you delete it. This makes the following two things much more likely:
Your source email system and Microsoft 365 or Office 365 mailboxes were synchronized at least once (they synchronize once a day).
The email systems of your customers and partners have recognized the changes to your MX records and are now properly sending email to your Microsoft 365 or Office 365 mailboxes.
When you delete the migration batch, the migration service cleans up any records related to the migration batch and removes it from the migration dashboard.
Delete a migration batch
In the Exchange admin center, go to Migration, select the batch, and then click Delete. The migration batch is no longer listed.
See also
Migrate your IMAP mailboxes to Microsoft 365 or Office 365