Confluence on-premises Microsoft Graph connector (Preview)
The Confluence on-premises Microsoft Graph connector allows your organization to index Confluence server or data center content. After you configure the connector and index data from the Confluence site, end users can search for those contents in Microsoft Search.
Note
The Confluence on-premises connector is in preview. If you wish to get early access to try it, sign up using this form.
This article is for Microsoft 365 administrators or anyone who configures, runs, and monitors a Confluence on-premises connector. It supplements the general instructions provided in Set up Microsoft Graph connectors in the Microsoft 365 admin center.
Each step in the setup process is listed below along with either a note that indicates you should follow the general setup instructions OR other instructions that apply to only Confluence on-premises Graph connector including information about Troubleshooting and Limitations.
Before you get started
Install the Microsoft Graph connector agent (GCA)
To index your Confluence server or data center content, you must install and register the connector agent. See install the Microsoft Graph connector agent for details.
You must be the administrator for your organization's Microsoft 365 tenant and the administrator for your organization's Confluence site.
Note
GCA can be installed on a different Windows machine and need not be on the same machine as that of the on-premises server. The machine can help generate App ID and secret which can be used for the setup. You must ensure that the GCA machine is on during the crawling.
Step 1: Add a connector in the Microsoft 365 admin center
Follow the general instructions in Step 1: Add a Microsoft Graph connector in the Microsoft 365 admin center.
Step 2: Name the connection
Follow the general instructions in Step 2: Name the connection.
Step 3: Configure the connection settings
Step 3.1: Select deployment type
Select Server or Data center option to index Confluence On-premises content and select next.
Step 3.2: Enter Confluence instance URL
To connect to your Confluence site, use your site URL.
Step 3.3: Select the Microsoft Graph connector agent
Select the connector agent from the drop-down list. The agent will securely send Confluence On-premises content into Microsoft Graph index.
Step 3.4: Select authentication type
You can choose either Basic Authentication or OAuth 1.0a (recommended) to authenticate to your Confluence site.
Tip
Make sure the service account has view access to the Confluence content you want to index.
Basic Authentication (Available only for testing in preview):
Enter a service account's username (usually email ID) and password to authenticate using basic auth.
OAuth 1.0a
Generate a public/private key pair and create an application link in Confluence On-premises site so that the connector agent can access the instance. To learn more, see step 1 in Atlassian developer documentation on how to configure OAuth 1.0a.
Step 3.4.1 Generate an RSA public/private key pair
Run the following openssl commands in your on-premises machine terminal.
| Step | Command |
|---|---|
| Generate a 1024-bit private key | openssl genrsa -out confluence_privatekey.pem 1024 |
| Create an X509 certificate | openssl req -newkey rsa:1024 -x509 -key confluence_privatekey.pem -out confluence_publickey.cer -days 365 |
Extract the private key (PKCS8 format) to the confluence_privatekey.pcks8 file |
openssl pkcs8 -topk8 -nocrypt -in confluence_privatekey.pem -out confluence_privatekey.pcks8 |
Extract the public key from the certificate to the confluence_publickey.pem file |
openssl x509 -pubkey -noout -in confluence_publickey.cer > confluence_publickey.pem |
Step 3.4.2 Create an application link
In Confluence, navigate to Administration (cog icon) > General configuration > Application Links in the side pane.
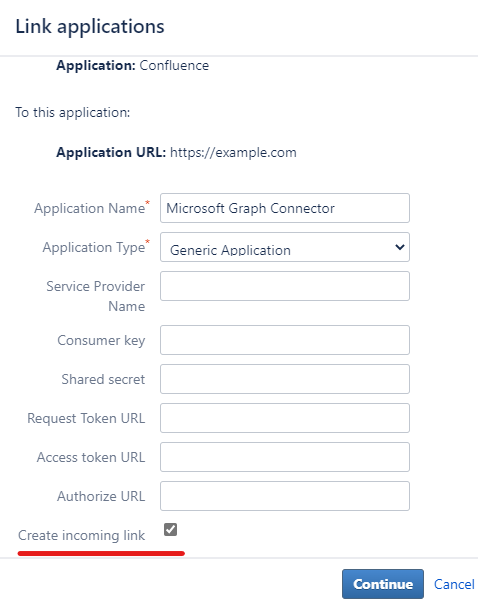
In the Enter URL of the application you want to link text box, enter any URL. For example,
https://example.comand then select Create new link. Ignore No response was received from the URL you entered warning and select Continue.On the first screen of Link applications dialog, provide an Application Name and select Generic Application type. Select the Create incoming link checkbox. All other fields are optional. Select Continue.
On the second screen of Link applications dialog, enter consumer details for sample client:
Field Recommended Value Consumer key OAuthkeyConsumer name Microsoft Graph Connector AppPublic key Copy the public key from confluence_publickey.pemfile generated from Step 3.4.1 and paste it into this field (for example,iuasge87awegrq3...).Select Continue. After successful creation, the application link will be displayed like the following screen.


Step 3.4.3 Enter consumer key and private key to sign in
In the connection creation configuration assistant in Microsoft 365 admin center, enter the Consumer key created during Step 3.4.2 and Private key from confluence_privatekey.pcks8 file in Step 3.4.1. Enable pop-up in the browser for Microsoft 365 admin center and select Sign in.
Step 3.4.4 Enter verification code to Finish Sign in
In the Confluence sign in screen, enter service account credentials. After successful sign-in, you'll get a verification code like the following screen.

Enter the Verification Code in connection creation configuration assistant and select Finish Sign in. After successful sign-in, select Next.
OAuth 2.0 (Recommended)
The following steps provide guidance on how to register the app Configure an incoming link
- Go to Administration > General Configuration > Application links.
- Select Create link
- Select External application, and then choose Incoming as the direction.
- Fill in the
- Redirect URL:
https://gcs.office.com/v1.0/admin/oauth/callback - Scope: Admin
- Redirect URL:
- Complete the connection settings step using the Client ID and Secret.
Step 4: Select properties
In this step, you can add or remove available properties from your Confluence data source. Microsoft 365 has already selected few properties by default.
With a Confluence Query Language (CQL) string, you can specify conditions for syncing pages. It's like a Where clause in a SQL Select statement. For example, you can choose to index only the pages that are modified in the last two years. To learn about creating your own query string, see Advanced Searching using CQL. By default, all pages will be indexed by the connector.
Tip
You may use the CQL filter to index content modified after a certain time using, lastModified >= "2018/12/31"
Use the preview results button to verify the sample values of the selected properties and CQL string.
Step 5: Manage search permissions
Confluence On-premises connector supports search permissions visible to Everyone or Only people with access to this data source. If you choose Everyone, indexed data will appear in the search results for all users. If you choose Only people with access to this data source, indexed data will appear in the search results for users who have access to them.
In Confluence On-premises, security permissions for users and groups are defined using space permissions and page restrictions. Confluence On-premises connector applies effective permissions provided by content restrictions API.
If you choose Only people with access to this data source, you need to further choose whether your Confluence site has Microsoft Entra ID provisioned users or Non-AAD users.
To identify which option is suitable for your organization:
Choose the Microsoft Entra ID option if the email ID of Confluence users is same as the UserPrincipalName (UPN) of users in Microsoft Entra ID.
Choose the Non-AAD option if the email ID of Confluence users is different from the UserPrincipalName (UPN) of users in Microsoft Entra ID.
Note
- If you choose Microsoft Entra ID as the type of identity source, the connector maps the Email IDs of users obtained from Confluence directly to UPN property from Microsoft Entra ID.
- If you chose "Non-AAD" for the identity type see Map your non-Azure AD Identities for instructions on mapping the identities. You can use this option to provide the mapping regular expression from Email ID to UPN.
- Updates to users or groups governing access permissions are synced in full crawls only. Incremental crawls do not currently support processing of updates to permissions.
Step 6: Assign property labels
Follow the general setup instructions.
Step 7: Manage schema
Follow the general setup instructions.
Step 8: Choose refresh settings
Follow the general setup instructions.
Note
For access permission updates, only full crawl scheduled will be applied.
Step 9: Review Connection
Follow the general setup instructions.
After publishing the connection, you need to customize the search results page. To learn about customizing search results, see Customize the search results page.
For testing purpose, you can choose publish to limited audience
Limitations
The confluence On-premises connector has the following known limitations in its latest release:
- Confluence On-premises connector doesn't index blogs, attachment files and comments.
Troubleshooting
After publishing your connection, you can review the status under the Data Sources tab in the admin center. To learn how to make updates and deletions, see Manage your connector. You can find troubleshooting steps for commonly seen issues here.
If you have any other issues or want to provide feedback, write to us aka.ms/TalkToGraphConnectors.
Feedback
Coming soon: Throughout 2024 we will be phasing out GitHub Issues as the feedback mechanism for content and replacing it with a new feedback system. For more information see: https://aka.ms/ContentUserFeedback.
Submit and view feedback for