Enrolling a device into Pro Management
With Teams Rooms on Windows app update (version 4.17 and higher), we have streamlined the enrollment process for Windows-based Teams Rooms devices. With version 4.17+, IT admins will no longer need to manually download and install the Teams Rooms Pro management admin agent on each device.
Instead of performing the steps in this article, the Teams Rooms Pro Management agent will be automatically downloaded and installed onto the Windows-based Teams Rooms devices as part of the Teams Rooms app update. This improvement simplifies the agent deployment and device enrollment tasks for IT admins, reducing their workload.
Once the Teams Rooms Pro Management agent is successfully installed and connected, devices with the Teams Rooms Pro license will be automatically enrolled and visible in the Teams Rooms Pro Management portal. There may be additional user actions depending on your use of proxies or other network restrictions.
Important
If your Windows-based Teams Rooms devices are running version 4.16 or earlier, you must still follow the steps below to enroll those devices.
Both automatic and manual deployment require onboarding Microsoft Teams Rooms devices to the Microsoft Teams Rooms Pro Management portal. The monitoring service agent is for use with certified Microsoft Teams Rooms (MTR) systems and peripherals.
Prerequisites
Follow these procedures to set up your hardware before attempting the enrollment process:
Adding proxy settings (optional)
Log in as administrator by following Performing operations as the Admin user of the MTR device.
In the Windows Search field (bottom-left section of the screen), enter cmd (either long press the screen or right select, and choose Run as administrator).
Run the following command (double quotes at end of command are important):
If using single proxy server:
bitsadmin /Util /SetIEProxy LOCALSYSTEM MANUAL_PROXY <proxyserver>:<port> ""Example:
bitsadmin /Util /SetIEProxy LOCALSYSTEM MANUAL_PROXY contosoproxy.corp.net:8080 ""If using a pac file:
bitsadmin /Util /SetIEProxy LOCALSYSTEM AUTOSCRIPT <pac file url>Example:
bitsadmin /Util /SetIEProxy LOCALSYSTEM AUTOSCRIPT http://contosoproxy.corp.net/proxy.pac
Performing operations as the Admin user of the Teams Rooms device
Some configuration/installation procedures require you to log in to the device as Administrator.
To log in to the device as Administrator (local administrator):
Ensure you hang up any ongoing calls and return to the home screen.
In the Microsoft Teams Rooms user interface, select More, then select Settings, where you're prompted for the local Administrator password on the device (the default password is sfb).
Select Settings, then select Windows Settings to access Windows as local administrator.
From the list of users displayed in the Windows login screen, select Administrator (or the respective local administrator of your device).
Note
If the computer is domain joined, choose Other User, then use .\admin, or the user name of the local administrator configured in the device as the user name.
To return to the Microsoft Teams Rooms app after performing the necessary administrative tasks:
- From the Windows Start menu, sign out from the Admin account.
- Return to Microsoft Teams Rooms by selecting the user account icon on the far-left side of the screen and then selecting Skype.
Note
If the Skype user is not listed, select Other User and enter .\skype as the user name, and sign in.
URLs Required for Communication
Note
All network traffic between the MTR devices agent and the Microsoft Teams Rooms Pro Management portal is SSL over port 443*.* See Office 365 URLs and IP address ranges - Microsoft 365 Enterprise | Microsoft Docs.
The following hosts must be allowed if you have traffic allowlist enabled within your enterprise environment:
agent.rooms.microsoft.com
global.azure-devices-provisioning.net
gj3ftstorage.blob.core.windows.net
mmrstgnoamiot.azure-devices.net
mmrstgnoamstor.blob.core.windows.net
mmrprodapaciot.azure-devices.net
mmrprodapacstor.blob.core.windows.net
mmrprodemeaiot.azure-devices.net
mmrprodemeastor.blob.core.windows.net
mmrprodnoamiot.azure-devices.net
mmrprodnoamstor.blob.core.windows.net
mmrprodglobapi.azurewebsites.net
mmrprodnoamapi.azurewebsites.net
mmrprodemeaapi.azurewebsites.net
mmrprodapacapi.azurewebsites.net
GCC customers should also ensure reachability to:
mmrprodgcciot.azure-devices.net
mmrprodgccstor.blob.core.windows.net
mmrprodgccapi.azurewebsites.net
Enrollment process
The Enrollment process involves these steps:
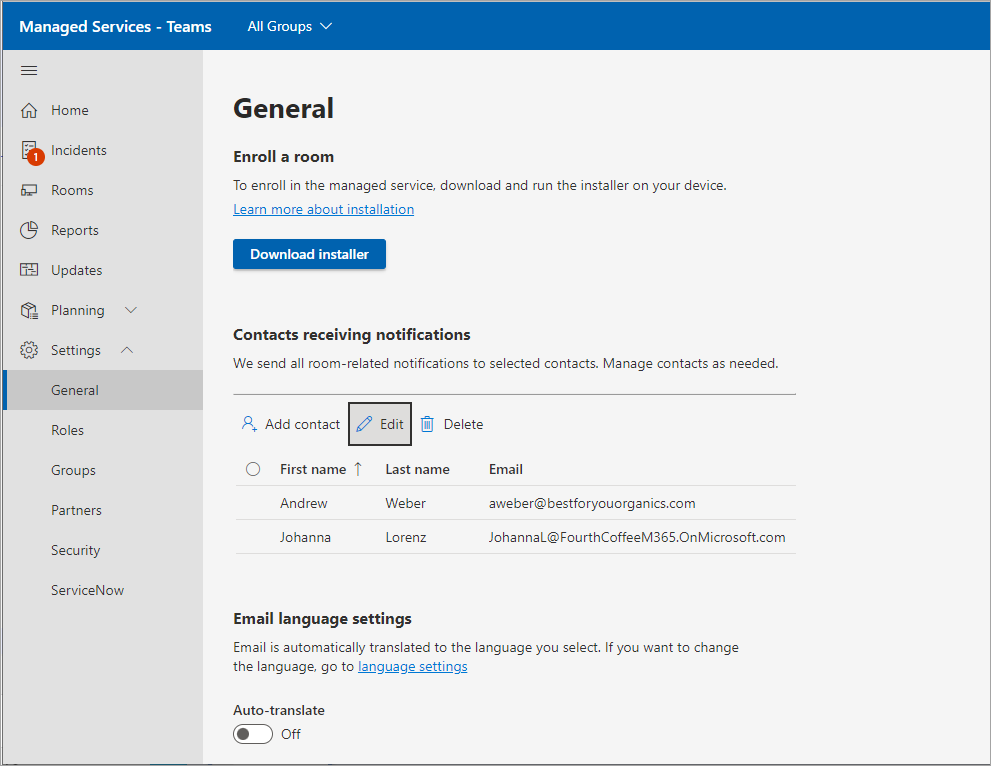
On the left navigation bar of the Microsoft Teams Rooms Pro Management portal http://portal.rooms.microsoft.com, expand Settings and select General.
Under Enroll a room, select Download installer to download the monitoring agent software.
Optional: Set up proxy settings for the agent; see Adding proxy settings (optional).
Install the agent installer (downloaded in step 2) on MTR units, either by running the MSI locally on an MTR device or via your normal means of publishing MSI applications en masse to devices within your environment (Group-Policy etc.)
The room appears in the portal within 5-10 minutes.
Installation
After downloading the installer from Microsoft (either from the portal or by using the AKA.ms URL provided above), unzip its contents to access the file ManagedRoomsInstaller.msi.
There are two modes of installation: 1) individual local machine install and 2) mass deploy mode (usually via Intune of similar method). We recommend individual install for non-domain joined machines or for machines that you have no way of running MSI installers remotely.
Due to the many varied ways in which customers can run MSI applications in mass deployment mode this document walks through only installation in individual mode as well in bulk on Intune-enrolled devices.
Individual device installation
Log in to the device as administrator. Ensure the Performing operations as the Admin user of the device steps are followed.
Copy the file ManagedRoomsInstaller.msi to the MTR device.
On running the ManagedRoomsInstaller.msi is a License Agreement screen.
After reading the agreement, check I accept the terms in the License Agreement and press Install.
This begins the Microsoft Teams Rooms Pro monitoring software install. A prompt for elevation (run as administrator) is displayed.
Select Yes.
The installation will continue. During the installation procedure, a console window opens and begins the final stage of the Microsoft Teams Rooms Pro monitoring software installation.
Note
Do not close the window. Once the installation is complete, the wizard displays a "Finish" button.
Intune-enrolled device bulk deployment
The following components are pre-requisites for successful installation:
- Intune enrollment: Teams Rooms on Windows devices must be already enrolled in Intune. For more information about how to enroll Teams Rooms on Windows devices in Intune, see Enrolling Microsoft Teams Rooms on Windows devices with Microsoft Endpoint Manager - Microsoft Tech Community
- Microsoft Entra group with all Teams Rooms on Windows devices as members – a group created in Microsoft Entra ID that includes all Teams Rooms on Windows devices that should be part of the Microsoft Teams Rooms Premium service. This group will be used for targeting the deployment of the MTR Pro agent.
Note
You may consider using Dynamic groups in Microsoft Entra ID for this purpose, more information at Enrolling Microsoft Teams Rooms on Windows devices with Microsoft Endpoint Manager - Microsoft Tech Community
- Download MTR Pro agent installer – Download the Agent’s zip file from https://aka.ms/serviceportalagentmsi and extract the contents of the zip (ManagedRoomsInstaller.msi) to a local temporary folder.
To install using Intune
Sign in to the Microsoft Endpoint Manager admin center.
Select Apps > All apps > Add.
In the Select app type pane, under Other app types, select Line-of-business app.
Click Select. The Add app steps are displayed.
In the Add app pane, click Select app package file.
- In the App package file pane, select Browse. Then, select the ManagedRoomsInstaller.msi file downloaded previously (refer to the pre-requisites section).
- When you're finished, select OK on the App package file pane to add the app.
In the App information page, perform the following changes:
Publisher: enter Microsoft Corporation.
Ignore app version: select Yes.
Note
The MTR Pro agent is self updating; hence, you should explicitly ignore the app version (any baseline version can update automatically).
(Optional) Category: Select Computer Management.
Click Next to display the Assignments page.
- Under the Required section, click + add group to target a group of devices for installation of the agent.
- In the Select group pane, type the group name in the Search box (refer to pre-requisites above) and click on the desired group and click Select. For more information, see Add groups to organize users and devices and Assign apps to groups with Microsoft Intune.
Click Next to display the Review + create page.
Review the values and settings you entered for the app. When you are done, click Create to add the app to Intune.
Once the process is completed, your devices will start installing the MTR Pro agent after a few minutes.
Note
Following installation, the Teams Rooms Pro management agent may take up to eight hours to execute a self-update to the latest version and become listed in the Teams Rooms Pro management portal. To expedite the automatic enrollment in the Teams Rooms Pro management portal, consider restarting the Teams Rooms device following the agent deployment.
Completing enrollment
When the installation is complete, wait 5-10 minutes, then refresh the portal to view the device in the list, reported as Onboarding state.
In Onboarding state, the status of the room is displayed and updated but it won't raise any alerts or create investigation tickets.
Choose the room and select Enroll to start receiving incident alerts.
Unenrolling and uninstalling monitoring software
To unenroll the device, remove the monitoring agent from the Teams Rooms device as follows:
On the device being monitored, log in the device as administrator. Be sure to follow the steps in Performing operations as the Admin user of the device.
Download reset script from aka.ms/MTRPDeviceOffBoarding.
Extract the script somewhere on the device and copy the path.
Open PowerShell as administrator: In the Windows Search field (bottom-left section of the screen), enter ‘Powershell' and right-click Windows PowerShell.
Select "Run as Administrator" and accept UAC prompt.
Enter Set-ExecutionPolicy –ExecutionPolicy RemoteSigned , then press Y on next prompt.
Paste or type the full path to the unzipped offboarding script into the PowerShell window and press Enter. Example:
C:\Users\admin\Downloads\MTRP\_Device\_Offboarding\MTRP\_Device\_Offboarding.ps1This command resets the device to user standard MTR updates and removes the Teams Rooms Pro management monitoring agent and files.
From the left-hand menu in the Microsoft Teams Rooms Pro Management portal, select Rooms.
In the list of rooms provided, choose the room you want to unenroll and select Unenroll to stop getting incident alerts or investigation tickets, or to report an incident for the room.
Troubleshooting table
Note
All Microsoft Teams Rooms Pro monitoring errors are logged on a specific Event Log file named Microsoft Managed Rooms.
Application runtime log file location =
C:\Windows\ServiceProfiles\LocalService\AppData\Local\ServicePortalAgent\ app-x.x.x\ServicePortalAgent\ServicePortal_Verbose_LogFile.log, where x.x.x is the app version number.
| Symptom | Recommended Procedure |
|---|---|
| You receive an error message stating: ERROR: Please run this application with |
Run the application with escalated privileges and try again. |
| You receive an error message stating: TPM data cannot be found |
Ensure that your device has TPM (Trusted Platform Module) turned on in its BIOS. This is usually found in the security settings of the device BIOS. |
| You receive an error message: ERROR: Local user account named 'Admin' or 'Skype' not found |
Ensure that the user accounts exist on the certified Microsoft Teams Rooms systems device. |
| You receive any error state messages that are not covered above. | Please provide a copy of your installation log to your Microsoft Teams System support agent. |
Feedback
Coming soon: Throughout 2024 we will be phasing out GitHub Issues as the feedback mechanism for content and replacing it with a new feedback system. For more information see: https://aka.ms/ContentUserFeedback.
Submit and view feedback for