Upgrade from Workflow Manager to SharePoint Workflow Manager on a new farm
APPLIES TO:  2013 2016 2019 Subscription Edition
  SharePoint in Microsoft 365
Overview
When upgrading older SharePoint farms that are using Classic Workflow Manager (WFM) to a newer version of SharePoint, WFM needs to be upgraded to SharePoint Workflow Manager (SPWFM) as well. Since you're installing a fresh copy of SPWFM on new hardware and upgrading the existing WFM databases, this procedure is essentially a mix of the new install and upgrade procedures with some added steps.
Note
As you are upgrading an existing WFM farm to a SPWFM farm, the WFM databases will be reused. Your existing registration and workflows should remain intact.
Step 1: Prepare the old Workflow Manager farm
You need information from the "old" environment to properly configure the "new" environment.
Get the Certificate Generation Key
As the upgrade steps require that you join an existing workflow farm, you need the WFM "Certificate Generation Key" when rejoining. If you don't know what that key is and have no written record, reset the Certificate Generation Key for WFM and Service Bus before proceeding. You must join the existing workflow farm with the proper Certificate Generation Key.
Check the Scope
You need to re-register the SPWorkflowService using the same scope name that was used in the old farm.
- To check the scope name, run the following PowerShell on one of the SharePoint servers in the “old” farm:
Add-PSSnapin *sharepoint*
$site = (Get-SPWebapplication -IncludeCentralAdministration | ?{$_.IsAdministrationWebApplication}).Sites[0]
$wfmProxy = Get-SPServiceApplicationProxy | ?{$_.TypeName -eq "Workflow Service Application Proxy"}
$wfmProxy.GetWorkflowServiceAddress($site)
- An address displays similar to this: https://apps.contoso.local:12290/SharePoint2013
The part after the port number is the scope name. In this example, it's "SharePoint2013”. Write down the scope name and save it for later. You need it when you run Register-SPWorkflowService in the new farm.
Check the service account and admin group
- On the WFM server in the "old" farm, open PowerShell.
- Run
GET-wffarm | select runasaccount, admingroup
Example:

Take note of the account and the group. When you rejoin the workflow farm in the new environment, you must supply the password for the RunAsAccount. Only users who are members of the AdminGroup are able to browse the workflow endpoint URI and run the Register-SPWorkflowService command.
Disjoin the old WFM farm
Important
You must run the wizard and leave the workflow farm on the "old" WFM server. You must do this for all nodes in the WFM farm so that the Workflow and Service Bus databases contain no hosts.
If you skip this step, you will orphan the host entries in the Workflow and Service Bus databases, which will cause many problems in the new environment.
- Sign in to the server hosting the WFM farm and open “Workflow Manager configuration”.
- Select Leave Workflow Manager farm and run through the steps to leave the current farm.
- If you have multiple nodes (hosts) in your WFM farm, repeat this step for each node.
Note
SharePoint Workflow Manager will be installed on your new hardware on the new farm. There is no need to uninstall Workflow Manager and the Service Bus components from your old servers.
If you want your "old" WFM farm to remain functional during the migration, backup the Workflow and Service Bus databases as described below, then rerun the wizard to rejoin the farm. To prevent moving any node info to the new farm, ensure all nodes are disjoined at the time of the database backup.
Step 2: Move the Databases
Move the Content Databases
To maintain parity between the SharePoint sites and the workflows that run on them, you must move the content databases along with the App Management service and WFM databases. Upgrading SharePoint content is outside the scope of this document, but we refer to a few items related to upgrading WFM.
Using the database attach method, you can move SharePoint content databases from the old farm to the new farm.
Note
If you are moving to a newer major version of SharePoint, you may have to complete an intermediate upgrade step. For example, only SharePoint 2016 and 2019 can be directly upgraded to SharePoint Server Subscription Edition (SPSE). SharePoint 2013 cannot. To upgrade a SharePoint 2013 content database to SPSE, you must first upgrade it to SharePoint 2016, then to SPSE.
Learn more at:
- Upgrade to SharePoint Server Subscription Edition
- Upgrade to SharePoint Server 2019
- Upgrade to SharePoint Server 2016
Move the App Management database
Since workflows get their permission to SharePoint content through app principals stored in the App Management database, you must also upgrade/migrate this database to the new farm.
Important
You must move the App Management database along with the content, WFM, and Service Bus databases. If you don't, all workflows created before the migration will fail.
You will encounter Issue 3: Workflows fail and return "Cannot get app principal permission information" error. While the problem can be corrected later, it is easier to avoid it by bringing the App Management database along during the upgrade/migration.
These are the basic steps:
- Backup the App Management database in the old farm using SQL Server backup.
- Restore the App Management database to the new SQL server.
- Create a new App Management Service In Central Administration in the new farm, go to Manage Service Applications and create a new App Management Service. In the Database section, enter the SQL server name and database name of the App Management database that you restored from the old farm. Basically, we're creating a new service app by reusing the old database. That should upgrade the database to the current SharePoint version.
- Confirm the service is in the default proxy group. Make sure that this new App Management Service is in the default proxy group, and that your web applications are using it.
Note
Like the content databases, if you are moving to a newer major version of SharePoint, you may have to complete an intermediate upgrade step. For example, only SharePoint 2016 and 2019 can be directly upgraded to SharePoint Server Subscription Edition (SPSE). SharePoint 2013 cannot. To upgrade a SharePoint 2013 content database to SPSE, you must first upgrade it to SharePoint 2016, then to SPSE.
Move the WFM and Service Bus databases
If the upgrade/migration includes moving databases to a new SQL server, you need to move all the WFM and Service Bus databases.
- Back up the databases on the old SQL server:
- SbGatewayDatabase
- SbManagementDB
- SBMessageContainer01
- WFInstanceManagementDB
- WFManagementDB
- WFResourceManagementDB
- Restore the databases on the new SQL server.
Restore the databases on the new SQL server
Important
You must restore the 6 databases to the new SQL server using the same database names that were used previously. If you change the database names, the workflow configuration wizard will time out when trying to start the Service Bus services.
Create a SQL alias
The workflow manager configuration wizard only prompts you to enter connection information for 2 of the six databases. The connection strings for the other four databases are stored within the two databases that you specify. This is why it's important to restore the databases with the same names that were used previously.
To keep the previous DB connection strings working, you must also create a SQL alias on the new SPWFM server(s).
- Find the name of the "old" SQL server by running this SQL query against the "SbManagementDB" database:
select Name, Value as "SQLServerName" from store.serviceconfig where name = 'SBGatewayDatabaseServer'
Example:

- On the SPWFM server, go to Start | Run and type in "cliconfg"
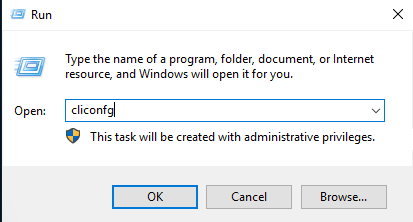
- On the Alias tab, select Add.
- Choose TCP/IP for the Network library.
- In the "Server Alias" box, type in the name of the "old" SQL server. Example: "SQL"
- In the "Server name" box, type in the name of the "new" SQL server (Example: "New_SQL"), and select ok.
Note
WFM versions do not align with SharePoint versions, which means if you're doing a multi-version upgrade of SharePoint, you do NOT have to upgrade WFM on each step.
For example, when upgrading from SharePoint 2013 to SharePoint 2019, you must upgrade the content databases and App Management service application to SharePoint 2016 and then to 2019. But you do NOT have to upgrade WFM in the 2016 farm. Only a single upgrade from WFM (in the 2013 environment) to SPWFM (in the 2019 environment) is required.
Step 3: Prepare the new SharePoint Workflow Manager server
Verify the IIS Server Role
- Check to see if you have the "Web Server (IIS)" server role installed on your new SPWFM server. Install it if it isn't on the server.
If you're installing SPWFM on a non-SharePoint server, it may not already have it installed. Unfortunately, there's nothing forcing you to install it, so if you don't, the Workflow Configuration Wizard fails with the error, "Could not load file or assembly 'Microsoft.Web.Administration".
Install Azure Service Fabric
SharePoint Workflow Manager requires Azure Service Fabric, which must be installed before you run SharePoint Workflow Manager setup. If the Azure Service Fabric Runtime isn't already installed, follow these steps below to install it:
The minimum version of Azure Service Fabric Runtime supported by SharePoint Workflow Manager is 9.1.1583.9590, and you can download it from Azure Service Fabric Runtime. Or you can find and download any higher version of its Windows Installer from here.
Open a PowerShell console as an elevated administrator and run the following command:
.\MicrosoftServiceFabric.9.1.1583.9590.exe /accepteula
To verify the Azure Service Fabric is installed, you should be able to find it in the Programs and Features of the Control Panel.
Note
SharePoint Workflow Manager supports version 9.1.1583.9590 of Azure Service Fabric and higher versions.You can install higher versions than that. Learn more at Service Fabric supported versions.
If you want to directly upgrade your Azure Service Fabric without uninstalling, be aware of the upgrade dependencies. Learn more at Service Fabric supported versions.
Important
If Windows Fabric is already installed on your computer, you must uninstall it before installing Azure Service Fabric.
Install SPWFM and the SPWFM client on the SPWFM server
- On the SPWFM server, download and install the SharePoint Workflow Manager Client and SharePoint Workflow Manager
Install the SPWFM Client on all SharePoint servers
- Download the installer for SharePoint Workflow Manager Client.
- Install the SharePoint Workflow Manager Client on all the SharePoint servers in the farm.
Configure App Management and Subscriptions Settings services
- On the SharePoint server (if you haven't already) set up the App Management service using the upgraded App Management database from the old farm. See the “Move the App Management Database” step above.
- Create a new Subscription Settings service.
$sa = New-SPSubscriptionSettingsServiceApplication -ApplicationPool 'SharePoint Web Services Default' -Name 'Subscriptions Settings Service Application' -DatabaseName 'Subscription'
New-SPSubscriptionSettingsServiceApplicationProxy -ServiceApplication $sa
- Check the App Management and Subscription service apps. They should be in "Started" state.

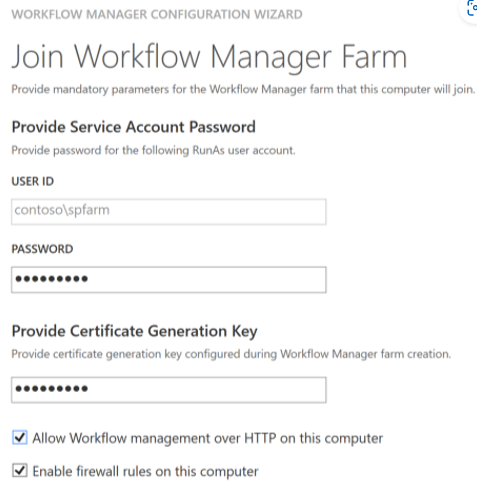
Step 4: Rejoin the Workflow Farm and Upgrade
- Run the SPWFM configuration wizard.
- On the SPWFM server, open “Workflow Manager Configuration” and select Join an existing Workflow Manager farm.
- Enter the SQL Server and database details that the previous WFM 'classic' install was using, and then run through the setup.
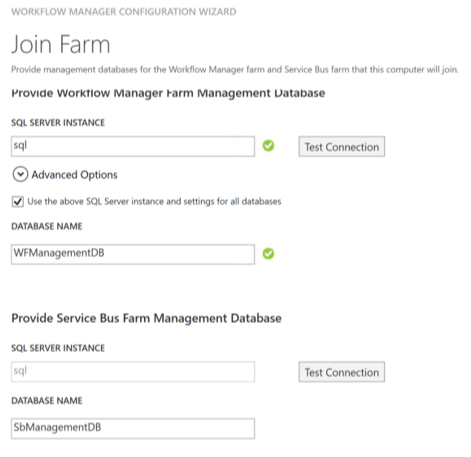
- Enter the password for the service account and the Certificate Generation Key.
- On the SPWFM server, open “Workflow Manager Configuration” again and select Upgrade Workflow Manager Farm, and let it run until finished.
Trust the SPWFM SSL certificate on the SharePoint servers
Since SharePoint must contact the SPWFM service endpoint, the SharePoint servers must trust the certificate it's using.
Export the certificate
- On the SPWFM server, open IIS Manager. Right-click on the Workflow Management Site and choose Edit Bindings. Select the HTTPS binding on port 12290 and choose Edit. Select the "View" button next to SSL certificate.
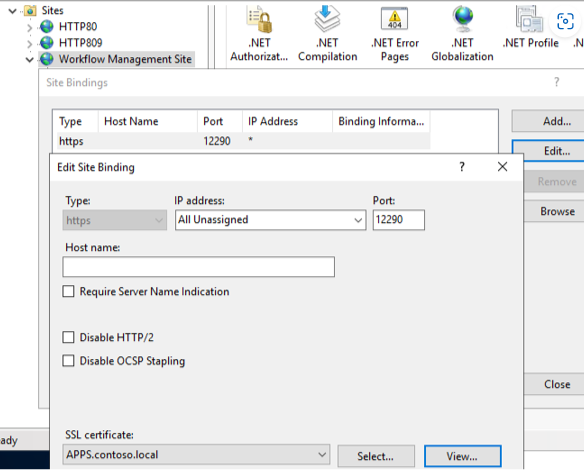
- Select the Details tab and choose “Copy to File…”
- Run through the Certificate Export Wizard to export the certificate without the private key as aDER encoded binary X.509 (.CER) certificate.
- Copy the .cer file to the SharePoint Central Administration server.
Add the SPWFM certificate to the Farm Trust
- In Central Administration, to go Security > Manage Trust.
- Choose New, give it a name like “Workflow” or “SPWFM”.
- Select Choose File, and then select the .cer file you copied to the computer. Select OK.
Add the SPWFM certificate to Trusted Root Authorities
- On the Central Admin server, right-click on the SPWFM certificate .cer file and choose Install Certificate.
- Using the Certificate Import Wizard, choose Local Machine > Place all certificates in the following store > Browse > Trusted Root Certification Authorities.

Important
You must repeat this certificate import step on all the SharePoint servers in the farm.
Validate the SharePoint Workflow Manager endpoint
Check from the SPWFM server first. a. Select Workflow Management Site. In the right-hand pane, choose Browse *12290 (https). b. A browser opens; navigate to https://localhost:12290. If you allowed connections over HTTP during setup, you'll have an HTTP endpoint on port 12291 and an HTTPS endpoint on port 12290. c. Test both the http and https endpoints.
Check from your SharePoint servers. Ultimately it's your SharePoint servers that must connect to the SPWFM endpoint, so you must make confirm there's connectivity from there as well.
a. Sign in to one of your SharePoint Servers with either the SPWFM RunAs account, or as a user that is a member of AdminGroup. See “Check the service account and admin group” step above.
b. Browse to the FQDN of the SPWFM endpoint.
For example:
https://apps.contoso.local:12290/. The result should look like this:

Register the Service
- Sign in to any SharePoint server as either the SPWFM RunAs account, or a user that is a member of AdminGroup. See “Check the service account and admin group” step above.
- Run the Register-SPWorkflowService command to register the workflow service within SharePoint. You need the SPWFM endpoint URI, the name of the Scope you gathered in the “Check the scope” step above, and will need to include the -Force parameter.
Example:
Register-SPWorkflowService -SPSite http://www.contoso.local -WorkflowHostUri https://spwfm.contoso.local:12290 -ScopeName SharePoint2013 -Force
Validate the Configuration
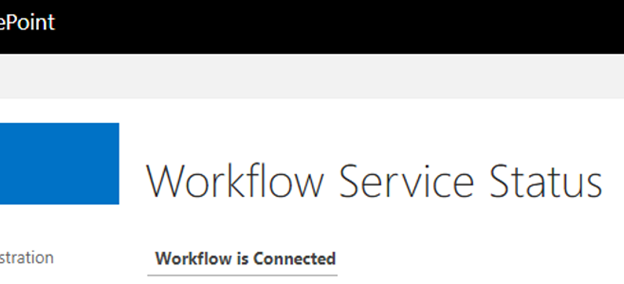
- Check the Workflow Service Application proxy in the Central Administration > Manage Service Applications. Select the link for Workflow Service Application Proxy. It should show as connected.
Example:
Test a new workflow
a. Sign in to a client computer, and then open SharePoint Designer.
b. Open one of your sites and go to Workflows.
c. Create a new workflow and make sure you can see the “SharePoint Workflow 2013” in the list of platforms to choose from.
d. Create a basic "log to history" 2013-platform workflow and test to make sure it’s successful.Test an old workflow
a. Find a list that had a workflow assigned to it in the "old" farm.
b. Launch a new instance of that workflow and verify that it works. If you included the App Management service app database during the migration, and ran the Register-SPWorkflowService using the correct "scope" name, workflows from the old farm should continue to work.