Note
Access to this page requires authorization. You can try signing in or changing directories.
Access to this page requires authorization. You can try changing directories.
Important
This feature is part of the Frontier preview program. Frontier connects you directly with Microsoft's latest AI innovations. Frontier previews are subject to the existing preview terms of your customer agreements. As these features are still in development, their availability and capabilities might change over time.
The Business Analytics app provides two ways to export data:
Use the Export page to find and manage export options across the services and datasets available to you.
Export directly from a dashboard under Services to export data associated with that service and dashboard view.
The Export page is designed for users whose primary goal is to retrieve data without first navigating through an individual dashboard. It brings available export options and export history together in one location. Dashboard-level export remains available when you want data specifically associated with the service or view you're currently using.
Export is only available when it's enabled for employees using access management. It's enabled by default.
Important
The services, datasets, export destinations, filters, and identifier options that appear depend on your organization's configuration and your assigned permissions. You might not see every option described in this article. If an expected service, dataset, export action, or identifier setting isn't available, contact your administrator to verify your access.
Export options
Depending on the selected service and your access, the app can provide the following export options:
CSV download: Create and download a file containing the selected service data
Microsoft Fabric or Power BI connection: Configure a programmatic or recurring connection for using the service data in Fabric or Power BI
Data warehouse connection: Connect the data to an available warehouse destination by using supported Fabric capabilities – Copy Job
MCP connection: View the setup information for making the service data available through an MCP connection
Some connection types provide setup instructions rather than immediately creating a downloadable file. Follow the guidance displayed for the selected connection type.
How to use the Export page
Use the Export page when you want to review the export options available across services or manage exports from a central location.
Open Business Analytics.
On the left, select Export.
Find the service or dataset that you want to export, and select Export data.
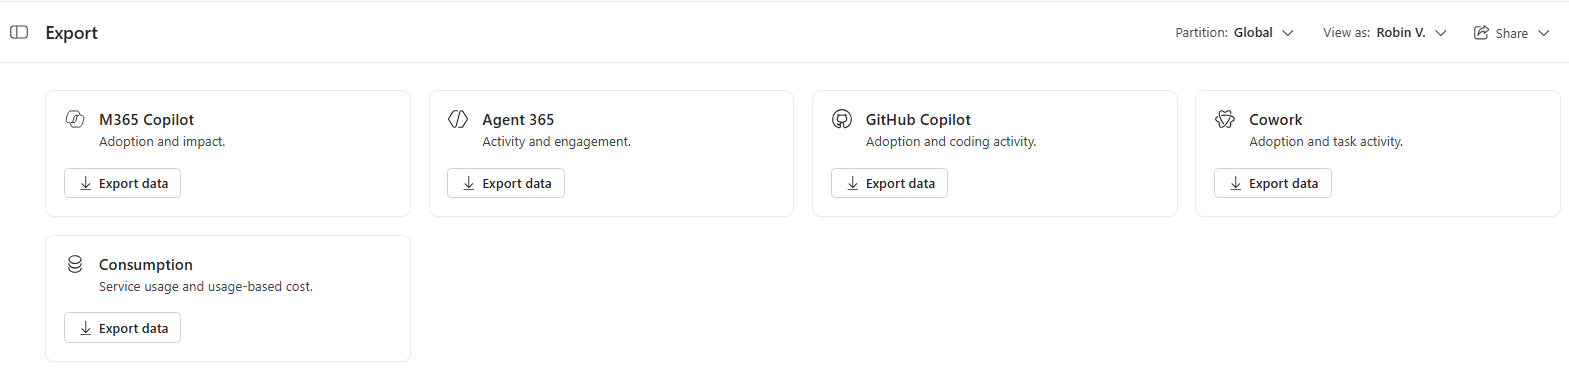
Configure a file export
When you start a file export, a configuration window opens. The available settings can vary by service or dataset.
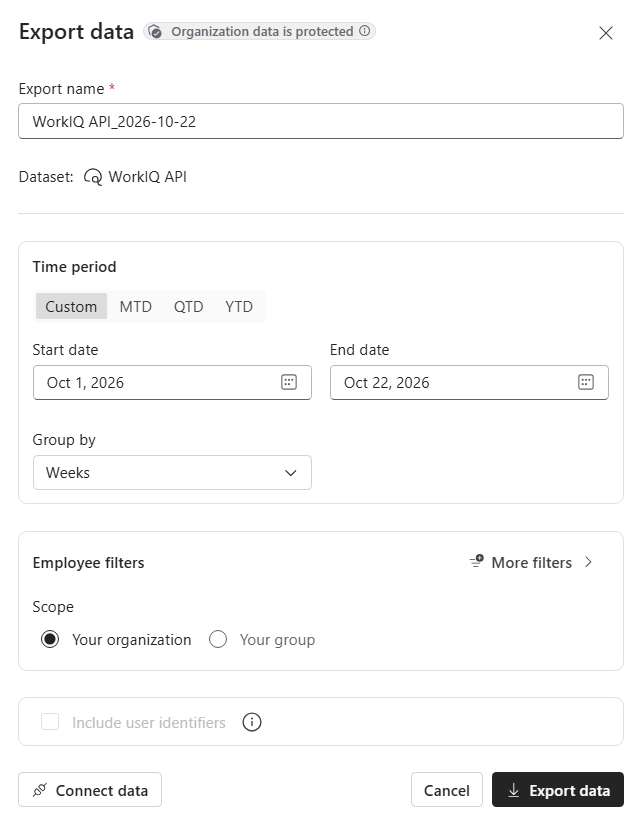
Select a time period
Choose the time period to include in the export. Available choices can include:
A custom start and end date
Month to date
Quarter to date
Year to date
Select how to group the data
Where supported, group the exported results by day or week.
Select the organizational scope
If more than one data scope is available to you, select the population to include. For example, you might be able to export data for the organization or restrict the export to your assigned reporting group.
Your access policy and data partition determine the employee population and datasets that you can include.
Apply employee and organizational filters
Use employee filters to retrieve a targeted subset of the available data. Depending on the dataset and your organization's configuration, filters can include attributes such as:
Function
Job or designation
Level
Location
Additional organizational attributes can appear when they have been made available by your organization's administrator.
The selected filters are applied to the export so you can retrieve a focused dataset instead of downloading a broad file and filtering or joining it afterward.
Choose whether to include user identifiers
If your access permissions allow identifiable exports, the configuration window can display an Include user identifiers setting. Turn on this setting to include available identifiers, such as a Microsoft Entra ID or user principal name, in the exported file.
Because user identifiers are sensitive information, the setting is off by default. If you don’t have permission to export identifiable information, the setting isn’t displayed and the export uses anonymized identifiers.
Connect data (optional)
If you'd like, at the bottom left, select Connect data to use a connection option. Choose this setting when you want to make data available through a supported recurring or programmatic destination instead of creating a one-time file. Choose between a Microsoft Fabric, Power BI, Data warehouse, or MCP connection and follow the on-screen instructions.
Start the export
After you configure the export:
Review the selected time period, grouping, population, and filters.
If you're creating a .csv download, select Export data to start the download.
The export is added to your export history. Depending on the size and type of export, processing might continue after you close the configuration window.
How to review export history
The Export page includes a history table for reviewing your exports.
Use the table to check information such as:
Export status
Whether the file is ready to download
Export date range
Selected service or dataset
Other details associated with the export
When processing is complete, use the available download action to retrieve the file.

How to export to data within a dashboard
You can also export data while viewing an individual dashboard under Services.
Dashboard-level export is scoped to the service and view you're currently using. Use it when you're already reviewing a dashboard and want the associated data. Use the Export page when you want to browse options across services or review export history centrally.
To export from a service dashboard:
In Business Analytics, under Services on the left, select the dashboard you want to review.
At the top right, select Export.

Configure the available export settings and start the export using the same steps described above.
Most service dashboards use the same basic export workflow. A service can provide additional settings when its data requires a different file or packaging option.
Note
The All services page doesn't provide a single combined export. To retrieve data from multiple services, export each service separately either from the Export page or the corresponding dashboard.