Note
Access to this page requires authorization. You can try signing in or changing directories.
Access to this page requires authorization. You can try changing directories.
To run Microsoft Shopping campaigns, you must create a feed and upload a catalog feed file. A feed file contains a list of your products and attributes that define how they will display on the Microsoft Advertising Network. Whenever you want to update your feed, you upload an updated feed file. Each store can have more than one feed, but the products in each file must be unique per market.
This article covers the following topics related to creating and organizing your feed files:
- Create a feed
- Create a feed file
- Submit a feed file
- Update a feed file
- Delete a feed file
- Show your products in multiple countries
- About test feeds
- About supplemental feeds
Create a feed
After you verify that you own your URL and your newly created store is approved, you create your feed. Note that you will need your feed file ready for feed creation. For more information, see Create a feed file.
- From the navigation menu on the left, select Tools > Merchant Center > Feeds.
- Select Create feed and enter your feed name.
- You can choose to enable your feed for testing only.
- Make sure to select Primary feed in the Feed type dropdown menu. Your primary feed can serve Online Product ads and/or Local inventory ads.
- Choose your Destinations: Online Product ads and/or Local inventory ads. This setting controls where you want your products to appear.
- Choose the rest of your options, including the Feed label or****Country of sale and any additional countries under Add more countries (optional). To learn more about this option, see Show your product in multiple countries.
- If you're specifying multiple countries/regions, you need to also specify currency under Default currency.
- Under Input method, you will see various options for submitting your feed file: Manually upload, Upload via FTP/SFTP, Automatically download file from URL, and Import.
- Select Create feed.
Create a feed file
Here is how you create a feed file using a spreadsheet program. If you want to use a text editor, make sure to use the required attributes. You can also take a look at this short example of a feed file.
Note
Your feed file must be tab-delimited plain text with extensions: TXT, ZIP, GZ, GZIP, TAR.GZ, TGZ. We only support XML files if it is an existing Google-formatted XML file.
The feed name is used for identification in Feeds and in Feed reports. It can be modified at a later time.
Open Microsoft Excel or another spreadsheet program.
Create a header row in the first row listing the attribute names used to describe products. Each attribute must be in its own column.
Be sure to include all required attributes.
Remember, if you added additional countries to your feed, you need to add their currency by listing their currency symbols (per ISO 4217). To learn more about this option, see Show your products in multiple countries.
Enter your product offer information in the rows below the header row, using one row for each product.
Each item's attribute values should be listed in the same column as the corresponding header attribute name. This means a product's ID must be in the column with header attribute “id”.
Save your spreadsheet as a tab delimited Excel file (TXT).
File format requirements
If the following file format requirements are not met, your feed file will not be processed.
- File must be tab-delimited plain text with extensions: TXT, ZIP, GZ, GZIP, TAR.GZ, or TGZ. XML files are also accepted (if Google-formatted).
- File name cannot contain any spaces.
- The file name can have a maximum of 50 characters.
- If uploading via FTP, the file name of TXT or XML files must match the file name specified for a feed's settings.
In the case of compressed text format, the compressed TXT file inside the archive (ZIP, GZ, GZIP, TAR.GZ, TGZ) must have the matching file name. Any feed file that is archived needs to have a single compressed file inside. - File must start with a single header row.
- Each product offer must be on a separate line of the file.
- Do not include HTML in the text files.
- Do not include trailing tabs at the end of lines.
- Do not include tabs or line breaks in the middle of offer attributes.
- Special/invalid characters will cause processing problems. Learn more about Accepted Symbols in feed files next.
Accepted symbols in feed files
Below are the symbols/special characters and what attribute they are accepted in.
Symbols Where you can use Period [.] Prices, URLs Colon [:]
Question [?]
Forward-slash [/]
Equal [=]URLs Hyphen [-] Offer Identifiers where this is valid (eg: ISBN, MPN) Pipe [|]
Comma [,]
Greater [>]Multi-value fields (MerchantCategory, B_Category) Percent [%]
Special ASCII charactersRedirect URL (ads_redirect) Any Unicode symbol Brand, Title, Description Microsoft Merchant Center supports the use of Google data feeds for catalog feed files. This way merchants won’t have to redo the work already done for Google's Product Listing Ads. Make it even easier to import your Google feed files to Microsoft Merchant Center by using the Google Merchant Center import tool. Learn more
Submit a feed file
Feed file submission methods specify how you will transfer the product offer information files to Microsoft Merchant Center. After you have created and perhaps also tested a corresponding feed file, it can be submitted to the associated feed. Once submitted, the feed file should finish processing within a few minutes; however, depending on the size of the file it can take up to several hours. The editorial review process can take up to 24 hours. If it doesn't pass the initial review, it'll undergo an additional review that may take up to three business days. If you still see an error after that time, please contact Support.
There are a couple different ways to submit a feed file:
Manually upload
You may use this option if the feed file is smaller than 4MB.
- From the navigation menu on the left, select Tools > Merchant Center > Feeds.
- Select Create feed.
- At the bottom of the setup wizard, select Manually upload.
- Browse for feed file and select Create feed.
Upload via FTP/SFTP
You may use this option if the feed file is smaller than 1GB. We recommend this option if the feed file is larger than 4MB.
If uploading via FTP/SFTP, the file name of TXT or XML files must match the file name specified for a feed’s settings. For compressed text format, the compressed TXT file inside the archive and the archive file (ZIP, GZ, GZIP) must have the matching file name. Any feed file that is archived needs to have a single compressed file inside. The max file size should be no more than 3GB (after the file is uncompressed, if the file is compressed).
From the navigation menu on the left, select Tools > Merchant Center > Feeds.
Select Create feed.
At the bottom of the setup wizard, select Upload via FTP/SFTP.
Enter Update feed. Do not include the file extension (for example, "merchant").
Select Create feed.
Enter File name. Do not include the file extension. For example, “merchant”.
If necessary, you can always select Change the FTP/SFTP account settings and update your FTP user name and password. To do this, you must follow the Update a feed file instructions.
You can now upload the file via the FTP/SFTP tool of your choice using the file name you specified.
FTP/SFTP server requirements
The recommended FTP/SFTP upload mechanism is via an FTP/SFTP program. It is, however, possible to do so via the command line or custom scripts (such as Python's ftplib.FTP module). The FileZilla FTP client is recommended for all platforms.
Use the following settings for file transfer with your FTP/SFTP client:
- Host: ftps://feeds.adcenter.microsoft.com
- User name: Your store's FTP/SFTP user name. Your user name must be 6 - 64 characters and cannot include any special characters. Use only a - z, A- Z, and 0 - 9.
- Password: Your store's FTP/SFTP password
- Transfer Mode: Passive
Learn more about FTP/SFTP upload.
Automatically download file from URL
You may use this option if the feed file is smaller than 1GB and on a publicly accessible server. The feed file will be downloaded once every 24 hours.
- From the navigation menu on the left, select Tools > Merchant Center.
- Select the store name and then the Feeds tab.
- Choose the feed name you wish to edit.
- Select the Feed settings tab.
- Under Feed file, select Automatically download file from URL.
- Enter Source URL (for example,
https://www.contoso.com/feeds/merchant.txt). - If required, enter User name and Password.
- Select Save.
Download the feed file from Google
You may also download your feed file from Google Docs. Keep in mind that we only accept CSV or TSV formats for feed files from Google.
- Open your feed file in Google Docs.
- Select File > Publish to the web.
- Select Web page and select either Comma-separated values (CSV) or Tab-separated values (TSV).
- Select Publish.
- Copy the generated link and use the link as your automatic download URL in your Microsoft Merchant Center feed.
Use the Google Merchant Center import tool
You can use the Google Merchant Center import tool, if you already have Product ads in your Google Merchant Center. Learn how to use the Google Merchant Center import tool.
Update a feed file
Your feed expires after 30 days, which causes the products to stop publishing; so, you need to update your feed file. To keep your product information fresh, it is good practice to upload your feed daily.
Note
Automatically download file from URL is the only upload method that supports built-in frequency scheduling (daily, weekly, or monthly) within Microsoft Merchant Center. If any other upload method is used, feed updates must be scheduled and managed externally.
- From the navigation menu on the left, select Tools > Merchant Center > Feeds.
- Choose the store you want to update.
- Select the Feeds tab.
- Choose and select the feed you want to update.
- Select Update feed.
- Use one of the submission methods detailed above. Note that at this stage, you may change your submission type.
- Select Update feed.
Delete a feed file
Note
For Google Merchant Center imports only, please make sure any scheduled imports have first been deleted.
From the navigation menu on the left, select Tools > Merchant Center > Feeds.
Choose the store for the feed file you want to delete.
Select the Feeds tab.
Select the checkbox next to the feed you want to delete.
Select Delete feed in the blue action bar.
Note
A default catalog cannot be deleted.
Show your products in multiple countries
Note
Not everyone has this feature yet. If you don't, don't worry—it's coming soon!
You can sell your products from a single feed to multiple countries. As you create your feed, the Country of sale specifies which market (country and language) the feed targets. Another option is to select the Use Feed Label checkbox and specify multiple target countries/regions. After indicating one country of sale, you have the option to add more countries.
Note
Your feed can target countries with the same language within your region (for example, the US and Canada or France and Belgium).
For the purposes of eligibility, when you create a Shopping campaign, be sure to select the same countries under Campaign targets that are indicated in your feed (using Let me choose specific locations) or you can also select the worldwide option (All available countries/regions). This is because it’s important that the added countries included in your feed align with those in your campaign location targets. In other words, the information—including details such as product filters—in your feed must align with that in your campaign. See What are the benefits of Shopping campaigns for more information.
Real-time currency conversion
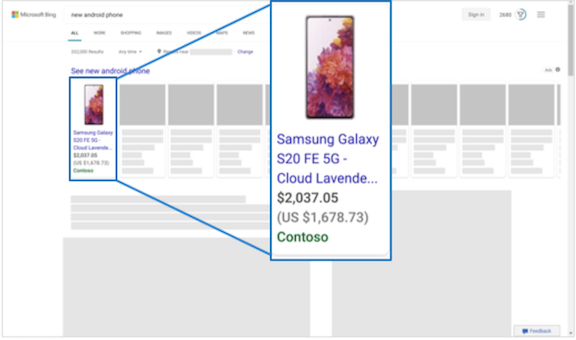
If the ad is shown outside the country of sale, we take care of ensuring that the real-time currency appears. This means that as long as you submit currency codes in your feed file, we make sure your ads show the relevant, converted currency with the country of sale’s currency in parentheses. For example, let’s say that the country of sale is the United States and that Canada is the additional country. As depicted below, an ad shown in Canada will include the Canadian Dollar amount and then the US dollar amount in parentheses.
Note
If you are creating a multi-market feed, the product(s) need to have currency details either in the price field or in the feed setting.
About test feeds
When enabled, this setting allows you to upload a feed for testing potential validation errors, but it won't serve or be published. Products uploaded to a feed enabled for testing will be validated for errors. However, they won't remove or prevent existing products from serving if there are validation errors.
If an existing feed is enabled for testing, all previously submitted offers will be deleted and will stop serving within a few hours.
Notes:
- You can always edit your test feed to change its settings.
- The test feed is for testing only. After testing is complete, clear the Use feed for testing only option and then re-upload the feed to start using it live.
About supplemental feeds
Supplemental feeds allow you to update specific product details in your product catalog without editing your primary feed. This is a streamlined way to manage your catalog, especially when frequent or targeted updates are required.
The override logic lies in matching the supplemental feed's Feed label (for some, Country of sale), corresponding Language, and individual products' Product ID with that in the primary feed. You can either add or update new fields in the supplemental feed, which are applied to the corresponding product in the primary feed (specified by Product ID). Because of Product ID matching, you can only modify product values; you cannot add or delete products.
Note
You can create separate supplemental feeds for each Feed label (or Country of sale) as needed.
You create and upload a supplemental feed into the Microsoft Merchant Center, whose Feed label and Language match a primary feed, and whose fields override corresponding fields in the primary feed. Whatever is left out of the supplemental feed will remain listed as per the primary feed.
Fields currently supported by supplemental feeds are:
- Product ID (required field)
- Custom label (0 – 4)
- Title
- Description
- Promotion ID
- Size
- Color
Uploading a supplemental feed
- From the navigation menu on the left, select Tools > Merchant Center > Feeds.
- Enter a Feed name.
- Select Supplemental feed from the Feed type dropdown menu.
- Select the Feed label (or Country of sale) and Language that match that of the primary feed.
- Select your Input method.
- Select Create feed.
Note
If the products in your primary feed expire, the associated products in the supplemental feed will activate once those in the primary feed do.