Note
Access to this page requires authorization. You can try signing in or changing directories.
Access to this page requires authorization. You can try changing directories.
Important
We support reading consent from the initial state and recommend firing the UET tag before the user makes a choice, prior to consent being given.
Our UET template now supports Google Tag Manager (GTM) Consent mode. Google's Consent Management Platform (CMP) partner program integrates with most CMPs, which you can review via the following resources:
This integration allows us to retrieve the consent state directly from GTM, in the case where you are using both GTM and one of the supported CMPs.
Official UET template installation
You can install the UET template by following the instructions provided here: Set up UET tags using Google Tag Manager.
User consent methods
We have implemented two methods to obtain user consent:
Inherit initial consent (disabled by default)
Enable consent updates (enabled by default)
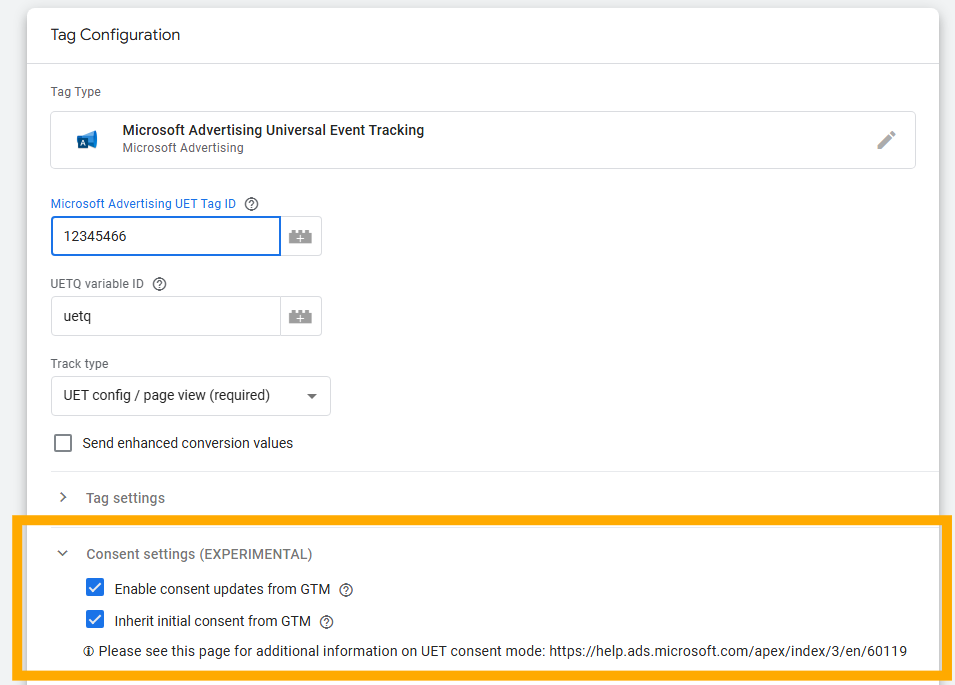
With the default option, Enable consent updates, the UET will obtain consent only after the user clicks the consent button. In some cases, the UET tag may fire after the user has already provided consent, meaning we won't capture consent updates that occur before the UET tag is loaded.
For these scenarios, we recommend enabling the Inherit Initial User Consent option.
Default behavior and recommendations
From our observations, the initial user consent defaults to a specific option even when no CMP is present on the website. Consequently, we have disabled the Inherit Initial User Consent option by default. This option should be enabled only in specific cases where it is necessary to inherit the initial user consent state.
Additional considerations
We understand that the current implementation requires additional actions from your end to ensure proper configuration and integration. it is important that you review the consent settings and, if necessary, customize the consent methods based on your specific requirements and the behavior of your CMPs.
Dynamic consent update in Google Tag Manager
If the official UET template Consent mode doesn't work for you, you can manually push consent signals. The following steps and code snippets demonstrate how to dynamically update the consent state based on user interactions using JavaScript functions and event listeners, such as onClick triggers.
Important
These aren't the only ways to dynamically update the consent state, and your specific setup may require different approaches.
FAQ
Example 1: Updating consent modes using triggers for button clicks
Create user interaction triggers in Google Tag Manager (GTM)
You need to create triggers in GTM that fire when the user interacts with your consent banner (e.g., clicks "Yes" or "No").
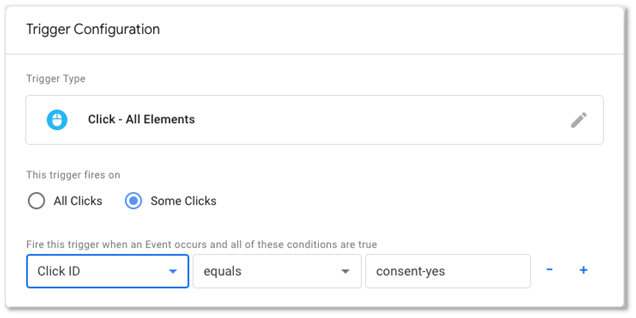
Click Trigger for "Yes":
- Go to Triggers in GTM and create a new trigger.
- Choose Click - All Elements.
- Choose to listen to Some Clicks.
- Select Choose Built-In Variable and select the appropriate variable type. For ID selectors, select Choose Click ID.
- Choose your condition operator and provide your consent prompt button IDs as a value.
- Name the trigger (e.g., "Consent Granted Click").
Click Trigger for "No":
- Repeat the steps above for the "No" button (or equivalent) and name it (e.g., "Consent Denied Click").
Example consent banner HTML
<div id="consent-banner"> <p>We use cookies to improve your experience. Do you accept?</p> <button id="consent-yes">Yes</button> <button id="consent-no">No</button> </div>Example consent-granted trigger
Create custom HTML tags for consent updates
Create two custom HTML tags in GTM to update the consent state based on user interaction.
Custom HTML tag for granted consent
- Go to Tags and create a new tag.
- Choose Custom HTML Tag.
- Add the following script
<script> window.uetq = window.uetq || []; window.uetq.push('consent', 'update', { 'ad_storage': 'granted' }); </script>- Set the Triggering to the "Consent Granted Click" trigger you created earlier.
- Save and publish the tag.
Custom HTML tag for denied consent:
- Repeat the steps above but change the script to:
<script> window.uetq = window.uetq || []; window.uetq.push('consent', 'update', { 'ad_storage': 'denied' }); </script>- Set the Triggering to the "Consent Denied Click" trigger you created earlier.
- Save and publish the tag.
Implementing the consent banner
Ensure your consent banner HTML includes buttons with IDs or classes that can be used to identify the elements for the GTM triggers.
Example 2: Updating consent modes using custom events
Send custom events on user choices to GTM's data layer
If you already are listening to user privacy choices and control JavaScript on your page, you may choose to leverage custom events that are sent to GTMs data layer and that can be used as custom event triggers in your GTM workspace.
Example consent banner HTML
<div id="consent-banner"> <p>We use cookies to improve your experience. Do you accept?</p> <button id="consent-yes">Yes</button> <button id="consent-no">No</button> </div>Assuming your consent banner looks like the above, a custom GTM event can be sent to GTM's data layer.
jQuery
$('#consent-yes').click(function() { dataLayer.push({'event': 'consent_granted'}); });JavaScript
document.getElementById('consent-yes').addEventListener('click', function() {
dataLayer.push({'event': 'consent_granted'}); });
Create User Interaction Triggers in GTM
You need to create triggers in GTM that fire when the user interacts with your consent banner (e.g., clicks "Yes" or "No").
Click Trigger for "Yes"
- Go to Triggers in GTM and create a new trigger.
- Choose Custom Events.
- Choose a descriptive event name.
- Choose to listen to Some Custom Events.
- Select Event as the variable type.
- Choose your condition operator and provide your data layer event name from your custom JavaScript function.
- Name the trigger (e.g., "Consent Granted Click").
Click Trigger for "No"
- Repeat the steps above for the "No" button (or equivalent) and name it (e.g., "Consent Denied Click").
Create custom HTML tags for consent updates
Create two custom HTML tags in GTM to update the consent state based on user interaction.
Custom HTML tag for granted consent
- Go to Tags and create a new tag.
- Choose Custom HTML Tag.
- Add the following script:
`<script> window.uetq = window.uetq || []; window.uetq.push('consent', 'update', { 'ad_storage': 'granted' }); </script>`- Set the Triggering to the "Consent Granted Click" trigger you created earlier.
- Save and publish the tag.
Custom HTML tag for denied consent:
- Repeat the steps above but change the script to:
`<script> window.uetq = window.uetq || []; window.uetq.push('consent', 'update', { 'ad_storage': 'denied' }); </script>`- Set the Triggering to the "Consent Denied Click" trigger you created earlier.
- Save and publish the tag.
Example 3: Setting consent mode for Universal Event Tracker using a Google Tag Manager template
Important
We suggest using the official UET template installation. Alternatively, you can use Google Tag Manager's custom template, which allows you to control the consent mode settings for the Universal Event Tracker.
To toggle Universal Event Tracker's consent mode based on Consent Management Platform (CMP) user interactions, you can implement the following tag template in your Google Tag Manager account.
Create a new template
First, we are going to create a new tag template that later can be used to generate custom tags.
Create a new template
- Go to Templates in GTM and create a new template.
- In the Info tab, fill out the meta data for your custom template.
- Go to the Code tab, and paste the following code into the code field.
`// COPY START
const isConsentGranted = require('isConsentGranted');
const addConsentListener = require('addConsentListener');
const setInWindow = require('setInWindow');
const callInWindow = require('callInWindow');
const logToConsole = require('logToConsole');
// UET consent update handler
const updateUetConsent = (consentType, granted) => {
  setInWindow('uetq', [], false);
  let consent = {};
  consent[consentType] = granted ? 'granted' : 'denied';
  logToConsole('GTM template updating UET consent:', consent);
  callInWindow('uetq.push', 'consent', 'update', consent);
};
// set UET consent default
setInWindow('uetq', [], false);
callInWindow('uetq.push', 'consent', 'default', { 'ad_storage': 'denied' });
// update UET consent on ad_storage consent changes
addConsentListener('ad_storage', updateUetConsent);
// update UET consent if pre-existing ad_storage consent
if (isConsentGranted('ad_storage')) {
  logToConsole('GTM template detected pre-existing ad_storage consent granted');
  updateUetConsent('ad_storage', 'granted');
}
data.gtmOnSuccess();
// COPY END`
 1. Go to the **Permission** tab, and make sure the following permissions are granted.

    1. **Accesses consent state** with read permissions for the consent type ad_storage
    1. **Access global variables** for the keys uetq (read & write) and uetq.push (execute)
    1. **Logs to console** with the limitation to only log during debug and preview
 1. Test your template and save it if all tests have been successful
Create a new tag based on the template
After you have created your new template, you can proceed to create a new tag.
Create a new Tag
- Go to Tags in GTM and create a new tag.
- Select Tag Configuration and select your newly created template under the Custom category.
- Define a Trigger for your tag. Preferably, this should be the same trigger as your Universal Event Tracker Base tag trigger or All Page Views.
- Save your tag.
- Publish the changes to your container.
Example 4: Controlling Universal Event Tracker fires with Google Tag Manager's consent requirement
Important
This approach may prevent Universal Event Tracker from measuring events in the absence of consent. Universal Event Tracker can be loaded on pages with the applicable consent settings to avoid the usage of personal data in the absence of consent. Please refer to Example #3 for further reference.
If you work with a CMP that is supporting Google's consent mode feature, you may choose to only fire Microsoft's Universal Event Tracker if a user has granted consent to given purposes.
Edit Universal Event Tracker consent setting
- Go to Tags in GTM and select your Universal Event Tracker.
- Choose Tag Configuration and Edit the existing tag.
- Expand the Advanced Settings.
- Expand the Consent Settings section.
- Select Require additional consent for tag to fire.
- Select the necessary purposes, such as ad_storage.
- Save your changes.
Important
This will cause Universal Event Tracker to only measure events in cases where users have granted consent to the ad_storage purpose via your CMP provider.
Testing and debugging
- Preview Mode in GTM: Use GTM's preview mode to test the triggers and tags.
- Check Console: Open the browser console to check if the consent updates are being pushed correctly.
By following these steps, you can dynamically update the consent settings based on user interactions using GTM. This method ensures that the user's consent preferences are honored in real-time, providing a compliant and user-friendly experience.
Example 5: For customers who have been managing consent and ad_storage correctly, but are facing challenges enabling consent with Microsoft Advertising, please use the solution below
Important
We recommend this solution for customers who manage General Data Protection Regulation (GDPR) consent appropriately and load the UET JavaScript code only after users have provided their consent.
Note
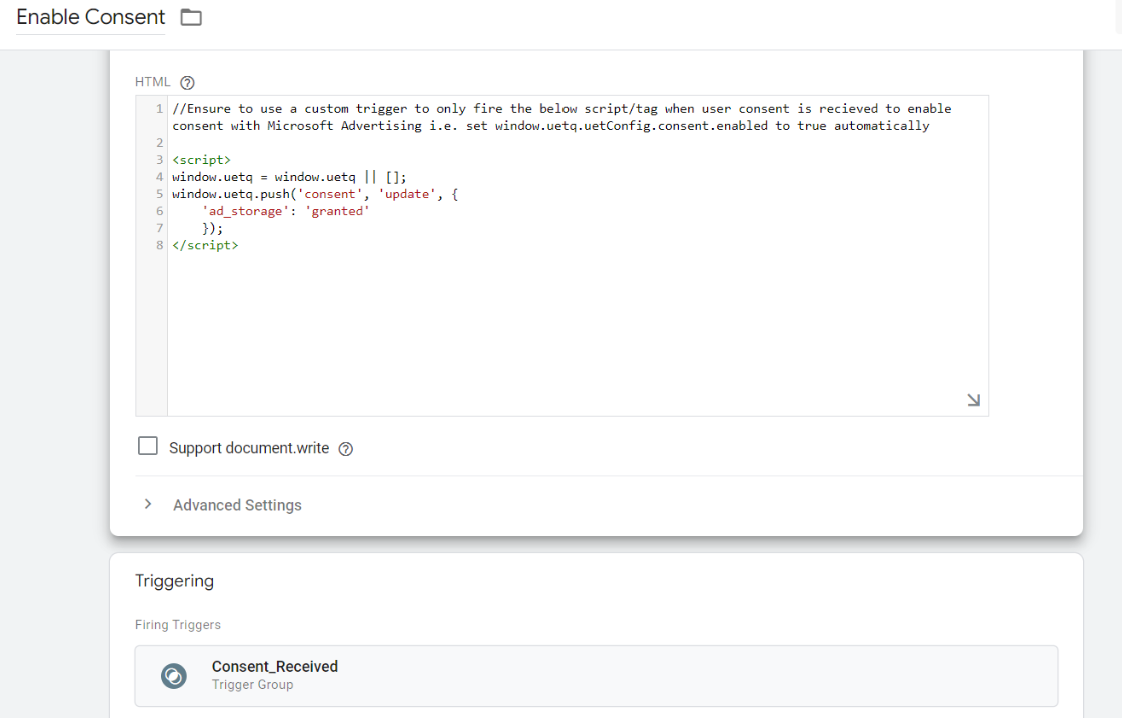
The most important part of this example is the custom trigger. Please use a trigger to ensure that the custom HTML tag below is fired only if consent is received.
<script>
window.uetq = window.uetq || [];
window.uetq.push('consent', 'update', {
'ad_storage': 'granted' });
</script>