Microsoft 365 and Office | Install, redeem, activate | For home | Other
Processes in Microsoft 365 for setting up Office apps, redeeming product keys, and activating licenses.
This browser is no longer supported.
Upgrade to Microsoft Edge to take advantage of the latest features, security updates, and technical support.
' cx='32' cy='32' r='32' /%3E%3Ctext x='50%25' y='55%25' dominant-baseline='middle' text-anchor='middle' fill='%23FFF' %3EA%3C/text%3E%3C/svg%3E)
Hi there,
I am looking for step by step instructions on how to add a guest to my Sharepoint account, in particular specific documents that are saved there. To be clear, I am not looking to add someone who can access everything on my site; but rather who can be given very specific and restricted access to content. The regular team, members of the account, would normally have access to the full site.
Thank you in advance!
Processes in Microsoft 365 for setting up Office apps, redeeming product keys, and activating licenses.
Locked Question. This question was migrated from the Microsoft Support Community. You can vote on whether it's helpful, but you can't add comments or replies or follow the question.
Answer accepted by question author

Hi Susan,
Please see information below for sharing a file or folder in a SharePoint site. Now this is granted your organization settings allow sharing with External users.
Share SharePoint files or folders
Choose this option if you want to send an email invitation to people or groups and keep track of who you invited. This also lets you remove permission for specific individuals or groups later if you need to.
 Share at the top of the page.
Notes:
- If the selected file or folder is shared with someone already, there is a **Shared with** list at the bottom. Each image is either the profile photo of an individual or the initials of a group that the file has been shared with. If you want to edit the access level for an individual or group, select a photo or group initials to open **Manage Access**.
- If the selected file or folder isn't currently shared with someone, there won't be a **Shared with** list.


Notes:
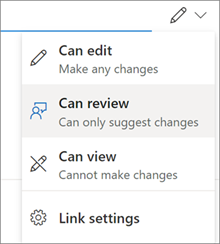
    - **Can edit**is turned on by default.
    - You can also set editing permissions on the previous screen. Under **Send link**, next to the **Name, group or email** field, select the pencil icon to change the editing permissions for the people or groups you have entered.
- **Block download** prevents people from downloading the file or folders they have access to. Unchecking this box means that people can download the files onto their devices.
**Note:**This option might not available for the file type you select. This option is only available if you don't allow editing. - Set expiration datelets you set a date for the link to expire. After the date you set, the link won't work and you will need to create a new link for users requiring access to your file or folder. **Note:**Set expiration date is only available if it is an anyone link. - Set passwordlets you set a password to access the file. When a user opens the link, they will be prompted to enter a password before they can access the file. You'll need to provide this password separately to anyone you want to share the file with. **Note:**Set password is only available if it is an anyone link. - Open in review mode onlylimits people to leaving comments and making suggestions on the file.
Notes:
    - Only Word documents have this permission option.
    - If someone already has editing permissions for the document, selecting **Open in review mode only** will not prevent them from making edits. For them, the document will open in edit mode.
 9. Include a message below the Name, group or email field, if you want.
**Note:**If you want to compose your message in Outlook, select the Outlook button and the link will be inserted into a draft email and everyone you entered to share with will be in the To / Recipient list. Depending on your SharePoint version, you may or may not see the Outlookbutton.
10. Select Send.
9. Include a message below the Name, group or email field, if you want.
**Note:**If you want to compose your message in Outlook, select the Outlook button and the link will be inserted into a draft email and everyone you entered to share with will be in the To / Recipient list. Depending on your SharePoint version, you may or may not see the Outlookbutton.
10. Select Send.